


目录
通过ubuntu-make 安装 Visual Studio Code(未成功,不建议)
通过 Snap 安装 Visual Studio Code(成功)
成功解决通过ubuntu-make 不能安装 Visual Studio Code的问题
解决fatal: unable to connect to github.com:问题
解决You're using an RSA key with SHA-1, which is no longer allowed.问题
解决error: RPC 失败。curl 18 transfer closed with outstanding read data remaining问题
虚拟操作系统版本:Ubuntu16.04LTS
安装Visual Studio Code
通过ubuntu-make 安装 Visual Studio Code(未成功,不建议)
在终端输入
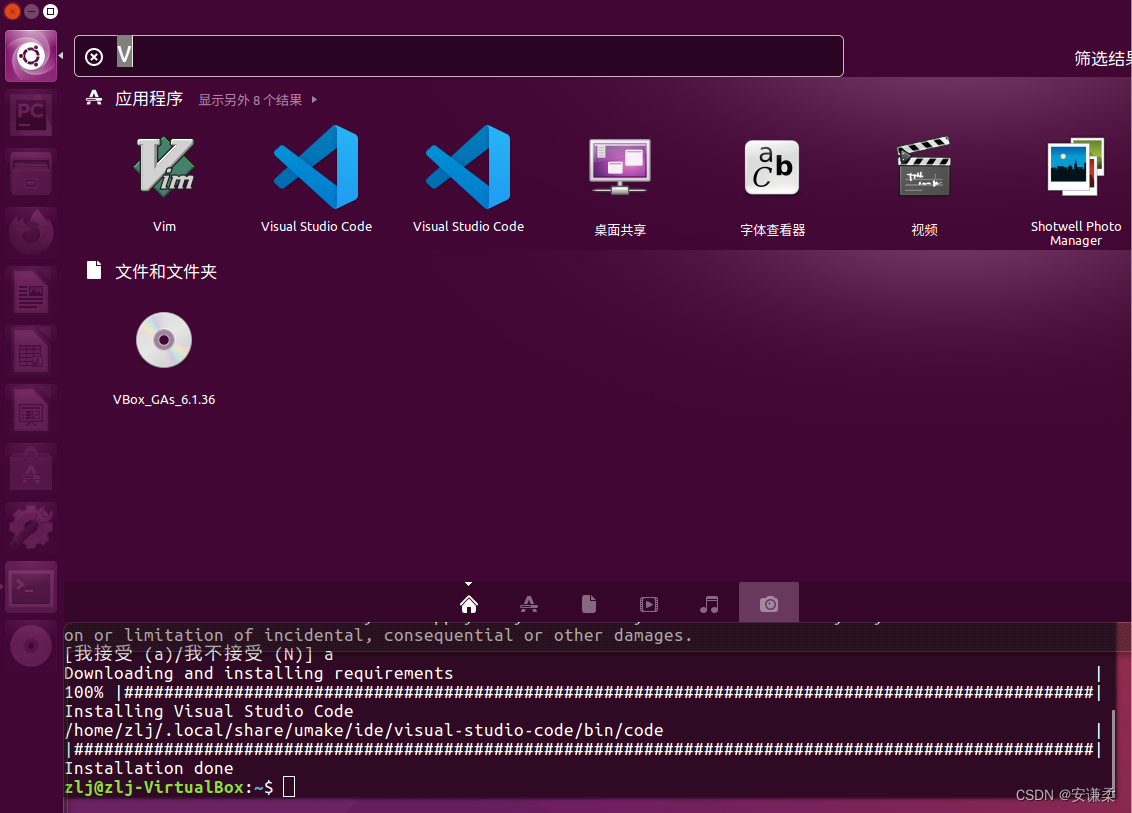
umake ide visual-studio-code结果发现程序“umake”尚未安装,那就按照提示,使用以下命令安装
sudo apt install ubuntu-make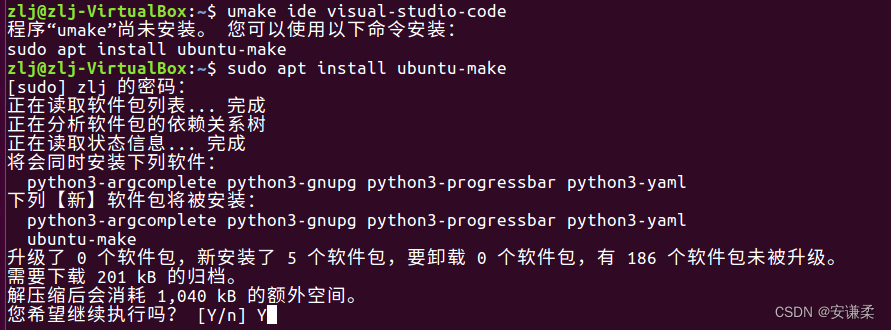
当出现“您希望继续执行吗? [Y/n]”,输入Y,继续执行。等待安装完成后,再次输入
umake ide visual-studio-code
选择安装VS code的路径,这里采用默认位置:/home/zlj/.local/share/umake/ide/visual-studio-code。当出现“[我接受 (a)/我不接受 (N)]”,输入a,继续执行下载安装过程。

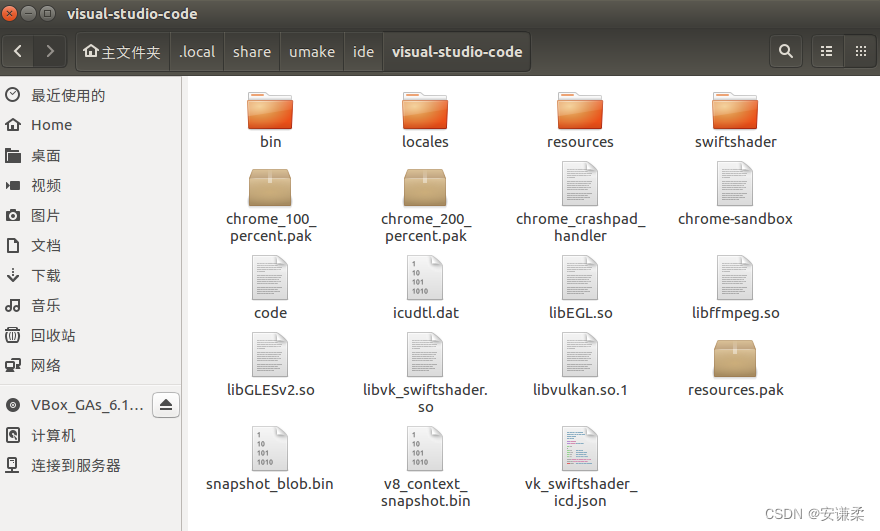
至此,VS code安装完成!但是很奇怪,通过启动器或者搜索计算机或者查找已安装软件都找不到,找不到visual studio code这个软件。特意去查看了安装的位置,发现确实有安装了。我甚至重启了虚拟机发现也没有用,仍然找不到这个软件。
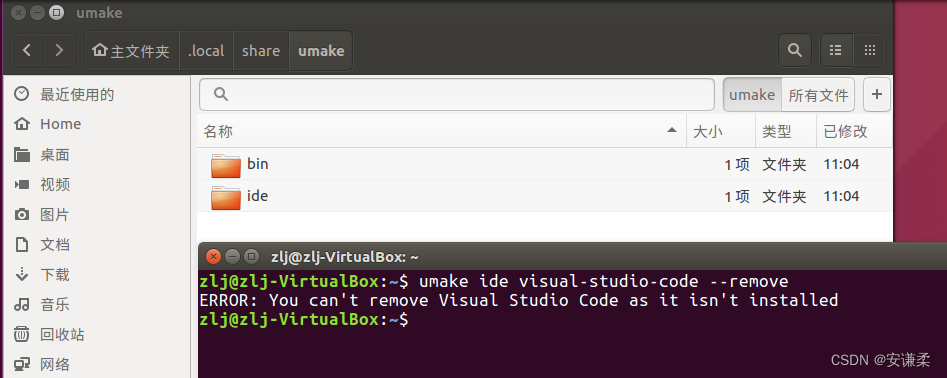
umake安装不行功那就卸载掉吧,输入
umake ide visual-studio-code --remove结果显示不能删除,因为未成功安装visual studio code。真奇怪!
通过 Snap 安装 Visual Studio Code(成功)
终端输入
sudo snap install --classic code
注:在Ubuntu16.04LTS中,即便没有Snap软件包也没关系,直接输出上面的命令即可,会自动安装Snap。
很显然,这次成功了。

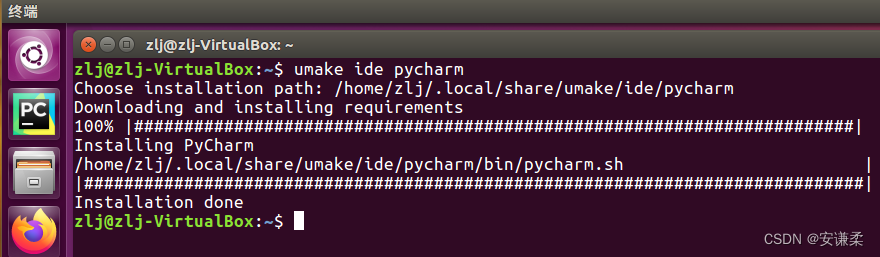
测试用ubuntu-make 安装Pycharm(成功)
用ubuntu-make 安装Pycharm试试看,终端输入
umake ide pycharm
选择安装Pycharm的路径,这里采用默认位置。等待安装成功后,发现左侧启动器栏增加了Pycharm的图标,说明安装成功了!
成功解决通过ubuntu-make 不能安装 Visual Studio Code的问题
那为啥VS code没安装成功呢?不可能啊。卸载VS code并重新安装,终端再次输入
umake ide visual-studio-code --removeumake ide visual-studio-code
具体安装和上面一样,选择默认安装位置,当出现“[我接受 (a)/我不接受 (N)]”,输入a,继续执行下载安装过程。很显然,这次成功了,出现了两个VS code的图标,一个是通过snap安装的,一个是通过umake安装的。
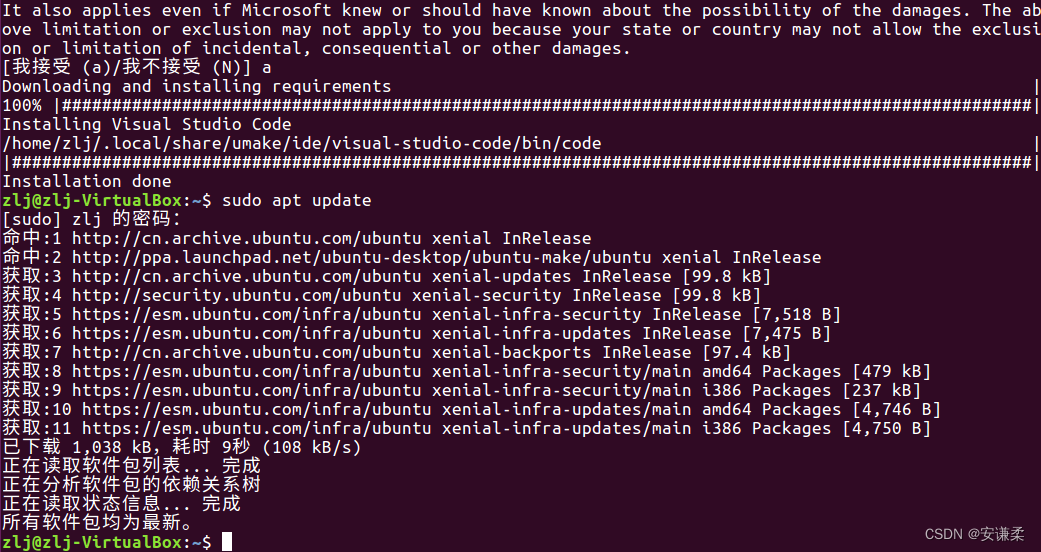
我有点忘了具体哪些操作使得由不成功变成了成功,可能因为执行了
- 升级apt软件仓库的命令:sudo apt update
- 列出所有可更新的软件包及版本信息的命令:apt list --upgradable
-
升级安装包的命令:sudo apt upgrade
我重新执行了第一条命令,可知现阶段所有软件包均为最新。
实际上,并不需要保留两个VS code。于是,我在终端输入
umake ide visual-studio-code --remove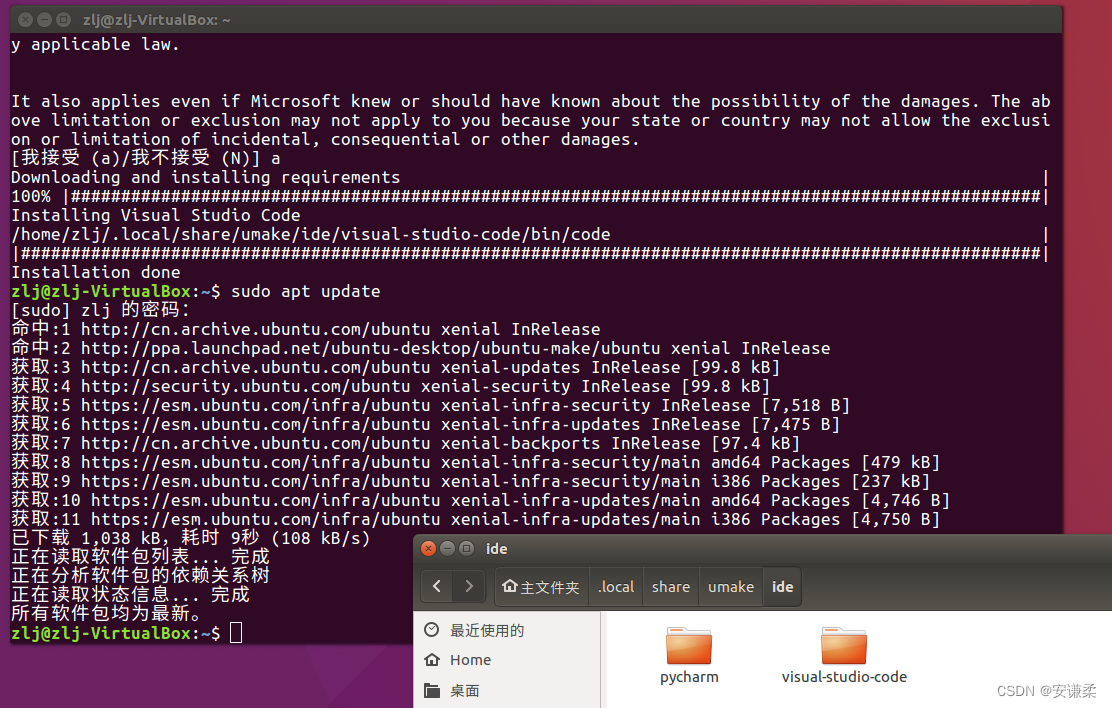
图 umake命令卸载前

图 umake命令卸载后
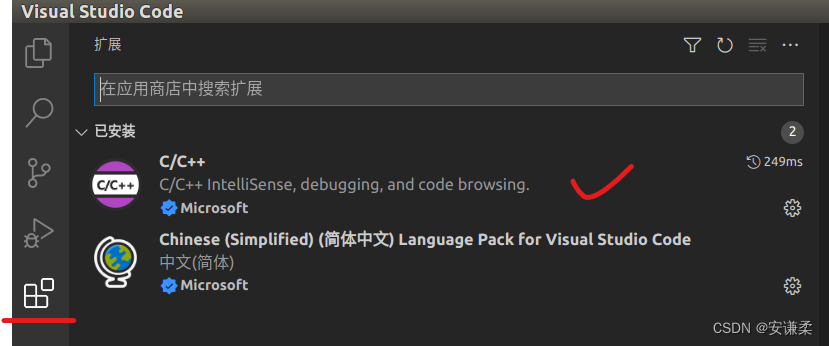
安装所需的插件
安装VS code运行c和c++代码所需的插件
新建一个文件夹后,新建一个.c或.cpp文件测试一下。
安装Git
参考网站:Git
终端先后输入三条命令即可:
sudo add-apt-repository ppa:git-core/ppasudo apt update
sudo apt install git等待安装完成后查看,安装的版本,在命令行输入git --version
![]()
测试使用 HTTPS URL 进行克隆仓库
下面可以输入任意希望克隆的链接进行测试,比如我在命令行输入
git clone https://github.com/resibots/pyhexapod.git
实现通过 SSH 方式的传输的Git设置
(1)设置用户名
git config --global user.name "Your Name"(2)设置邮箱
git config --global user.email "youremaill@xxx.com"(3)设置 SSH 密钥并将其添加到 GitHub.com 上的帐户。
终端输入
ssh-keygen -t rsa 特别强调:生成密钥对的终端输入的命令格式是
ssh-keygen -t 加密算法 -C "邮箱"
但是,上面的命令【ssh-keygen -t rsa 】中的加密算法已经不能再用了。后面发现是坑之后,换了一种加密算法ed25519,一定要避免啊!!!
然后,连续三次回车(即不做任何输入),结果如下:
zlj@zlj-VirtualBox:~$ ssh-keygen -t rsa
Generating public/private rsa key pair.
Enter file in which to save the key (/home/zlj/.ssh/id_rsa):
Enter passphrase (empty for no passphrase):
Enter same passphrase again:
Your identification has been saved in /home/zlj/.ssh/id_rsa.
Your public key has been saved in /home/zlj/.ssh/id_rsa.pub.
The key fingerprint is:
SHA256:hZJD7H1SAhlkgJuvSK0Uygsojuuq2UjYCf+LSVTMec0 zlj@zlj-VirtualBox
The key's randomart image is:
+---[RSA 2048]----+
|   *****         |
|  *********      |
|   ********      |
| ***********     |
|**********       |
|******           |
|****             |
|*****            |
|*******          |
+----[******]-----+
由上述可知,public key存放于id_rsa.pub中。去指定目录(/home/zlj/.ssh/id_rsa.pub)下,复制所有内容。具体方法为:在终端输入下面的命令,用vim打开该文件,并将其复制到剪贴板。
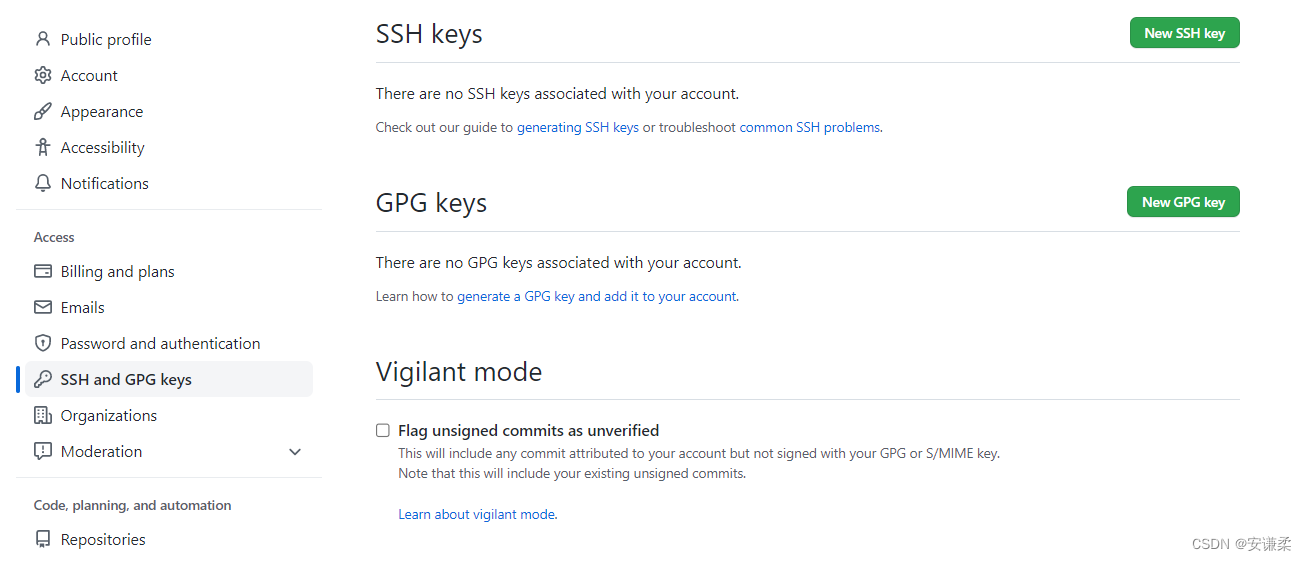
vim ~/.ssh/id_rsa.pub #用vim打开公钥所在的文件之后,登录github,点击右上角账户管理-Settings,点击左侧“SSH and GPG keys”菜单,点击绿色的New SSH keys按钮,新建一个。在”title”栏输入一个自己喜欢的标题,“key”栏中粘贴刚刚复制的公钥内容(粘贴时选择为纯文本),最后点击“Add key”按钮。
为测试是否连接成功,再次输入
ssh -T git@github.com结果变为

git clone问题解决
解决fatal: unable to connect to github.com问题
当我输入期望下载的链接
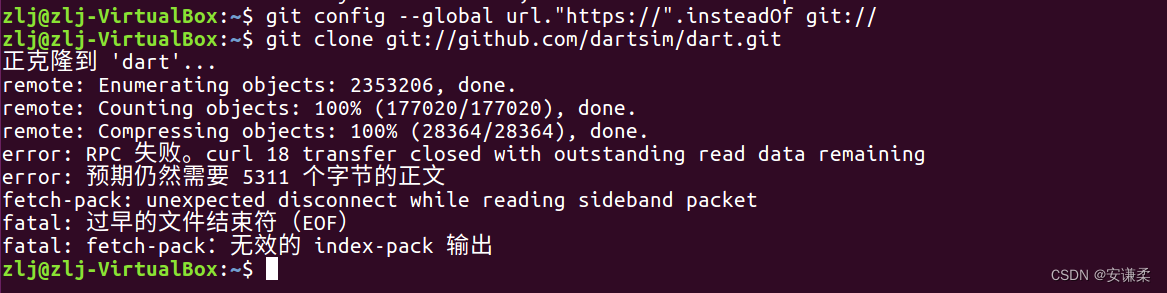
git clone git://github.com/dartsim/dart.git报错:fatal: 无法连接到 github.com:
github.com[0: **.***.***.***]: errno=连接超时
正克隆到 'dart'...
fatal: unable to connect to github.com:
github.com[0: ***.**.***.*]: errno=Unknown error
解决方法
Git Bash中输入
git config --global url."https://".insteadOf git://
虽然,解决了无法连接到 github.com:的错误,但是又有新的错误
error: RPC 失败。curl 18 transfer closed with outstanding read data remaining
error: 预期仍然需要 5311 个字节的正文
fetch-pack: unexpected disconnect while reading sideband packet
fatal: 过早的文件结束符(EOF)
fatal: fetch-pack:无效的 index-pack 输出
解决You're using an RSA key with SHA-1, which is no longer allowed.问题
上面的问题先放放。我尝试了另外一个仓库的克隆命令
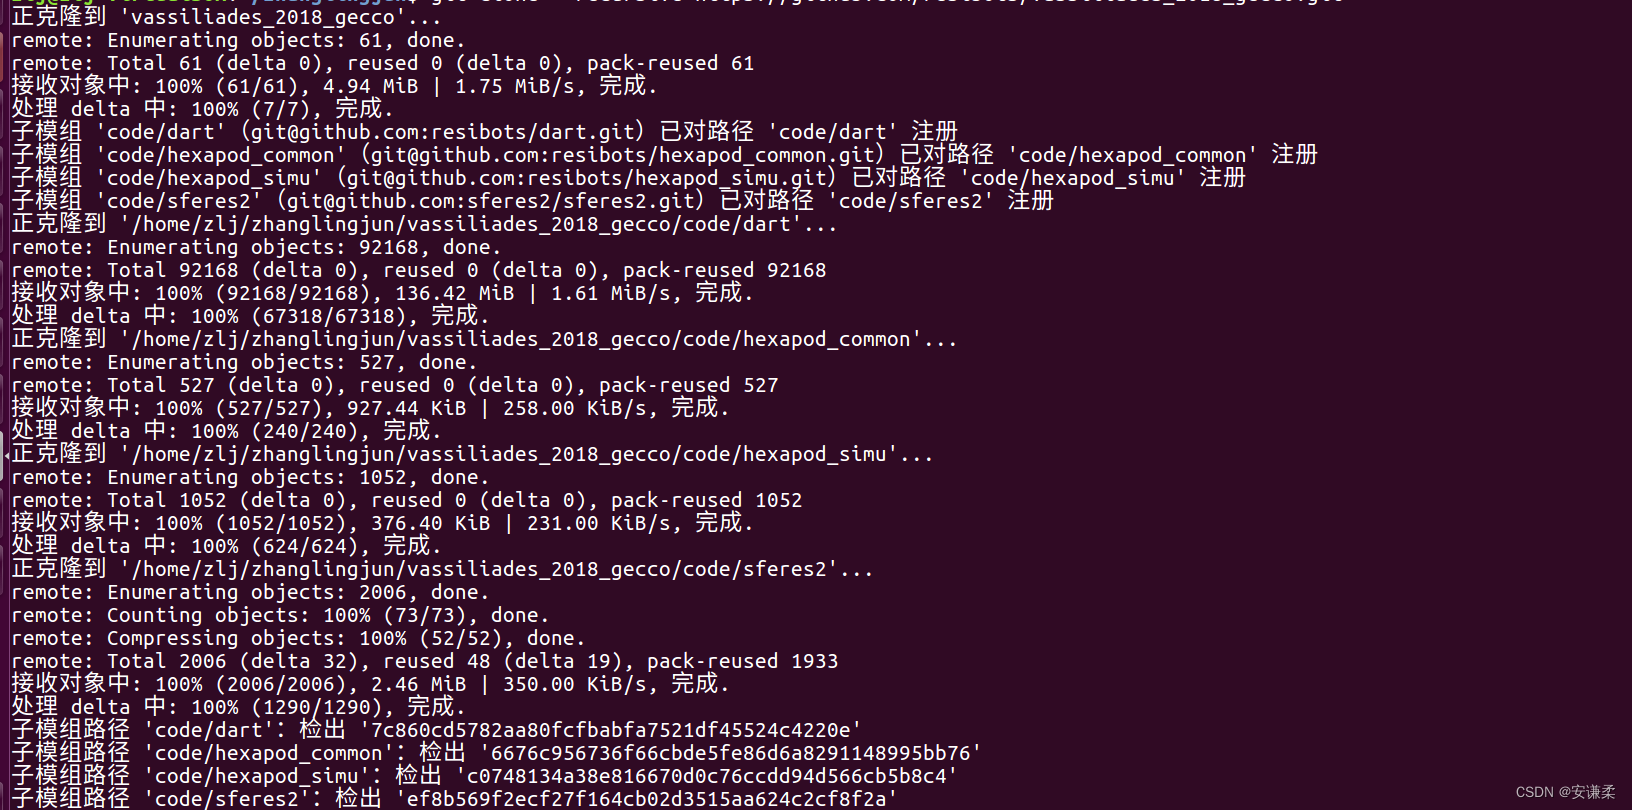
git clone --recursive https://github.com/resibots/vassiliades_2018_gecco.git克隆子模组时,报了另外一个错误
ERROR: You're using an RSA key with SHA-1, which is no longer allowed.
正克隆到 '/home/zlj/vassiliades_2018_gecco/code/dart'...
ERROR: You're using an RSA key with SHA-1, which is no longer allowed. Please use a newer client or a different key type.
Please see https://github.blog/2021-09-01-improving-git-protocol-security-github/ for more information.

fatal: 无法读取远程仓库。

请确认您有正确的访问权限并且仓库存在。
fatal: 无法克隆 'git@github.com:resibots/dart.git' 到子模组路径 '/home/zlj/vassiliades_2018_gecco/code/dart'
克隆 'code/dart' 失败。按计划重试
原因:不再支持SHA-1的加密方式。
参考:Generating a new SSH key and adding it to the ssh-agent - GitHub Docs
解决方案:
第一步,生成新的 SSH 密钥。
打开终端输入(双引号里面替换成个人邮箱地址)
ssh-keygen -t ed25519 -C "your_email@example.com"这将使用提供的电子邮件作为标签创建一个新的 SSH 密钥。
- 当系统提示您“输入要在其中保存密钥的文件”时,按 Enter。这接受默认文件位置。
- 在提示符处,键入安全密码。
运行结果如下
Generating public/private ed25519 key pair.
Enter file in which to save the key (/home/zlj/.ssh/id_ed25519):
Enter passphrase (empty for no passphrase):
Enter same passphrase again:
Your identification has been saved in /home/zlj/.ssh/id_ed25519.
Your public key has been saved in /home/zlj/.ssh/id_ed25519.pub.
The key fingerprint is:
SHA256:IDgNP8q5rD6GcWy2aohJvr8gBsJhs5yz+6y5GkJyBTI fukuoka1943@126.com
The key's randomart image is:
+--[ED25519 256]--+
|***              |
| ***             |
| *************   |
|********         |
|*********        |
|****             |
|****             |
|*****            |
|******           |
+----[******]-----+
第二步,将 SSH 密钥添加到 ssh-agent。
在向 ssh-agent 添加新的 SSH 密钥以管理您的密钥之前,您应该检查现有的 SSH 密钥并生成一个新的 SSH 密钥。
(1)在后台启动 ssh-agent
eval "$(ssh-agent -s)"(2)将您的 SSH 私钥添加到 ssh-agent。
因为我在第一步生成SSH密钥时选用的是默认文件位置,在终端输入
ssh-add ~/.ssh/id_ed25519注:如果您使用不同的名称创建了密钥,或者如果您要添加具有不同名称的现有密钥,请将命令中的id_ed25519替换为您的私钥文件的名称。
展示一下输出的结果
zlj@zlj-VirtualBox:~$ eval "$(ssh-agent -s)"
Agent pid 7017
zlj@zlj-VirtualBox:~$ ssh-add ~/.ssh/id_ed25519
Identity added: /home/zlj/.ssh/id_ed25519 (your_email@example.com)
(3)将 SSH 密钥添加到您在 GitHub 上的帐户。过程和上面相同。
齐活!再次用“git clone --recursive”克隆仓库,成功!!!结果如下
解决error: RPC 失败。curl 18 transfer closed with outstanding read data remaining问题
现在回过头来,解决error: RPC 失败。curl 18 transfer closed with outstanding read data remaining问题。我查看了虚拟机设置的内存是20729Mb,于是 b。终端输入
git config --global http.postBuffer 19327352832设置完成后,可以查看是否设置成功,通过输入
git config --list下面,再次尝试克隆仓库,重新输入
git clone git://github.com/dartsim/dart.git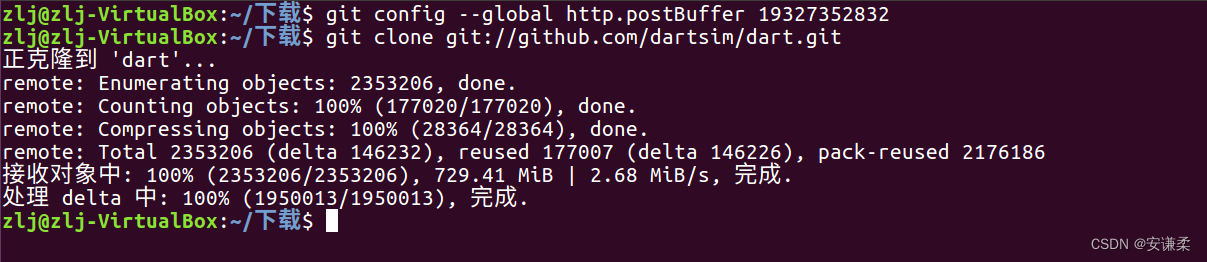
成功!!!


 2183
2183


 被折叠的 条评论
为什么被折叠?
被折叠的 条评论
为什么被折叠?
 到【灌水乐园】发言


