


目录
一、配置环境
本实验的环境是Linux下,g++8.2.0
查看g++版本
g++ --version
下载g++ 8
参考链接: https://blog.csdn.net/dbdxnuliba/article/details/100977363.
sudo add-apt-repository ppa:ubuntu-toolchain-r/test
sudo apt-get update
sudo apt-get install gcc-8
sudo apt-get install g++-8
#配置:将gcc8,g++8作为默认选项
sudo update-alternatives --install /usr/bin/gcc gcc /usr/bin/gcc-8 100
sudo update-alternatives --config gcc
sudo update-alternatives --install /usr/bin/g++ g++ /usr/bin/g++-8 100
sudo update-alternatives --config g++
#查看是否安装成功
gcc --version
g++ --version
二、手工组网
2.1 获取网页
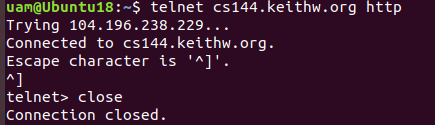
使用telnet发送HTTP,注意最后一行要加上一个回车,不然会报错,报错见图2
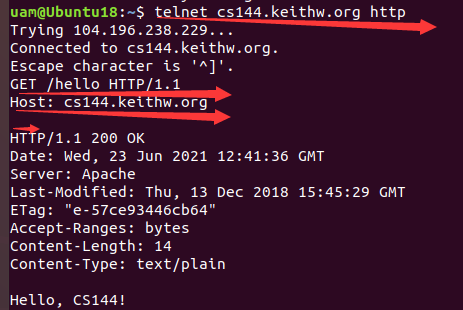
图1:使用telnet发送HTTP
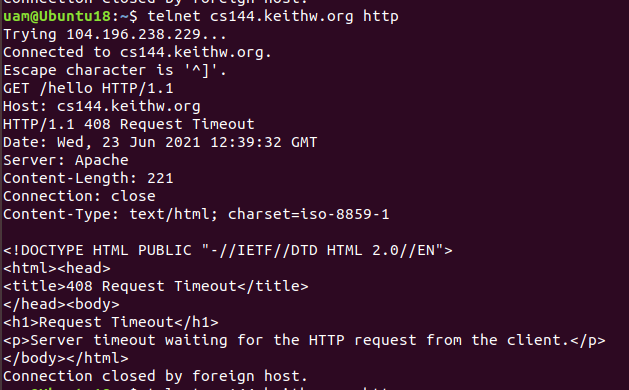
图2:最后没有回车,报错
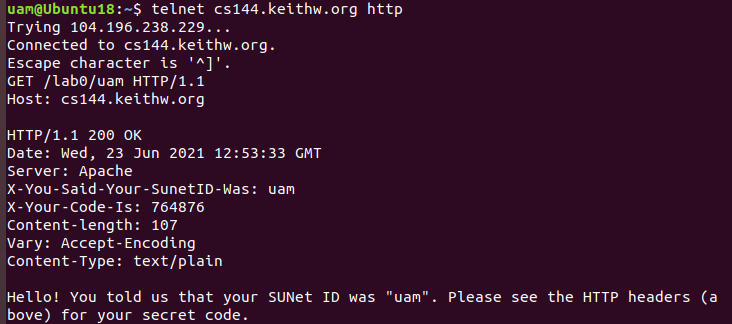
如法炮制,换一个url
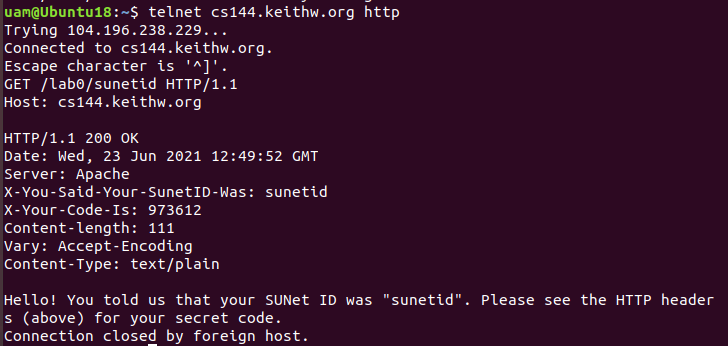
可以修改SUnetid
退出:按住CTRL+],输入close回车
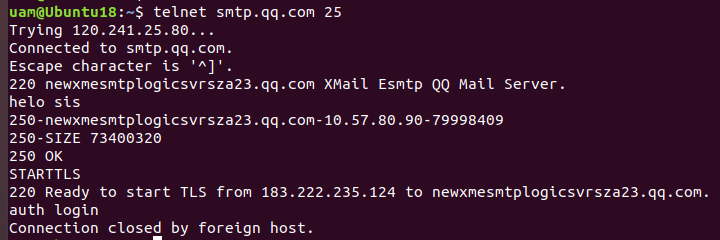
2.2 给自己发一封电子邮件
此处我一直没成功,大家可参考这个链接
链接: https://www.cnblogs.com/cthon/p/9151467.html.
我的报错如下
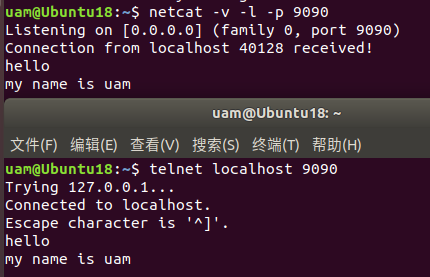
2.3 监听和连接
经过前面两个小实验,我们现在知道telnet是一个客户端(client)程序,可以连接到运行在其他计算机上的程序。
现在让我们来尝试一个简单的服务器(service)程序,即等待客户机连接到它的那种程序
打开一个终端,输入
netcat -v -l -p 9090
该终端为服务器,等待连接。
打开另一个终端,输入
telnet localhost 9090
该终端为客户机,尝试建立连接。
可看到服务器端显示Connection from localhost 40128 received!表示连接建立成功。
此时不管是在服务器端还是客户机端输入字符,另一端回应相同字符。
在服务器端输入CTRL+C,服务器端停止运行。客户机端也停止运行。
三、使用操作系统套接字编写网络程序
3.1 获取和构建入门代码
git clone https://github.com/cs144/sponge #克隆代码
cd sponge #进入lab0目录
mkdir build #创建build目录用于存放编译文件
cd build #进入build目录
cmake ..
make #编译
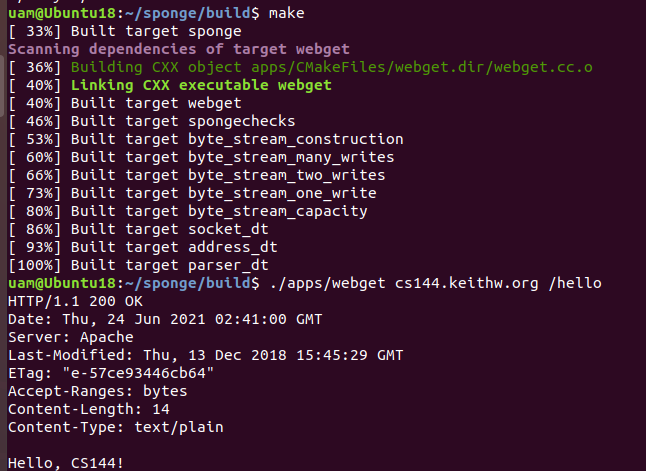
3.4 编写webget
实现一个TCP客户端连接。(服务器端是 http://cs144.keithw.org/hello)
实现get_URL方法,功能是向指定IP地址发送HTTP GET请求
这部分可以看看libsponge/util目录下的descriptor.hh, socket.hh, and address.hh,以及配套Doc中的示例代码.
// Your code here.
	TCPSocket tcpSocket;
	Address address = Address(host,"http");
	tcpSocket.connect(address);//创建连接
	string msg = "GET "+path+" HTTP/1.1\r\n"+"HOST: "+host+"\r\n\r\n";//这里用一个\r\n可以吗?--不可以,会连接不成功
	tcpSocket.write(msg);//继承自FileDescriptor的写方法
	tcpSocket.shutdown(SHUT_WR);//告诉服务器我已完成请求
	while(!tcpSocket.eof()){//读取服务器端返回的数据
		cout<<tcpSocket.read();
	}
	tcpSocket.close();
	return;
在build目录下编译并运行
make
./apps/webget cs144.keithw.org /hello
我们可以使用官方提供的自动检测工具进行自动检查
make check_webget
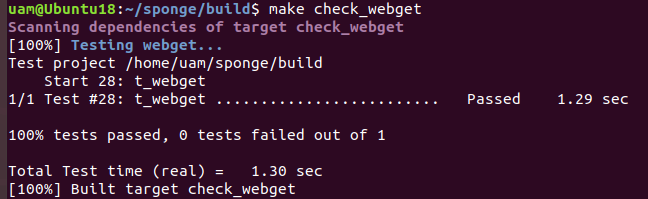
100% tests passed 即正确编写
四、内存中可靠的字节流
本节要求我们实现一个有序字节流,该字节流容量有限,从一端写入,另一端按相同的顺序读出。字节流是用于单个线程,不需要担心并发写入/读取,锁定或竞争条件。
分析byte_stream.hh:
构造方法里有capacity表示有限有序字节流的容量,因此我们需要一个参数表示容量大小,用_capacity表示。我们需要一个变量来存储写入的字节流,用byte_stream表示
//! Construct a stream with room for `capacity` bytes.
ByteStream(const size_t capacity);
写入部分:
写方法:往字节流中写入尽可能多的数据,返回写入成功数据的字节数。
//! Write a string of bytes into the stream. Write as many
//! as will fit, and return how many were written.
//! \returns the number of bytes accepted into the stream
size_t write(const std::string &data);
查看剩余容量方法,用容量-已有数据长度即可实现。
//! \returns the number of additional bytes that the stream has space for
size_t remaining_capacity() const;
表示输入字节流已到达末尾。我们需要一个bool变量is_end来判断是否结束输入。false表示未结束输入,true表示结束输入。
//! Signal that the byte stream has reached its ending
void end_input();
读取部分:
查看下次字节流中的len长度的字节。可以利用一个字符串截取从0到len的子字符串并返回。需要注意越界问题
    //! Peek at next "len" bytes of the stream
    //! \returns a string
    std::string peek_output(const size_t len) const;
从字节流中移除len长度的字节。使用字符串删除函数,对0到len的字符串进行删除。同样需要注意越界问题
    //! Remove bytes from the buffer
    void pop_output(const size_t len);
读取len长度的字节。可以调用前面已经实现的查看与删除函数来实现本函数
    //! Read (i.e., copy and then pop) the next "len" bytes of the stream
    //! \returns a string
    std::string read(const size_t len);
判断是否结束输入,返回is_end即可
    //! \returns `true` if the stream input has ended
    bool input_ended() const;
查看当前可从流中读取的最大数量,返回已用大小即可
    //! \returns the maximum amount that can currently be read from the stream
    size_t buffer_size() const;
判断是否为空函数,可通过已用大小是否为0来实现
    //! \returns `true` if the buffer is empty
    bool buffer_empty() const;
判断输出是否已经到达结尾。内存中容量为空且输入结束,则输出已达到结尾
    //! \returns `true` if the output has reached the ending
    bool eof() const;
查看已读、已写函数。我们需要额外的两个变量write_cnt、read_cnt来存储这两个值
    //! Total number of bytes written
    size_t bytes_written() const;

    //! Total number of bytes popped
    size_t bytes_read() const;
    //!@}
代码如下
byte_stream.hh
class ByteStream {
  private:
    // Your code here -- add private members as necessary.
	std::string _byte_stream="";
	size_t _capacity=0;
	size_t _write_cnt=0,_read_cnt=0;
	bool _is_end=false;
	...
byte_stream.cc
#include "byte_stream.hh"

// Dummy implementation of a flow-controlled in-memory byte stream.

// For Lab 0, please replace with a real implementation that passes the
// automated checks run by `make check_lab0`.

// You will need to add private members to the class declaration in `byte_stream.hh`

template <typename... Targs>
void DUMMY_CODE(Targs &&... /* unused */) {}

using namespace std;

ByteStream::ByteStream(const size_t capacity) { _capacity=capacity; }

size_t ByteStream::write(const string &data) {
	size_t len = data.length();
	if(len>_capacity-_byte_stream.length()){//如果data过长就截断
		len = _capacity-_byte_stream.length();
	}
	_write_cnt += len;//更新已写数量
	//写入数据
	std::string msg = data.substr(0,len);//substr:起始位置,复制的字符数目
	_byte_stream += msg;
	return len;//返回写入长度
}

//! \param[in] len bytes will be copied from the output side of the buffer
string ByteStream::peek_output(const size_t len) const {
	std::string msg;
	size_t length = len;//参数len是只读的,需要赋值才能修改
	if(length>_byte_stream.length())length=_byte_stream.length();
	msg = _byte_stream.substr(0,length);
	return msg;
}

//! \param[in] len bytes will be removed from the output side of the buffer
void ByteStream::pop_output(const size_t len) {
	size_t length = len;
	if(length>_byte_stream.length())length=_byte_stream.length();
	_read_cnt += length;
	_byte_stream.erase(0,length);
}

//! Read (i.e., copy and then pop) the next "len" bytes of the stream
//! \param[in] len bytes will be popped and returned
//! \returns a string
std::string ByteStream::read(const size_t len) {
	msg=peek_output(length);
	pop_output(length);
	return msg;
}

void ByteStream::end_input() {_is_end=true;}

bool ByteStream::input_ended() const { return _is_end; }

size_t ByteStream::buffer_size() const { return _byte_stream.length(); }

bool ByteStream::buffer_empty() const { return _byte_stream.length()==0; }

bool ByteStream::eof() const { return buffer_empty() && input_ended(); }

size_t ByteStream::bytes_written() const { return _write_cnt; }

size_t ByteStream::bytes_read() const { return _read_cnt; }

size_t ByteStream::remaining_capacity() const { return _capacity-buffer_size(); }
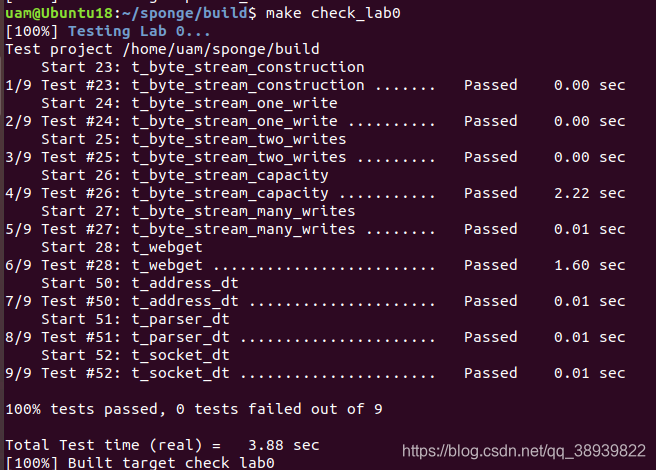
build目录下自动检测
备注:git push -u uam master


 2321
2321


 被折叠的 条评论
为什么被折叠?
被折叠的 条评论
为什么被折叠?
 到【灌水乐园】发言


