


一、准备
- 注册微信订阅号
- 注册小程序测试号
- sunny-ngrok工具安装及注册账号
注意:sunny-ngrok的原型是ngrok,不过ngrok是国外的,sunny-ngrok是国内的一个私服,速度更快了,主要作用是域名转发,模拟公网ip和端口,甚至可以配置给客户在公网上展示项目。地址:http://www.ngrok.cc/
,进去后注册开通隧道,有免费的。
记住:一个微信号只能注册一种微信产品,但是可以管理多个。
这是我的隧道:(免费的如果启动不了就直接用这个吧)

使用sunny-ngrok尝试一次转发:
下载工具,启动工具,输入隧道id,回车

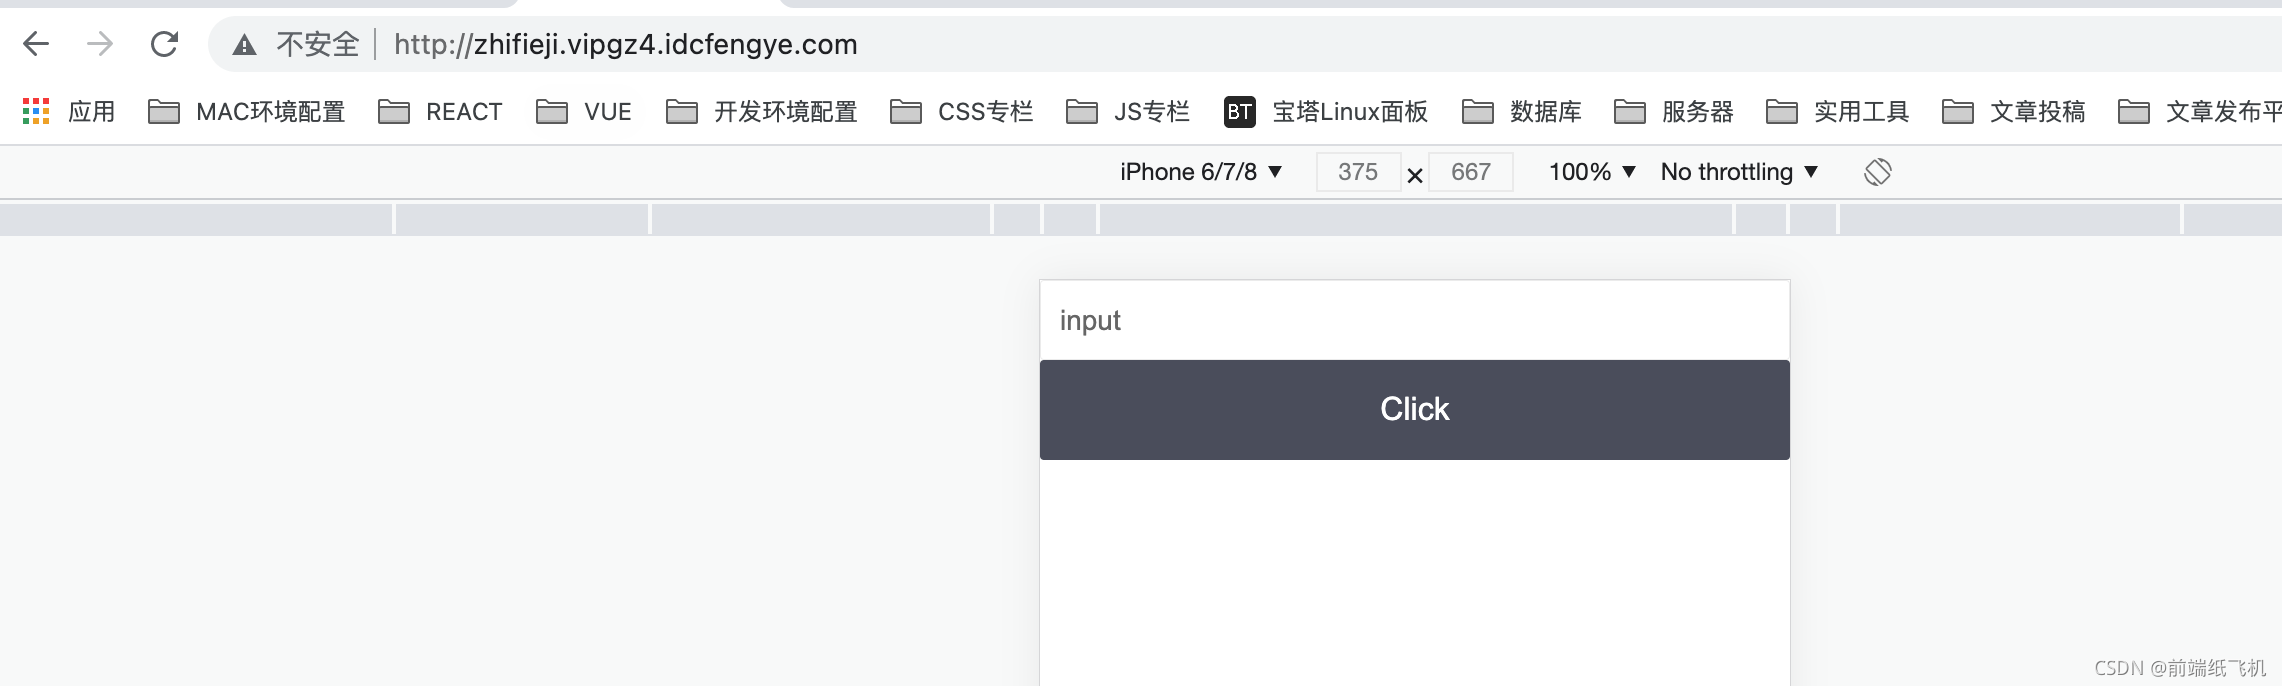
说明127.0.0.1:3000已经被转发到zhifieji.vipgz4.idcfengye.com的公网ip上了。
建个weixin目录,npm初始化:
npm init -y
把下面的内容复制到package.json里:
{
  "name": "weixin-lesson",
  "version": "1.0.0",
  "description": "微信开发",
  "main": "index.js",
  "directories": {
    "doc": "doc"
  },
  "scripts": {
    "sunny": "./bin/sunny clientid 62d16df91a118fd3",
    "ngrok": "./bin/ngrok http 3000",
    "test": "echo \"Error: no test specified\" && exit 1"
  },
  "repository": {
    "type": "git",
    "url": "git@gitlab.kaikeba.com:web_dev/weixin-lesson.git"
  },
  "author": "",
  "license": "ISC",
  "dependencies": {
    "axios": "^0.18.0",
    "co-wechat": "^2.3.0",
    "co-wechat-oauth": "^2.0.1",
    "crypto": "^1.0.1",
    "express": "^4.16.4",
    "jsonwebtoken": "^8.4.0",
    "koa": "^2.6.2",
    "koa-bodyparser": "^4.2.1",
    "koa-compress": "^3.0.0",
    "koa-jwt": "^3.5.1",
    "koa-route": "^3.2.0",
    "koa-router": "^7.4.0",
    "koa-socket": "^4.4.0",
    "koa-static": "^5.0.0",
    "koa-views": "^6.1.5",
    "koa-websocket": "^5.0.1",
    "koa-xml-body": "^2.1.0",
    "moment": "^2.23.0",
    "mongoose": "^5.4.4",
    "promise-redis": "0.0.5",
    "pug": "^2.0.3",
    "redis": "^2.8.0",
    "request": "^2.88.0",
    "request-promise": "^4.2.2",
    "socket.io": "^2.2.0",
    "watch": "^1.0.2",
    "wechat": "^2.1.0",
    "wechat-oauth": "^1.5.0",
    "xml2js": "^0.4.19"
  }
}
然后安装依赖
npm install
# 或
yarn
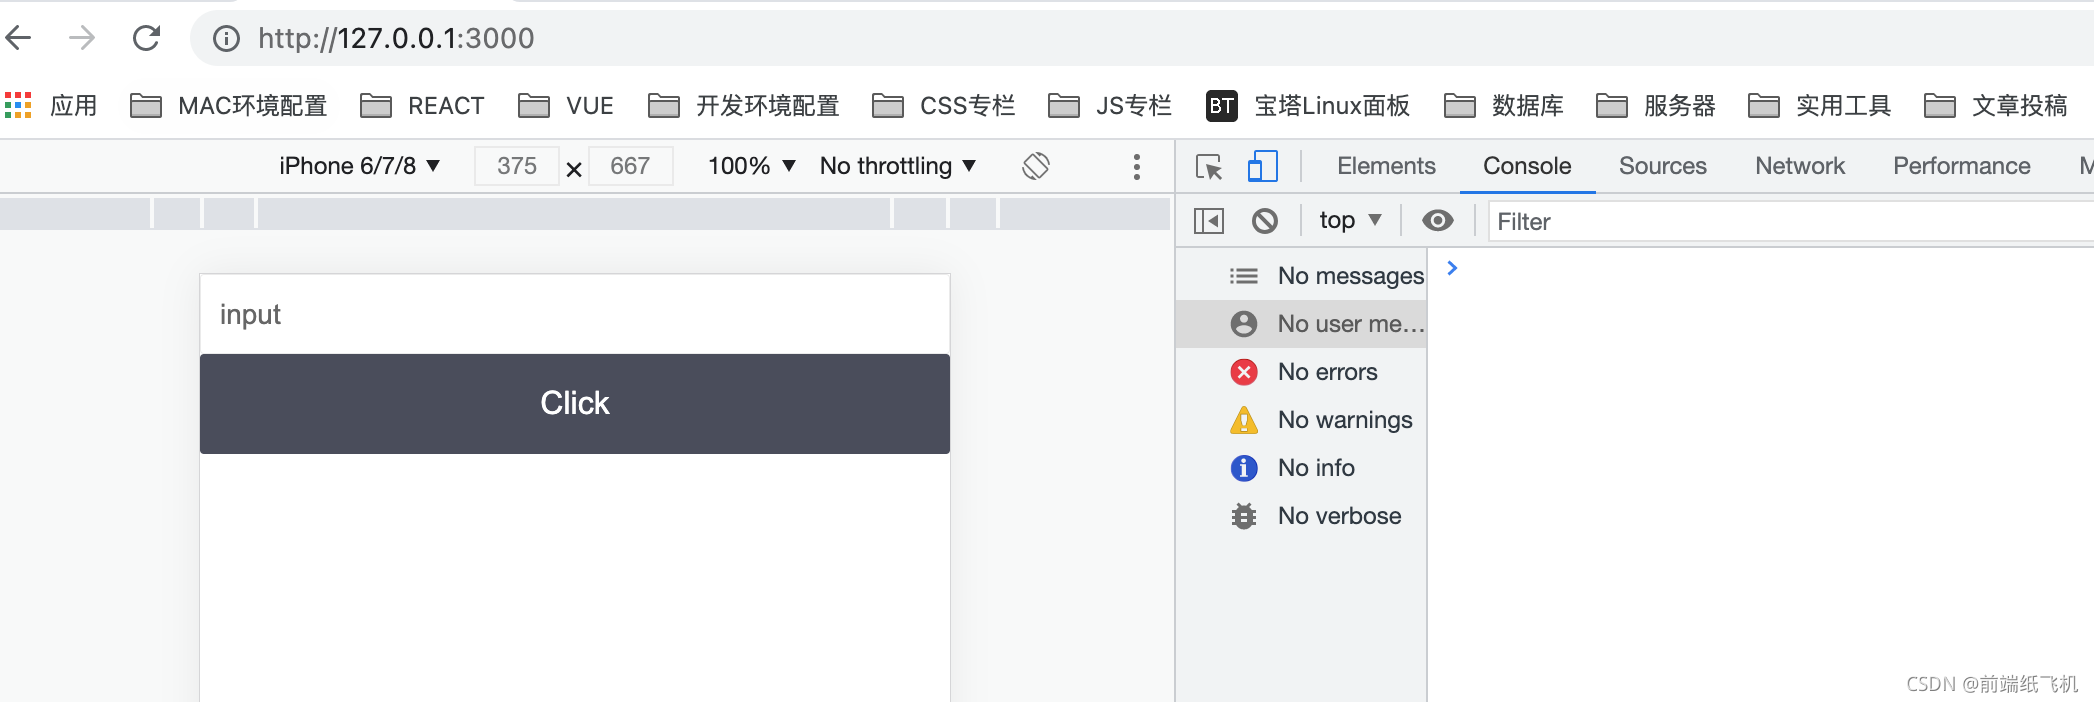
再在weixin目录下建立seed目录,seed目录下建立index.js和index.html。
index.js:
const Koa = require('koa')
const Router = require('koa-router')
const static = require('koa-static')
const bodyParser = require('koa-bodyparser');
const app = new Koa()
app.use(bodyParser())
const router = new Router()
app.use(static(__dirname + '/'))
app.use(router.routes()); /*启动路由*/
app.use(router.allowedMethods());
app.listen(3000);
index.html:
<!DOCTYPE html>
<html>
<head>
    <title>全栈开发微信公众号</title>
    <meta charset="UTF-8">
    <meta name="viewport" content="width=device-width,initial-scale=1,user-scalable=0">
    <script src="https://unpkg.com/vue@2.1.10/dist/vue.min.js"></script>
    <script src="https://unpkg.com/axios/dist/axios.min.js"></script>
    <script src="https://unpkg.com/cube-ui/lib/cube.min.js"></script>
    <script src="https://cdn.bootcss.com/qs/6.6.0/qs.js"></script>
    <script src="http://res.wx.qq.com/open/js/jweixin-1.4.0.js"></script>
    <link rel="stylesheet" href="https://unpkg.com/cube-ui/lib/cube.min.css">
    <style>
        /* .cube-btn {
            margin: 10px 0;
        } */
    </style>
</head>
<body>
    <div id="app">
        <cube-input v-model="value"></cube-input>
        <cube-button @click='click'>Click</cube-button>
    </div>
    <script>
        var app = new Vue({
            el: '#app',
            data: {
                value: 'input'
            },
            methods: {
                click: function () {
                    console.log('click')
                }
            },
            mounted: function () {
            },
        });
    </script>
</body>
</html>
在seed目录打开终端,执行nodemon(需要安装), 3000端口打开127.0.0.1
npm install -g nodemon
nodemon

前面说通过ngrok把3000端口转发到了zhifieji.vipgz4.idcfengye.com上,我们打开这个网址试下:
二、使用消息接口
微信自带消息自动回复功能,可以在公众平台设置,但是很死板,无法动态回复消息
进入微信开发者工具,申请公众平台测试账号

有一些配置,填写转发的域名,token随意,要和服务器的用的一样


接口配置的URL就是转发的网址加了/wechat,再去提交接口配置信息(要多试试,才能提交成功)。
再就是在项目seed目录里配置,新建一个conf.js,把前面的appid、appsecret、token带上:
module.exports={
    appid: 'wx77f481fc8a9113a4',
    appsecret: '2b84470b9fb0f8166a8518c5b40edaf9',
    token: 'qweqwe'
}
在index.js里引入,使用一个库co-wechat,所以index.js将变成下面:
const Koa = require('koa')
const Router = require('koa-router')
const static = require('koa-static')
const bodyParser = require('koa-bodyparser');
const app = new Koa()
const conf = require('./conf')//引入conf
app.use(bodyParser())
const router = new Router()
app.use(static(__dirname + '/'))
const wechat = require('co-wechat')//使用co-wechat库
router.all('/wechat', wechat(conf).middleware(
    async message => {
        console.log('wechat:', message)
        return 'Hello World ' + message.Content
    }
))
app.use(router.routes()); /*启动路由*/
app.use(router.allowedMethods());
app.listen(3000);
知识点:co-开头的库是代表着满足异步要求的库
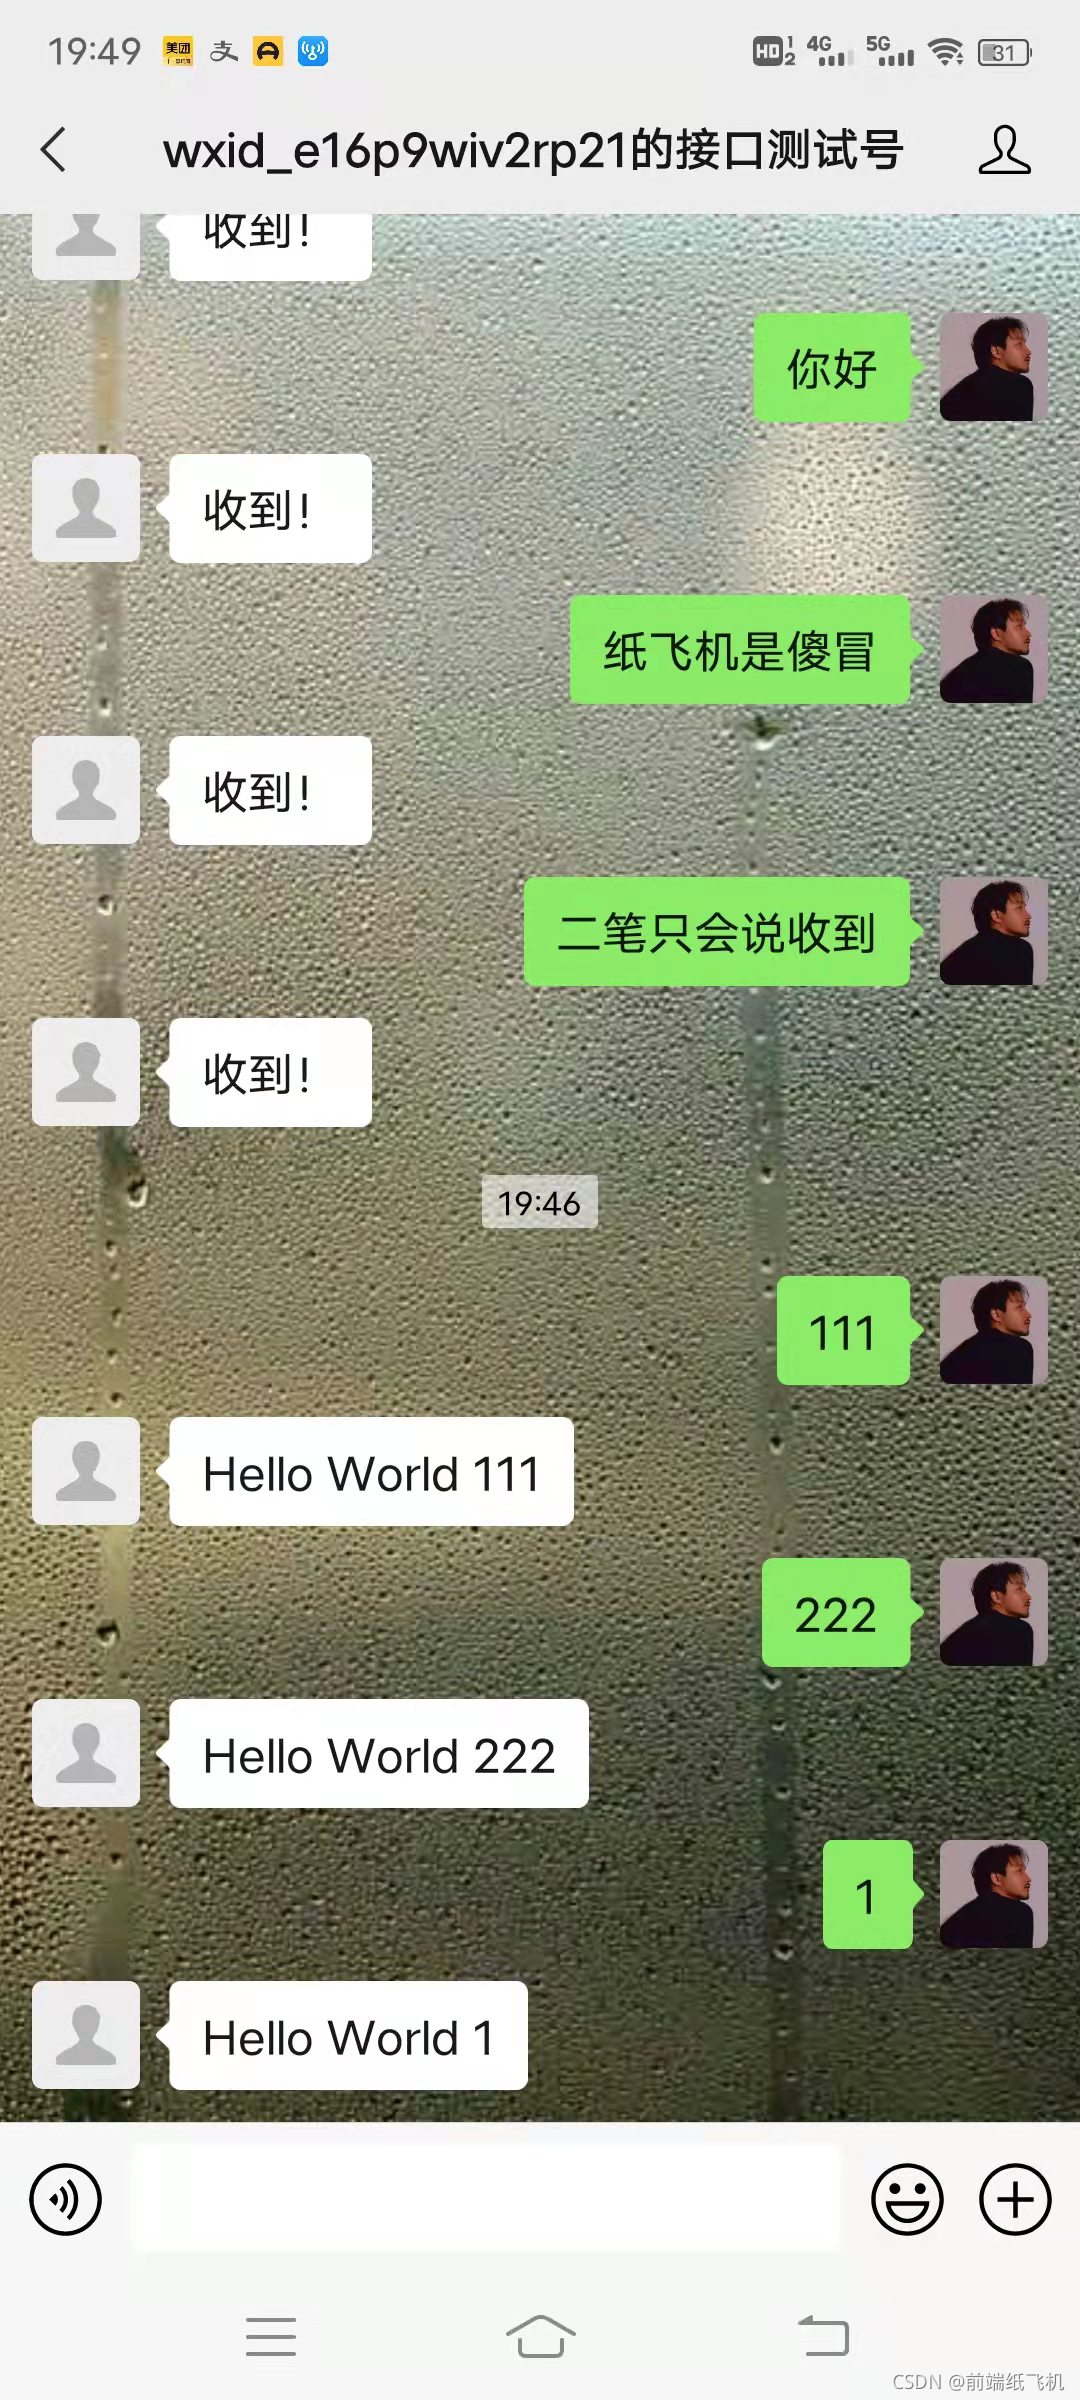
成功后,这个时候呢,可以关注下面的测试号二维码
发送1,会回复Hello World 1(如果是设置的没有这中获取用户发送的信息的方法,所以有时候也需要api),如下图:
三、微信一些api的调用
相关文档:https://developers.weixin.qq.com/doc/offiaccount/Basic_Information/Get_access_token.html
获取token:
const axios = require('axios')
const tokenCache = {
    access_token:'',
    updateTime:Date.now(),
    expires_in:7200
}
router.get('/getTokens',async ctx => {//获取token
    const wxDomain =  `https://api.weixin.qq.com`
    const path = `/cgi-bin/token`
    const param = `?grant_type=client_credential&appid={conf.appid}&secret={conf.appsecret}`
    const url = wxDomain + path + param
    const res = await axios.get(url)
    Object.assign(tokenCache,res.data,{
        updateTime:Date.now()
    })
    ctx.body = res.data
})
获取用户信息
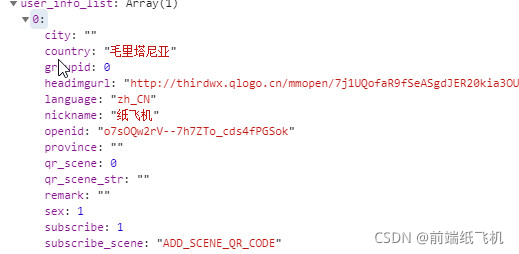
router.get('/getFollowers',async ctx => {//获取用户信息
    const url = `https://api.weixin.qq.com/cgi-bin/user/get?access_token=${tokenCache.access_token}`
    const res = await axios.get(url)
    console.log('getFollowers:',res)
    ctx.body = res.data
})
以上为原生的写法,实际上我们十有库可以用的。
使用 co-wechat-api
yarn add co-wechat-api
const WechatAPI = require('co-wechat-api')
const api = new WechatAPI(
    conf.appid,
    conf.appsecret,
    // // 取Token
    // async () => await ServerToken.findOne(),
    // // 存Token
    // async token => await ServerToken.updateOne({}, token, { upsert: true })
)
router.get('/getFollowers', async ctx => {
    let res = await api.getFollowers()
    res = await api.batchGetUsers(res.data.openid, 'zh_CN')//加上后会返回详细信息
    ctx.body = res
})
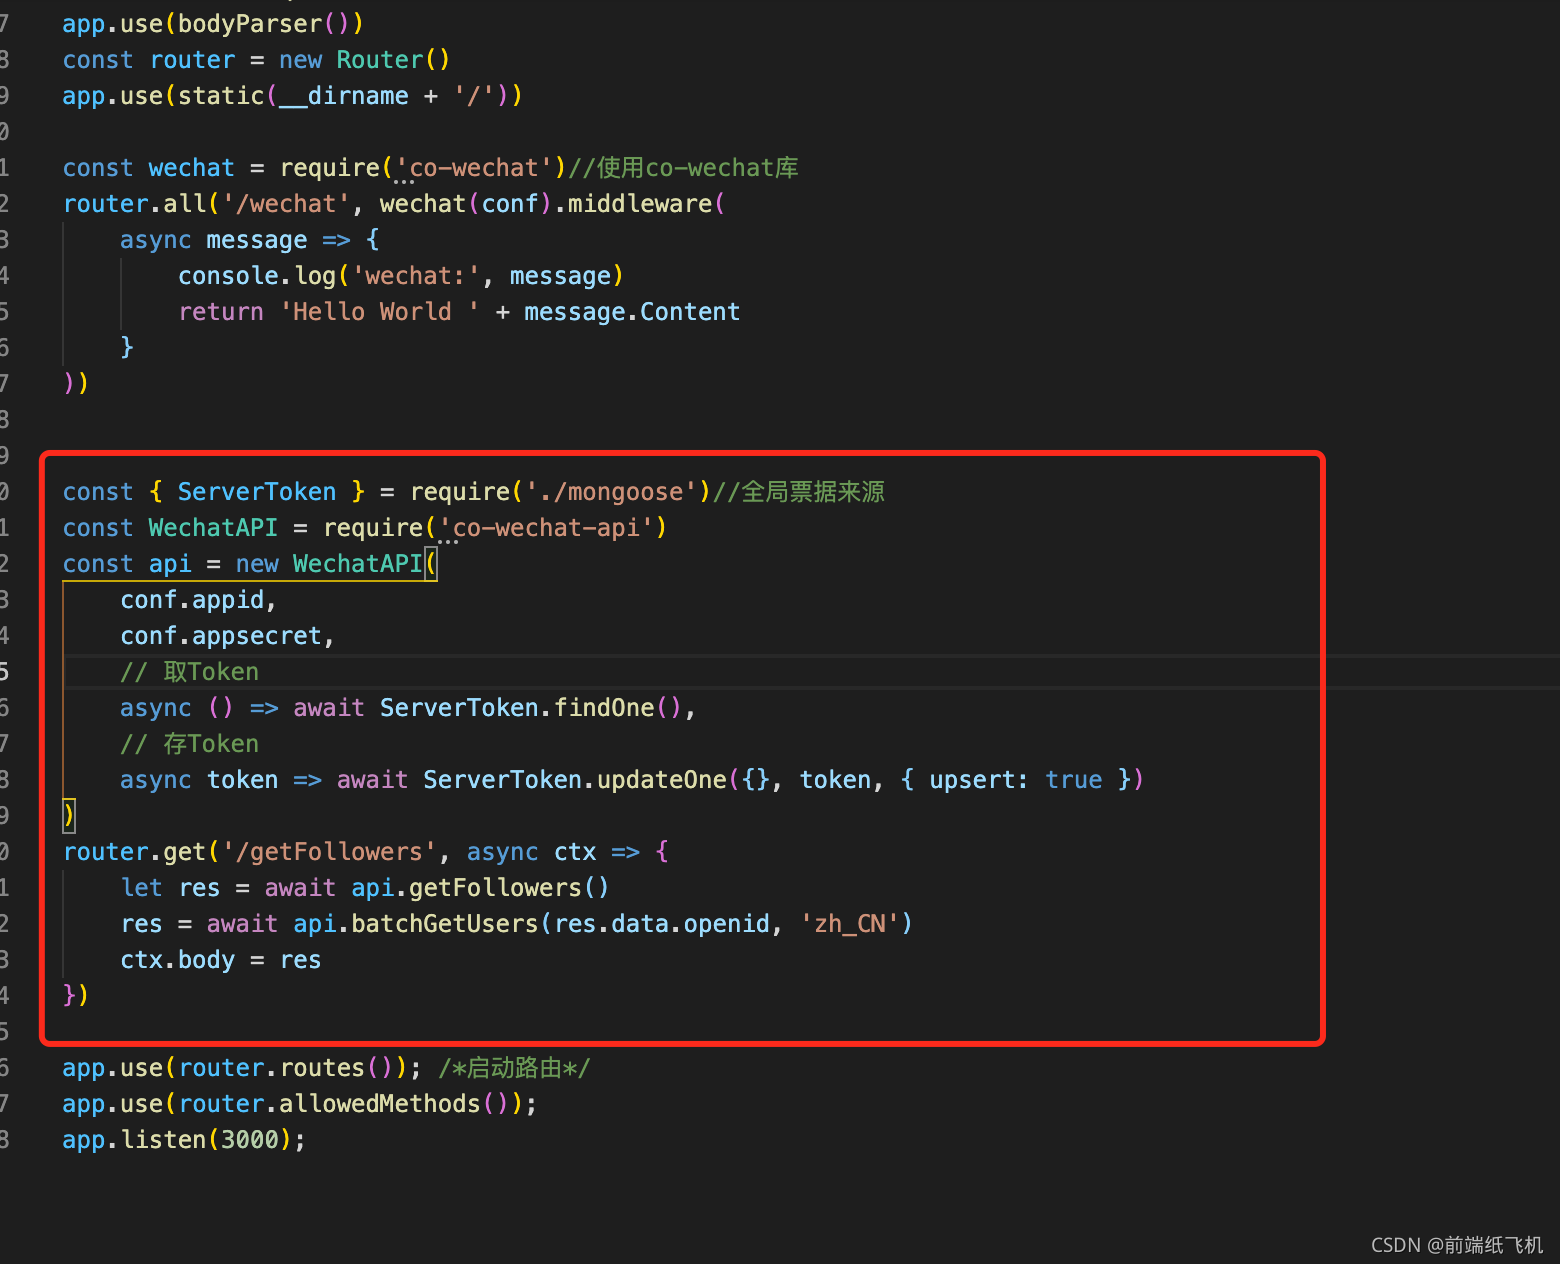
四、全局票据
全局票据需要基于mongodb或者redires,我们用mongodb。
新建个mongoose.js
const mongoose = require('mongoose')
const {
    Schema
} = mongoose
mongoose.connect('mongodb://localhost:27017/weixin', {
    useNewUrlParser: true
}, () => {
    console.log('Mongodb connected..')
})
exports.ServerToken = mongoose.model('ServerToken', {
    accessToken: String
});
index.js里改造上面用co-wechat-api的:
const { ServerToken } = require('./mongoose')//全局票据来源
const WechatAPI = require('co-wechat-api')
const api = new WechatAPI(
    conf.appid,
    conf.appsecret,
    // 取Token
    async () => await ServerToken.findOne(),
    // 存Token
    async token => await ServerToken.updateOne({}, token, { upsert: true })
)
router.get('/getFollowers', async ctx => {
    let res = await api.getFollowers()
    res = await api.batchGetUsers(res.data.openid, 'zh_CN')
    ctx.body = res
})
再在index.html中加上一个按钮和一个按钮点击方法:
<cube-button @click='getFollowers'>getFollowers</cube-button>
 async getFollowers(){
      const res = await axios.get('/getFollowers')
      console.log('res',res)
},
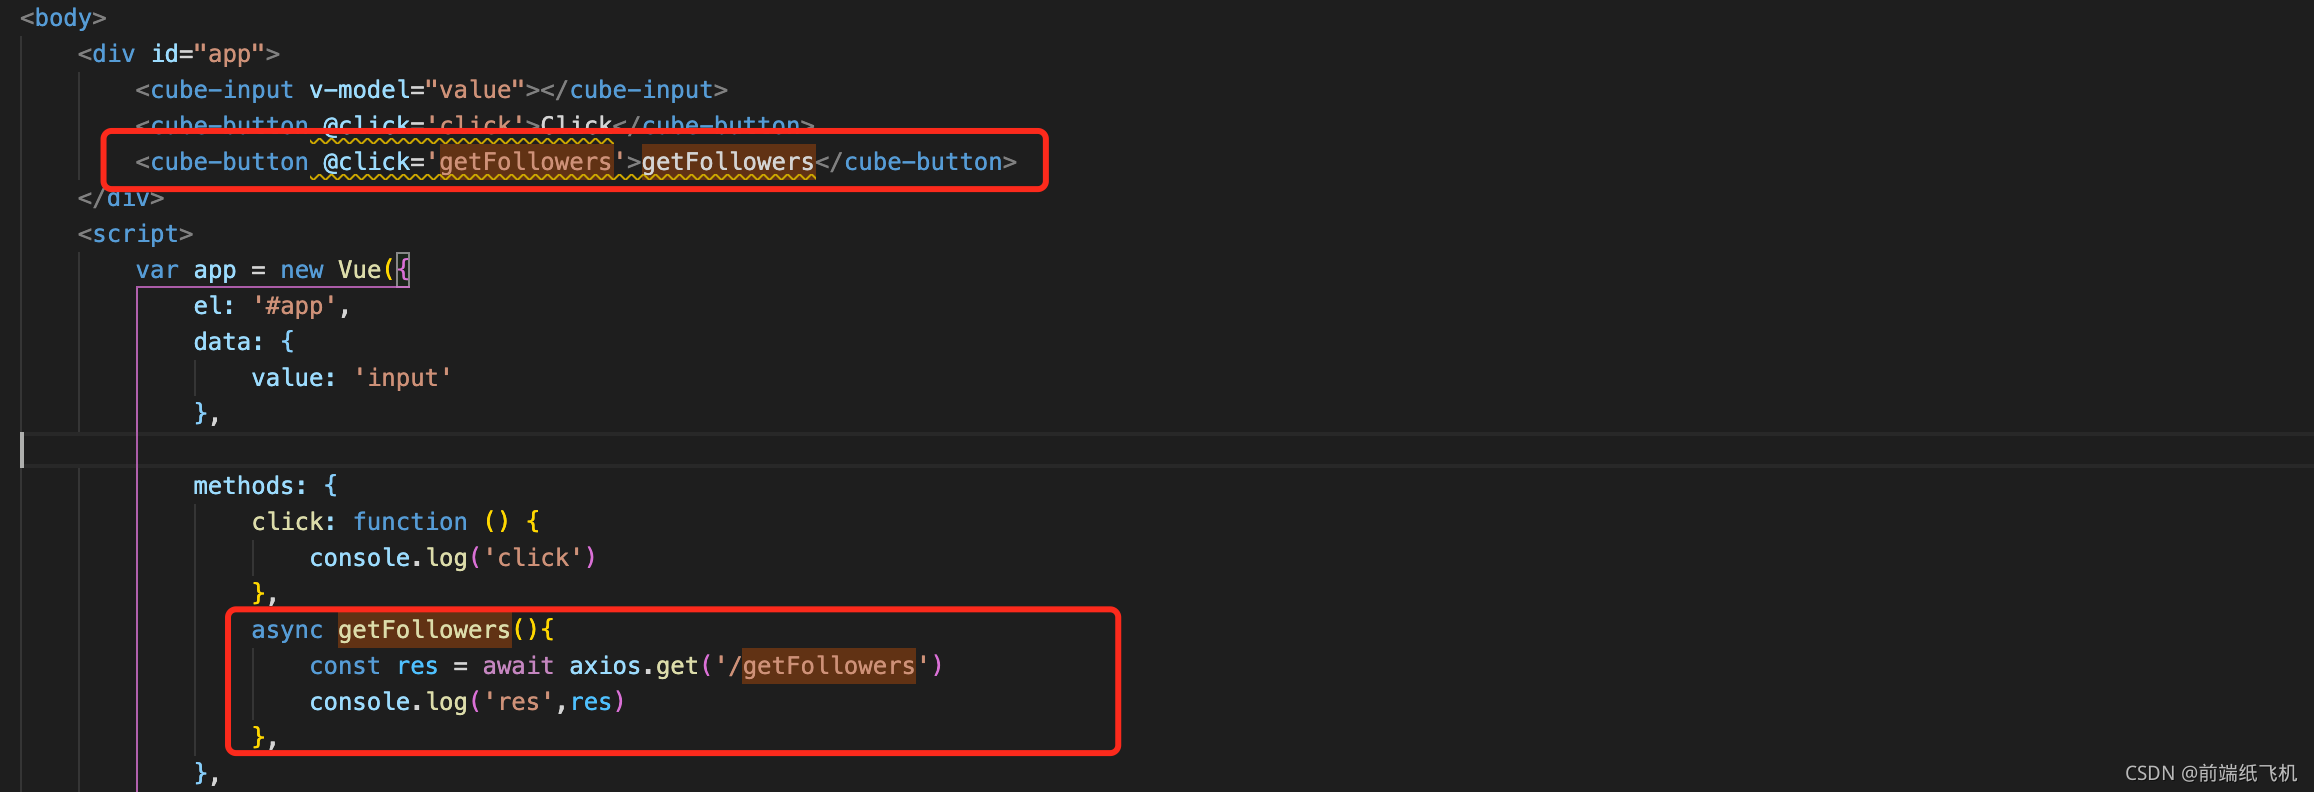
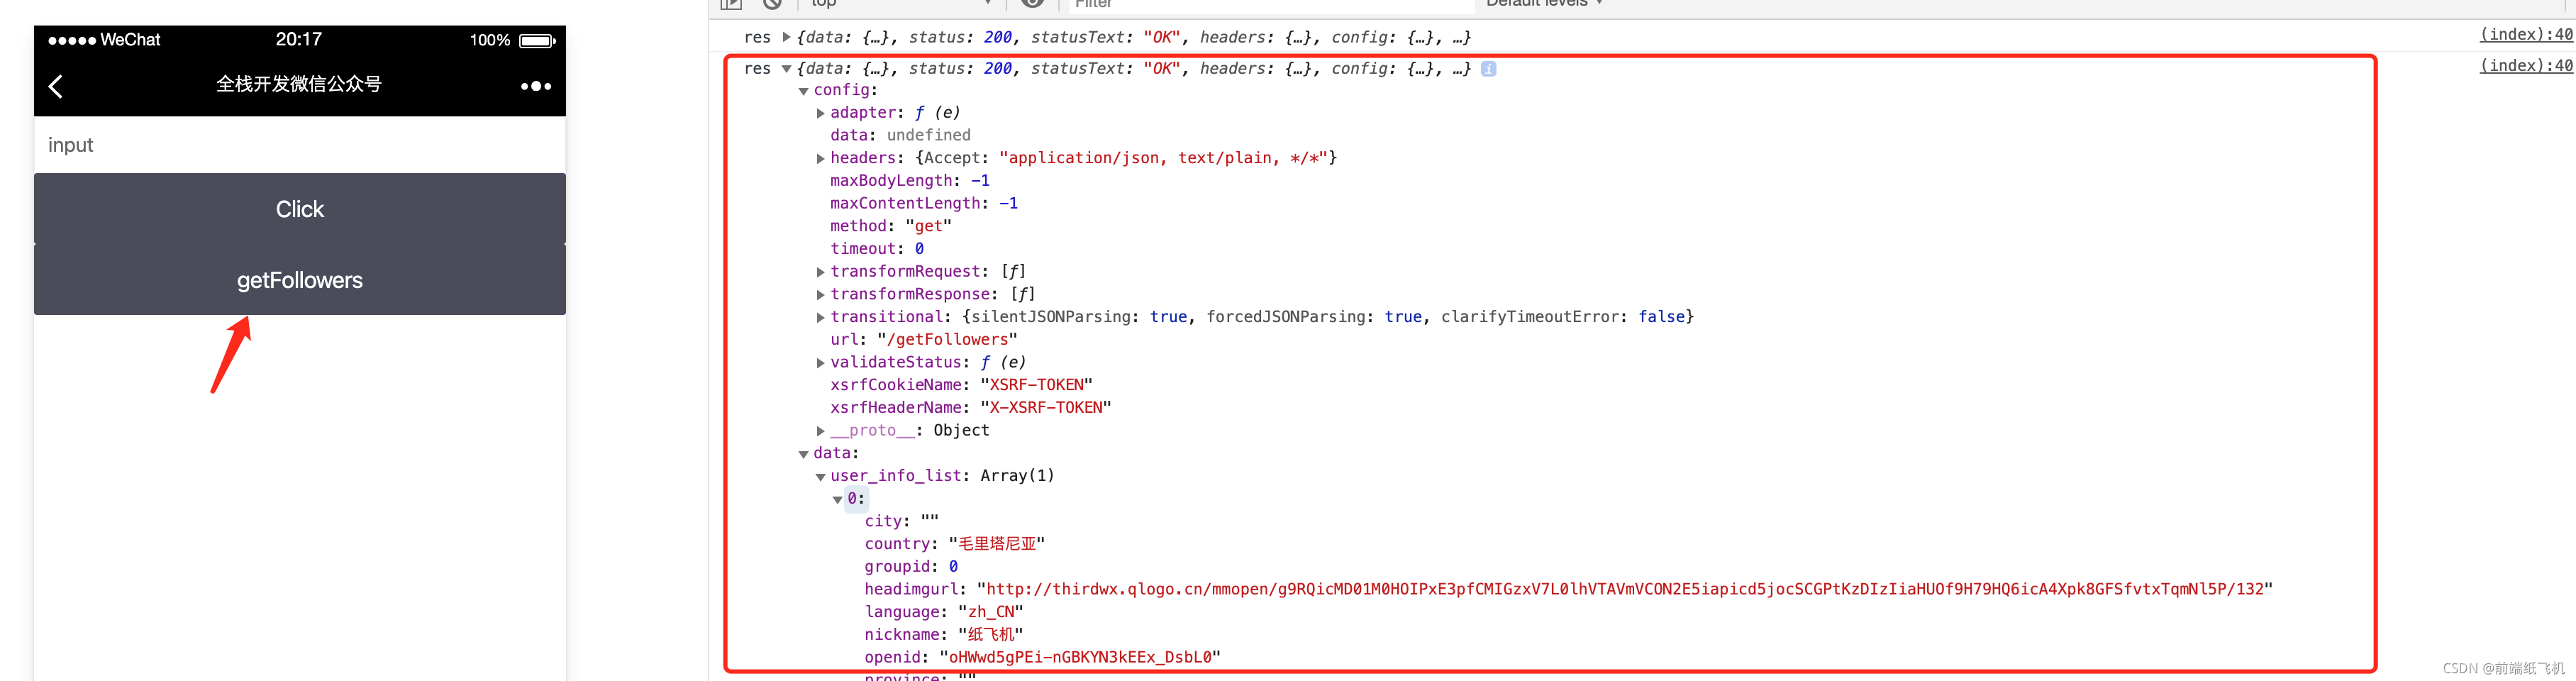
动动小手点击一下:(这个getFollwers拿到了数据)
五、消息推动
就类似于这个,手机微信扫码微信公众平台前台发送1或者2,饼图自动统计1和2发送的次数。
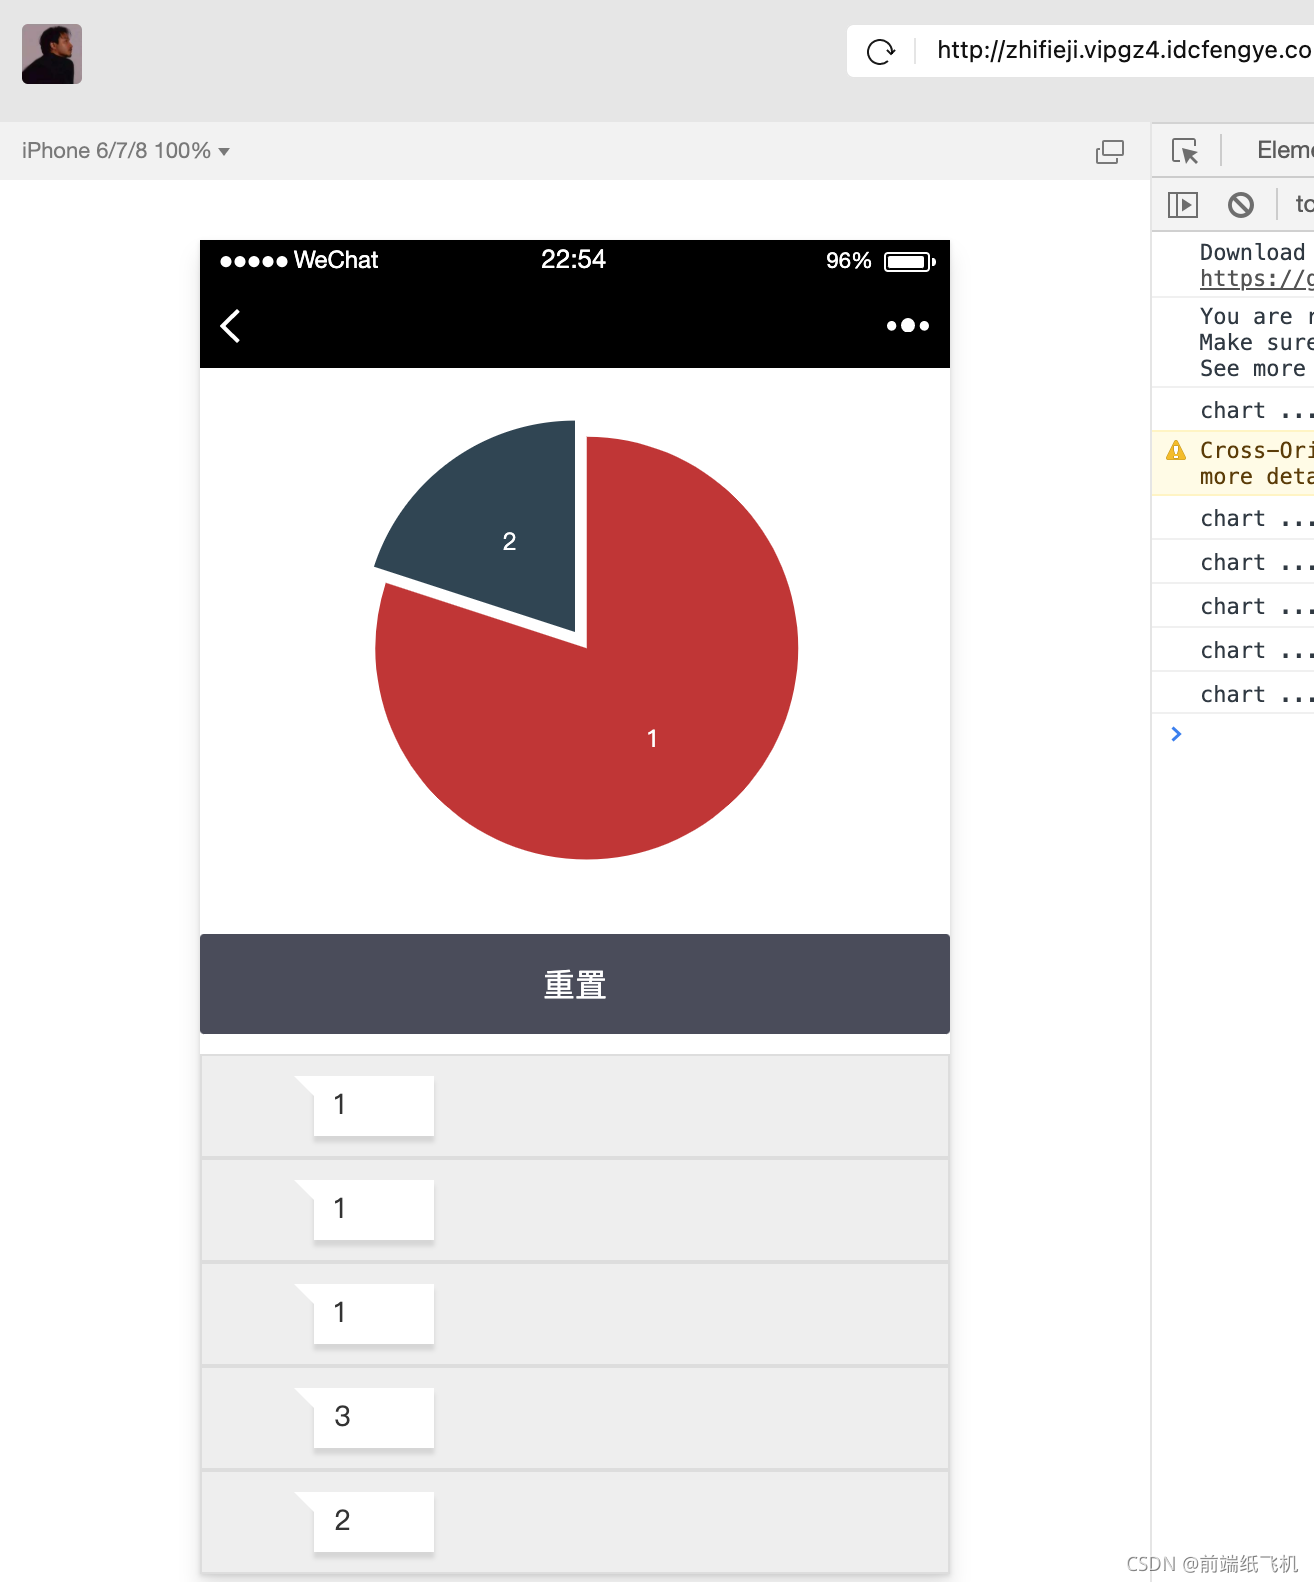
后台(模拟器)会显示前台(手机微信在测试订阅号)的推送,而且更新echart。
代码为下面的vote部分,后面会放出代码。

六、Oauth2认证流程
首先要知道有三个端,浏览器,服务器,微信服务器。

1.浏览器向服务器发送认证请求
2.服务器让浏览器重定向微信认证界面
3.浏览器向微信服务器请求第三方认证(微信认证)
4.微信服务器毁掉给服务器一个认证code
5.服务器用code向微信服务器申请认证令牌
6.微信服务器返给服务器一个令牌
最后当服务器得到令牌认证成功后,发给浏览器一个指令,刷新界面

刷新后就会有一个用户信息
使用微信开发者工具,选择公众号网页,用来预览。
PS:以上代码中
- 消息推动我放在vote目录了
- 剩余的api调用方法放在了seed目录
七、实现一个微信认证登录
配置js接口安全域名,就是我们转发的公网域名(不用带协议):zhifieji.vipgz4.idcfengye.com

再就是每个微信接口api那里也要授权域名,即下图的修改位置,修改的和上面一样:(zhifieji.vipgz4.idcfengye.com)


把前面的项目中seed目录拷贝一份叫做seed_up,我们给予前面的在seed_up中继续干!
index.js;
const OAuth = require('co-wechat-oauth')//引入一个oauth库
const oauth = new OAuth(conf.appid,conf.appsecret)
/**
 * 生成用户URL
 */
router.get('/wxAuthorize', async (ctx, next) => {
    const state = ctx.query.id
    console.log('ctx...' + ctx.href)
    let redirectUrl = ctx.href
    redirectUrl = redirectUrl.replace('wxAuthorize', 'wxCallback')
    const scope = 'snsapi_userinfo'
    const url = oauth.getAuthorizeURL(redirectUrl, state, scope)
    console.log('url' + url)
    ctx.redirect(url)
})
/**
 * 用户回调方法
 */
router.get('/wxCallback', async ctx => {
    const code = ctx.query.code
    console.log('wxCallback code', code)
    const token = await oauth.getAccessToken(code)
    const accessToken = token.data.access_token
    const openid = token.data.openid
    console.log('accessToken', accessToken)
    console.log('openid', openid)
    ctx.redirect('/?openid=' + openid)
})
/**
 * 获取用户信息
 */
router.get('/getUser', async ctx => {
    const openid = ctx.query.openid
    const userInfo = await oauth.getUser(openid)
    console.log('userInfo:', userInfo)
    ctx.body = userInfo
})
index.html:
<!DOCTYPE html>
<html>
<head>
    <title>全栈开发微信公众号</title>
    <meta charset="UTF-8">
    <meta name="viewport" content="width=device-width,initial-scale=1,user-scalable=0">
    <script src="https://unpkg.com/vue@2.1.10/dist/vue.min.js"></script>
    <script src="https://unpkg.com/axios/dist/axios.min.js"></script>
    <script src="https://unpkg.com/cube-ui/lib/cube.min.js"></script>
    <script src="https://cdn.bootcss.com/qs/6.6.0/qs.js"></script>
    <script src="http://res.wx.qq.com/open/js/jweixin-1.4.0.js"></script>
    <link rel="stylesheet" href="https://unpkg.com/cube-ui/lib/cube.min.css">
    <style>
        /* .cube-btn {
            margin: 10px 0;
        } */
    </style>
</head>
<body>
    <div id="app">
        <cube-input v-model="value"></cube-input>
        <cube-button @click='click'>Click</cube-button>
        <cube-button @click='getTokens'>getTokens</cube-button>
        <cube-button @click='getFollowers'>getFollowers</cube-button>
        <cube-button @click='auth'>微信登录</cube-button>
        <cube-button @click='getUser'>获取用户信息</cube-button>
    </div>
    <script>
        var app = new Vue({
            el: '#app',
            data: {
                value: 'input'
            },
            methods: {
                click: function () {
                    console.log('click')
                },
                async getTokens(){
                    const res = await axios.get('/getTokens')
                    console.log('res:',res)
                },
                async getFollowers(){
                    const res = await axios.get('/getFollowers')
                    console.log('res',res)
                },
                async auth(){
                    window.location.href = '/wxAuthorize'
                },
                async getUser(){
                    const qs = Qs.parse(window.location.search.substr(1))
                    const openid= qs.openid
                    const res = await axios.get('/getUser',{
                        params:{
                            openid
                        }
                    })
                    console.log('res',res)
                }
            },
            mounted: function () {
            },
        });
    </script>
</body>
</html>
全局票据(一样用到mongoose,从上次的修改)
mongoose.js:
const mongoose = require('mongoose')
const {
    Schema
} = mongoose
mongoose.connect('mongodb://localhost:27017/weixin', {
    useNewUrlParser: true
}, () => {
    console.log('Mongodb connected..')
})
exports.ServerToken = mongoose.model('ServerToken', {
    accessToken: String
});
//以下为seed_up新增
schema = new Schema({
    access_token: String,
    expires_in: Number,
    refresh_token: String,
    openid: String,
    scope: String,
    create_at: String
});
// 自定义getToken方法
schema.statics.getToken = async function (openid) {
    return await this.findOne({
        openid: openid
    });
};
schema.statics.setToken = async function (openid, token) {
    // 有则更新,无则添加
    const query = {
        openid: openid
    };
    const options = {
        upsert: true
    };
    return await this.updateOne(query, token, options);
};
exports.ClientToken = mongoose.model('ClientToken', schema);
继续改下index.js:
const { ServerToken,ClientToken } = require('./mongoose')//全局票据来源
const oauth = new OAuth(conf.appid, conf.appsecret,
    async function (openid) {
        return await ClientToken.getToken(openid)
    },
    async function (openid, token) {
        return await ClientToken.setToken(openid, token)
    }
)
写出来效果如下:完美
八、调用微信jssdk
准备:
1.获取jsconfig
index.html:
<cube-button @click='getJSConfig'>获取jsconfig</cube-button>
async getJSConfig(){
  console.log('wx',wx)
  const res = await axios.get('/getJSConfig',{
      params:{
          url:window.location.href
      }
  })
  console.log('config',res)
  res.data.jsApiList = ['onMenuShareTimeline']
  wx.config(res.data)
  wx.ready(function () {
      console.log('wx.ready......')
  })
}
index.js:
/**
 * 获取JSConfig
 */
router.get('/getJsConfig',async ctx => {
    console.log('getJSSDK...',ctx.query)
    const res = await api.getJsConfig(ctx.query)
    ctx.body = res
})
如果能走到wx.ready(),说明这个时候可以使用别的功能那个api了。

2.获取网络状态
在wx.ready()后加,当然在ready()里加最为合理:
//获取网络状态
wx.getNetworkType({
     success: function (res) {
         // 返回网络类型2g,3g,4g,wifi
         const networkType = res.networkType
         console.log('getNetworkType...', networkType)
     }
})

获取到我是wifi环境,很完美!其余的jssdk调用方法也是如此!
还有一点,通常我们十前后端分离的开发项目,所以我把项目改成了前后端分离。
九、前后端分离的开发
1、新建了个weixin_pro的项目
2、将weixin项目的package.json复制到weixin_pro
3、分一个cube-ui目录为前端代码
4、分一个quiz目录为后端代码

5、weixin_pro下安装依赖,为后端依赖
6、cube-ui下安装依赖为前端依赖
7、分别启动前端代码后后端代码
运行效果如下:
十、代码地址
前后端分离前的代码:https://gitee.com/huqinggui/weixin.git
前后端分离后的代码:https://gitee.com/huqinggui/weixin_pro.git
🔥热门推荐🔥
表弟说看了这本书后,他的TypeScript技术已经登峰造极了
手把手教你在 Vue 中使用 JSX,不怕学不会!【建议收藏】
2021年的几次面试让我死磕了17道JS手写题!
大前端基本知识点及面试重灾区学习目录
一个聊天室案例带你了解Node.js+ws模块是如何实现websocket通信的!
npm常用命令以及npm publish常见问题处理方法


 2486
2486


 被折叠的 条评论
为什么被折叠?
被折叠的 条评论
为什么被折叠?
 到【灌水乐园】发言


