


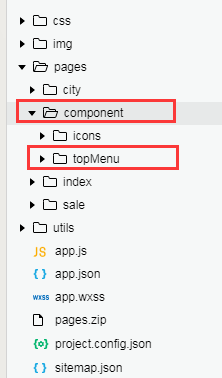
1、首先先自定义顶部导航组件topMenu,一下是目录结构,component下都是自定义的组件
index首页 city 城市页 sale 列表页
2、topMenu.js
const app = getApp();
Component({
    /*** 组件的属性列表*/
    properties: {
        pageName: String,
        showNav: {
            type: Boolean,
            value: true
        },
        bgColor: {
            type: String,
            value: '#fff'
        },
        iconColor: {
            type: String,
            value: '#000'
        },
        iconSize:{
            type: String,
            value: '18px'
        }
    },
    data: {///组件的初始数据
    },
    lifetimes: {
        attached: function () {
            this.setData({
                navHeight: app.globalData.navHeight+60,
                navTop: app.globalData.navTop,
                topmenuHeight: app.globalData.topmenuHeight,
                jninfos: app.globalData.jnInfo
            })
        }
    },
    methods: {///组件的方法列表
        //返回上一页
        _navBack:function () {
            console.log("回退")
            wx.navigateBack({
                delta: 1
            })
        },
        //回主页
        _toIndex:function () {
            console.log("回到首页")
            wx.redirectTo({
                url: '/pages/index/index'
            })
        }
    }
})
3、topMenu.wxml 这里用的myIcon是自定义的图片组件,可参考 https://blog.csdn.net/qq_39109182/article/details/101451616
<view class="navbar custom-class" style='height:{{topmenuHeight}}px;background-color:{{bgColor}}'>
    <view wx:if="{{showNav}}" class="navbar-action-wrap navbar-action-group row item-center" style='top:{{navTop}}px;height:{{jninfos}}px;line-height:{{jninfos}}px;border-radius:{{jninfos/2}}px;background-color:rgba(255,255,255,.6);'>
        <myIcon class="fanhui"  name="myIconfanhui" color="{{iconColor}}" size='{{iconSize}}' bindtap="_navBack"></myIcon>
        <myIcon class="home"  name="myIconHome" color="{{iconColor}}" size='{{iconSize}}' bindtap="_toIndex" ></myIcon>
    </view>
    <view class='navbar-title' style='top:{{navTop}}px'>
        {{pageName}}
    </view>
</view>
4、topMenu.json 因为我这里用了图标组件,所以json里要配置
{
    "component": true,
    "usingComponents": {
        "myIcon": "../icons/icons"
    }
}
5、配置app.js
//app.js
App({
globalData: {
    helloFromApp: null,
    windowHeight: null,
    thisAdr: ''
},
onLaunch: function (options) {
    // console.log("_____________________");
    let menuButtonObject = wx.getMenuButtonBoundingClientRect();
    wx.getSystemInfo({
        success: res => {
            let statusBarHeight = res.statusBarHeight,
                navTop = menuButtonObject.top,//胶囊按钮与顶部的距离
                navHeight = statusBarHeight + menuButtonObject.height + (menuButtonObject.top - statusBarHeight) * 2;//导航高度
            this.globalData.navHeight = navHeight;
            this.globalData.navTop = navTop;
            this.globalData.windowHeight = res.windowHeight;
            //胶囊的高度+胶囊按钮与顶部的距离+胶囊按钮与顶部的距离的一半
            var topmenu = menuButtonObject.height + navTop + navTop/2
            this.globalData.topmenuHeight = topmenu
            this.globalData.jnInfo = menuButtonObject.height
            console.log('胶囊按高度-------', menuButtonObject.height)
            console.log('胶囊按钮信息-------' ,menuButtonObject)
            console.log('胶囊按钮与顶部的距离-------' + navTop)
            console.log('导航高度-------' + navHeight)
            console.log('导航高度2-------' + topmenu)
        },
        fail(err) {
            console.log(err);
        }
    })
},
})
6、配置app.json , navigationStyle:custom
{
    "pages": [
        "pages/index/index",
        "pages/city/city",
        "pages/sale/sale",
        "pages/component/topMenu/topMenu"
    ],
    "window": {
        "backgroundTextStyle": "light",
        "navigationBarBackgroundColor": "#fff",
        "navigationBarTitleText": "WeChat",
        "navigationBarTextStyle": "black",
        "navigationStyle": "custom"
    },
    "permission": {
        "scope.userLocation": {
            "desc": "你的位置信息将用于城市定位和附近房源查询"
        }
    },
    "sitemapLocation": "sitemap.json",
    "usingComponents": {
        "myIcon": "pages/component/icons/icons",
        "navtab": "pages/component/topMenu/topMenu"
    }
}
7、index.wxml 默认启动页index调用自定义头部 page-name就是配置的导航的title
<navtab page-name="首页"></navtab>

<!-- 以下不重要 是搜索部分内容 因为自定义导航是定位fixed
所以下面加了 style="margin-top:{{topMenuHeight}}rpx"  高度-->

<view style="margin-top:{{topMenuHeight}}rpx" class="indexBox">
    <view class="topSerachBox">
        <view class="inputBoxStyle boxCommon flexbox">
            <view bindtap="cityIndex" class="cityView">{{cityName}}</view>
            <image class="searchImages" src="/img/home-search.png"></image>
            <view bindtap="searchIndex" class="serachView">搜索</view>
        </view>
    </view>
</view>
8、index.json,用了自定义头部 navigationBarTitleText 可以不用加
{
    "navigationBarTitleText": "首页",
    "backgroundColor": "#ffffff",
    "usingComponents": {
        "navtab": "../component/topMenu/topMenu"
    }
}
9、index.js
//index.js
//获取应用实例
const app = getApp()
const topMenuHeight = app.globalData.topmenuHeight //导航高度
Page({
    data: {
        cityName: '北京',
        cityId: 1,
        value: false //首页不需要返回按钮,隐藏掉
        // value: true
    },
    onLoad: function (options) {
        var that=this;
        that.setData({
            topMenuHeight: topMenuHeight*2+30
        })
    },
    cityIndex:function(){//城市
        wx.navigateTo({
            url: '/pages/city/city',
        })
    },
    searchIndex:function(e){//搜索
        console.log('搜索')
    },

})
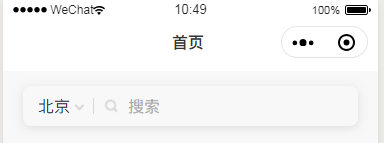
首页最终展示效果
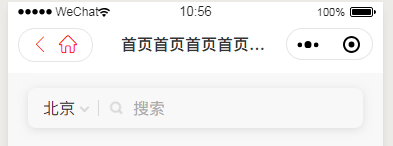
如果想要显示,还要设置icon的颜色 具体设置大小等其他参数,详见博文 https://blog.csdn.net/qq_39109182/article/details/101451616
index.wxml
<navtab page-name="首页首页首页首页首页首页首页首页首页首页首页首页首页首页首页" iconColor='red' showNav="{{value}}" ></navtab>index.js data里的值改一下就可以
    data: {
        // value: false
        value: true
    },
运行结果
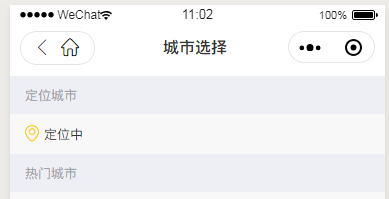
10、city.wxml 城市页面引用定义头部 ,
<navtab  page-name="城市选择" ></navtab>
<view style="margin-top:{{topMenuHeight}}px" class="cityIndex">
    <view class="dingCityTit">定位城市</view>
    <view class="ding">
        <image mode="widthFix" src="/img/index-position.png"/>
		<text class=" _auto ">定位中</text>
    </view>
</view>
11、city.json和index.json设置方法一样
12、city.js
// pages/city/city.js
const app = getApp()
const topMenuHeight = app.globalData.topmenuHeight
Page({
    onLoad: function (options) {
        var that = this;
        that.setData({
            topMenuHeight: topMenuHeight // 下面内容距离导航的高度
        })
    }
})
运行结果


 1169
1169


 被折叠的 条评论
为什么被折叠?
被折叠的 条评论
为什么被折叠?
 到【灌水乐园】发言


