


Hibernate框架是当今主流的Java持久层框架之一,由于它具有简单易学、灵活性强、扩展性强等特点,能够大大地简化程序的代码量,提高工作效率,因此受到广大开发人员的喜爱。
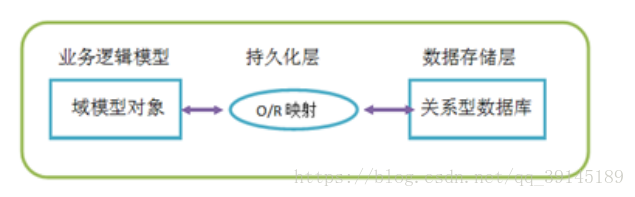
那么为什么要使用hibernate呢?因为 Hibernate是一个开放源代码的ORM(Object Relational Mapping)框架,它对JDBC进行了轻量级的对象封装,使得Java开发人员可以使用面向对象的编程思想来操作数据库。ORM原理如下图所示。
像之前一直写的dao包里的方法,都是千篇一律的,除了sql语句不一样,其他的基本上都是大同小异,这样不仅增加的代码量,效率慢,而且容易出错。
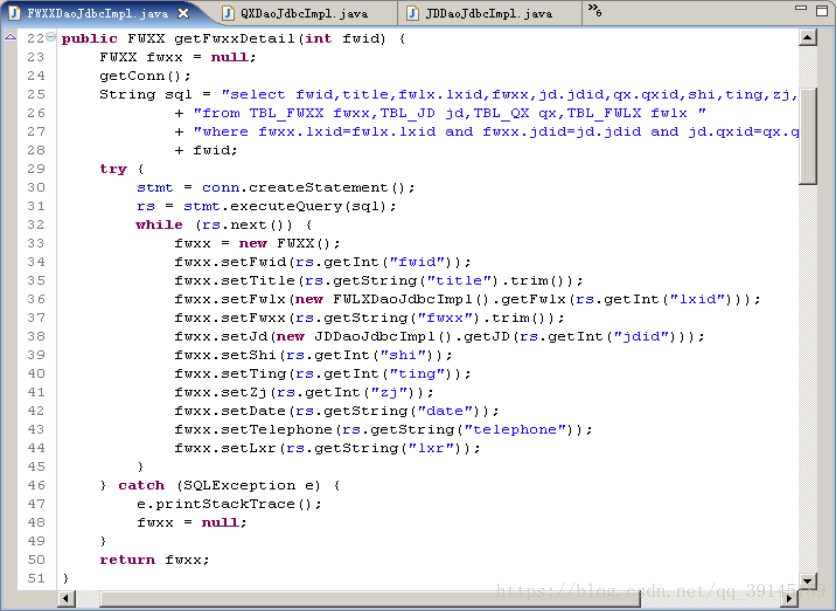 但是hibernate,可以精简这个这些代码,不需要花费过多的时间再这上边,可以把精力大部分放到业务逻辑上。
public class FwxxDAOHibImpl
          extends BaseHibernateDAO
          implements FwxxDAO {

     public FWXX get(int fwid) {
            super.get(FWXX.class,fwid);
     }
     public void add(FWXX fwxx) {
            super.add(fwxx);
     }
     public void del (int fwid) {
            super.del(FWXX.class,fwid);
     }
     public void update(FWXX fwxx) {
            super.update(fwxx);
     }
}
封装了JDBC操作,以面向对象的方式操作数据,代码精简易读。
下面先介绍一下什么是ORM(对象-关系映射)
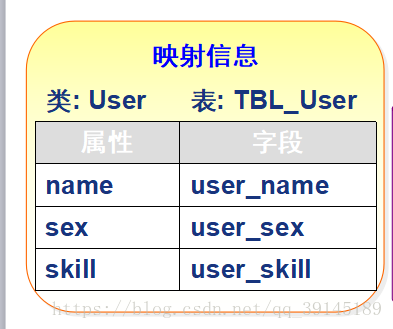
完成对象数据到关系型数据映射的机制称为对象-关系映射,简称ORM。
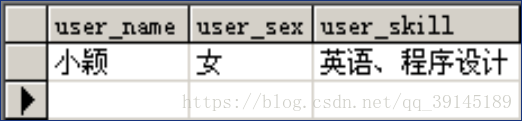
比如,创建一个实体类User,里边的变量分别是:name,sex,skill,那么对应数据库表中的
下面具体讲解一下怎么用hibernate
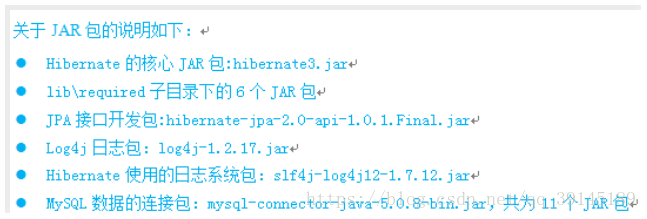
首先是jar包
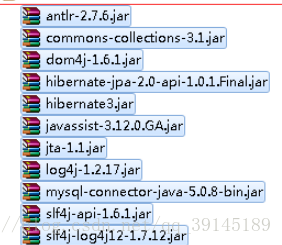 必须的11个 如果需要数据库则添加对应的jar包。
必须的11个 如果需要数据库则添加对应的jar包。
去网上下载就行
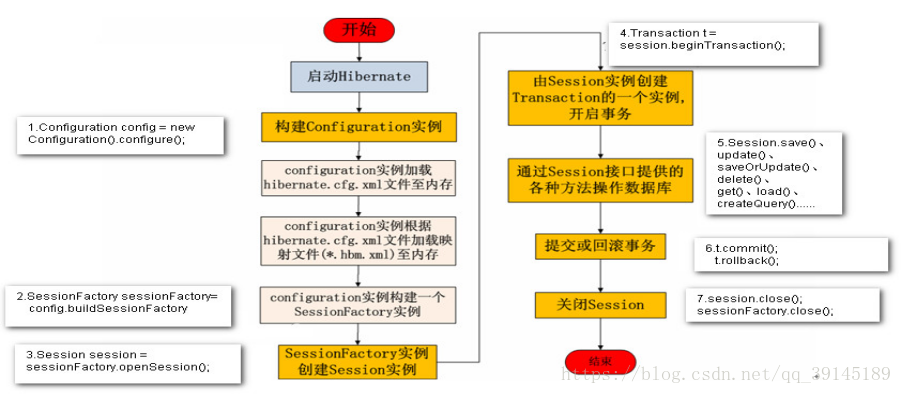
在Hibernate执行过程中通常会用到5个核心接口,分别为:Configuration接口、SessionFactory接口、Session接口、Transaction接口和Query接口。接下来了解一下Hibernate的执行流程。
当你添加好jar包以后,需要首先配置hibernate,尽量命名为:hibernate.cfg.xml。 后续可以默认调用
<!-- 配制文件的dtd信息 -->
<!DOCTYPE hibernate-configuration PUBLIC
	"-//Hibernate/Hibernate Configuration DTD 3.0//EN"
	"http://www.hibernate.org/dtd/hibernate-configuration-3.0.dtd">
<hibernate-configuration>
 <session-factory>
	<!-- 指定方言 -->
	<property name="hibernate.dialect">
	    org.hibernate.dialect.MySQLDialect
	</property>
    <!--数据库驱动 -->
	<property name="hibernate.connection.driver_class">
	    com.mysql.jdbc.Driver
	</property>
    <!--连接数据库的url -->
	<property name="hibernate.connection.url">
	    jdbc:mysql:///hibernate?characterEncoding=utf8
	</property>
	<!--数据库的用户名 -->
	<property name="hibernate.connection.username">
		root
	</property>
	<!--数据库的密码 -->
	<property name="hibernate.connection.password">
		root
	</property>
         <!--其它配置 -->
        <!-- 显示sql语句 -->
	<property name="hibernate.show_sql">true</property>
	<!-- 格式化sql语句 -->
	<property name="format_sql">true</property>
        <!--自动建表 -->
	<property name="hibernate.hbm2ddl.auto">update</property>
	<!-- 用来关联hbm配置文件 -->
	<mapping resource="com/ruanyuan/domain/Customer.hbm.xml"/>
 </session-factory>
</hibernate-configuration>
如果你的你的项目中用到了c3p0连接池,那么配置文件也是在这里边写。
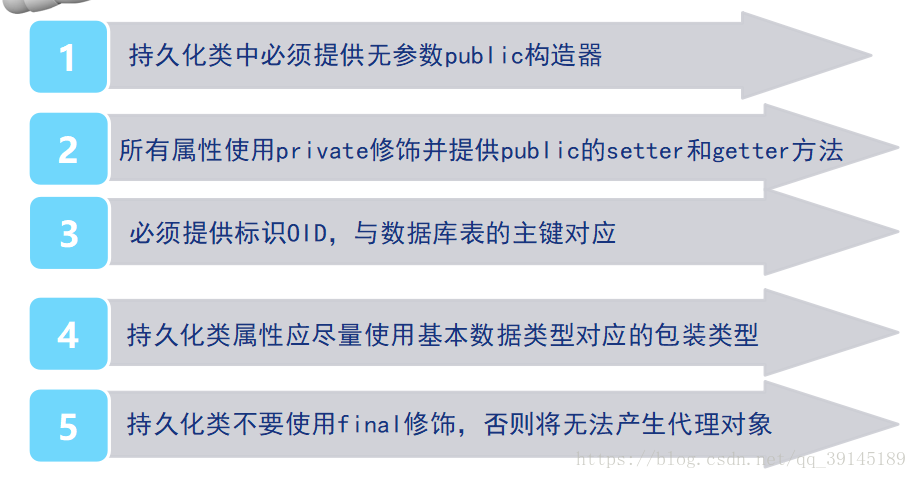
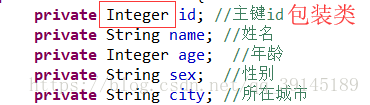
配置完hibernate以后,然后是写持久化类,类似于实体类,但是持久化类有必须遵守的规则,
这个样子写:
Hibernate映射文件用于向Hibernate提供,将对象的持久化到关系型数据库中的相关信息,每个映射文件的的结构基本都是相同的,其普遍的代码形式如下:
<?xml version="1.0" encoding="UTF-8"?>
<!DOCTYPE hibernate-mapping PUBLIC
    "-//Hibernate/Hibernate Mapping DTD 3.0//EN"
    "http://www.hibernate.org/dtd/hibernate-mapping-3.0.dtd">
<hibernate-mapping>
  <class name="XXX" table="xxx">
               <id name="id" column="id">
         <generator class="native"/>
               </id>
               <property name="XXX" column="xxx" type="string" />
   </class>
</hibernate-mapping>
下面来具体说明
<!DOCTYPE hibernate-mapping PUBLIC
    "-//Hibernate/Hibernate Mapping DTD 3.0//EN"
    "http://www.hibernate.org/dtd/hibernate-mapping-3.0.dtd">
<hibernate-mapping>
    <!-- name代表的是实体类名   talbe代表的是表名 -->
  <class name="com.ruanyuan.domain.Customer" table="customer">
	<!-- name=id 代表的是customer类中属性
	     column=id 代表的是table表中的字段 -->
	<id name="id" column="id">
		<generator class="native"/><!-- 主键生成策略 -->
	</id>
   	<!-- 其它属性使用property标签来映射 -->
	<property name="name" column="name" type="string" />
	<property name="age" column="age" type="integer" />
	<property name="sex" column="sex" type="string"/>
	<property name="city" column="city" type="string"/>
   </class>
</hibernate-mapping>
接下来就是访问方法了。先列举crud
/**
	 *  1.添加操作
	 */
	@Test
	public void insertTest() {
		// 1.加载hibernate.cfg.xml配置

		//查找指定位置的配制文件
		//Configuration config = new Configuration().configure("/config/hibernate.cfg.xml");
		//默认去类路径的根目录下查找名称为hibernate.cfg.xml的文件
		Configuration config = new Configuration().configure();
		// 2.获取SessionFactory
		SessionFactory sessionFactory = config.buildSessionFactory();
		// 3.得到一个Session
		Session session = sessionFactory.openSession();
		// 4.开启事务
		 Transaction t = session.beginTransaction();
		//session.beginTransaction();
		// 5.操作
		// 5.1创建一个对象
		Customer c = new Customer();
		c.setName("王五");
		c.setAge(20);
		c.setCity("上海");
		c.setSex("男");
		// 5.2将数据存储到表中
		session.save(c);
		// 6.提交事务
		 t.commit();
		// 7.关闭资源
		session.close();
		sessionFactory.close();
		System.out.println("success");
	}

	/**
	 *  2.修改操作
	 */
	@Test
	public void updateTest() {
		// 1.加载hibernate.cfg.xml配置
		Configuration config = new Configuration().configure();
		// 2.获取SessionFactory
		SessionFactory sessionFactory = config.buildSessionFactory();
		// 3.得到一个Session
		Session session = sessionFactory.openSession();
		// 4.开启事务
		Transaction t = session.beginTransaction();
		// 5.操作
		// 5.1创建一个对象
		Customer c = new Customer();
		c.setId(1);
		c.setName("李四");
		c.setAge(20);
		c.setSex("男");
		c.setCity("广州");
		// 5.2将数据存储到表中
		session.update(c);
		// 6.提交事务
		t.commit();
		// 7.关闭资源
		session.close();
		sessionFactory.close();
	}

	/**
	 *  3.查询操作--根据id查找
	 */
	@Test
	public void findByIdTest() {
		// 1.加载hibernate.cfg.xml配置
		Configuration config = new Configuration().configure();
		// 2.获取SessionFactory
		SessionFactory sessionFactory = config.buildSessionFactory();
		// 3.得到一个Session
		Session session = sessionFactory.openSession();
		// 4.开启事务
		Transaction t = session.beginTransaction();
		// 5.操作
		// 对于hibernate中根据id查找操作,它可以使用两个方法 get load
		//get加载数据时,如果指定的记录不存在,则返回null,而load则会报ObjectNotFoundException异常
		 Customer c=(Customer) session.get(Customer.class, 1);
		//Customer c = (Customer) session.load(Customer.class, 1);
		 System.out.println("姓名:"+c.getName());
		 System.out.println("年龄:"+c.getAge());
		 System.out.println("性别:"+c.getSex());
		 System.out.println("所在城市:"+c.getCity());
		// 6.提交事务
		t.commit();
		// 7.关闭资源
		session.close();
		sessionFactory.close();
	}

	/**
	 *  4.删除操作
	 */
	@Test
	public void deleteByIdTest() {
		// 1.加载hibernate.cfg.xml配置
		Configuration config = new Configuration().configure();
		// 2.获取SessionFactory
		SessionFactory sessionFactory = config.buildSessionFactory();
		// 3.得到一个Session
		Session session = sessionFactory.openSession();
		// 4.开启事务
		Transaction t = session.beginTransaction();
		// 5.操作
		Customer c = (Customer) session.get(Customer.class, 1); // 先查询
		session.delete(c);// 删除
		// 6.提交事务
		t.commit();
		// 7.关闭资源
		session.close();
		sessionFactory.close();
	}


 471
471


 被折叠的 条评论
为什么被折叠?
被折叠的 条评论
为什么被折叠?
 到【灌水乐园】发言


