


前言
好久没正经更新这个系列了,还是要续一下的…
设计
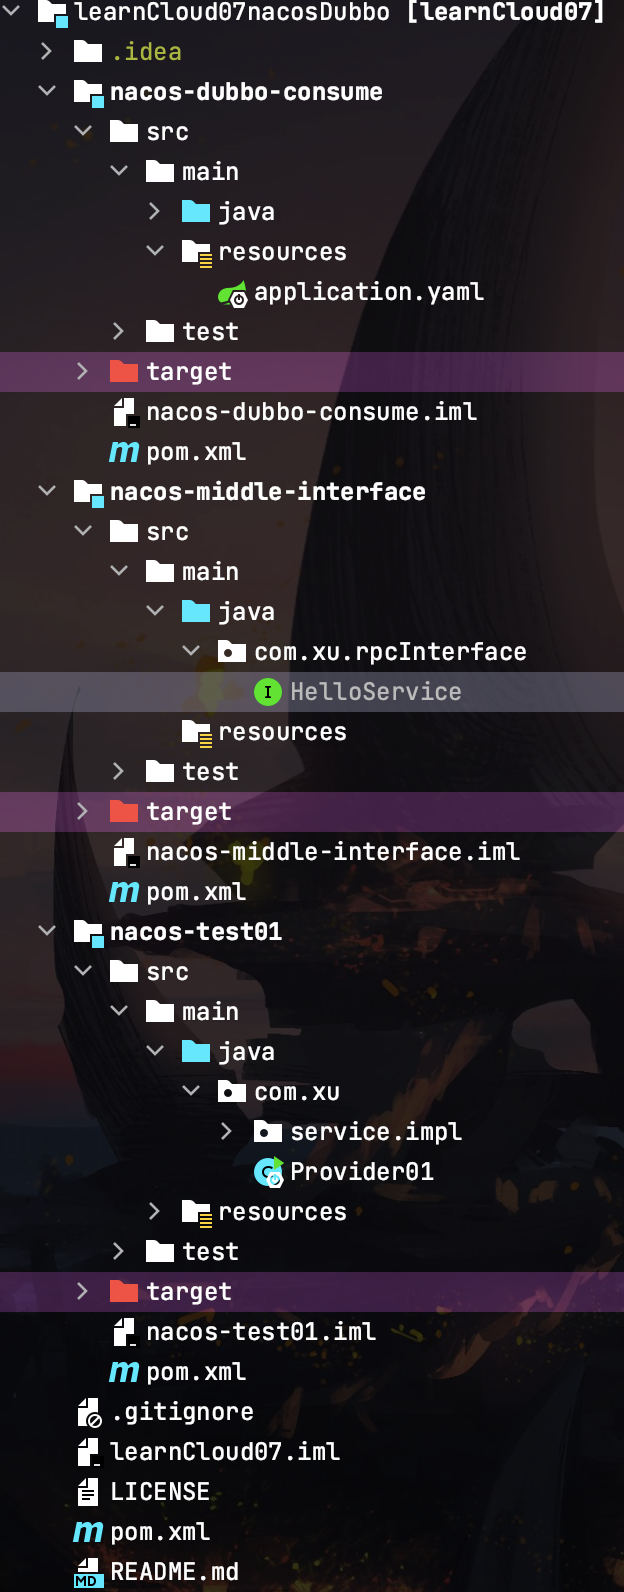
springboot + nacos + dubbo。本集只更新最基础最简单的用法。项目结构如下:
父工程
pom.xml
<?xml version="1.0" encoding="UTF-8"?>
<project xmlns="http://maven.apache.org/POM/4.0.0"
    xmlns:xsi="http://www.w3.org/2001/XMLSchema-instance"
    xsi:schemaLocation="http://maven.apache.org/POM/4.0.0 http://maven.apache.org/xsd/maven-4.0.0.xsd">
    <modelVersion>4.0.0</modelVersion>

    <groupId>org.example</groupId>
    <artifactId>learnCloud07</artifactId>
    <packaging>pom</packaging>
    <version>1.0-SNAPSHOT</version>
    <modules>
        <module>nacos-test01</module>
        <module>nacos-dubbo-consume</module>
        <module>nacos-middle-interface</module>
    </modules>

    <properties>
        <maven.compiler.source>8</maven.compiler.source>
        <maven.compiler.target>8</maven.compiler.target>
        <spring-cloud.version>HOXTON.SR8</spring-cloud.version>
        <spring-boot.version>2.3.2.RELEASE</spring-boot.version>
    </properties>

    <dependencyManagement>
        <dependencies>
            <dependency>
                <groupId>org.springframework.boot</groupId>
                <artifactId>spring-boot-dependencies</artifactId>
                <version>${spring-boot.version}</version>
                <type>pom</type>
                <scope>import</scope>
            </dependency>
            <dependency>
                <groupId>org.springframework.cloud</groupId>
                <artifactId>spring-cloud-dependencies</artifactId>
                <version>${spring-cloud.version}</version>
                <type>pom</type>
                <scope>import</scope>
            </dependency>
            <dependency>
                <groupId>org.projectlombok</groupId>
                <artifactId>lombok</artifactId>
                <version>1.18.16</version>
                <scope>provided</scope>
            </dependency>
            <dependency>
                <groupId>com.alibaba</groupId>
                <artifactId>fastjson</artifactId>
                <version>1.2.75</version>
            </dependency>
        </dependencies>
    </dependencyManagement>
</project>
服务接口约定
在父项目中新建一个模块,什么依赖都不需要,直接
package com.xu.rpcInterface;

public interface HelloService {

    /**
     * hello!
     * @return
     */
    String sayHello();
}
服务提供方
pom.xml
<dependencies>
        <dependency>
            <groupId>org.springframework.boot</groupId>
            <artifactId>spring-boot-starter-web</artifactId>
        </dependency>
        <dependency>
            <groupId>org.springframework.boot</groupId>
            <artifactId>spring-boot-starter-actuator</artifactId>
        </dependency>
        <dependency>
            <groupId>org.springframework.cloud</groupId>
            <artifactId>spring-cloud-starter-openfeign</artifactId>
        </dependency>
        <dependency>
            <groupId>com.alibaba.cloud</groupId>
            <artifactId>spring-cloud-starter-alibaba-nacos-discovery</artifactId>
            <version>2.2.5.RELEASE</version>
        </dependency>
        <!-- https://mvnrepository.com/artifact/org.apache.dubbo/dubbo-spring-boot-starter -->
        <dependency>
            <groupId>org.apache.dubbo</groupId>
            <artifactId>dubbo-spring-boot-starter</artifactId>
            <version>2.7.8</version>
        </dependency>
        <!-- https://mvnrepository.com/artifact/org.apache.commons/commons-lang3 -->
        <dependency>
            <groupId>org.apache.commons</groupId>
            <artifactId>commons-lang3</artifactId>
            <version>3.11</version>
        </dependency>
        <dependency>
            <groupId>org.example</groupId>
            <artifactId>nacos-middle-interface</artifactId>
            <version>1.0-SNAPSHOT</version>
            <scope>compile</scope>
        </dependency>

    </dependencies>
配置文件
server:
  port: 8001
spring:
  application:
    name: nacos-provider
  cloud:
    nacos:
      discovery:
        server-addr: {your nacos ip}
        username: nacos
        password: nacos
dubbo:
  application:
    name: ${spring.application.name}
  registry:
    address: nacos://${spring.cloud.nacos.discovery.server-addr}:8848
  protocol:
    name: dubbo # 指定通信协议
    port: 20880 # 通信端口  这里指的是与消费者间的通信协议与端口
  provider:
    timeout: 10000 # 配置全局调用服务超时时间
    retries: 3 # 重试3次
    delay: -1
启动类
import org.apache.dubbo.config.spring.context.annotation.EnableDubbo;
import org.springframework.boot.SpringApplication;
import org.springframework.boot.autoconfigure.SpringBootApplication;

@SpringBootApplication
@EnableDubbo
public class Provider01 {

    public static void main(String[] args) {
        SpringApplication.run(Provider01.class, args);
    }
}
服务提供
import com.xu.rpcInterface.HelloService;
import org.apache.dubbo.config.annotation.DubboService;
import org.springframework.stereotype.Component;

@Component
@DubboService
public class HelloServiceImpl implements HelloService {

    @Override
    public String sayHello() {
        return "hello dubbo";
    }
}
启动项目,如果正确的话应该能在nacos的管理页面看到。
服务消费方
pom.xml
和生产者一样的
配置文件
server:
  port: 8002
spring:
  application:
    name: nacos-consumer
  cloud:
    nacos:
      discovery:
        server-addr: {your nacos ip}
        username: nacos
        password: nacos

dubbo:
  # 配置服务信息
  application:
    name: dubbo-consumer
    # 禁用QOS同一台机器可能会有端口冲突现象
    qos-enable: false
    qos-accept-foreign-ip: false
  # 配置注册中心
  registry:
    address: nacos://${spring.cloud.nacos.discovery.server-addr}:8848
  # 设置超时时间
  consumer:
    timeout: 10000
启动类
import org.apache.dubbo.config.spring.context.annotation.EnableDubbo;
import org.springframework.boot.SpringApplication;
import org.springframework.boot.autoconfigure.SpringBootApplication;

@SpringBootApplication
@EnableDubbo
public class NacosDubboConsume {

    public static void main(String[] args) {
        SpringApplication.run(NacosDubboConsume.class, args);
    }
}
服务调用
import com.xu.rpcInterface.HelloService;
import org.apache.dubbo.config.annotation.DubboReference;
import org.springframework.stereotype.Service;

@Service
public class RpcCallServiceImpl {

    @DubboReference
    private HelloService helloService;

    public String sayHello() {
        return helloService.sayHello();
    }
}
控制器
import com.xu.service.RpcCallServiceImpl;
import org.springframework.web.bind.annotation.GetMapping;
import org.springframework.web.bind.annotation.RestController;

import javax.annotation.Resource;

@RestController
public class HelloController {

    @Resource
    private RpcCallServiceImpl rpcCallService;

    @GetMapping("/hello")
    public String sayHelloFunc() {
        return rpcCallService.sayHello();
    }
}
然后
curl http://localhost:8002/hello
就能得到结果,超简单的。更多的,关于负载均衡,熔断之类的,自己探索啦~
首发于csdn,作者 亭台烟雨中


 6744
6744


 被折叠的 条评论
为什么被折叠?
被折叠的 条评论
为什么被折叠?
 到【灌水乐园】发言


