


rsync+inotify实时同步案例
注意:本文为增量同步,而不是全量同步,网上找了很多资料,有好有坏,参考借鉴了很多。
1.1 inotify介绍
inotify是一种强大的、细粒度的、异步的文件系统事件控制机制。linux内核从2.6.13起,加入了inotify支持,通过inotify可以监控文件系统中添加、删除、修改、移动等各种事件,利用这个内核接口,第三方软件就可以监控文件系统下文件的各种变化情况,而inotify-tools正是实施监控的软件。
2.1 基本环境部署(这里为了避免不兼容的情况出现,采用统一版本的系统)
| 主机名 | IP地址 | 系统版本 |
|---|---|---|
| inotify master | 47.94.227.223 | centos 7.9 64位 |
| inotify slave | 182.92.156.134 | centos 7.9 64位 |
3.1 inotify-slave部署
这里就是部署rsync服务,rsync daemon工作模式。
重启命令(配置文件配置不对,修改配置时候会用到)
systemctl restart rsyncd.service
3.1.1检查是否安装rsync
rpm -qa rsync
3.1.2 新建rsync用户及模块目录并更改其用户组
useradd rsync -s /sbin/nologin  -M
mkdir /backup   #创建rsync daemon工作模式的模块目录
chown rsync.rsync /backup/   #更改模块目录的用户组
ll -d /backup/
3.1.3 编写rsync daemon配置文件/etc/rsyncd.conf
#rsync_config_____start
#created by chensiqi 13:40 2017-3-6
##blog:http://www.cnblogs.com/chensiqiqi/
##rsyncd.conf start##

# 用户
uid = rsync
# 组
gid = rsync
# 程序安全设置
use chroot = no
# 客户端连接数
max connections = 200
# 超时时间
timeout = 300
# 进程号文件位置
pid file = /var/run/rsyncd.pid
# 进程锁
lock file = /var/run/rsync.lock
# 日志文件位置
log file = /var/log/rsyncd.log
##########################################
[backup]
# 使用目录
path = /backup/
# 有错误时忽略
ignore errors
# 可读可写(true或false)
read only = false
# 阻止远程列表(不让通过远程方式看服务端有啥)
list=false
# 允许IP
hosts allow = 47.94.227.0/24
# 禁止IP 以下表示没有拒绝的链接。
hosts deny = 0.0.0.0/32
# 虚拟用户
auth users = rsync_backup
# 存放用户和密码的文件
secrets file = /etc/rsync.password

##rsync_config______end##
3.1.4 配置虚拟用户的密码文件
echo "rsync_backup:123456" >/etc/rsync.password
#注:rsync_backup为虚拟用户,123456为这个虚拟用户的密码
chmod 600 /etc/rsync.password #为密码文件提权,增加安全性
3.1.5 启动rsync 服务
rsync --daemon   #启动rsync服务
ps -ef |grep rsync
root       2389      1  0 10:15 ?        00:00:00 rsync --daemon
root       2392   2305  0 10:15 pts/0    00:00:00 grep rsync
ss -tunl
tcp   LISTEN     0      5       :::873       :::*
tcp   LISTEN     0      5       *:873        *:*
3.1.6 通过inotify-master测试推送
inotify-master配置密码文件,测试推送
echo "123456" >/etc/rsync.password
#注意:这里只要写密码即可,切记。
chmod 600 /etc/rsync.password
echo "hello sjf">test.txt
rsync -avz test.txt rsync_backup@182.92.156.134::backup --password-file=/etc/rsync.password
sending incremental file list
test.txt

sent 79 bytes  received 27 bytes  42.40 bytes/sec
total size is 10  speedup is 0.09
inotify-slave检查:
ll /backup/
total 4
-rw-r--r-- 1 rsync rsync 10 Oct 29 10:20 test.txt
cat /backup/test.txt
hello sjf
4.1 inotify-master部署
注:
inotify是 inotify master 安装和执行的
企业场景压力测试200-300个同步限制,受网卡,磁盘,带宽等的制约。
4.1.1 查看当前系统是否支持inotify
ll /proc/sys/fs/inotify/
total 0
-rw-r--r-- 1 root root 0 Oct 29 10:43 max_queued_events
-rw-r--r-- 1 root root 0 Oct 29 10:43 max_user_instances
-rw-r--r-- 1 root root 0 Oct 29 10:43 max_user_watches
#显示这三个文件则证明支持。
番外:
   /proc/sys/fs/inotify/max_queued_evnets
表示调用inotify_init时分配给inotify instance中可排队的event的数目的最大值,超出这个值的事件被丢弃,但会触发IN_Q_OVERFLOW事件。
   /proc/sys/fs/inotify/max_user_instances
表示每一个real user ID可创建的inotify instatnces的数量上限。
   /proc/sys/fs/inotify/max_user_watches
表示每个inotify instatnces可监控的最大目录数量。如果监控的文件数目巨大,需要根据情况,适当增加此值的大小。
例如: echo 30000000 > /proc/sys/fs/inotify/max_user_watches优化:
echo "50000000" >/proc/sys/fs/inotify/max_user_watches
echo "50000000" >/proc/sys/fs/inotify/max_queued_events
4.1.2 inotify的安装
经验:优先使用编译安装
inotify可以编译安装也可以直接yum安装
我这里采用的是yum安装的方式
yum -y install inotify-tools
当然我这里也给出编译安装的方法
wget  http://jaist.dl.sourceforge.net/project/inotify-tools/inotify-tools/3.13/inotify-tools-3.13.tar.gz
tar zxf inotify-tools-3.13.tar.gz
cd inotify-tools-3.13
./configure --prefix=/usr/local/inotify-3.13 #配置inotify,并指定安装路径为/usr/local/inotify-3.13
make && make install
注意这里安装完成后记得将命令所在路径引入环境变量
vi /etc/profile
PATH=$JAVA_HOME/bin:/usr/local/sbin:/usr/local/bin:/sbin:/bin:/usr/sbin:/usr/bin:/root/bin:$JAVA_HOME/bin:/usr/local/inotify-3.13/bin
source /etc/profile
测试create
#在inotify master 创建需要同步的源路径
mkdir /backup

在第一个窗口输入如下内容:
[root@backup ~]# ls /backup
[root@backup ~]# inotifywait -mrq --timefmt '%y %m %d %H %M' --format '%T %w%f' -e create /backup

在第二个窗口:输入如下内容
[root@backup ~]# cd /backup
[root@backup backup]# touch chensiqi

此时回到第一个窗口出现如下内容:
17 03 11 07 19 /backup/chensiqi

#命令说明
inotifywait:ionotify的命令工具
-mrq:-q只输入简短信息 -r,递归监控整个目录包括子目录 -m进行不间断持续监听
--timefmt 指定输出的时间格式
--format:指定输出信息的格式
-e create:制定监控的时间类型,监控创建create事件。
4.1.3 编写监控脚本并加载到后台执行
#这里使用的是增量脚本,每次都是只处理发生改变的文件
#!/bin/bash
src=/backup/                           # 需要同步的源路径
des=backup                             # 目标服务器上 rsync --daemon 发布的名称,rsync --daemon这里就不做介绍了,网上搜一下,比较简单。
rsync_passwd_file=/etc/rsync.password            # rsync验证的密码文件
#ip1=182.92.156.134                 # 目标服务器1
ip2=182.92.156.134                 # 目标服务器2
user=rsync_backup                            # rsync --daemon定义的验证用户名
cd ${src}
# 此方法中,由于rsync同步的特性,这里必须要先cd到源目录,inotify再监听 ./ 才能rsync同步后目录结构一致,有兴趣的同学可以进行各种尝试观看其效果
/usr/local/inotify-3.13/bin/inotifywait -mrq --format  '%Xe %w%f' -e modify,create,delete,attrib,close_write,move ./ | while read file
# 把监控到有发生更改的"文件路径列表"循环
do
        INO_EVENT=$(echo $file | awk '{print $1}')      # 把inotify输出切割 把事件类型部分赋值给INO_EVENT
        INO_FILE=$(echo $file | awk '{print $2}')       # 把inotify输出切割 把文件路径部分赋值给INO_FILE
        #echo "-------------------------------$(date)------------------------------------"
        #echo $file
        #增加、修改、写入完成、移动进事件
        #增、改放在同一个判断,因为他们都肯定是针对文件的操作,即使是新建目录,要同步的也只是一个空目录,不会影响速度。
		#echo $INO_EVENT;
		#echo $INO_FILE;
        if [[ $INO_EVENT =~ 'CREATE' ]] || [[ $INO_EVENT =~ 'MODIFY' ]] || [[ $INO_EVENT =~ 'CLOSE_WRITE' ]] || [[ $INO_EVENT =~ 'MOVED_TO' ]]         # 判断事件类型
        then
                #echo 'CREATE or MODIFY or CLOSE_WRITE or MOVED_TO'
                #rsync -avzcR --password-file=${rsync_passwd_file} $(dirname ${INO_FILE}) ${user}@${ip1}::${des} &&
# INO_FILE变量代表路径哦  -c校验文件内容
                rsync -apvzcR --password-file=${rsync_passwd_file} $(dirname ${INO_FILE}) ${user}@${ip2}::${des}
#仔细看 上面的rsync同步命令 源是用了$(dirname ${INO_FILE})变量 即每次只针对性的同步发生改变的文件的目录(只同步目标文件的方法在生产环境的某些极端
#环境下会漏文件 现在可以在不漏文件下也有不错的速度 做到平衡)
#然后用-R参数把源的目录结构递归到目标后面 保证目录结构一致性
        fi
        #删除、移动出事件
        if [[ $INO_EVENT =~ 'DELETE' ]] || [[ $INO_EVENT =~ 'MOVED_FROM' ]]
        then
                #echo 'DELETE or MOVED_FROM'
                #rsync -avzR --delete --password-file=${rsync_passwd_file} $(dirname ${INO_FILE}) ${user}@${ip1}::${des} &&
                rsync -avzR --delete --password-file=${rsync_passwd_file} $(dirname ${INO_FILE}) ${user}@${ip2}::${des}
#看rsync命令 如果直接同步已删除的路径${INO_FILE}会报no such or directory错误 所以这里同步的源是被删文件或目录的上一级路径
#并加上--delete来删除目标上有而源中没有的文件,这里不能做到指定文件删除,如果删除的路径越靠近根,则同步的目录月多,同步删除的操作就越花时间。
#这里有更好方法的同学,欢迎交流。
        fi
        #修改属性事件 指 touch chgrp chmod chown等操作
        if [[ $INO_EVENT =~ 'ATTRIB' ]]
        then
                #echo 'ATTRIB'
                if [ ! -d "$INO_FILE" ]
				echo '非目录'
# 如果修改属性的是目录 则不同步,因为同步目录会发生递归扫描,等此目录下的文件发生同步时,rsync会顺带更新此目录。
                then
                        #rsync -avzcR --password-file=${rsync_passwd_file} $(dirname ${INO_FILE}) ${user}@${ip1}::${des} &&
                        rsync -apvzcR --password-file=${rsync_passwd_file} $(dirname ${INO_FILE}) ${user}@${ip2}::${des}
                fi
        fi
done
经验:
1、如果脚本报错。请仔细检查脚本是否正确。
2、如果文件权限同步不过来,则是因为rsync用户权限不足导致的,可以调整rsync用户权限,或者直接将配置文件中,rsync 用户改为root用户。
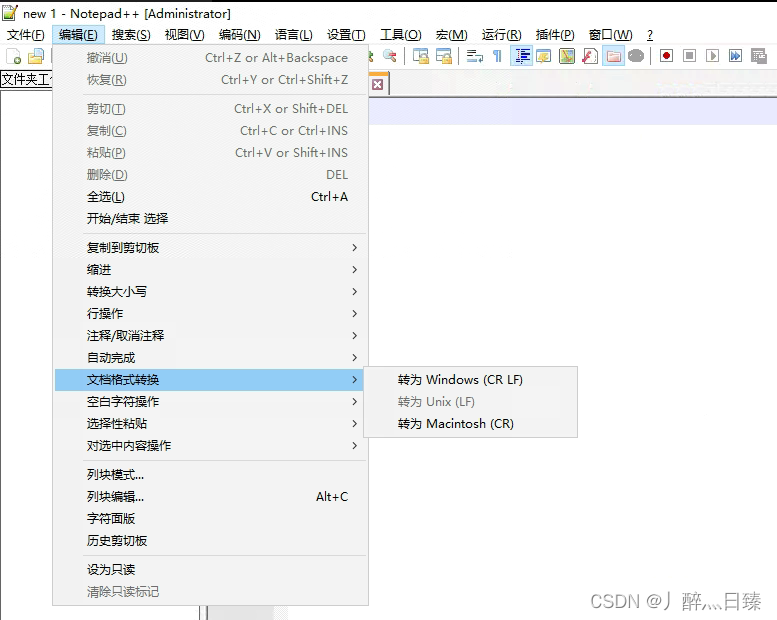
3、编码问题:建议使用Notepad++ 编辑,然后在‘编辑’中将‘文档格式转化‘改为Unix(有Windows和Unix区分),Windows的脚本在linux上会因为换行符导致执行错了
启动inotify脚本
sh inotify.sh &
inotify-master操作:
cd /backup/
for i in `seq 200`;do  touch   $i  ;done  #创建200个文件
ls -l --time-style=full-iso
total 0
-rw-r--r-- 1 root root 0 2016-10-29 11:38:16.183409656 +0800 1
-rw-r--r-- 1 root root 0 2016-10-29 11:38:16.225409783 +0800 10
-rw-r--r-- 1 root root 0 2016-10-29 11:38:16.526410667 +0800 100
-rw-r--r-- 1 root root 0 2016-10-29 11:38:16.528410673 +0800 101
-rw-r--r-- 1 root root 0 2016-10-29 11:38:16.530410679 +0800 102
-rw-r--r-- 1 root root 0 2016-10-29 11:38:16.533410688 +0800 103
-rw-r--r-- 1 root root 0 2016-10-29 11:38:16.535410694 +0800 104
-rw-r--r-- 1 root root 0 2016-10-29 11:38:16.538410703 +0800 105
-rw-r--r-- 1 root root 0 2016-10-29 11:38:16.539410707 +0800 106
-rw-r--r-- 1 root root 0 2016-10-29 11:38:16.552410742 +0800 107
inotify-slave检查
ll  --time-style=full-iso
total 0
-rw-r--r-- 1 rsync rsync 0 2016-10-29 11:38:16.000000000 +0800 1
-rw-r--r-- 1 rsync rsync 0 2016-10-29 11:38:16.000000000 +0800 10
-rw-r--r-- 1 rsync rsync 0 2016-10-29 11:38:16.000000000 +0800 100
-rw-r--r-- 1 rsync rsync 0 2016-10-29 11:38:16.000000000 +0800 101
-rw-r--r-- 1 rsync rsync 0 2016-10-29 11:38:16.000000000 +0800 102
-rw-r--r-- 1 rsync rsync 0 2016-10-29 11:38:16.000000000 +0800 103
-rw-r--r-- 1 rsync rsync 0 2016-10-29 11:38:16.000000000 +0800 104
-rw-r--r-- 1 rsync rsync 0 2016-10-29 11:38:16.000000000 +0800 105
-rw-r--r-- 1 rsync rsync 0 2016-10-29 11:38:16.000000000 +0800 106
-rw-r--r-- 1 rsync rsync 0 2016-10-29 11:38:16.000000000 +0800 107
-rw-r--r-- 1 rsync rsync 0 2016-10-29 11:38:16.000000000 +0800 108
5增加开机自启动
5.1 给 inotify master 增加开机自启动
1、给客户端/etc/rc.d/rc.local文件执行权限x
chmod +x /etc/rc.d/rc.local
2、在客户端/etc/rc.d/rc.local文件添加脚本信息(nohup /root/inotify.sh &)
vim /etc/rc.d/rc.local
#!/bin/bash
# THIS FILE IS ADDED FOR COMPATIBILITY PURPOSES
#
# It is highly advisable to create own systemd services or udev rules
# to run scripts during boot instead of using this file.
#
# In contrast to previous versions due to parallel execution during boot
# this script will NOT be run after all other services.
#
# Please note that you must run 'chmod +x /etc/rc.d/rc.local' to ensure
# that this script will be executed during boot.

touch /var/lock/subsys/local
nohup /root/inotify.sh &
5.2 给inotify-slave增加开机自启动
1、给客户端/etc/rc.d/rc.local文件执行权限x
chmod +x /etc/rc.d/rc.local
2、在客户端/etc/rc.d/rc.local文件添加脚本信息(rsync --daemon)
vim /etc/rc.d/rc.local
#!/bin/bash
# THIS FILE IS ADDED FOR COMPATIBILITY PURPOSES
#
# It is highly advisable to create own systemd services or udev rules
# to run scripts during boot instead of using this file.
#
# In contrast to previous versions due to parallel execution during boot
# this script will NOT be run after all other services.
#
# Please note that you must run 'chmod +x /etc/rc.d/rc.local' to ensure
# that this script will be executed during boot.

touch /var/lock/subsys/local
rsync --daemon
5.3
定时全量同步 (根据自己业务情况使用)
crontab -e
* */2 * * * rsync -avz --password-file=/etc/rsync.password /backup/ rsync_backup@182.92.156.134::backup && rsync -avz --password-file=/etc/rsync.password /backup/ rsync_backup@192.168.0.19::backup
最后发现一个不明白地方
问题:日志确实是增量同步,但是显示的不是发生改变的文件,而是master服务器中有 ,但是 slave服务器中没有的文件都会同步过去
复现操作步骤:
1、先给master 上传A、B、C三个文件,这时同步正常,master和slave服务器都有这三个文件
2、将slave服务器中B、C两个文件删除
3、在给master 服务器重新上传一个D
这时候就会发现 在slave服务器上,ABCD四个文件都存在
有哪位大佬明白怎么回事,希望可以留言一下。感谢。


 874
874


 被折叠的 条评论
为什么被折叠?
被折叠的 条评论
为什么被折叠?
 到【灌水乐园】发言


