


Spring中注解标签的分类
1.用于创建对象的:
(和 标签效果相同)
@component:用于把当前类对象存入spring容器中
@Controller:一般使用在表现层
@Service:一般使用在业务层
@Repository:一般使用在持久层
这三个的属性和Component相同,他三个能做的Component都能做,这是spring框架为我们提供的明确的spring三层架构注解,使我们的三层架构更加清楚。
属性:
value:用于指定bean的id。当我们不写时,他的默认值时当前类名,首字母小写
2.用于注入数据的
(和标签中系的标签效果相同)
@AutoWired
作用:按照类型注入。只要容器中有唯一一个bean对象类型和要注入的变量类型匹配,就可以成功注入。
出现位置:可以实变量上,也可以是方法上。
所以在使用注解注入时,set方法就不是必须的。
若IOC容器中没有要注入的对象类型,就会报错
若IOC容器中要注入的对象类型存在两个,现根据数据类型来圈定可以匹配的数据范围,然后再根据注入变量的变量名称去匹配到底注入进哪个bean类。

红色为根据数据类型确定范围,蓝色为根据变量名称来确定注入何处。
所以使用AutoWired注解必须修改变量名来确定如何注入。为了解决修改变量名称的问题,就引入了一个新的注解。
@Qualifier
作用:在按照类型的注入基础之上,再按照名称注入。它再给类成员注入时不能单独使用,但是再给方法参数注入时可以。
属性:value,用于指定注入bean的id,
@Qualifier注解必须在给类成员注入时必须和Autowired配合。为了解决这个注入时使用两个注解的问题,我们可以使用下一个注解。
@Resource
作用:直接按照id注入,独立使用
属性:name,用于指定bean的id
以上三个注解都只能注入其他bean类型的数据,而基本类型和String类型无法使用上述注解实现。另外集合类型只能使用xml来实现。
@Value
作用:用于注入基本类型和String类型的数据
属性:
value:用于指定数据的值。
3.用于改变作用范围的:
(和scope标签效果相同)
@Scope
作用:用于指定bean的作用范围
属性:
value:指定范围取值。常用取值:singleton,prototype。若不写,默认情况下时单例的。
4.和生命周期相关的
(和init-method 和 destroy-method效果相同)
@PreDestroy
作用:用于指定销毁方法
@PostConstruct
作用:用于指定初始化方法
使用注解的步骤:
1.在xml文件中引入约束:
<beans xmlns="http://www.springframework.org/schema/beans"
    xmlns:xsi="http://www.w3.org/2001/XMLSchema-instance"
    xmlns:context="http://www.springframework.org/schema/context"
    xsi:schemaLocation="http://www.springframework.org/schema/beans
        https://www.springframework.org/schema/beans/spring-beans.xsd
        http://www.springframework.org/schema/context
        https://www.springframework.org/schema/context/spring-context.xsd">
因为我们为了使用注解,需要开启注解扫描,而开启注解扫描的约束在context包中,所以我们也需要导入spring context这个包

因为我是maven项目所以导入坐标之后都有了,所以大家使用非maven项目的同学不要少导入jar包
2.开启注解扫描:
<context:component-scan base-package="com.jack"/>
开启扫描后,com.jack包下的所有文件和子包都可以使用注解了。
测试一下
注解注册加入spring容器中的类:
package com.jack.service.imp;

import com.jack.service.AccountService;
import org.springframework.stereotype.Component;

import java.util.Date;

/**
 * @Author: jack
 * @date: 2019/10/21 21:44
 */
@Component//创建对象的注解
public class AccountServiceImpl2 implements AccountService {


    public String findAll() {

        return "查询到了所有";
    }


}
测试类:
package com.jack.ui;

import com.jack.service.AccountService;
import org.springframework.context.ApplicationContext;
import org.springframework.context.support.ClassPathXmlApplicationContext;

/**
 * @Author: Jack
 * @date: 2019/10/21 21:44
 */
public class AccountUi {
    public static void main(String[] args) {
        //获取核心容器对象
        ApplicationContext ac = new ClassPathXmlApplicationContext("bean.xml");


        AccountService accountServiceImpl3 = ac.getBean("accountServiceImpl2", AccountService.class);

        String all = accountServiceImpl3.findAll();
        System.out.println(all);


    }
}
结果:

没毛病,这就是spring注解配置的入门案例。
接下来我们写两个案例,一个是SpringIOC基于xml配置的案例,
另外一个是注解配置的案例。
Spring案例内容介绍
我们写一个使用Spring框架中IOC技术的案例,结构目录如下:
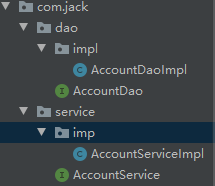
只使用了dao层和service层,视图层我们使用test来代替。
Dao层代码:
package com.jack.dao;

/**
 * @Author: jack
 * @date: 2019/10/21 21:42
 */
public interface AccountDao {

    /**
     * 查找所有账户信息
     * @return 用户信息
     */
    String findAll();

    /**
     * 根据ID删除账户信息
     * @return
     */
    String deleteById();

     /**
     * 更新账户
     * @return
     */
    String update();

    /**
     * 添加账户
     * @return
     */
    String insert();
}
Service层代码:
package com.jack.service;

import com.jack.dao.AccountDao;

/**
 * @Author: jack
 * @date: 2019/10/21 21:43
 */
public interface AccountService {


    /**
     * 查找所有账户信息
     * @return 用户信息
     */
    String findAll();

    /**
     * 根据ID删除账户信息
     * @return
     */
    String deleteById();

    /**
     * 更新账户
     * @return
     */
    String update();

    /**
     * 添加账户
     * @return
     */
    String insert();
}
----------------------------service层实现:--------------------

package com.jack.service.imp;

import com.jack.dao.AccountDao;
import com.jack.service.AccountService;

import java.util.Date;

/**
 * @Author: jack
 * @date: 2019/10/21 21:44
 */
public class AccountServiceImpl implements AccountService {

    private AccountDao accountDao;

    public void setAccountDao(AccountDao accountDao) {
        this.accountDao = accountDao;
    }

    public String findAll() {

        return accountDao.findAll();
    }

    public String deleteById() {
        return accountDao.deleteById();
    }

    public String update() {
        return accountDao.update();
    }

    public String insert() {
        return accountDao.insert();
    }


}
这里我就把接口给大家贴出来了,具体的实现根据情况的不同可以有不同的实现方式,我的方法返回值也都是String类型,主要是为了打印一句话测试。
测试方法:
    @Test
    public void testInsert() {
        String insertRes = accountService.insert();
        System.out.println(insertRes);
    }

    @Test
    public void testDelete() {
        String deleteRes = accountService.deleteById();
        System.out.println(deleteRes);
    }

    @Test
    public void testUpdate() {
        String updateRes = accountService.update();
        System.out.println(updateRes);
    }

    @Test
    public void testFindAll() {
        String all = accountService.findAll();
        System.out.println(all);
    }
Spring XML配置文件的书写:
现在具体的逻辑是这样:
service层调用dao层方法,需要dao层对象。
测试调用service层方法,需要service对象。
所以我们就要为service层注入dao层对象。
<?xml version="1.0" encoding="UTF-8"?>
<beans xmlns="http://www.springframework.org/schema/beans"
       xmlns:xsi="http://www.w3.org/2001/XMLSchema-instance"

       xsi:schemaLocation="http://www.springframework.org/schema/beans
        https://www.springframework.org/schema/beans/spring-beans.xsd
        d">


    <!--service层中注入dao层对象-->
    <bean id="accountService" class="com.jack.service.imp.AccountServiceImpl">
        <property name="accountDao" ref="accountDao"/>
    </bean>

    <bean id="accountDao" class="com.jack.dao.impl.AccountDaoImpl"/>

</beans>
测试一下:
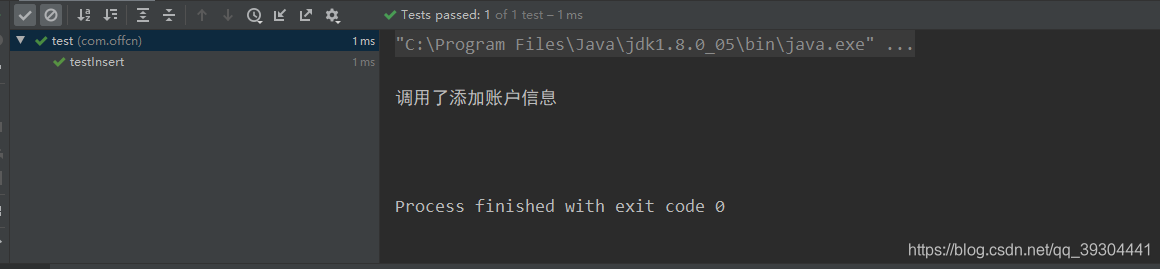
测试成功,配置完成。
Spring 注解开发配置:
bean文件中别的都不在需要,只需要把注解扫描打开。
<?xml version="1.0" encoding="UTF-8"?>
<beans xmlns="http://www.springframework.org/schema/beans"
       xmlns:xsi="http://www.w3.org/2001/XMLSchema-instance"
       xmlns:context="http://www.springframework.org/schema/context"
       xsi:schemaLocation="http://www.springframework.org/schema/beans
        https://www.springframework.org/schema/beans/spring-beans.xsd
        http://www.springframework.org/schema/context
        https://www.springframework.org/schema/context/spring-context.xsd">
    <context:component-scan base-package="com.jack"/>


</beans>
另外我们分析一下,我们需要的类一共有service层的实现类和Dao层的实现类,所以要使用注解将service层的类实例化加入容器中,而且也要把dao层的实现类实例化添加到容器中。
所以我们先把他们用@Service注解和@Repository实例化。


当这两个类都加入容器中时,我们就可以为service层需要注入的dao变量注入了。

因为此处只有一个,所以我们使用自动注入。
然后在测试类中测试:
```kotlin
package com.offcn;

import com.jack.service.AccountService;
import com.jack.service.imp.AccountServiceImpl;
import org.junit.Test;
import org.springframework.beans.factory.annotation.Autowired;
import org.springframework.context.ApplicationContext;
import org.springframework.context.support.ClassPathXmlApplicationContext;

import javax.annotation.Resource;
import java.sql.Connection;
import java.sql.DriverManager;
import java.sql.SQLException;

/**
 * @Author: ZhanFeng Qi
 * @date: 2019/10/22 16:54
 */
public class test {

    private ApplicationContext ac = new ClassPathXmlApplicationContext("bean.xml");

    private AccountService accountService = ac.getBean("accountService",AccountService.class);


    @Test
    public void testInsert() {
        String insertRes = accountService.insert();
        System.out.println(insertRes);
    }

    @Test
    public void testDelete() {
        String deleteRes = accountService.deleteById();
        System.out.println(deleteRes);
    }

    @Test
    public void testUpdate() {
        String updateRes = accountService.update();
        System.out.println(updateRes);
    }

    @Test
    public void testFindAll() {
        String all = accountService.findAll();
        System.out.println(all);
    }

}
执行结果:
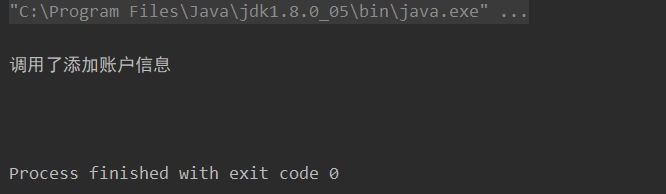
测试成功。


 273
273


 被折叠的 条评论
为什么被折叠?
被折叠的 条评论
为什么被折叠?
 到【灌水乐园】发言


