


前言
消息的顺序消费场景虽然用的不多,但在面试过程中还是会经常被问到的。打个比方,在用户购买商品的场景中,正常的流程是【创建订单消息 —> 支付 —> 发货】,如果还没支付成功就先发货了,那老板的荷包都被你榨干了,你也只好准备收拾东西走人了~
那在 Spring Cloud Stream 中该怎么保证消息的顺序性呢?
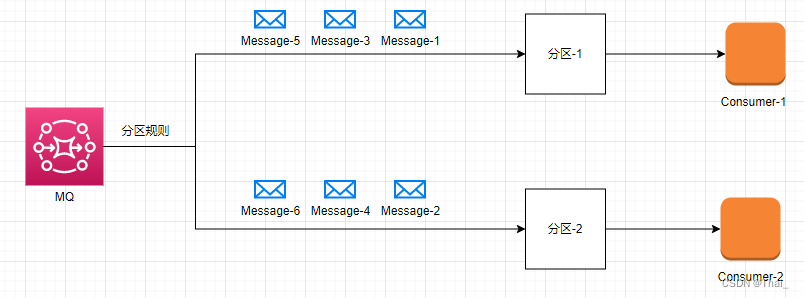
我们能够使用基于键值的方式做分区,让一个队列只存在一个消费者去做消费即可。
分区配置
讲完了借助分区来实现消息消费的顺序性,下面在看看如何使用 Spring Cloud Stream 的配置来实现分区。
生产者分区配置
Spring Cloud Stream 默认根据 key 进行 hash 并取模得到需要发送的目标分区索引,伪代码如下:
// 根据 key 的 hashCode 取模;key 默认为发送的消息体
int destinationIdx = key.hashCode() % partitionCount;
// 将消息发到指定的分区
sendToDestinationParittion(destionationIdx);
假设需要根据订单 id 的 hashCode 分发到指定的分区,使用 Spring Cloud Stream 需要以下配置
# 配置获取 Message 对象的哪个字段作为 key,如根据订单 id 作为 key 则写成 headers.orderId,orderId 需要自己设置到消息头
spring.cloud.stream.bindings.<channelName>.producer.partitionKeyExpression=headers.orderId
# 根据获取到的 key(订单 id) 进行取模
spring.cloud.stream.bindings.<channelName>.producer.partitionCount=2
注:partitionKeyExpression 表达式中的 headers 与 payload 对象均为 Message 实现类里面的字段名称;实测根据 payload.字段名 无法获取值,因为消息体被转为字节数组,获取不到字段从而报错;而官网的解释是类似投递员,不能看到信封里的内容,只能根据地址、邮政编码等将消息投递出去。
通过以上配置,即可简单实现消息分区,MQ 就能确保同一类的消息发往同一个分区。
当然,这里只是生产者的配置,还需要对消费者指定分区的索引,需要跟生产者发送的索引匹配。
消费者分区配置
消费者分区的一个前提是需要开启分区,并设置好消费者的实例数以及当前服务的分区索引;假设有两个消费者,这里为每个消费者创建一个分区。
# 开启消费者分区
spring.cloud.stream.bindings.<channelName>.consumer.partitioned=true
# 当前消费者在分区实例列表中的索引,从 0 开始
spring.cloud.stream.instanceIndex=0
# 消费者实例数量
spring.cloud.stream.instanceCount=2
测试
先根据官方文档,定义好需要的交换机与队列,再配置对应的分区参数。
生产者配置:
# 对 rabbitMQ 来说,此处是交换机名称,默认 topic 类型
spring.cloud.stream.bindings.testChannel-out-0.destination=testExchange
# 取消息体的 orderId 字段作为 key 进行 hashCode % partitionCount
spring.cloud.stream.bindings.testChannel-out-0.producer.partitionKeyExpression=headers.orderId
# 分区数量与消费者实例数量一致
spring.cloud.stream.bindings.testChannel-out-0.producer.partitionCount=2
消费者 1 配置:
# 只有单例的时候能够自动检测到 MQ 的输入,多个 bean 实例需要手动定义
spring.cloud.function.definition=testChannel
# 对 rabbitMQ 来说,此处是交换机名称,默认 topic 类型
spring.cloud.stream.bindings.testChannel-in-0.destination=testExchange
# 消费组名称,默认是随机生成的字符串;生成的队列为 ${destination}.${group},写死了能够避免多节点重复消费
spring.cloud.stream.bindings.testChannel-in-0.group=queueSuffix
# 批量获取消息条数,有顺序要求应该设置为 1
spring.cloud.stream.rabbit.bindings.testChannel-in-0.consumer.prefetch=1
# 并发获取消息数
spring.cloud.stream.bindings.testChannel-in-0.consumer.concurrency=1
spring.cloud.stream.rabbit.bindings.testChannel-in-0.consumer.maxConcurrency=1
#### 分区
# 开启消费者分区
spring.cloud.stream.bindings.testChannel-in-0.consumer.partitioned=true
# * 当前消费者在分区实例列表中的索引,从 0 开始
spring.cloud.stream.instanceIndex=0
# 消费者实例数量
spring.cloud.stream.instanceCount=2
# 应用名称
spring.application.name=consumer1
消费者 2 配置:
# 只有单例的时候能够自动检测到 MQ 的输入,多个 bean 实例需要手动定义
spring.cloud.function.definition=testChannel
# 对 rabbitMQ 来说,此处是交换机名称,默认 topic 类型
spring.cloud.stream.bindings.testChannel-in-0.destination=testExchange
# 消费组名称,默认是随机生成的字符串;生成的队列为 ${destination}.${group},写死了能够避免多节点重复消费
spring.cloud.stream.bindings.testChannel-in-0.group=queueSuffix
# 批量获取消息条数,有顺序要求应该设置为 1
spring.cloud.stream.rabbit.bindings.testChannel-in-0.consumer.prefetch=1
# 并发获取消息数
spring.cloud.stream.bindings.testChannel-in-0.consumer.concurrency=1
spring.cloud.stream.rabbit.bindings.testChannel-in-0.consumer.maxConcurrency=1
#### 分区
# 开启消费者分区
spring.cloud.stream.bindings.testChannel-in-0.consumer.partitioned=true
# * 当前消费者在分区实例列表中的索引,从 0 开始
spring.cloud.stream.instanceIndex=1
# 消费者实例数量
spring.cloud.stream.instanceCount=2
# 应用名称
spring.application.name=consumer1
上面配置 MQ 实际生成的交换机与队列如图
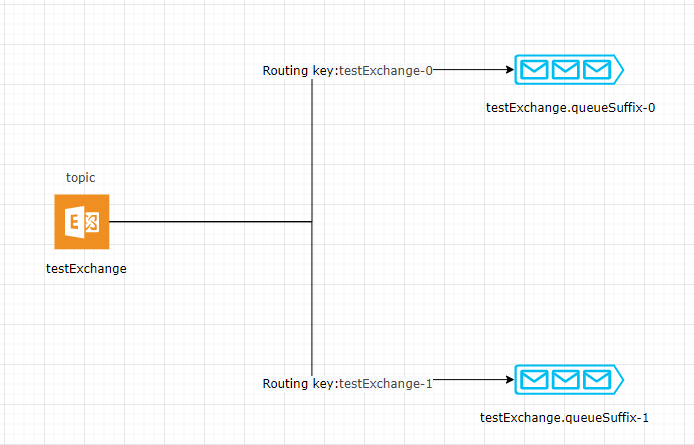
通过上图,可以清楚看到,对于 RabbitMQ 来说实际上分区就是建立多个消费队列,通过分区规则组合成路由键发送到指定的队列(分区)。
配置完成队列与分区后,下面就可以通过代码进行消息的发送与消息的监听了
生产者:
@Resource
private StreamBridge streamBridge;

@Test
public void sendMsg() throws InterruptedException {
    // 通过 i 来区分发往不同的分区,预期是 i % 2 的结果对应不同分区,那么发往 0 分区就是 0,2,4,6,8,发往第 1 分区就是 1,3,5,7,9
    for (int i = 0; i < 10; i++) {
        OrderDTO orderDTO = new OrderDTO();
        orderDTO.setOrderId((long) i);
        orderDTO.setBody(i + "");

        Message<OrderDTO> message = MessageBuilder
            .withPayload(orderDTO)
            .setHeader("orderId", i)
            .build();
        streamBridge.send("testChannel-out-0", message);
    }
}
消费者:
@Bean
public Consumer<OrderDTO> testChannel() {
    return orderDTO -> {
        if (log.isInfoEnabled()) {
            log.info("端口 {} 收到消息,orderId 为 {}", port, orderDTO.orderId);
        }
    };
}
实测结果与预期的符合


自定义分区键与分区选择策略
Spring Cloud Stream 为我们提供了自定义策略,分别为分区键策略 PartitionKeyExtractorStrategy 与 分区选择策略 PartitionSelectorStrategy;
有点疑惑就是为啥需要将键与选择策略拆成两个来实现?直接使用分区选择策略不就直接能够完成所需的功能了?猜大概是为了能够更灵活与复用,只要定义好选择策略,后面只需要指定分区间就能复用策略了,大佬们的设计还是考虑得很周全的。
-
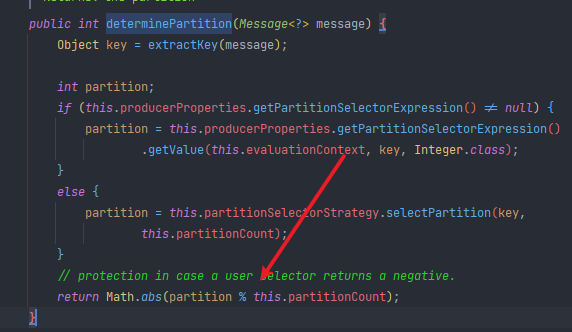
PartitionSelectorStrategy
分区的选择策略,根据 key 进行分区的选择,默认的策略是 key.hashCode() % partitionCount;
源码如下(org.springframework.cloud.stream.binder.PartitionHandler#determinePartition):
-
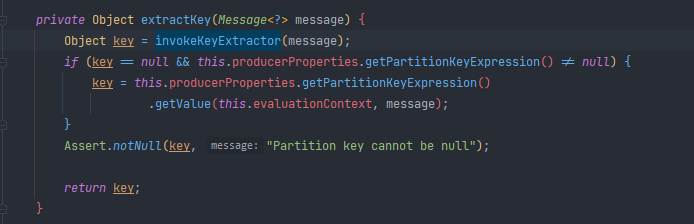
PartitionKeyExtractorStrategy
从发送的 Message 中提取哪一部分作为 key ,这个 key 将传递给 PartitionSelectorStrategy 进行分区选择;
源码如下(org.springframework.cloud.stream.binder.PartitionHandler#extractKey):
下面我们就定义这样一个策略,将 orderId 为奇数的都发到分区 1, orderId 为偶数的都发往分区 0
分区键策略:
/**
 * 分区键表达式策略
 *
 * @author zxb
 * @date 2022-09-22 10:52
 **/
public class MyPartitionKeyExtractorStrategy implements PartitionKeyExtractorStrategy {
    @Override
    public Object extractKey(Message<?> message) {
        MessageHeaders headers = message.getHeaders();
        Long orderId = headers.get("orderId", Long.class);
        Preconditions.checkNotNull(orderId, "请求头中 orderId 不能为空");
        return orderId;
    }
}
分区选择策略:
/**
 * 分区选择策略
 *
 * @author zxb
 * @date 2022-09-22 10:51
 **/
public class MyPartitionSelectorStrategy implements PartitionSelectorStrategy {

    @Override
    public int selectPartition(Object key, int partitionCount) {
        if (partitionCount != 2) {
            return Math.abs(key.hashCode() % partitionCount);
        }
        // 假设分区只有两个
        if (((long) key & 1) == 0) {
            return 0;
        } else {
            return 1;
        }
    }
}
配置为 bean:
/**
 * @author zxb
 * @date 2022-09-22 10:53
 **/
@Configuration
public class PartitionConfig {
    @Bean
    public MyPartitionKeyExtractorStrategy myPartitionKeyExtractor() {
        return new MyPartitionKeyExtractorStrategy();
    }

    @Bean
    public MyPartitionSelectorStrategy myPartitionSelector() {
        return new MyPartitionSelectorStrategy();
    }
}
生产者代码:
@Resource
private StreamBridge streamBridge;

@Test
public void sendMsg() {
    for (int i = 1; i <= 10; i++) {
        OrderDTO orderDTO = new OrderDTO();
        orderDTO.setOrderId((long) i);
        orderDTO.setBody(i + "");

        Message<OrderDTO> message = MessageBuilder
            .withPayload(orderDTO)
            .setHeader("orderId", (long) i)
            .build();
        streamBridge.send("testChannel-out-0", message);
    }
}
消费者代码:
@Bean
public Consumer<OrderDTO> testChannel() {
    return orderDTO -> {
        if (log.isInfoEnabled()) {
            log.info("第 1 个分区 收到消息,orderId 为 {}", orderDTO.getOrderId());
        }
    };
}
输出结果如预期,1、3、5、7、9 基数发往分区1; 2、4、6、8、10 偶数发往分区2


总结
使用 Spring Cloud Stream 的配置即可简单实现消息的分区,但实际的场景并不是这么简单,例如存在如何扩缩容?在收到消息后,不可能也是同步的消费,如果要异步消费该如何才能保证在本地的顺序?
关于这些问题,会在后续的文章再作讨论。


 2466
2466


 被折叠的 条评论
为什么被折叠?
被折叠的 条评论
为什么被折叠?
 到【灌水乐园】发言


