


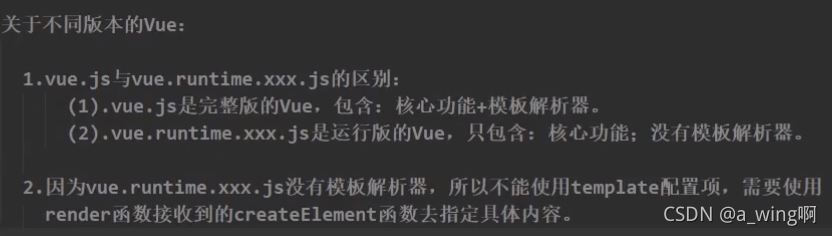
学习Vue2
看这个视频学的:
https://www.bilibili.com/video/BV1Zy4y1K7SH
入门小案例:
<!DOCTYPE html>
<html lang="en">
<head>
    <meta charset="UTF-8">
    <meta http-equiv="X-UA-Compatible" content="IE=edge">
    <meta name="viewport" content="width=device-width, initial-scale=1.0">
    <script src="./js/vue.js"></script>
    <title>Document</title>
</head>
<body>
    <!--创建一个容器-->
    <div id="root">
        <h1>hello,{{name}}</h1>
    </div>
    <script>
        //创建一个Vue实例
        new Vue({
            el:'#root',	//指定哪个容器,这里用了id选择器
            data:{
                name:'friend'
            }
        })
    </script>
</body>
</html>
1个容器只能对应1个Vue实例
{{xx}}两个花括号里面的内容xx可以是js表达式,如:1+1,Date.now()等
模板语法
模板语法有下面两种:
- 双花括号的是插值语法
- 指令语法
<body>
    <div id="root">
        <h1>hello,{{name}}</h1>
        <!-- v-bind:可以简写为:
        :href='xxx',xxx也可以写js表达式如school.url.toUpperCase()
        -->
        <a v-bind:href="school.url">链接</a>
        <a :href="school.url">链接</a>
    </div>

    <script>
        new Vue({
            el:'#root',
            data:{
                name:'friend',
                school:{
                    url:'http://www.baidu.com'
                }
            }
        })
    </script>
</body>
开始标签与结束标签之间的内容用{{xx}},标签里面的属性用指令语法
数据绑定
2种数据绑定的方式:
- 单向绑定:数据只能从Vue实例里面的data传到页面
- 双向绑定:数据不仅能从Vue实例里面的data传到页面,还可以从页面传到Vue实例里面的data。使用v-model:
<body>
    <div id="root">
       <input v-model:value="name">
    </div>

    <script>
        new Vue({
            el:'#root',
            data:{
                name:'friend',
            }
        })
    </script>
</body>

这里我在输入框输入123,vue开发者工具可以看到也自动变化了。
双向绑定一般使用在表单输入类标签上如<input>,<select>等。v-model:value可以简写为v-model,因为v-model默认的就是标签的value值。
el和data的两种写法:
<script>
        new Vue({
            el:'#root',		//el的第1种写法
            data:{			//data的第1种写法
                name:'friend'
            }
        })
    </script>
<script>
        const v = new Vue({
            data:function(){	//data的第2种写法,这里不可以写为箭头函数的形式!
                return{
                   name:'friend'
                }
            }
        });
        v.$mount('#root');	//el的第2种写法
    </script>
MVVM模型

简单理解:
- v就是指HTML页面
- m就是Vue实例里data的数据
- vm就是Vue实例
图里的DataBindings可以理解为把data的数据,绑定到HTML页面上(就像上面几个小节的例子)
DOM Listeners就是比如我们使用双向绑定的时候,在输入框输入数据,data的数据也会跟着变,就是它要一直监听我们的页面,它监听到我们在输入框输入了数据,那么它就做相应的处理去改变data里的数据。
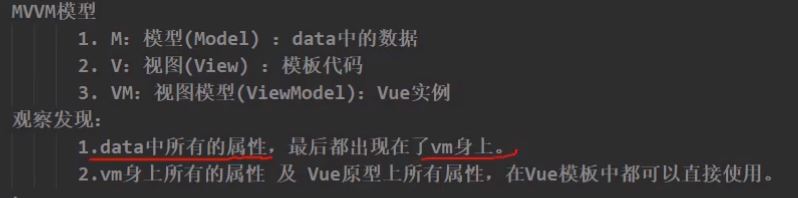
官方文档里用vm代表Vue实例,就像这样:
const vm = new Vue({
            //el:'#root',
            data:{
                   name:'friend'
              }
        });
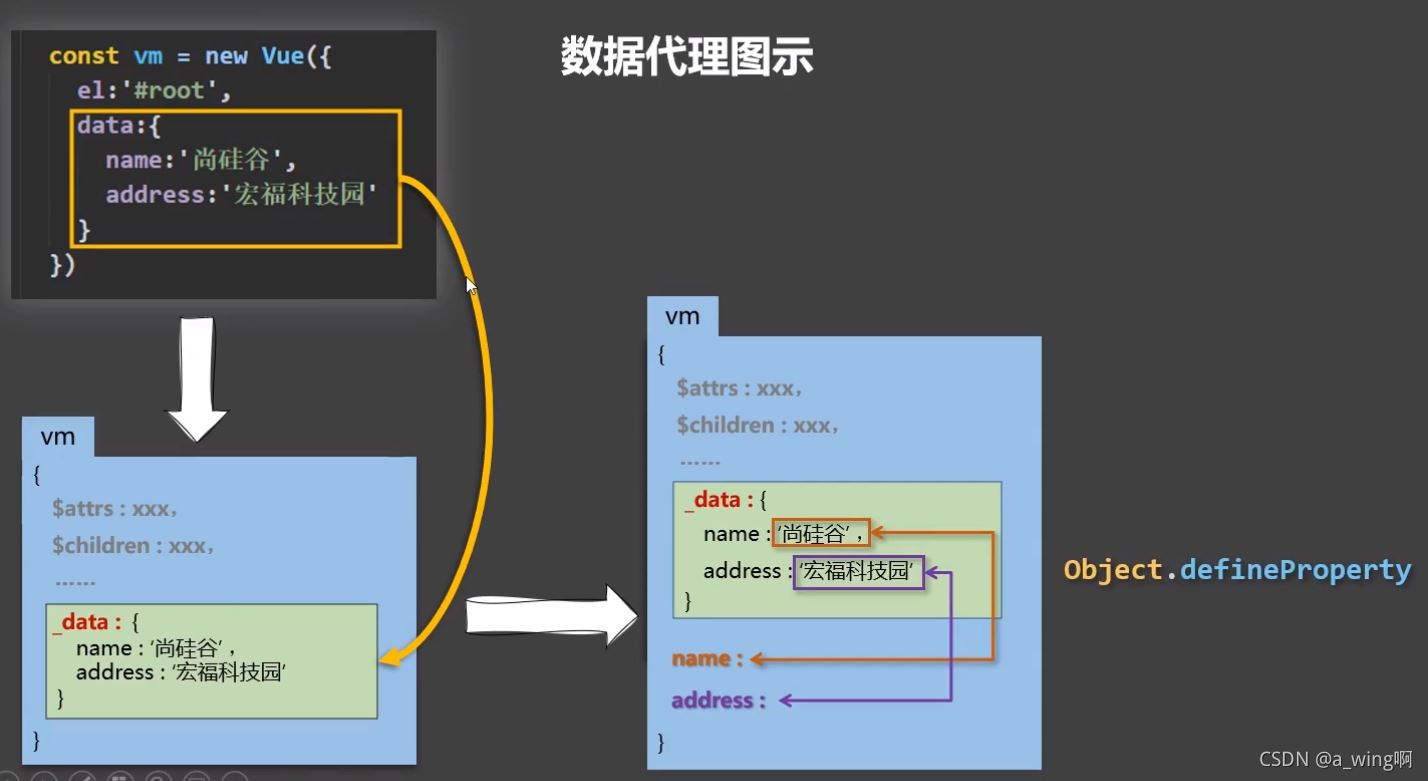
数据代理

修改number的值,person对象里的age属性也会跟着发生变化,但他不是通过person.age = number这种直接赋值的方式修改的,而是通过defineProerty()函数里的第3个参数进行配置,配置get()、set()函数来获取和修改person的age属性的。
这里的get()是简写,可以写为get:function(){…},set()也一样
//数据代理简单例子,通过1个对象代理,对另一个对象中的属性进行操作(读/写)
let obj1 = {x:100}
        let obj2 = {y:200}
        Object.defineProperty(obj2,'x',{
            get(){
                return obj1.x;
            },
            set(value){
                obj1.x = value;
            }
        })
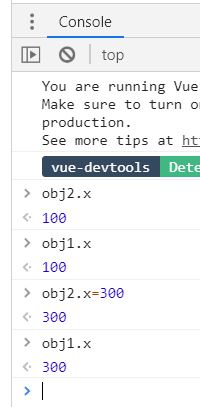
没有直接修改obj1的x属性,而是通过修改obj2的x属性来实现修改obj1的x属性的。
Vue中的数据代理
事件处理
简单点击使用v-on
<body>
    <div id="root">
       <button v-on:click="showInfo($event,'321')">点我</button>
    </div>

    <script>
        new Vue({
            el:'#root',
            data:{},
            methods:{
                showInfo(event,num){
                    alert('你好呀'+num);
                }
            }
        });
    </script>
</body>
showInfo( e v e n t , ′ 32 1 ′ ) , event,'321'), event,′321′),event是点击的事件,如果不写出来的话函数里即使你写了showInfo(event,num)参数你也是接收不到的

事件修饰符
@click.xx xx就是修饰符
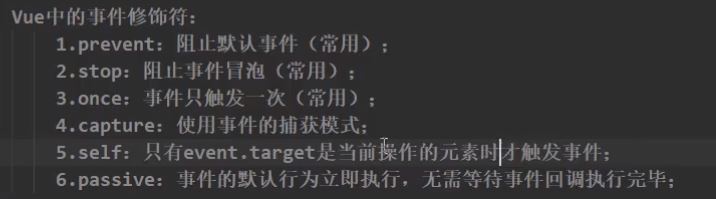
prevent
<body>
    <div id="root">
        <a href="http://www.baidu.com" @click='showInfo'>百度</a>
    </div>

    <script>
        new Vue({
            el:'#root',
            data:{},
            methods:{
                showInfo(){
                    alert('你好呀');
                }
            }
        });
    </script>
</body>
当我点击百度a标签时,会先执行showInfo()弹窗显示’你好呀’,当你关闭弹窗后,他会自动跳转到href属性的地址,也就是百度。如果不想他进行跳转,那就加个prevent修饰符阻止他的默认行为(即跳转页面)。
<a href="http://www.baidu.com" @click.prevent='showInfo'>百度</a>
stop
<div @click='showInfo1'>
        div1
        <div @click='showInfo2'>div2</div>
    </div>
像这种嵌套的情况,外层div有点击事件,内层div也有点击事件,那么当我点击div2时,就会先执行div2的点击事件showInfo2(),然后就冒泡上去,执行showInfo1的事件。如果想阻止冒泡的行为,在内层添加stop修饰符
<div @click='showInfo1'>
        div1
        <div @click.stop='showInfo2'>div2</div>
    </div>
once
比如1个按钮有点击事件,每点1次按钮就执行1次它的点击事件,但是我想只允许用户执行1次这个按钮的点击事件,后面无论点多少次都不执行这个按钮的点击事件了,这时就可以加once修饰符
<button @click.once='showInfo'>btn</button>
修饰符也可以连着用,如@click.prevent.stop,表示阻止默认行为并且停止冒泡
键盘事件
@keyup当按键弹起时,@keydown当按键按下时
<body>
    <div id="root">
        <input type="text" @keyup.enter='showInfo'>
    </div>

    <script>
        new Vue({
            el:'#root',
            data:{},
            methods:{
                showInfo(){
                    alert('你好呀');
                }
            }
        });
    </script>
</body>
@keyup.enter表示当按下回车键然后松手就执行事件
enter可以替换为其他按键:

如果想同时按下ctrl键和y键才执行事件,可以这样写:@keydown.ctrl.y
计算属性
<body>
    <div id="root">
        <input type="text" v-model="firstName"><br>
        <input type="text" v-model="lastName"><br>
        <span>{{fullName}}</span>
    </div>

    <script>
        new Vue({
            el:'#root',
            data:{
                firstName:"张",
                lastName:"三"
            },
            computed:{      //计算属性
                fullName:{
                    get(){
                        //此处的this指的是vm
                        return this.firstName+"-"+this.lastName;
                    },
                    set(value){
                        const arr = value.split('-');
                        this.firstName = arr[0];
                        this.lastName = arr[1];
                    }
                }
            }
        });
    </script>
</body>


简写方式
计算属性只是用来读取,不修改的情况下,才能简写
computed:{      //计算属性
	fullName:function(){
		//此处的this指的是vm
		return this.firstName+"-"+this.lastName;
	}
}
再简单点
computed:{      //计算属性
	fullName(){
		//此处的this指的是vm
		return this.firstName+"-"+this.lastName;
	}
}
监视属性
<body>
    <div id="root">
        <p>今天天气很{{info}}</p>
        <button @click="changeWeather">切换天气</button>
    </div>

    <script>
        const vm = new Vue({
            el:'#root',
            data:{
                isHot:true
            },
            methods: {
                changeWeather(){
                    this.isHot = !this.isHot;
                }
            },
            computed:{      //计算属性
                info(){
                        //此处的this指的是vm
                        return this.isHot ? '热':'冷'
                    }
            },
            watch:{     //监视属性
                isHot:{     //表示你要监视isHot属性
                    handler(newValue,oldValue){
                        console.log("isHot被修改","新的值"+newValue,"旧的值"+newValue)
                    }
                }
            }
        });

        /*监视属性的另一种写法
        vm.$watch('isHot',{
             handler(newValue,oldValue){
             	console.log("isHot被修改","新的值"+newValue,"旧的值"+newValue)
             }
        })
        */
    </script>
</body>


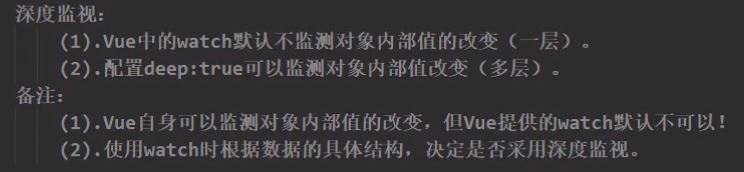
深度监视
<body>
    <div id="root">
        <p>今天天气很{{info}}</p>
        <button @click="changeWeather">切换天气</button>
    </div>

    <script>
        const vm = new Vue({
            el:'#root',
            data:{
                isHot:true,
                numbers:{
                    a:1,
                    b:2
                }
            },
            methods: {
                changeWeather(){
                    this.isHot = !this.isHot;
                }
            },
            computed:{      //计算属性
                info(){
                        //此处的this指的是vm
                        return this.isHot ? '热':'冷'
                    }
            },
            watch:{     //监视属性
                isHot:{     //表示你要监视isHot属性
                    handler(newValue,oldValue){
                        console.log("isHot被修改","新的值"+newValue,"旧的值"+newValue)
                    }
                },
                //监视多级结构中的某个属性的变化
                /*'numbers.a':{   //注意这里一定要用引号包围键
                    handler(){
                        console.log("a被改了");
                    }
                },*/
                //监视多级结构中的多个属性的变化
                numbers:{
                    deep:true,
                    handler(){
                        console.log("a被改了");
                    }
                }
            }
        });
    </script>
</body>
简写方式
<body>
    <div id="root">
        <p>今天天气很{{info}}</p>
        <button @click="changeWeather">切换天气</button>
    </div>

    <script>
        const vm = new Vue({
            el:'#root',
            data:{
                isHot:true
            },
            methods: {
                changeWeather(){
                    this.isHot = !this.isHot;
                }
            },
            computed:{      //计算属性
                info(){
                        //此处的this指的是vm
                        return this.isHot ? '热':'冷'
                    }
            },
            watch:{     //监视属性
                //一般写法
                isHot:{     //表示你要监视isHot属性
                    //immediate:true,
                    //deep:true,
                    handler(newValue,oldValue){
                        console.log("isHot被修改","新的值"+newValue,"旧的值"+newValue)
                    }
                },
                /*简写方法
                isHot(newValue,oldValue){
                    //这个函数就相当于handler()函数,这里函数名就是你要监视的属性名
                    console.log("isHot被修改","新的值"+newValue,"旧的值"+newValue)
                }*/
            }
        });
        /*vm.$watch一般写法
        vm.$watch('isHot',{
            immediate:true,
            deep:true,
            handler(newValue,oldValue){
                console.log("isHot被修改","新的值"+newValue,"旧的值"+newValue)
            }
        })
        */
       /*vm.$watch简单写法
        vm.$watch('isHot',(newValue,oldValue){
                console.log("isHot被修改","新的值"+newValue,"旧的值"+newValue)
            })
        */
    </script>
</body>
计算属性和监视属性的区别

绑定样式
绑定class样式方法1
<head>
    <script src="./js/vue.js"></script>
	<style>
        .normal{
            color: orange;
        }
    </style>
</head>
<body>
    <div id="root">
        <!-- 绑定样式方法1,字符串写法,适用于:样式的类名不确定,需要动态指定 -->
        <div class="basic" :class="mood">div</div>
    </div>

    <script>
        new Vue({
            el:'#root',
            data:{
                mood:'normal'
            }
        })
    </script>
</body>
绑定class样式方法2
<head>
    <script src="./js/vue.js"></script>
    <style>
        .normal{
            color: orange;
        }
        .boxborder{
            border: green 1px solid;
        }
    </style>
</head>
<body>
    <div id="root">
        <!-- 方法2,数组写法,适用于:要绑定的样式个数不确定、名字也不确定 -->
        <div class="basic" :class="arr">方法2</div>
    </div>

    <script>
        new Vue({
            el:'#root',
            data:{
                arr:['normal','boxborder']
            }
        })
    </script>
</body>
绑定class样式方法3
<head>
    <script src="./js/vue.js"></script>
    <style>
        .normal{
            color: orange;
        }
        .boxborder{
            border: green 1px solid;
        }
    </style>
</head>
<body>
    <div id="root">
        <!-- 方法3,对象写法,适用于:要绑定的样式个数确定、名字也确定,但要动态决定用不用 -->
        <div class="basic" :class="classObj">方法2</div>
    </div>

    <script>
        new Vue({
            el:'#root',
            data:{
                classObj:{
                    normal:true,	//true表示使用这个样式,false表示不用
                    boxborder:true
                }
            }
        })
    </script>
</body>
绑定style样式方法1
<body>
    <div id="root">
        <div class="basic" :style="styleObj">方法1</div>
    </div>

    <script>
        new Vue({
            el:'#root',
            data:{
                styleObj:{
                    fontSize:'40px'
                }
            }
        });
    </script>
</body>
绑定style样式方法2
<body>
    <div id="root">
        <div class="basic" :style="[styleObj1,styleObj2]">方法1</div>
    </div>

    <script>
        new Vue({
            el:'#root',
            data:{
                styleObj1:{
                    fontSize:'40px',
                    color:'green'
                },
                styleObj2:{
                    border:'blue 1px solid'
                }
            }
        });
    </script>
</body>
条件渲染
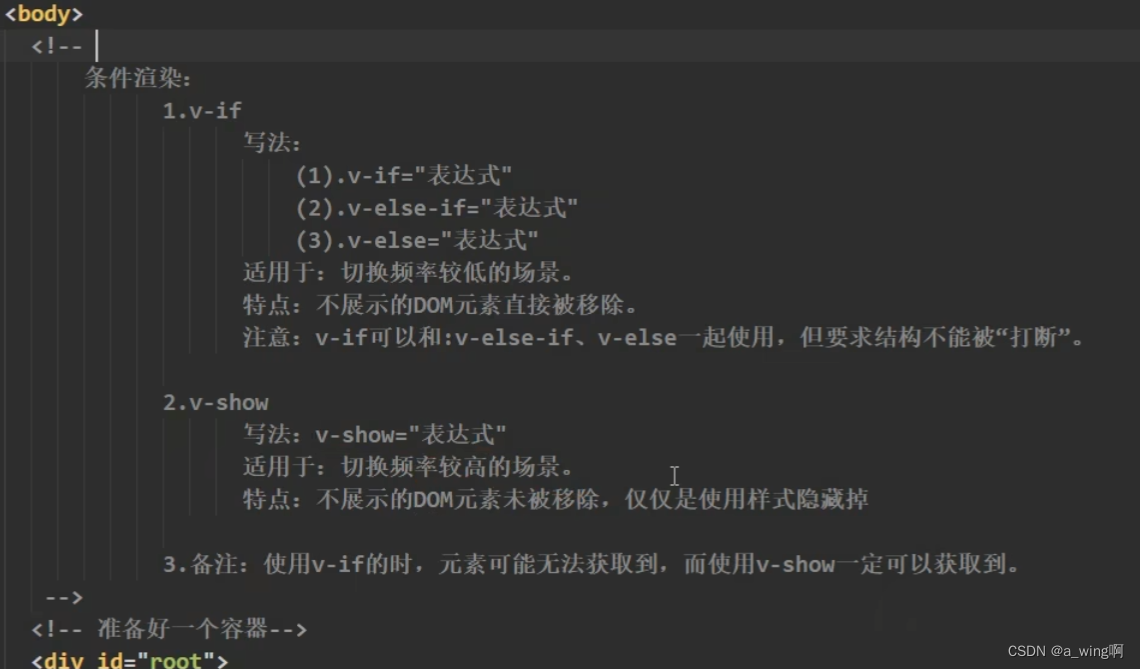

v-show其实就是控制标签的display:none属性,true就显示出来,false就隐藏(但是在浏览器上看DOM节点还在)
v-if true就显示出来,false就消除(在浏览器上看DOM节点不存在!)
<template>标签与v-if配合使用,v-if为true时,在页面上是没有<template>标签的,直接把<template>标签里面的内容显示出来,当v-if为false时,整个<template>标签包括里面的内容都消失(在浏览器上看DOM节点也是不存在的)
列表渲染

遍历数组
<body>
<div id="root">
<ul>
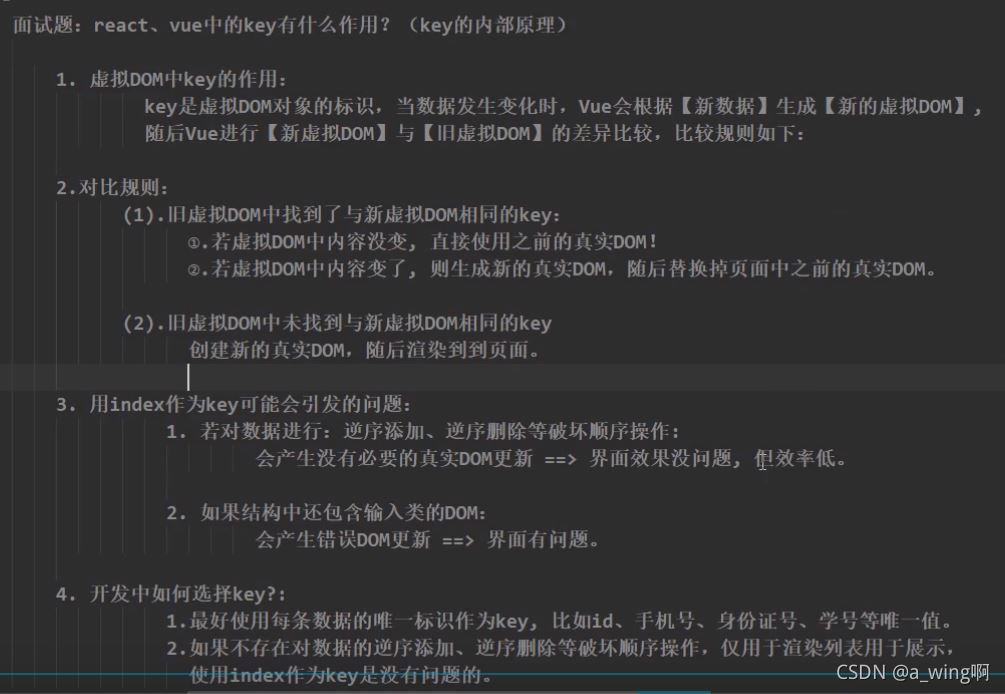
<!-- :key的值要是唯一的,所以这里取索引值index,其他的唯一值如p.id也可以
遍历数组
-->
<li v-for="(p,index) in persons" :key="index">
{{p.name}}-{{p.age}}
</li>
</ul>
</div>
<script>
new Vue({
el:'#root',
data:{
persons:[
{id:'01',name:'tom',age:18},
{id:'02',name:'mike',age:19},
{id:'03',name:'tony',age:20}
]
}
});
</script>
</body>
遍历对象
<body>
    <div id="root">
        <ul>
            <!-- 遍历对象-->
            <li v-for="(value,key) in car" :key="key">
                {{value}}-{{key}}
            </li>
        </ul>
    </div>

    <script>
        new Vue({
            el:'#root',
            data:{
                car:{
                    name:'波子',
                    price:'100W'
                }
            }
        });
    </script>
</body>
遍历字符串
<body>
    <div id="root">
        <ul>
            <!-- 遍历字符串-->
            <li v-for="(value,key) in str" :key="key">
                {{value}}-{{key}}
            </li>
        </ul>
    </div>

    <script>
        new Vue({
            el:'#root',
            data:{
                str:'hello'
            }
        });
    </script>
</body>
遍历指定次数
<ul>
    <!-- 遍历字符串-->
    <li v-for="(value,key) in 5" >
    <!-- 这里value从1开始,遍历5次即从1到5 -->
    {{value}}-{{key}}
    </li>
</ul>
key的原理
列表过滤
<body>
    <div id="root">
        <input type="text" v-model='keyword'>
        <ul>
            <li v-for="(p,key) in filterData" :key='p.id'>
                {{p.id}}-{{p.name}}-{{p.email}}
            </li>
        </ul>
    </div>

    <script>
        new Vue({
            el:'#root',
            data:{
                keyword:'',
                persons:[
                    {id:'001',name:'tony',email:'123@qq.com'},
                    {id:'002',name:'tom',email:'123@qq.com'},
                    {id:'003',name:'mike',email:'123@qq.com'}
                ]
            },
            computed:{
                filterData(){
                    return this.persons.filter((p)=>{
                        return p.name.indexOf(this.keyword)!==-1;
                    });
                }
            }
        });
    </script>
</body>
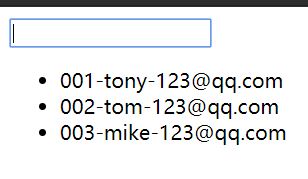
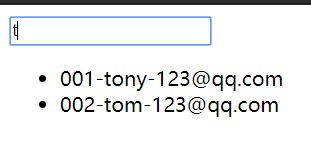
就类似模糊查询
列表排序
<body>
    <div id="root">
        <input type="text" v-model='keyword'>
        <button @click="sortType=0">原顺序</button>
        <button @click="sortType=1">降序</button>
        <button @click="sortType=2">升序</button>
        <ul>
            <li v-for="(p,key) in filterData" :key='p.id'>
                {{p.id}}-{{p.name}}-{{p.age}}
            </li>
        </ul>
    </div>

    <script>
        new Vue({
            el:'#root',
            data:{
                keyword:'',
                sortType:0,//0原顺序,1降序,2升序
                persons:[
                    {id:'001',name:'tony',age:35},
                    {id:'002',name:'tom',age:33},
                    {id:'003',name:'mike',age:66}
                ]
            },
            computed:{
                filterData(){
                    let arr = this.persons.filter((p)=>{
                        return p.name.indexOf(this.keyword)!==-1;
                    });
                    //判断是否需要排序
                    if(this.sortType){
                        arr.sort((p1,p2)=>{
                            return this.sortType == 1 ? p2.age-p1.age : p1.age-p2.age;
                        });
                    }
                    return arr;
                }
            }
        });
    </script>
</body>
数据监测

<body>
    <div id="root">
        <button @click="student.age++">年龄+1岁</button>
        <button @click="addSex">添加性别属性值,默认值:男</button>
        <button @click="student.sex= '未知' ">修改性别</button>
        <button @click="addFriend">在列表首位添加一个朋友</button>
        <button @click="updateFirstFriendName">修改第1个朋友的名字</button>
        <button @click="addHobby">添加一个爱好</button>
        <button @click="removeLearn">过滤掉爱好中的学习</button>
        <h3>姓名:{{student.name}}</h3>
        <h3>年龄:{{student.age}}</h3>
        <h3 v-show="student.sex">性别:{{student.sex}}</h3>
        <h3>爱好:</h3>
        <ul>
            <li v-for="(h,index) of student.hobby" :key="index">
                {{h}}
            </li>
        </ul>
        <h3>朋友:</h3>
        <ul>
            <li v-for="(f,index) of student.friends" :key="index">
                {{f.name}}--{{f.age}}
            </li>
        </ul>
    </div>

    <script>
        new Vue({
            el:'#root',
            data:{
                student:{
                    name:'tom',
                    age:18,
                    hobby:['跑步','打篮球'],
                    friends:[
                    {name:'tony',age:35},
                    {name:'tom',age:33},
                    {name:'mike',age:66}
                    ]
                }
            },
            methods:{
                addSex(){
                    //Vue.set(this,student,'sex','男'); //方法1
                    this.$set(this.student,'sex','男'); //方法2
                },
                addFriend(){

                    this.student.friends.unshift({name:'sarah',age:19});
                },
                updateFirstFriendName(){
                    this.student.friends[0].name = 'kk';
                },
                addHobby(){
                    this.student.hobby.push('学习')
                },
                updateHobby(){
                    //this.student.hobby.splice(0,1,'开车');    //方法1
                    //Vue.set(this.student.hobby,0,'开车');     //方法2
                    this.$set(this.student.hobby,0,'开车');     //方法3
                },
                removeLearn(){
                    this.student.hobby = this.student.hobby.filter((h)=>{
                        return h!== '学习';
                    });
                }
            }
        });
    </script>
</body>
收集表单数据

<body>
    <div id="root">
        <!-- @submit表单的提交事件,prevent阻止默认行为,即阻止表单点击提交后跳转页面 -->
        <form @submit.prevent="demoFunc">
            账号:<input type="text" v-model="userInfo.account"><br><br>
            密码:<input type="text" v-model="userInfo.password"><br><br>
            <!-- v-model.number作用:把输入值转为数字而不是字符串,如 age:30 而不是 age:'30' -->
            年龄:<input type="number" v-model.number="userInfo.age"><br><br>
            性别:
            <!-- 注意这里一定要加value -->
            男<input type="radio" name="sex" v-model="userInfo.sex" value="male">
            女<input type="radio" name="sex" v-model="userInfo.sex" value="female"><br><br>
            爱好:
            学习<input type="checkbox" v-model="userInfo.hobby" value="study">
            打游戏<input type="checkbox" v-model="userInfo.hobby" value="game">
            <br><br>
            所在城市
            <select v-model="userInfo.city">
                <option value="">请选择城市</option>
                <option value="guangzhou">广州</option>
                <option value="shenzhen">深圳</option>
            </select>
            <br><br>
            补充信息:
            <textarea v-model="userInfo.other"></textarea><br><br>
            <input type="checkbox" v-model="userInfo.agree">阅读并接受。。。
            <button>提交</button>
        </form>
    </div>
    <script>
        new Vue({
            el:"#root",
            data:{
                userInfo:{
                    account:'',
                    password:'',
                    age:18,
                    sex:'male',
                    hobby:[],
                    city:'',
                    other:'',
                    agree:''
                }
            },
            methods: {
                demoFunc(){
                    console.log("发送");
                }
            }
        })
    </script>
</body>
过滤器

<body>
    <div id="root">
        <h3>现在的时间:{{Date.now()}}</h3>
        <!-- 用过滤器格式化时间 |为管道符-->
        <!-- 这里timeFormater不写括号默认把|左边的值作为参数传入 -->
        <h3>格式化后:{{Date.now() | timeFormater}}</h3>
        <h3>格式化后(有参数):{{Date.now() | timeFormater('YYYY年MM月DD日')}}</h3>
        <h3>格式化后(有参数):{{Date.now() | timeFormater('YYYY年MM月DD日') | mySlice}}</h3>
    </div>
    <script>
        //设置全局过滤器,表示即使有多个Vue实例都能共同使用
        //filter第1个参数为过滤器名,第2个参数为过滤器的函数部分
        Vue.filter('mySlice',function(value){
            return value.slice(0,5);    //提取字符串,从第0个开始,到5之前
        });
        new Vue({
            el:"#root",
            data:{

            },
            filters:{   //这里都是局部过滤器,如果用另一个Vue实例是不能调用这些过滤器的
                //
                timeFormater(value,format="YYYY-MM-DD HH:mm:ss"){
                    return dayjs(value).format(format);
                }
            }
        })
    </script>
</body>

v-text

<body>
    <div id="root">
        <div v-text="name"></div>
    </div>
    <script>
        new Vue({
            el:"#root",
            data:{
                name:'jack'
            },
        })
    </script>
</body>
注意,如果这里的name包含html标签,如name=‘<h3>hello</h3>’,vue是不会解析的,只会把整个’<h3>hello</h3>'当作字符串显示出来
v-html
这个指令就能把html标签也解析出来
<body>
    <div id="root">
        <div v-html="name"></div>
    </div>
    <script>

        new Vue({
            el:"#root",
            data:{
                name:'<h1>321</h1>'
            },
        })
    </script>
</body>

v-cloak
<head>
    <meta charset="UTF-8">
    <meta http-equiv="X-UA-Compatible" content="IE=edge">
    <meta name="viewport" content="width=device-width, initial-scale=1.0">
    <script src="./js/vue.js"></script>
    <style>
        [v-cloak]{
            display: none;
        }
    </style>
    <title>Document</title>
</head>
<body>
    <div id="root">
        <div v-cloak>{{name}}</div>
    </div>
    <script>

        new Vue({
            el:"#root",
            data:{
                name:'123'
            },
        })
    </script>
</body>

场景:网络很慢时,vue.js文件还没加载完,在页面上直接显示’{{name}}'这么个东西用户看起来感觉很怪,只有当vue.js加载完,{{name}}才会变为它的值123。
为了避免用户看起来感觉很怪可以配合css[v-cloak]{display: none;},这样即使vue.js文件还没加载完,页面上也不会出现{{name}}这个东西
v-once

<body>
    <div id="root">
        <div v-once>{{n}}</div>
        <div>{{n}}</div>
        <button @click="n++">点击n+1</button>
    </div>
    <script>

        new Vue({
            el:"#root",
            data:{
                n:1
            },
        })
    </script>
</body>
v-once就是标签里的数据第一次渲染后就不会再变的了
v-pre

<body>
    <div id="root">
        <div v-pre>{{n}}</div>
        <div>{{n}}</div>
        <button @click="n++">点击n+1</button>
    </div>
    <script>

        new Vue({
            el:"#root",
            data:{
                n:1
            },
        })
    </script>
</body>

把v-pre指令用在有Vue语法的标签里,那么这个标签里的内容Vue不会进行解析
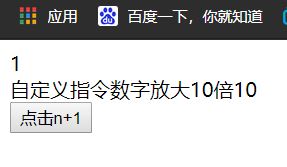
自定义指令
<body>
    <div id="root">
        <div>{{n}}</div>
        <div >自定义指令数字放大10倍<span v-big="n"></span></div>
        <button @click="n++">点击n+1</button>
    </div>
    <script>

        new Vue({
            el:"#root",
            data:{
                n:1
            },
            directives:{
                //函数何时被调用?
                //1.指令与元素成功绑定时(一打开页面)2.指令所在模板被重新解析时
                big(element,binding){
                    element.innerText=binding.value*10;
                }
            }
        })
    </script>
</body>
对象写法
<body>
    <div id="root">
        <div>{{n}}</div>
        <div >自定义指令数字放大10倍<span v-big="n"></span></div>
        <button @click="n++">点击n+1</button>
        <input v-fbind:value="n">
    </div>
    <script>

        new Vue({
            el:"#root",
            data:{
                n:1
            },
            directives:{
                //函数何时被调用?
                //1.指令与元素成功绑定时(一打开页面)2.指令所在模板被重新解析时
                big(element,binding){
                    element.innerText=binding.value*10;
                },
                fbind:{
                    //方法何时被调用?
                    //指令与元素成功绑定时(一打开页面)
                    bind(element,binding){
                        console.log("bind"+this);	//注意,这里的this是window
                        element.value=binding.value;
                    },
                    //指令所在元素被插入页面时
                    inserted(element,binding){
                        element.focus()//元素获取焦点
                    },
                    //指令所在模板被重新解析时
                    update(element,binding){
                        element.value=binding.value;
                        element.focus()
                    }
                }
            }
        })
    </script>
</body>

一刷新页面或点击n+1按钮,自动把焦点放到输入框里
指令名由多个单词组成时用-隔开
<div v-big-number="n"></div>	<!--不要用驼峰式命名,就是不要命名为bigNumber,要用-隔开-->
<!--...-->
<script>

        new Vue({
            el:"#root",
            data:{
                n:1
            },
            directives:{
                //名字里有-用''包围
                'big-number'(element,binding){
                    element.innerText=binding.value*10;
                },
            }
        })
    </script>
自定义指令都是局部的,如果其他Vue对象是无法调用我的自定义指令的,当自定义指令变为全局的自定义指令时才能让多个Vue对象使用:
//设置全局的自定义指令方法1
        Vue.directive('big',function(element,binding){
                    element.innerText=binding.value*10;
        });

        //设置全局的自定义指令方法2
        Vue.directive('fbind',{
                    bind(element,binding){
                        element.value=binding.value;
                    },
                    inserted(element,binding){
                        element.focus()//元素获取焦点
                    },
                    update(element,binding){
                        element.value=binding.value;
                        element.focus()
                    }
                });

生命周期


<script>

        new Vue({
            el: "#root",
            data: {
                n: 1
            },
            beforeCreate() {
            },
            created() {
            },
            beforeMount() {
            },
            //Vue完成模板解析并把初始的真实DOM放入页面后(挂载完毕)调用mounted
            mounted() {
                //挂载
            },
            beforeUpdate() {
            },
            updated() {
            },
            beforeDestroy() {//这里可以做一些收尾工作
            },
            destroyed() {
            },
        })
    </script>

组件
非单文件组件

<body>
    <div id="root">
        <school></school>
        <student></student>
    </div>
    <script>
        //创建组件
        const mySchool = Vue.extend({
            template:`
            <div>
                <h2>学校名:{{schoolName}}</h2>
                <h2>地址:{{address}}</h2>
            </div>
            `,
            data(){     //data一定要写成函数的形式
                return{
                    schoolName:'GGS',
                    address:'佛山'
                }
            }
        });
        const myStudent = Vue.extend({
            template:`
            <div>
                <h2>学生名:{{studentName}}</h2>
                <h2>年龄{{age}}</h2>
            </div>
            `,
            data(){
                return{
                    studentName:'张三',
                    age:18
                }
            }
        });
        //全局注册的方式注册mySchool,这让即使在一个id为root2的容器里也能用这个组件
        Vue.component('student',mySchool);//第1个参数是名字,第2个参数是哪个组件
        new Vue({
            el: "#root",
            components:{
                //注册组件(局部注册),只能在id为root的容器里使用
                school:mySchool,//这一行直接写mySchool也可以,但是上面的标签也要改为mySchool
                //student:myStudent
            }
        })
    </script>
</body>

组件嵌套

<body>
    <div id="root">
    </div>
    <script>
        const student = Vue.extend({
            template:`
            <div>
                <h2>学生名:{{studentName}}</h2>
                <h2>年龄{{age}}</h2>
            </div>
            `,
            data(){
                return{
                    studentName:'张三',
                    age:18
                }
            }
        });
        //创建组件
        const school = Vue.extend({
            template:`
            <div>
                <h2>学校名:{{schoolName}}</h2>
                <h2>地址:{{address}}</h2>
                <student></student>
            </div>
            `,
            data(){
                return{
                    schoolName:'GGS',
                    address:'佛山'
                }
            },
            components:{
                student
            }
        });

        const app = Vue.extend({
            template:`<school></school>`,
            components:{
                school
            }
        })
        new Vue({
            el: "#root",
            template:`<app></app>`,
            components:{
               app
            }
        })
    </script>
</body>

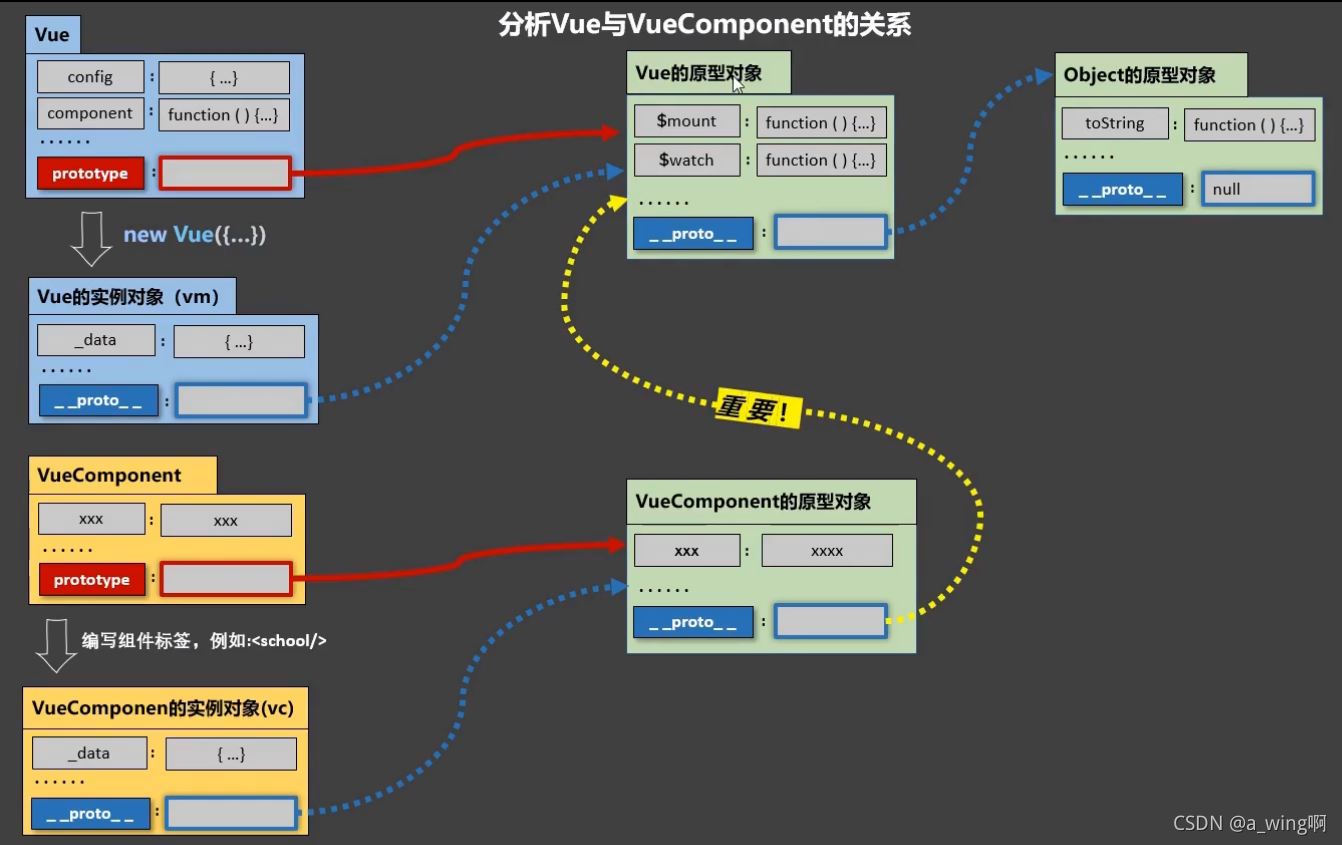
VueComponent构造函数
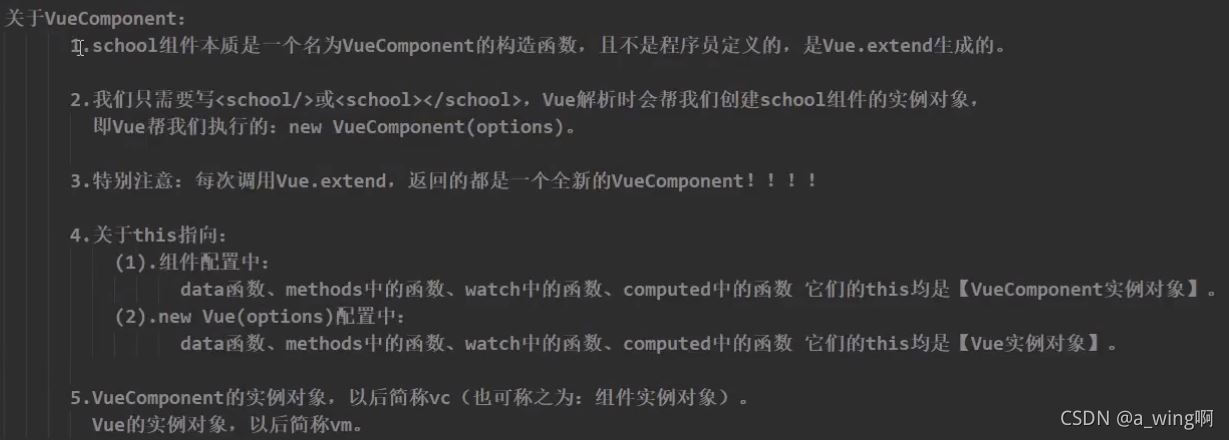
Vue和VueComponent的关系

注意:在JS里,实例对象的__proto__属性指向缔造者的原型对象。
如下方的:Vue的实例对象(vm)的__proto__属性指向缔造者(Vue,即图中左上角蓝色块)的原型对象(Vue的原型对象,即图中间最上方的绿色块)。
单文件组件
目录
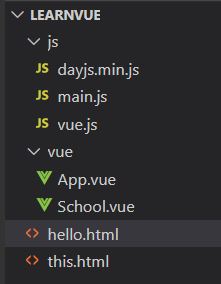
School.vue
<template>
  <!-- 写html -->
  <!-- template里必须要有1个根结点 -->
  <div>
      <h3>{{name}}</h3>
  </div>
</template>

<script>//写js
export default {    //一般是这样写暴露出去
    name:'School',   //一般与文件名相同
    data(){
        return{
            name:'GGS'
        }
    }
}
</script>

<style>
/* 写css样式 */
</style>
App.vue
<template>
    <div>
        <School></School>
    </div>
</template>

<script>
import School from './School.vue'

export default {
    name:'App',
    components:{
        School
    }
}
</script>

<style>

</style>
main.js
import App from '../vue/App.vue'

new Vue({
    el:'#root',
    template:`<App></App>`,
    components:{
        App
    }
})
hello.html
<body>
    <div id="root">
    </div>
    <script src="./js/vue.js"></script>
    <script src="./js/main.js"></script>
</body>
脚手架
安装
首先安装node.js,我安装16.4版本后,安装vue脚手架出现问题安装失败,改为12.22版本就可以。 安装过程有个选项问是否安装python和C++工具,感觉打钩会比较好,因为之前16.4版安装脚手架时的报错就出现了python和C++的字眼,可能跟他们关。
安装node.js后切换国内镜像源加快下载速度
npm config set registry https://registry.npm.taobao.org
全局安装方式,安装脚手架
npm install -g @vue/cli
创建项目
vue create 项目名
然后会让你选择vue版本,选择自己对应的
运行项目
npm run serve
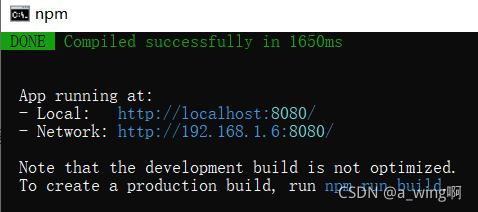
浏览器打开输入地址http://localhost:8080/

出现以上画面说明成功。停止项目就在cmd窗口按键盘ctrl+c停止。
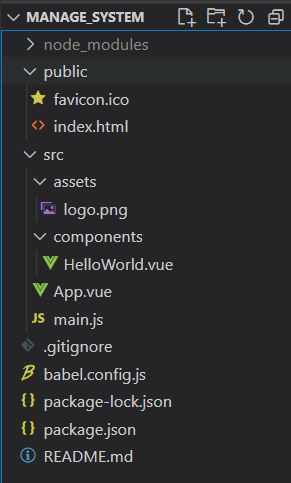
目录文件

脚手架相关


项目根目录下创建vue.config.js文件,可以做一些配置
module.exports = {
    // 选项...
    lintOnSave: false,   //关闭语法检查
    devServer:{
      port:8081 // 启动端口号
    }
  }
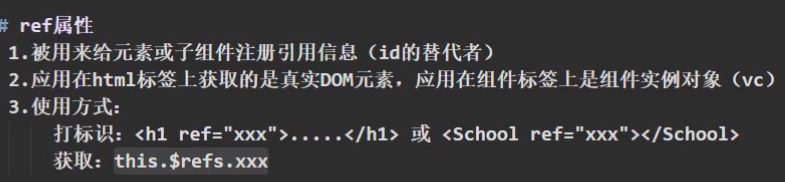
ref属性
与html标签里的id属性差不多

School.vue
<template>
  <!-- 写html -->
  <!-- template里必须要有1个根结点 -->
  <div>
      <h3>{{name}}</h3>
  </div>
</template>

<script>//写js
export default {    //一般是这样写暴露出去
    name:'School',   //一般与文件名相同
    data(){
        return{
            name:'GGS'
        }
    }
}
</script>

<style>
/* 写css样式 */
</style>
App.vue
<template>
  <div id="app">
    <img alt="Vue logo" src="./assets/logo.png">
    <HelloWorld msg="Welcome to Your Vue.js App"/>
    <School ref="school"></School>
    <span ref="title" v-text='msg'></span>
    <button @click="printDOM">点击打印DOM</button>
  </div>
</template>

<script>
import HelloWorld from './components/HelloWorld.vue'
import School from './components/School.vue'

export default {
  name: 'App',
  components: {
    HelloWorld,
    School
  },
  data(){
    return{
      msg:'你好呀'
    }
  },
  methods: {
    printDOM(){
      console.log(this.$refs.title) //真实DOM
      console.log(this.$refs.school)  //School组件的实例对象
    }
  },
}
</script>

<style>
/*一些默认的样式*/
</style>
其他文件默认,运行后点击打印DOM按钮

props配置项

App.vue
<template>
  <div id="app">
    <!-- 这里写:num='18',这样传递的就是数字18,而不是字符串'18' -->
    <School ref="school" name='GGS' address='guangdong' ></School>
    <span ref="title" v-text='msg'></span>
    <button @click="printDOM">点击打印DOM</button>
  </div>
</template>

<script>
import HelloWorld from './components/HelloWorld.vue'
import School from './components/School.vue'

export default {
  name: 'App',
  components: {
    HelloWorld,
    School
  },
  data(){
    return{
      msg:'你好呀'
    }
  },
  methods: {
    printDOM(){
      console.log(this.$refs.title) //真实DOM
      console.log(this.$refs.school)  //School组件的实例对象
    }
  },
}
</script>
School.vue
<template>
  <div>
      <h3>{{haha}}</h3>
      <h3>接收标签传来的属性</h3>
      <div>{{name}}</div>
      <div>{{address}}</div>
      <div>{{num}}</div>
  </div>
</template>

<script>//写js
export default {    //一般是这样写暴露出去
    name:'School',   //一般与文件名相同
    data(){
        return{
            haha:'哈哈'
        }
    },
    //项目运行时先接收props,再创建上方的data(){...}
    //简单接收标签里的属性
    //props:['name','address','num']

    //接收的同时对数据进行类型限制
    /* props:{
        name:String,
        address:String,
        num:Number
    } */

    //接收的同时对数据进行类型限制+默认值的指定+必要性的限制
    props:{
        name:{
            type:String,
            required:true   //name属性是必须要传过来的
        },
        address:{
            type:String
        },
        num:{
            type:Number,
            default:28		//没传过来就用默认值
        }
    }
}
</script>

<style>
/* 写css样式 */
</style>
mixin(翻译为混入)配置项
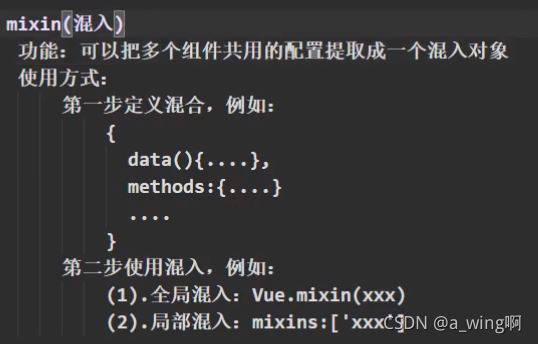
创建一个js文件,随意命名,里面可以存放一些可以多个组件通用的东西
//mixin.js
export const mixFunc = {
    methods: {
        showHello(){
            alert("你好呀~~~")
        }
    },
    data(){
        return {
            x:100
        }
    }
}
注意,这里的data有个x:100,如果引入mixin混入对象的组件里的data也有x(如x:200),那么以组件里的优先。(组件里的x不会变为100)
然后在需要用到这些通用东西的组件里进行引入(这种是局部引入):
School.vue
template>
  <div>
      <h3>{{haha}}</h3>
      <button @click="showHello">alertHello</button>
  </div>
</template>

<script>
import {mixFunc} from '../mixin'    //1.引入
export default {
    name:'School',
    data(){
        return{
            haha:'哈哈'
        }
    },
    mixins:[mixFunc]    //2.在mixins配置项里再写一次
}
</script>

<style>
</style>
全局引入:
在main.js里面导入mixin配置项:
import Vue from 'vue'
import App from './App.vue'
import {mixFunc} from './mixin' //1.导入

Vue.config.productionTip = false
Vue.mixin(mixFunc)  //2.全局配置
new Vue({
  render: h => h(App),
}).$mount('#app')
这样就不用在组件里面写mixin相关的配置了,全局引入导致项目里所有的VueComponent实例和Vue实例都拥有了mixin.js里的东西
插件

创建js文件,随意命名
export default {
    install(){
        console.log('plugin hello')
    }
}
main.js
import Vue from 'vue'
import App from './App.vue'
import plugins from './plugins'  //1.导入

Vue.config.productionTip = false
Vue.use(plugins)  //2.应用插件
new Vue({
  render: h => h(App),
}).$mount('#app')
scoped样式

每个组件里写的样式,最终都会汇总到一起的。这就有个问题,如果组件1写了个.test{}的样式,组件2也写了个.test{}的样式,这样名字重复了,就会导致最后导入到Vue的那个组件里的样式会覆盖其他重名的样式。
为了避免重名,可以在<style>标签内添加scoped,这样写的样式只给当前的文件用
注意,如果在App.vue里写样式,如.test{color:blue},那么导入到App.vue里的组件如果有用到 class=‘test’,那么就会应用App.vue的样式,所有字变为蓝色。为了避免错乱,在<style>标签内添加scoped,各管各的,互不干扰。
TodoList案例总结

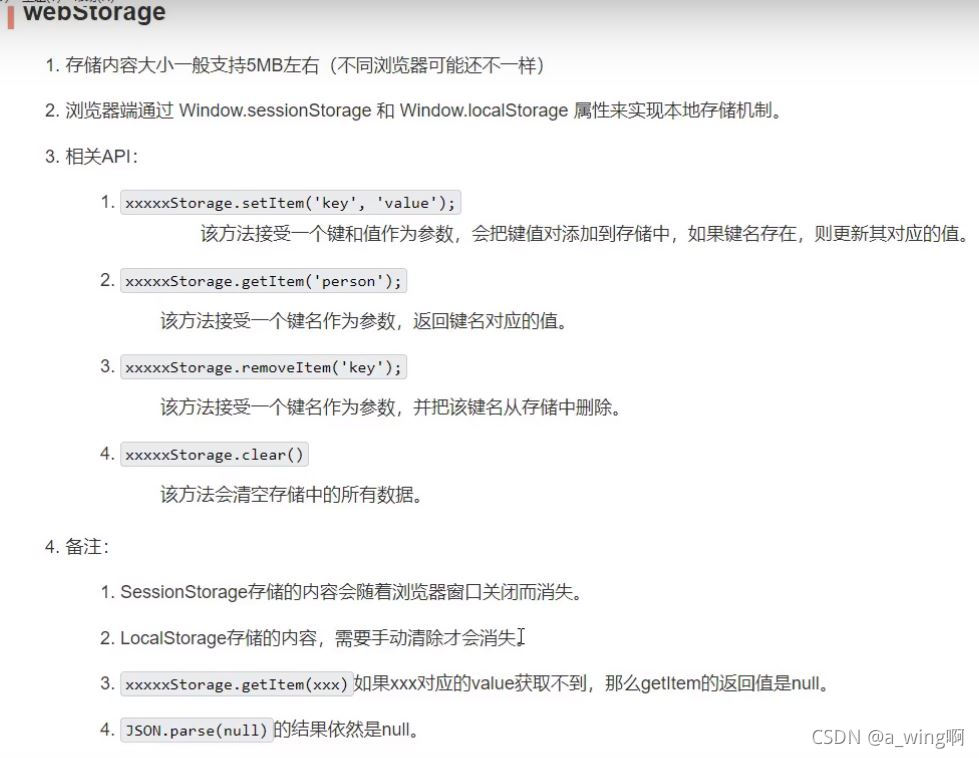
浏览器存储
localStorage
关闭浏览器也不会清除,除非手动清除了浏览器的缓存之类的数据
localStorage.setItem(key,value);	//存储,value不论什么类型的值都会转为字符串存储
localStorage.getItem(key);		//获取
localStorage.removeItem(key);	//移除
localStorage.clear();		//清空
sessionStorage
关闭浏览器会清除
sessionStorage.setItem(key,value);	//存储,value不论什么类型的值都会转为字符串存储
sessionStorage.getItem(key);		//获取
sessionStorage.removeItem(key);	//移除
sessionStorage.clear();		//清空
localStorage和sessionStorage统称webStorage
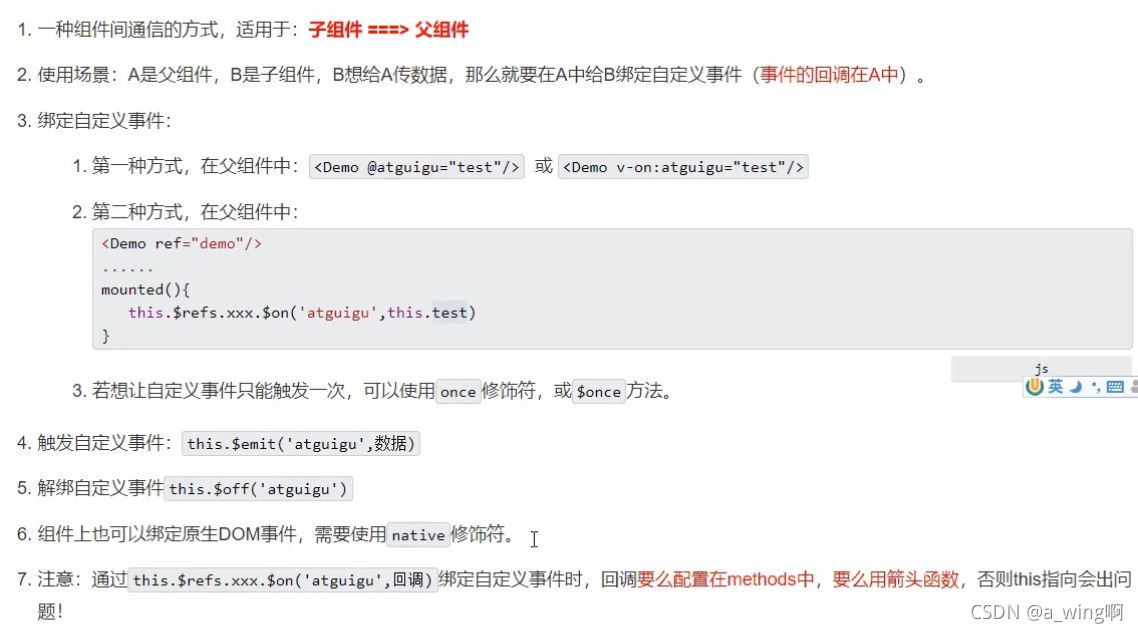
自定义事件
App.vue
<template>
  <div id="app">
    <!-- 1.给School组件绑定自定义事件showMsg 用v-on或@-->
    <!-- <School v-on:showMsg='getMsg'></School> -->

    <!-- 给School组件绑定自定义事件showMsg方式2 -->
    <School ref="school"></School>
  </div>
</template>

<script>
import School from './components/School.vue'

export default {
  name: 'App',
  components: {
    School
  },
  methods: {
    //2.创建方法接收数据
    getMsg(msg){
      console.log('App接收到:'+msg);
    }
  },
  mounted(){
    //绑定自定义事件方式2
    this.$refs.school.$on('showMsg',this.getMsg);
    //this.$refs.school.$once('showMsg',this.getMsg);   //只触发1次
  }
}
</script>
School.vue
<template>
  <div>
      <h3>School,{{haha}}</h3>
      <!-- 3.用按钮来演示 -->
      《<button @click="diyEvent">启动自定义事件</button>
  </div>
</template>

<script>
export default {
    name:'School',
    data(){
        return{
            haha:'哈哈',
            sayHello:'你好~'
        }
    },
    methods: {
        diyEvent(){
            //4.触发自定义事件并传递数据this.sayHello
            this.$emit('showMsg',this.sayHello);
        }
    },
}
</script>
解绑自定义事件
this.$off('showMsg')    //解绑1个自定义事件
//this.$off(['showMsg','abc'])    //解绑多个自定义事件
//this.$off()    //解绑所有自定义事件
全局总线

main.js
import Vue from 'vue'
import App from './App.vue'

Vue.config.productionTip = false
new Vue({
  render: h => h(App),
  beforeCreate(){
    Vue.prototype.$bus = this //1.安装全局事件总线
  }
}).$mount('#app')
App.vue
<template>
  <div id="app">
    <School></School>
  </div>
</template>

<script>
import School from './components/School.vue'

export default {
  name: 'App',
  components: {
    School
  },
  methods: {
    //2.创建方法接收数据
    getMsg(msg){
      console.log('App接收到:'+msg);
    }
  },
  mounted(){
    //3.给全局总线绑定事件
    this.$bus.$on('showMsg',this.getMsg);
  },
  beforeDestroy(){
    //5.这个组件销毁前把全局总线里自己定义的事件解绑
    //(组件都销毁了,那他绑定的事件自然也没用了,所以解绑)
    this.$bus.$off('showMsg');
  }
}
</script>
School.vue
<template>
  <div>
      <h3>School,{{haha}}</h3>
      <button @click="diyEvent">启动自定义事件</button>
  </div>
</template>

<script>
export default {
    name:'School',
    data(){
        return{
            haha:'哈哈',
            sayHello:'你好~'
        }
    },
    methods: {
        diyEvent(){
            //4.触发自定义事件并传递数据this.sayHello
            this.$bus.$emit('showMsg',this.sayHello);
        }
    },

}
</script>
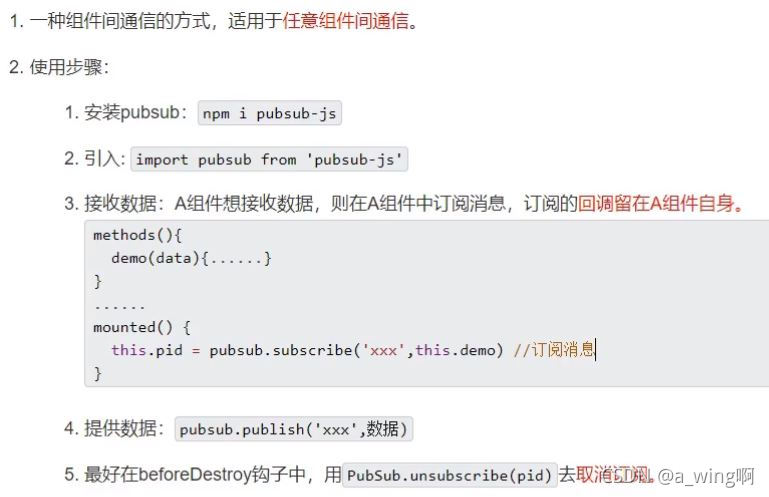
消息订阅与发布
利用一个插件也能实现任意组件间通信
App.vue
<template>
  <div id="app">
    <School></School>
  </div>
</template>

<script>
import School from './components/School.vue'
import pubsub from 'pubsub-js'

export default {
  name: 'App',
  components: {
    School
  },
  methods: {
    //1.创建方法接收数据
    getMsg(msgName,data){
      console.log('App接收到:'+data);
    }
  },
  mounted(){
    //2.订阅消息
    this.pid = pubsub.subscribe('showMsg',this.getMsg);
  },
  beforeDestroy(){
      pubsub.unsubscribe(this.pid)
  }
}
</script>
School.vue
<template>
  <div>
      <h3>School,{{haha}}</h3>
      <button @click="diyEvent">启动自定义事件</button>
  </div>
</template>

<script>
import pubsub from 'pubsub-js'

export default {
    name:'School',
    data(){
        return{
            haha:'哈哈',
            sayHello:'你好~'
        }
    },
    methods: {
        diyEvent(){
            //3.发布消息
            pubsub.publish('showMsg',this.sayHello);
        }
    },

}
</script>
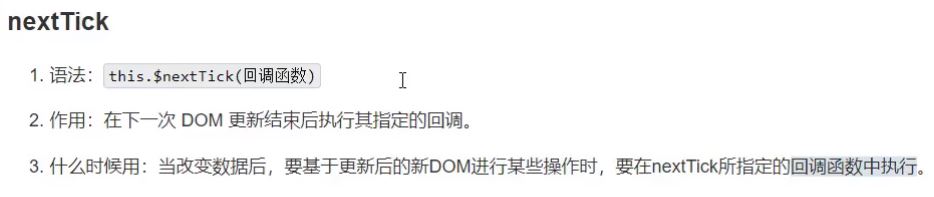
nextTick
动画效果
<template>
  <div id="app">
    <button @click="isShow = !isShow">显示/隐藏</button>
    <!-- 显示到页面时<transition>标签会删除的,只保留里面的内容 -->
      <!-- vue动画效果利用<transition>标签 -->
    <transition>
      <h2 v-show="isShow">动画滑块</h2>
    </transition>
  </div>
</template>

<script>

export default {
  name: 'App',
  data(){
    return {
      isShow:true
    }
  }

}
</script>

<style>
  h2{background-color: rgb(19, 111, 185);}
  /*
  如果<transition name='abc'>标签里面有name属性,那么下面样式命名开头的v改为name的值
  v-enter-active这种是vue规定的命名
  */
  .v-enter-active{
    animation: aaa 1s;
  }
  .v-leave-active{
    animation: aaa 1s reverse;
  }

  @keyframes aaa{
    from{
      transform: translateX(-100%);
    }
    to{
      transform: translateX(0px);
    }
  }
</style>

滑块可以向左移动隐藏和向右移动出现
过渡效果
<template>
  <div id="app">
    <button @click="isShow = !isShow">显示/隐藏</button>
     <!--如果transition表里里有多个子标签,把<transition>替换为<transition-group>-->
    <transition name="hello" appear>
      <h2 v-show="isShow">动画滑块</h2>
    </transition>
  </div>
</template>

<script>
export default {
  name: 'App',
  data(){
    return {
      isShow:true
    }
  }
}
</script>

<style>
  h2{background-color: rgb(19, 111, 185);}
  /* 进入的起点,离开的终点 */
  .hello-enter,.hello-leave-to{
    transform:translateX(-100%);
  }
  /* 进入的过程,离开的过程 */
  .hello-enter-active,.hello-leave-active{
    transition: 0.5s linear;
  }
  /* 进入的终点,离开的起点 */
  .hello-enter-to,hello-leave{
    transform: translateX(0);
  }
</style>
与动画效果一样,写法不同
第三方动画库
以Animate.css为例,具体参考官网:https://animate.style/
安装
npm install animate.css
<template>
  <div id="app">
    <button @click="isShow = !isShow">显示/隐藏</button>

    <transition name="animate__animated animate__bounce" appear
    enter-active-class="animate__backInDown" leave-active-class="animate__rubberBand">
      <h2 v-show="isShow">动画滑块</h2>
    </transition>
  </div>
</template>

<script>
import 'animate.css'  //1.引入

export default {
  name: 'App',
  data(){
    return {
      isShow:true
    }
  }
}
</script>

<style>
  h2{background-color: rgb(19, 111, 185);}
</style>


配置代理
解决跨域问题,也可以用nginx,这里用vue自带的


引入css资源的技巧
在public文件夹里创建css文件夹,再把css文件放进css文件夹,然后在index.html中引入,注意路径写法,这样就能生效了。
slot插槽
默认插槽
App.vue
<template>
  <div id="app">
    <School>abb</School>
  </div>
</template>

<script>
import School from './components/School.vue'

export default {
  name: 'App',
  components:{School}
}
</script>
School.vue
<template>
  <div>
      <h3>School,{{haha}}</h3>
      <!--如果调用School的人没有传东西就显示这句话-->
      <slot>slot默认值666</slot>
  </div>
</template>

<script>

export default {
    name:'School',
    data(){
        return{
            haha:'哈哈'
        }
    },
}
</script>

如果<School>abb</School>里没有内容,即<School></School>,就会把<slot>slot默认值666</slot>的内容放到
<School></School>里,即<School>slot默认值666</School>
插槽命名
School.vue
<template>
  <div>
      <h3>School,{{haha}}</h3>
      <slot name="sl1">slot默认值,如果调用School的人没有传东西就显示这句话1</slot>
      <slot name="sl2">slot默认值,如果调用School的人没有传东西就显示这句话2</slot>
      <slot name="sl3">slot默认值,如果调用School的人没有传东西就显示这句话3</slot>
  </div>
</template>

<script>

export default {
    name:'School',
    data(){
        return{
            haha:'哈哈'
        }
    },
}
</script>
App.vue
<template>
  <div id="app">
    <School>
      <h3 slot="sl1">插槽1</h3>
      <h3 slot="sl2">插槽2</h3>
      <!-- 插槽另一种用法,配合<template></template> -->
      <template v-slot:sl3>
        <h3>插槽3</h3>
      </template>
    </School>
  </div>
</template>

<script>
import School from './components/School.vue'

export default {
  name: 'App',
  components:{School}
}
</script>

作用域插槽
School.vue
<template>
  <div>
      <h3>School,{{haha}}</h3>
      <slot :childData='games'>slot默认值,如果调用School的人没有传东西就显示这句话1</slot>
  </div>
</template>

<script>

export default {
    name:'School',
    data(){
        return{
            haha:'哈哈',
            games:['cs','cf']
        }
    },
}
</script>
App.vue
<template>
  <div id="app">
    <School>
      <template scope="childData">
        {{childData}}
        <ul>
          <li v-for="(g,index) in childData.childData" :key='index'>{{g}}</li>
        </ul>
      </template>
    </School>
  </div>
</template>

<script>
import School from './components/School.vue'

export default {
  name: 'App',
  components:{School},
}
</script>


Vuex
概念
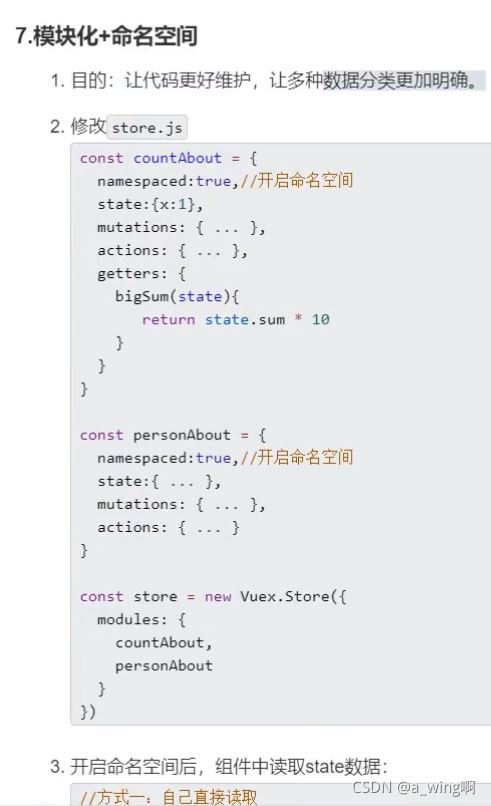
专门在Vue中实现集中式状态(或者叫数据)管理的一个Vue插件,对Vue应用中多个组件的共享状态进行集中式的管理(读/写),也是一种组件间通信的方式,且适用于任意组件间通信。
什么时候用
1.多个组件依赖于同一状态(数据)
2.在多个组件中,需要对同一状态(数据)进行变更
全局总线和Vuex的对比:

全局总线:B想获取A的中的x数据,那就在B中绑定一个getX事件,A用$emit调用getX事件并把x数据传递过去。但是如果很多个组件都想获取x数据或者修改x数据,那就要写很多这种绑定事件的代码,容易混乱。

Vuex:多个组件都用到的x数据放在Vuex里集中管理,这样会比较好。
执行过程

Vuex里的3个东西:
Actions:动作
Mutation:变化
State:状态,里面放的就是多个组件都用到的数据
这3个都是对象
在图里,State里保存了1个sum数据,值为0,Vue组件想对这个数增加2,就调用dispatch(‘jia’,2),Actions里有一个对应的键jia,值为一个函数,这个函数能收到增加的数字2,在这个函数里调用commit(‘jia’,2),Mutations里也有个对应的键jia,值为函数,在这个函数里能收到两个参数,state(就是图里紫色圈State对象),和数字2,在这个函数里才是正在执行了加法state.sum += 2,现在sum的值变为2了,就会重新把2渲染到组件里面显示了。
和Actions连接的Backend API(后端接口)意思是:我想对sum的值执行加法,但是加多少我不知道,让Actions请求后端接口,后端接口告诉Actions要加5,那下一步就是comit(‘jia’,5)了。

以饭店举例子,Vue组件是客人,Actions是服务员,Mutations是后厨。客人说想要1碗炒饭(dispatch(‘rice’,1)),服务员记下来,去跟后厨说要1碗炒饭(commit(‘rice’,1)),后厨收到了,就真的开始做炒饭了(对数据进行处理),做好了就交给客人(渲染到组件上)。
这里服务员的角色有点多余,客人跟服务员说要1碗炒饭,和客人直接跟后厨说要1碗炒饭,效果是一样的。在Vue里也是可以跳过Actions直接与Mutation进行交互的。

Actions,Mutations,State这3个对象有store进行管理,执行方法调用时也是类似store.dispatch()这样使用。
使用
提示:在js文件中,import语句无论写在第几行,vue都会自动把所有import语句汇总到最上方。
安装Vuex:
npm i vuex


//读取vuex中的数据:
this.$store.state.xxx
//修改vuex中的数据:
this.$store.dispatch('action中的方法',数据)


路由


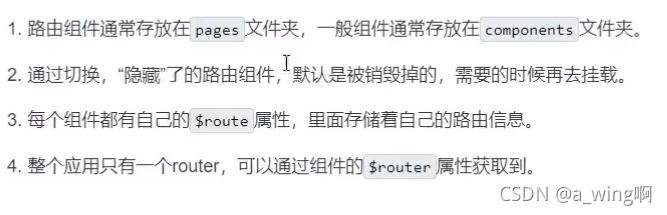
简单实例
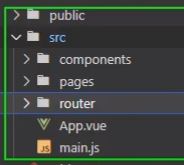
目录

main.js
import Vue from 'vue'
import App from './App.vue'
import VueRouter from 'vue-router'
import router from './router/index'

Vue.use(VueRouter)
Vue.config.productionTip = false
new Vue({
  render: h => h(App),
  router:router
}).$mount('#app')
src/router/index.js
//用于创建整个项目的路由器
import VueRouter from "vue-router";
import School from '../components/School.vue'
import Student from '../components/Student.vue'

//创建1个路由
export default new VueRouter({
    //配置路由
    routes:[
        {
            path:'/school', //请求路径
            component:School
        },
        {
            path:'/student',
            component:Student
        }
    ]
})
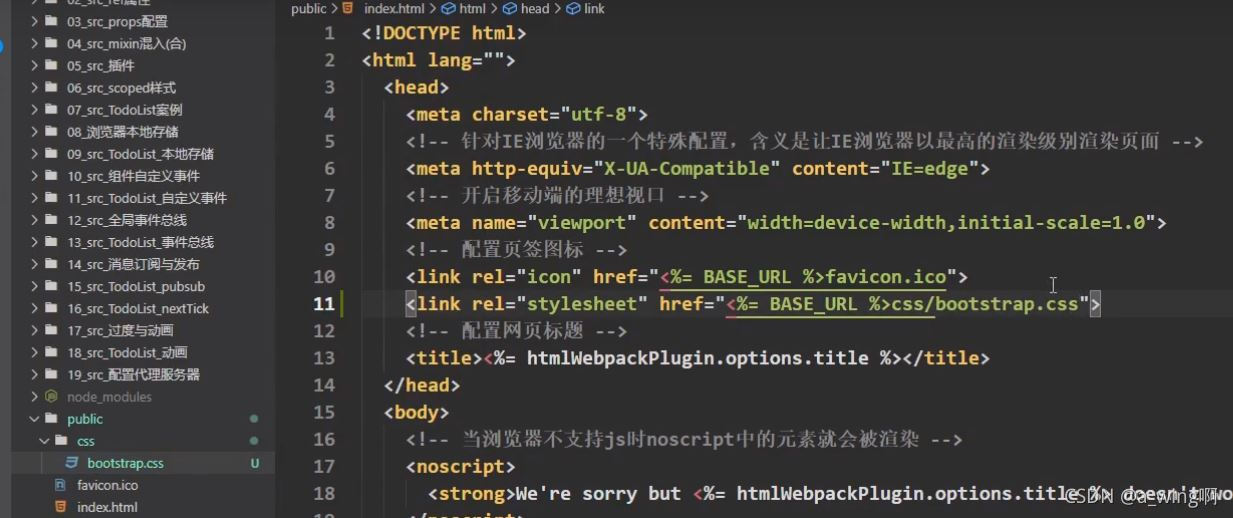
index.html 引入bootstrap样式
<link rel="stylesheet" href="<%= BASE_URL %>css/bootstrap.css">
School.vue
<template>
    <div>
      <h3>我是School</h3>
  </div>
</template>

<script>
export default {
    name:'School',
}
</script>
Student.vue
<template>
  <div>
      <h3>我是Student</h3>
  </div>
</template>

<script>
export default {
    name:'Student'
}
</script>
App.vue
<template>
  <div class="container">
    <h1>我的第一个 Bootstrap 页面</h1>
    <div class="row">
      <div class="col-lg-4">
          <ul class="list-group">
            <!-- router-link在页面中会自动变为a标签,to与a标签的href属性类似
              active-class=" active"  告诉路由当被点击时应用active 的class样式
            -->
            <router-link class="list-group-item" active-class=" active" to="/school">School</router-link>
            <router-link class="list-group-item" active-class=" active" to="/student">Student</router-link>
        </ul>
      </div>
      <div class="col-lg-8">
        <!-- 指定组件的显示位置 -->
        <router-view></router-view>
      </div>
    </div>
  </div>
</template>

<script>
export default {
  name: 'App',
}
</script>
效果

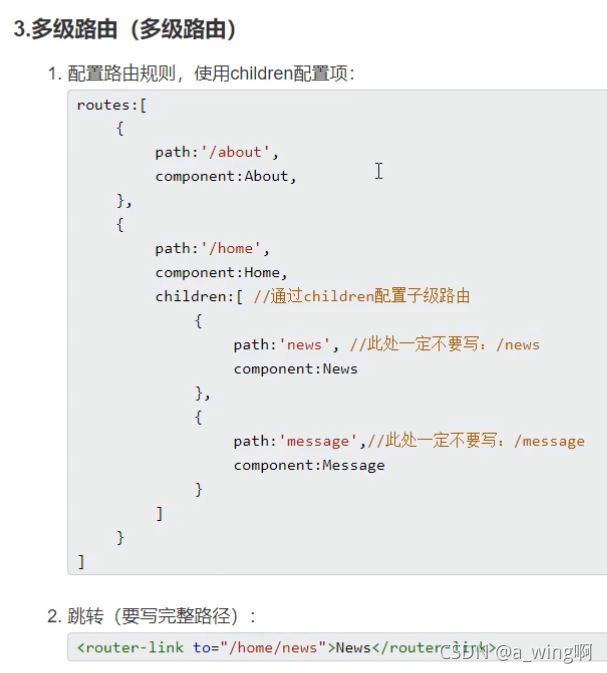
多级路由
路由query传参
就类似浏览器里路径传参数 http://localhost:8080/student?id=123&name=tom
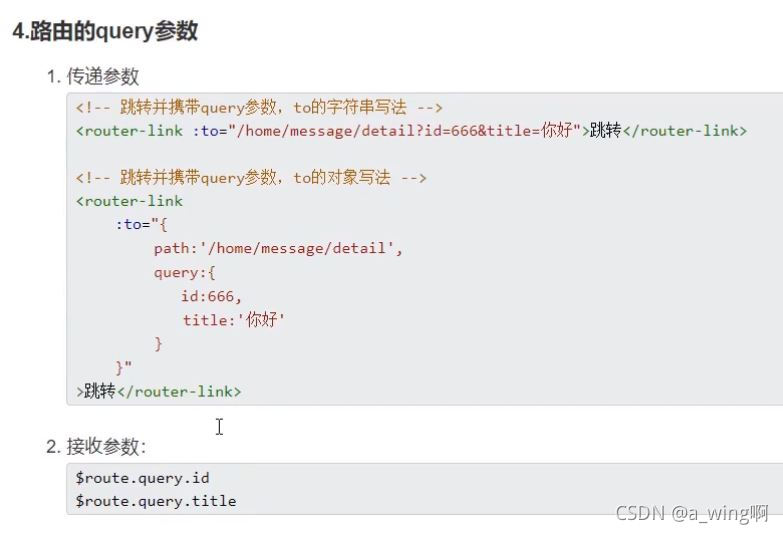
接收参数可以:<h3>{{$route.query.id}}</h3>
路由命名


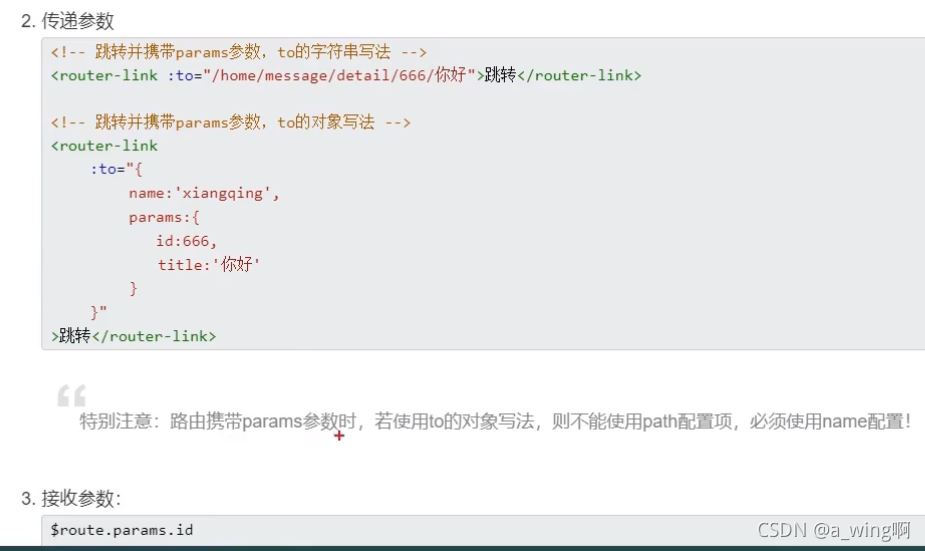
路由params传参数
就类似浏览器里路径传参数 http://localhost:8080/student/123/name 123就是我的参数
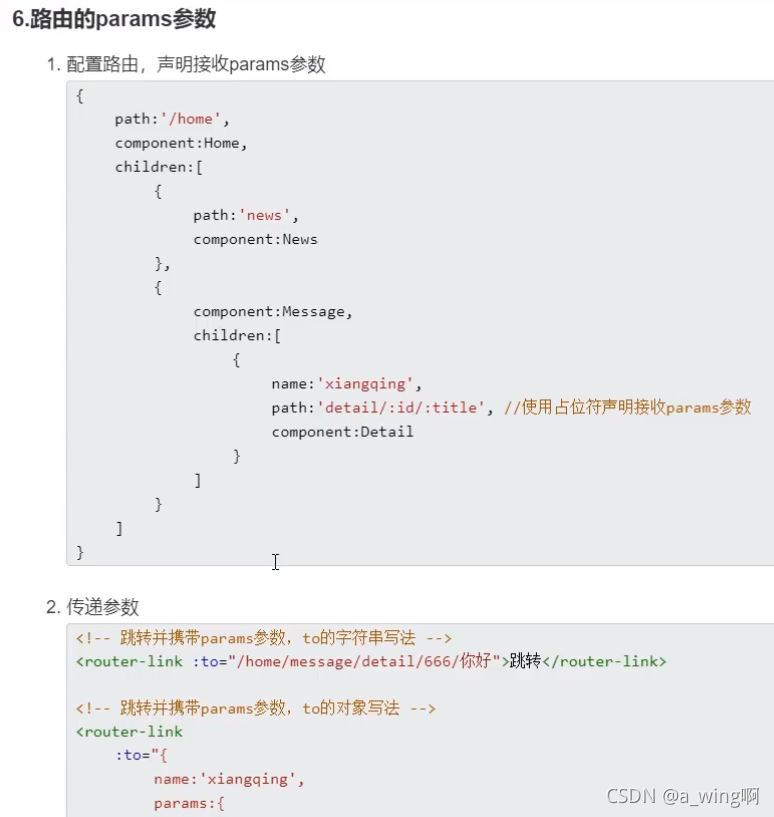
实例:
src/router/index.js
//用于创建整个项目的路由器
import VueRouter from "vue-router";
import School from '../pages/School.vue'
import Student from '../pages/Student.vue'

//创建1个路由
export default new VueRouter({
    //配置路由
    routes:[
        {
            name:'schoolName',
            path:'/school/:id', //params传参数 :占位符声明
            component:School
        },
        {
            path:'/student',
            component:Student
        }
    ]
})
App.vue
<template>
  <div class="container">
    <h1>我的第一个 Bootstrap 页面</h1>
    <div class="row">
      <div class="col-lg-4">
          <ul class="list-group">
            <!-- params传参数方式1 -->
            <!-- <router-link class="list-group-item" active-class=" active" :to="`/school/${123}`">School</router-link> -->

            <!-- params传参数方式2 -->
            <router-link class="list-group-item" active-class=" active" :to="{
              name:'schoolName',
              params:{
                id:123
              }
            }">School</router-link>
            <router-link class="list-group-item" active-class=" active" to="/student">Student</router-link>
        </ul>
      </div>
      <div class="col-lg-8">
        <router-view></router-view>
      </div>
    </div>
  </div>
</template>

<script>
export default {
  name: 'App',
}
</script>
School.vue
<template>
    <div>
      <h3>我是School</h3>
      <h3>{{$route.params.id}}</h3>
  </div>
</template>

<script>
export default {
    name:'School',
}
</script>

路由的props配置
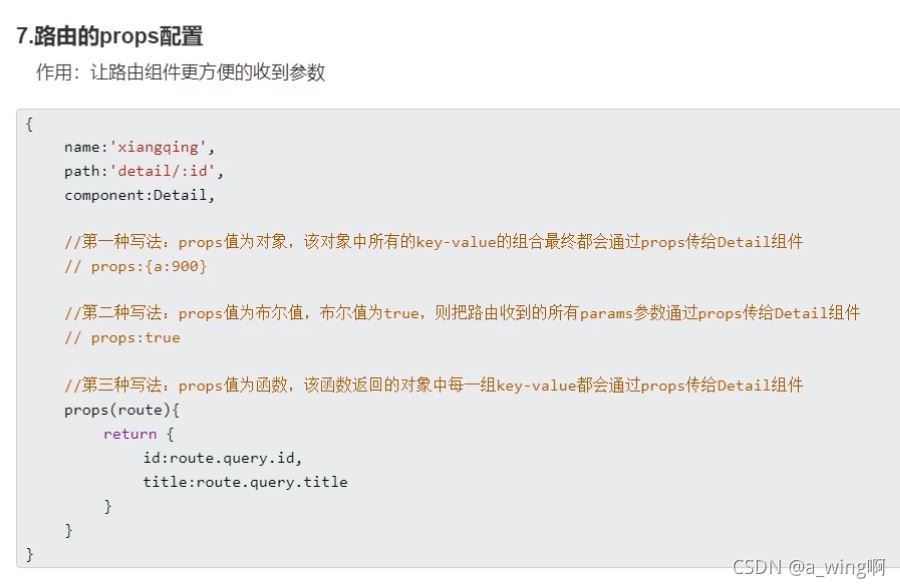
路由组件接收参数:
<script>
export default {
    name:'School',
    props:['id']   //接收参数
}
</script>
router-link的replace属性

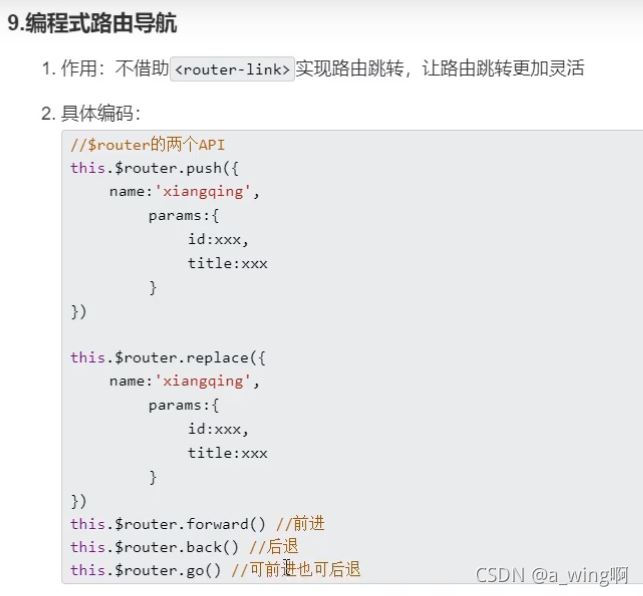
编程式路由导航
缓存路由组件

include里写的是组件名,
<script>
export default {
	name:'News',	//组件名
....
}
</script>
如果不写include则<router-view>里的所有组件页面都会被缓存。
如果有多个组件需要被缓存,要把include写为数组形式:
<keep-alive :include="['News','School']">
    <router-view></router-view>
</keep-alive>
使用场景:
有2个导航项,对应有2个页面。页面1里有输入框,用户输入了一些内容,然后点击导航项2去到页面2,再点击导航项1回到页面1,输入框里的内容没有被清空,依然存在。
属于路由组件的生命周期

<script>
export default {
....
	activated(){	//激活时调用
	...
	},
	deactivated(){	//失活时调用
	...
	}
}
</script>
如有2个组件页面,从组件1切换到组件2,组件1此时就失活了,从组件2再切换到组件1,组件1此时就激活了。
路由守卫
全局路由守卫
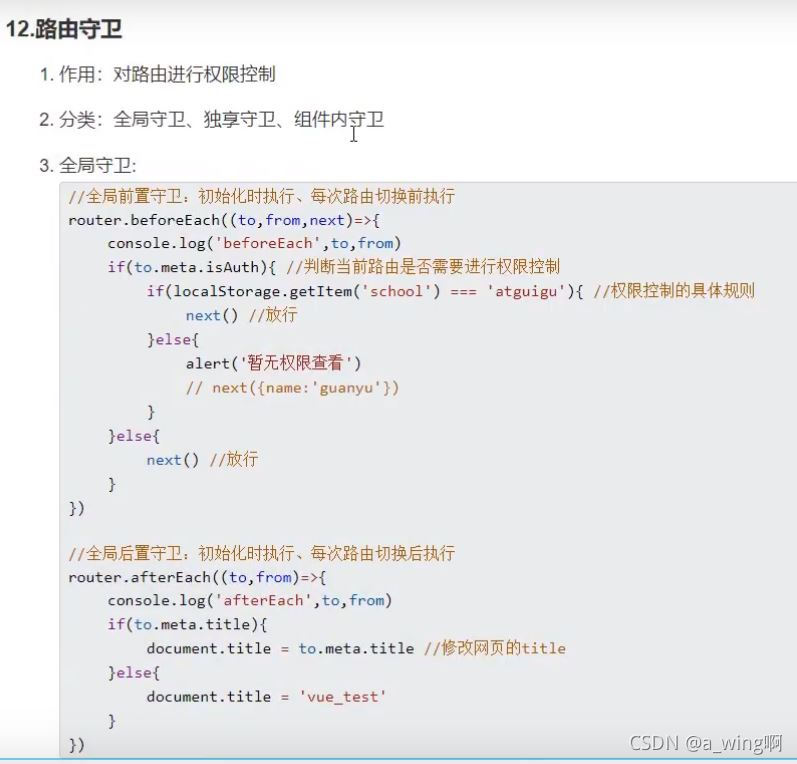
meta:开发者可以在meta里放一些自定义的数据
src/router/index.js
//创建1个路由器
export default new VueRouter({
    //配置路由
    routes:[
        {
            name:'schoolName',
            path:'/school/:id',
            component:School,
            meta:{title:'你好'}
        },
        ]
 })
如果在想在路由守卫里获取vuex的store可以参考以下:
//		/src/store/index.js
export default new Vuex.Store({
    xxxx
})

//			/src/router/index.js
import store from '../store'

const router = new VueRouter({
	//...
})
router.beforeEach((to, from, next) =>{
    store.state.userInfo
})
export default router
独享路由守卫

//创建1个路由器
export default new VueRouter({
    //配置路由
    routes:[
        {
            name:'schoolName',
            path:'/school/:id',
            component:School,
            meta:{title:'你好'},
            beforeEnter: (to, from, next) => {
                // ...
            }
        },
        ]
 })
守卫配置在1个路由内,就只给这一个路由使用,其他不管。
组件内守卫
to,from,next的意思与上面的一样
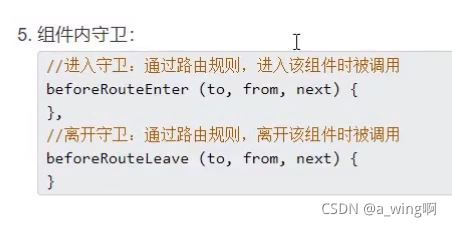
写在组件里面:
<script>
export default {
    name:'Student',
    beforeRouteEnter (to, from, next) {
      // ...
    },
    beforeRouteLeave (to, from, next) {
      // ...
    }
}
</script>
路由器的两种工作模式:hash和history

src/router/index.js
export default new VueRouter({
    mode:'history'	//工作模式,默认是hash
    //配置路由
    routes:[
    ......
    ]
})
hash模式路径里会有#,history没有
项目打包
把public和src文件夹里的文件打包变为js、css、html文件
npm run build
生成的dist文件夹就是打包好的项目了
使用Element组件库
以下操作可能随着时间会有所改变,应根据组件库官网的指引来操作。
安装
npm i element-ui
官网的命令是npm i element-ui -S,在新版本npm里不带-S参数也行,所以我安装的时候就没写了。
全部引入
在main.js里添加:
//引入element组件库
import ElementUI from 'element-ui';
//引入element组件库样式
import 'element-ui/lib/theme-chalk/index.css';
//使用element
Vue.use(ElementUI);
上面这种方式是把Element全部组件都引入进来,这样文件容量会变很大,不推荐,开发时就随意,打包使用应该使用按需引入的方式,以达到减小项目体积的目的。
试了一下,element的组件只在.vue文件里有效,放在.html文件里无效。
按需引入
安装:
npm install babel-plugin-component -D
-D参数是开发依赖的意思
官网上是说修改 .babelrc文件,但是现在脚手架生成的项目里已经没有这个文件了,根据视频教程修改babel.config.js文件:
module.exports = {
  presets: [
    '@vue/cli-plugin-babel/preset',
//    ["es2015", { "modules": false }]  按照官方的写报错了,下面是可行的方法
    ["@babel/preset-env", { "modules": false}]
  ],
  plugins: [
    [
      "component",
      {
        "libraryName": "element-ui",
        "styleLibraryName": "theme-chalk"
      }
    ]
  ]
}
在main.js里按需引入用到的组件,假设用到了Button和Row组件:
import { Button, Row} from 'element-ui';

Vue.component(Button.name, Button);
Vue.component(Row.name, Row);
在.vue文件中使用
	<el-row>
      <el-button>默认按钮</el-button>
      <el-button type="primary">主要按钮</el-button>
      <el-button type="success">成功按钮</el-button>
    </el-row>
这样即达到了按需引入。
使用axios
一个基于 promise 的 HTTP 库,类似ajax
安装
npm install axios
在main.js中全局引入axios:
import axios from 'axios'
Vue.prototype.$axios = axios
axios的拦截
在src目录下创建一个文件axios.js(与main.js同级),定义axios的拦截:
import axios from "axios";

axios.defaults.baseURL = "http://localhost:8080"

//使用自定义配置新建一个 axios 实例
const myAxios = axios.create({
    timeout : 5000,
    headers:{
        'Content-Type':'application/json;charset=utf8'
    }
})

//添加请求拦截器
myAxios.interceptors.request.use(config => {
    //在发送请求前做什么
    //在所有需要权限的请求的header里添加JWT
    config.headers['Authorization'] = localStorage.getItem('Authorization')
    return config;
})

//添加响应拦截器
myAxios.interceptors.response.use(response => {
    //对响应数据做点什么
    let resp = response.data;
    console.log(resp);
    return response;
    },
    error => {
        //对响应错误做点什么
        console.log(error);
        return Promise.reject(error);
    }
)
export default myAxios;
修改main.js:
删除之前引入的axios
import axios from 'axios'	//删除
Vue.prototype.$axios = axios	//删除
引入自定义的axios实例
import myAxios from './axios';
Vue.prototype.$axios = myAxios;
安装qs
qs是一个流行的查询参数序列化和解析库。可以将一个普通的object序列化成一个查询字符串,或者反过来将一个查询字符串解析成一个object,帮助我们查询字符串解析和序列化字符串。
npm install qs


 73
73


 被折叠的 条评论
为什么被折叠?
被折叠的 条评论
为什么被折叠?
 到【灌水乐园】发言


