


了解
WPF中所有布局如下,我们一一尝试实现,本文档主要以图形化的形式展示每个布局的功能。
-
布局: Border、 BulletDecorator、 Canvas、 DockPanel、 Expander、 Grid、 GridView、 GridSplitter、 GroupBox、 Panel、 ResizeGrip、 Separator、 ScrollBar、 ScrollViewer、 StackPanel、 Thumb、 Viewbox、 VirtualizingStackPanel、 Window和 WrapPanel。
布局
Border(边框)
主要用于绘制另一个元素四周的边框和/或背景样式。
Border 只能有一个子级。 若要显示多个子元素,需要在父 Border内放置一个附加Panel元素。 然后,可以在该 Panel 元素中放置子元素。(以下展示存放两个元素,就会出现报错)

如果要在内容周围显示边框,必须将元素放在父 Border 元素中。
效果

代码
<!--margin为外边距-->
<!--borderthickness为边框的厚度-->
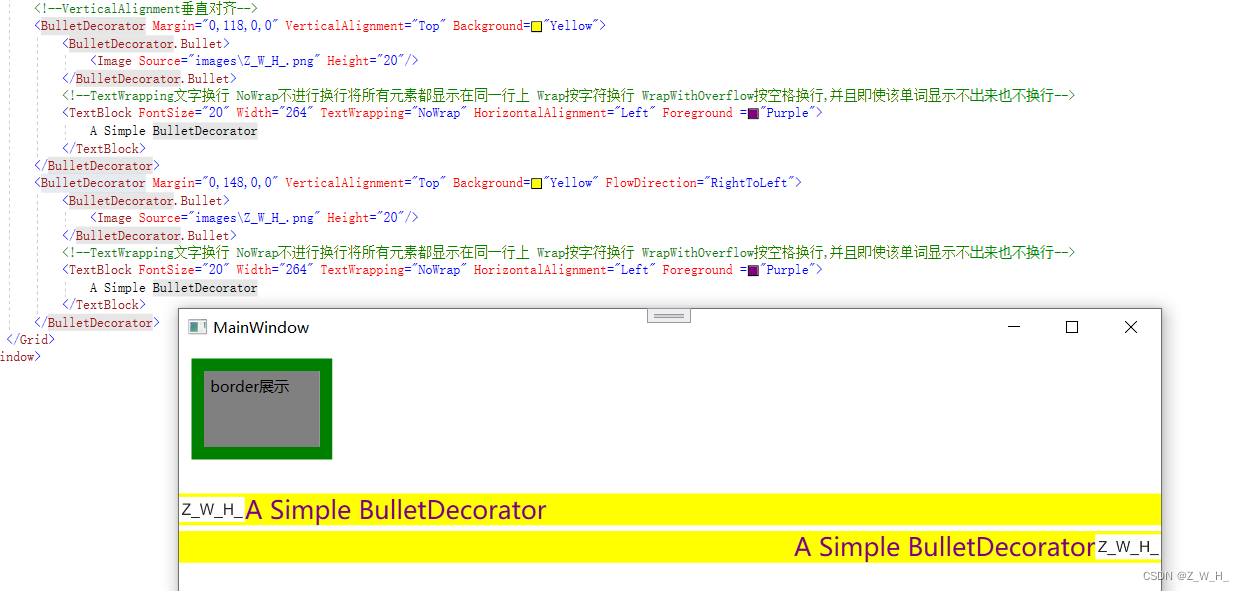
<Border BorderBrush="Green" BorderThickness="10" Margin="10,10,663,322" Background="Gray">
<Label Content="border展示"/>
</Border>BulletDecorator(子弹头装饰)
表示一个布局控件,该控件将项目符号与另一个可视对象对齐。
BulletDecorator简单来说就是用来控制项目布局的,其布局方式分为:从左往右(默认)、从右往左;是通过FlowDirection属性来设置的;
效果
可能遇到的问题
读者如果遇到运行前图片可以显示但是运行后图片显示不了的情况,右键图片属性将其生成操作更改为资源,并重写生成项目解决方案

BulletDecorator只能添加一个子元素,可以配合WrapPanel、StackPanel等控件一起使用,进行布局。

代码
        <!--VerticalAlignment垂直对齐-->
        <BulletDecorator Margin="0,118,0,0" VerticalAlignment="Top" Background="Yellow">
            <BulletDecorator.Bullet>
                <Image Source="images\Z_W_H_.png" Height="20"/>
            </BulletDecorator.Bullet>
            <!--TextWrapping文字换行 NoWrap不进行换行将所有元素都显示在同一行上 Wrap按字符换行 WrapWithOverflow按空格换行,并且即使该单词显示不出来也不换行-->
            <TextBlock FontSize="20" Width="264" TextWrapping="NoWrap" HorizontalAlignment="Left" Foreground ="Purple">
                A Simple BulletDecorator
            </TextBlock>
        </BulletDecorator>
        <BulletDecorator Margin="0,148,0,0" VerticalAlignment="Top" Background="Yellow" FlowDirection="RightToLeft">
            <BulletDecorator.Bullet>
                <Image Source="images\Z_W_H_.png" Height="20"/>
            </BulletDecorator.Bullet>
            <!--TextWrapping文字换行 NoWrap不进行换行将所有元素都显示在同一行上 Wrap按字符换行 WrapWithOverflow按空格换行,并且即使该单词显示不出来也不换行-->
            <TextBlock FontSize="20" Width="264" TextWrapping="NoWrap" HorizontalAlignment="Left" Foreground ="Purple">
                A Simple BulletDecorator
            </TextBlock>
        </BulletDecorator>
Canvas(画布)
定义一个区域,可在其中使用相对于 Canvas 区域的坐标以显式方式来定位子元素。通过top,left,bottom,right设置相对于父元素的位置
效果

代码
        <Canvas Margin="10,178,554,42">
            <Canvas Height="100" Width="100" Top="0" Left="0" Background="Red"/>
            <Canvas Height="100" Width="100" Top="100" Left="100" Background="Green"/>
            <Canvas Height="100" Width="100" Top="50" Left="50" Background="Blue"/>
        </Canvas>
DockPanel(停靠面板)
定义一个区域,从中可以按相对位置水平或垂直排列各个子元素。
停靠面板类似于WinForm中控件的Dock属性。DockPanel会对每个子元素进行排序,并将根据指定的边进行停靠,多个停靠在同侧的元素则按顺序排序。在DockPanel中,指定停靠边的控件,会根据定义的顺序占领边角,所有控件绝不会交叠。
默认情况下,后添加的元素只能使用剩余空间,无论对DockPanel的最后一个子元素设置任何停靠值,该子元素都将始终填满剩余的空间。如果不希望最后一个元素填充剩余区域,可以将DockPanel属性LastChildFill设置为false,还必须为最后一个子元素显式指定停靠方向。
效果一

代码一
        <DockPanel Margin="526,285,0,0">
            <Button DockPanel.Dock="Left" Content="ButtonLeft"></Button>
            <Button DockPanel.Dock="Top" Content="ButtonTop"></Button>
            <Button DockPanel.Dock="Right" Content="ButtonRight"></Button>
            <Button DockPanel.Dock="Bottom" Content="ButtonBottom"></Button>
            <Button  Content="ButtonTop"></Button>
        </DockPanel>
效果二

代码二
        <DockPanel LastChildFill="False" Margin="165,285,279,0" >
            <Button DockPanel.Dock="Left" Content="ButtonLeft"></Button>
            <Button DockPanel.Dock="Top" Content="ButtonTop"></Button>
            <Button DockPanel.Dock="Right" Content="ButtonRight"></Button>
            <Button DockPanel.Dock="Bottom" Content="ButtonBottom"></Button>
            <Button  DockPanel.Dock="Top" Content="最后一个Button不填充剩余空间"></Button>
        </DockPanel>
Expander(扩展器)
表示一种控件,该控件显示具有可折叠内容显示窗口的标题。
效果


代码
        <!--HorizontalAlignment水平对齐-->
        <!--ExpandDirection内容窗口的打开方向-->
        <!--Header设置控件的标题-->
        <!--IsExpanded初始的时候窗口是否可见-->
        <Expander Name="myExpander" Background="Tan"  HorizontalAlignment="Left" Header="My Expander"  ExpandDirection="Down" IsExpanded="True" Width="100" Margin="165,10,0,322">
            <TextBlock TextWrapping="Wrap">
                Lorem ipsum dolor sit amet, consectetur
                adipisicing elit, sed do eiusmod tempor incididunt ut
                labore et dolore magna aliqua
            </TextBlock>
        </Expander>
Grid(网格)
定义由列和行组成的灵活的网格区域。
效果

代码
        <!--ShowGridLines网格线在此 Grid 中是否可见。-->
        <Grid VerticalAlignment="Top" HorizontalAlignment="Left" ShowGridLines="True" Width="250" Height="100" Margin="362,13,0,0">
            <!--ColumnDefinitions列定义-->
            <Grid.ColumnDefinitions>
                <ColumnDefinition />
                <ColumnDefinition />
                <ColumnDefinition />
            </Grid.ColumnDefinitions>
            <!--RowDefinitions行定义-->
            <Grid.RowDefinitions>
                <RowDefinition />
                <RowDefinition />
                <RowDefinition />
                <RowDefinition />
            </Grid.RowDefinitions>
            <!--ColumnSpan指示 Grid 中的子内容所跨越的总列数。-->
            <TextBlock FontSize="20" FontWeight="Bold" Grid.ColumnSpan="3" Grid.Row="0">2005 Products Shipped</TextBlock>
            <!--Row显示 Grid 中的哪个子内容行。-->
            <!--Column显示 Grid 中的子内容的列。-->
            <!--FontWeight指定所需的字体粗细-->
            <TextBlock FontSize="12" FontWeight="ExtraLight" Grid.Row="1" Grid.Column="0">Quarter 1</TextBlock>
            <TextBlock FontSize="12" FontWeight="Black" Grid.Row="1" Grid.Column="1">Quarter 2</TextBlock>
            <TextBlock FontSize="12" FontWeight="Bold" Grid.Row="1" Grid.Column="2">Quarter 3</TextBlock>
            <TextBlock Grid.Row="2" FontWeight="DemiBold" Grid.Column="0">50000</TextBlock>
            <TextBlock Grid.Row="2" FontWeight="ExtraBlack" Grid.Column="1">100000</TextBlock>
            <TextBlock Grid.Row="2" FontWeight="ExtraBold" Grid.Column="2">150000</TextBlock>
            <TextBlock FontSize="16" FontWeight="Heavy" Grid.ColumnSpan="3" Grid.Row="3">Total Units: 300000</TextBlock>
        </Grid>
GridView(显示数据表格)
表示 ListView 控件的以列形式显示数据项的视图模式。
GridView视图模式是ListView控件的视图模式中的一种。
效果

代码
前端
        <ListView x:Name="UserListView"  Margin="236,148,350,156">
            <ListView.View>
                <GridView>
                    <GridView.Columns>
                        <GridViewColumn DisplayMemberBinding="{Binding UserName}" Header="用户名"/>
                        <GridViewColumn DisplayMemberBinding="{Binding Password}" Header="密码"/>
                        <GridViewColumn DisplayMemberBinding="{Binding Level}" Header="权限等级"/>
                    </GridView.Columns>
                </GridView>
            </ListView.View>
        </ListView>
后台
    public partial class MainWindow : Window
    {
        public MainWindow()
        {
            InitializeComponent();
        }

        private void Window_Loaded(object sender, RoutedEventArgs e)
        {
            UserListView.ItemsSource = GetNameList();
        }
        public List<UserList> GetNameList()
        {
            List<UserList> list = new List<UserList>();
            list.Add(new UserList() { Level = 1, UserName = "John", Password = "Doe" });
            list.Add(new UserList() { Level = 2, UserName = "Jane", Password = "Doe" });
            list.Add(new UserList() { Level = 3, UserName = "Tom", Password = "Smith" });
            list.Add(new UserList() { Level = 4, UserName = "Jerry", Password = "Wang" });
            list.Add(new UserList() { Level = 5, UserName = "Linda", Password = "Li" });
            return list;
        }
    }
    public class UserList
    {

        public string UserName { get;set; }
        public string Password { get;set; }
        public int Level {get;set; }
    }
GridSplitter
表示重新分布 Grid 控件的列间距或行间距的控件。
效果


代码
        <Grid Margin="487,217,67,176" ShowGridLines="True" Background="AliceBlue">
            <Grid.ColumnDefinitions>
                <ColumnDefinition/>
                <ColumnDefinition/>
            </Grid.ColumnDefinitions>
            <!--通过 GridSplitter 覆盖列的边缘来调整 中 Grid 列的大小。-->
            <GridSplitter Grid.Column ="0" Background="Blue" Height="10" HorizontalAlignment="Stretch" VerticalAlignment="Top"/>
            <GridSplitter Grid.Column ="0" Background="Blue" Width="10" HorizontalAlignment="Right" VerticalAlignment="Stretch"/>
            <GridSplitter Grid.Column ="0" Background="Blue" Width="10" HorizontalAlignment="Left" VerticalAlignment="Stretch"/>
            <GridSplitter Grid.Column ="1" Background="Blue" Width="10" HorizontalAlignment="Right" VerticalAlignment="Stretch"/>
            <Border Grid.Row="0" Grid.Column="0" BorderBrush="Red" BorderThickness="2"></Border>
        </Grid>
        <Grid Margin="514,63,40,330" ShowGridLines="True" Background="AliceBlue">
            <Grid.ColumnDefinitions>
                <ColumnDefinition/>
                <ColumnDefinition Width="Auto"/>
                <ColumnDefinition/>
            </Grid.ColumnDefinitions>
            <!--定义 一个 GridSplitter ,以重设中的 Grid 列大小,并占用 中的 Grid列。-->
            <!--ShowsPreview指示 GridSplitter 控件在用户拖动控件时是否更新列大小或行大小。-->
            <GridSplitter Grid.Column="1" HorizontalAlignment="Center" VerticalAlignment="Stretch" Background="Black"  ShowsPreview="True" Width="5" />
            <Border Grid.Row="0" Grid.Column="0" BorderBrush="Red" BorderThickness="2"></Border>
        </Grid>
GroupBox
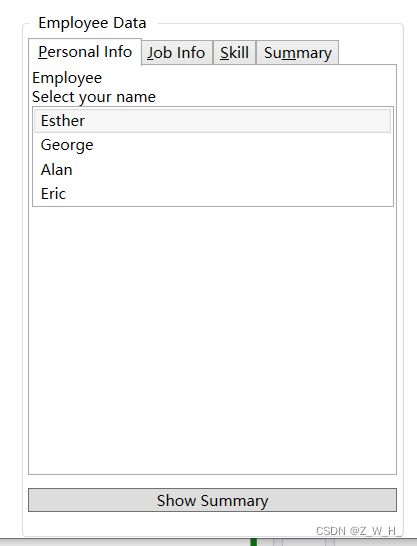
表示一个控件,该控件用于创建具有用户界面 (UI) 内容边框和标题的容器。
效果
代码
前端
<GroupBox Margin="1070,0,685,0">
<GroupBox.Header>
<Label>Employee Data</Label>
</GroupBox.Header>
<StackPanel>
<TabControl Name="myTabControl" TabStripPlacement="Top" Margin="0, 0, 0, 10" Height="350" >
<TabItem Name="PersonalInfo">
<TabItem.Header>_Personal Info</TabItem.Header>
<StackPanel>
<TextBlock>Employee</TextBlock>
<TextBlock>Select your name</TextBlock>
<ListBox Name="empName" SelectionChanged="updateSummary">
<ListBoxItem IsSelected="true">Esther</ListBoxItem>
<ListBoxItem>George</ListBoxItem>
<ListBoxItem>Alan</ListBoxItem>
<ListBoxItem>Eric</ListBoxItem>
</ListBox>
</StackPanel>
</TabItem>
<TabItem>
<TabItem.Header>_Job Info</TabItem.Header>
<StackPanel>
<TextBlock>Select a job</TextBlock>
<ListBox Name ="job" SelectionChanged="updateSummary">
<ListBoxItem IsSelected="true">Programmer</ListBoxItem>
<ListBoxItem>Tester</ListBoxItem>
<ListBoxItem>Writer</ListBoxItem>
<ListBoxItem>Manager</ListBoxItem>
</ListBox>
</StackPanel>
</TabItem>
<TabItem Name="Skill">
<TabItem.Header>_Skill</TabItem.Header>
<StackPanel>
<TextBlock>
Select your strongest skill
</TextBlock>
<ListBox Name="skills" SelectionChanged="updateSummary">
<ListBoxItem IsSelected="true">C#</ListBoxItem>
<ListBoxItem>Visual Basic</ListBoxItem>
<ListBoxItem>.NET</ListBoxItem>
<ListBoxItem>JScript</ListBoxItem>
</ListBox>
</StackPanel>
</TabItem>
<TabItem Name="Summary" >
<TabItem.Header>Su_mmary</TabItem.Header>
<StackPanel>
<TextBlock Name="emp"/>
<TextBlock Name="ejob"/>
<TextBlock Name="eskill"/>
</StackPanel>
</TabItem>
</TabControl>
<Button Content="Show Summary" Click="goToSummaryTab"/>
</StackPanel>
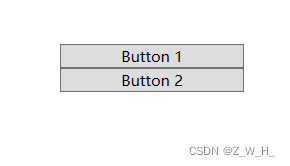
</GroupBox>Panel
为所有 Panel 元素提供基类。 使用 Panel 元素放置和排列 WPF应用程序中的子对象。
效果
代码
        <StackPanel Margin="832,48,1083,288">
            <Button>Button 1</Button>
            <Button>Button 2</Button>
        </StackPanel>
ResizeGrip
表示 Thumb 控件的一种实现,该控件使 Window 能改变其自身的大小。
ResizeGrip 定义为 的可视化树的一 Window部分。
效果
代码
Separator
用于分隔项控件中各个项的控件。
效果

代码
        <ToolBarTray Background="White" Margin="839,131,1083,276">
            <ToolBar Band="1" BandIndex="1">
                <Button Content="1"></Button>
                <Button  Content="1"></Button>
                <Button  Content="1"></Button>
                <Separator/>
                <Button  Content="1"></Button>
                <Button  Content="1"></Button>
                <Button  Content="1"></Button>
                <Separator/>
                <Button  Content="1"></Button>
                <Button  Content="1"></Button>
            </ToolBar>
        </ToolBarTray>
ScrollBar
表示提供滚动条的控件,该滚动条具有一个滑动 Thumb,其位置对应于一个值。
效果

代码
<ScrollBar Orientation="Horizontal" Width ="4in"
           Scroll="OnScroll" Minimum="1" Maximum="100" />
ScrollViewer
表示可包含其他可视元素的可滚动区域。
效果

代码
        <ScrollViewer HorizontalScrollBarVisibility="Auto" Margin="1446,28,421,197">
            <StackPanel VerticalAlignment="Top" HorizontalAlignment="Left">
                <TextBlock TextWrapping="Wrap" Margin="0,0,0,20">Scrolling is enabled when it is necessary.
      Resize the window, making it larger and smaller.</TextBlock>
                <Rectangle Fill="Red" Width="500" Height="500"></Rectangle>
            </StackPanel>
        </ScrollViewer>
StackPanel
效果
代码
        <StackPanel Margin="832,48,1083,288">
            <Button>Button 1</Button>
            <Button>Button 2</Button>
        </StackPanel>
Thumb
表示可以由用户拖动的控件。 Thumb还可用于调整控件的大小。 例如, Thumb 窗口一角的控件可以提供一个位置,供用户使用鼠标单击以开始调整大小操作。
效果
代码
Viewbox
定义一个内容修饰器,以便拉伸或缩放单一子项使其填满可用的控件。
效果
代码
VirtualizingStackPanel
在水平或垂直的一行中排列并显示内容。
效果
代码
Window(窗口)
提供创建、配置、显示和管理窗口和对话框的生存期的能力。
我们新建一个wpf应用程序后,就包含一个window布局元素
用户与独立应用程序之间的交互点是一个窗口。

效果

代码
<Window x:Class="WpfApp2.MainWindow"
        xmlns="http://schemas.microsoft.com/winfx/2006/xaml/presentation"
        xmlns:x="http://schemas.microsoft.com/winfx/2006/xaml"
        xmlns:d="http://schemas.microsoft.com/expression/blend/2008"
        xmlns:mc="http://schemas.openxmlformats.org/markup-compatibility/2006"
        xmlns:local="clr-namespace:WpfApp2"
        mc:Ignorable="d"
        Title="MainWindow" Height="450" Width="800">

</Window>
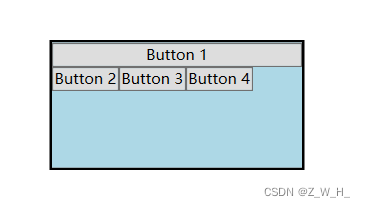
WrapPanel
按从左到右的顺序位置定位子元素,在包含框的边缘处将内容切换到下一行。 后续排序按照从上至下或从右至左的顺序进行,具体取决于 Orientation 属性的值。
效果
代码
        <Border HorizontalAlignment="Left" VerticalAlignment="Top" BorderBrush="Black" BorderThickness="2" Margin="1766,88,0,0">
            <WrapPanel Background="LightBlue" Width="200" Height="100">
                <Button Width="200">Button 1</Button>
                <Button>Button 2</Button>
                <Button>Button 3</Button>
                <Button>Button 4</Button>
            </WrapPanel>
        </Border>
参考文献
WPF图片问题:运行前可以看见,运行后不见了_wpf运行图片不显示-CSDN博客


 1530
1530


 被折叠的 条评论
为什么被折叠?
被折叠的 条评论
为什么被折叠?
 到【灌水乐园】发言


