java串口通信详细教程(附源码)

介绍


java串口通信其实很早就有用到,最近是项目的新需求才让我发现这玩意,搞的我还挺费劲的,不过还好捣鼓出来了;java中的串口通信主要还是跟SerialPort类打交道,引入的jar包是RXTXComm.jar,这是从Comm.jar里面扩展出去的;当然这是有原因的,因为之前的只适用于32位的,由于新的需求才诞生的。

实战


首先我们需要下载jar包及其dll文件(必须要有)这个具体我也不大清除哈,我是看了很多都是要弄这个的,我也没太去深究这个,下载RXTXComm.jar地址(提取码:gwpc)

下载之后将RXTXcomm.jar包放置C:\Program Files\Java\jre1.8.0_181\lib\ext\ 目录下,rxtxParallel.dll和rxtxSerial.dll放置C:\Program Files\Java\jre1.8.0_181\bin 目录下。

安装串口驱动:串口驱动地址(提取码:8j5w)

接下来开始编写代码:

创建工具类并实现SerialPortEventListener接口

import gnu.io.*;

import java.io.IOException;
import java.io.InputStream;
import java.io.OutputStream;
import java.util.Enumeration;
import java.util.HashMap;
import java.util.Map;
import java.util.TooManyListenersException;
import java.util.concurrent.BlockingQueue;
import java.util.concurrent.LinkedBlockingQueue;

import org.apache.tomcat.util.buf.HexUtils;

public class ContinueRead extends Thread implements SerialPortEventListener {


    static CommPortIdentifier portId; // 串口通信管理类
    static Enumeration<?> portList; // 有效连接上的端口的枚举
    static InputStream inputStream; // 从串口来的输入流
    static OutputStream outputStream;// 向串口输出的流
    static SerialPort serialPort; // 串口的引用
    // 堵塞队列用来存放读到的数据
    private BlockingQueue<String> msgQueue = new LinkedBlockingQueue<String>();
    public static Map<Integer, String> map = new HashMap<Integer, String>();

    @Override
    /**
     * SerialPort EventListene 的方法,持续监听端口上是否有数据流
     */
    public void serialEvent(SerialPortEvent event) {//

        switch (event.getEventType()) {
            case SerialPortEvent.BI:
            case SerialPortEvent.OE:
            case SerialPortEvent.FE:
            case SerialPortEvent.PE:
            case SerialPortEvent.CD:
            case SerialPortEvent.CTS:
            case SerialPortEvent.DSR:
            case SerialPortEvent.RI:
            case SerialPortEvent.OUTPUT_BUFFER_EMPTY:
                break;
            case SerialPortEvent.DATA_AVAILABLE:// 当有可用数据时读取数据
                byte[] readBuffer = new byte[20];
                try {
                    int numBytes = -1;
                    while (inputStream.available() > 0) {
                        numBytes = inputStream.read(readBuffer);

                        if (numBytes > 0) {
                            msgQueue.add(HexUtils.toHexString(readBuffer).substring(0, 2));
                            readBuffer = new byte[20];// 重新构造缓冲对象,否则有可能会影响接下来接收的数据
                        } else {
                            msgQueue.add("额------没有读到数据");
                        }
                    }
                } catch (IOException e) {
                }
                break;
        }
    }

    /**
     * 通过程序打开COM3串口,设置监听器以及相关的参数
     *
     * @return 返回1 表示端口打开成功,返回 0表示端口打开失败
     */
    public int startComPort() {
        // 通过串口通信管理类获得当前连接上的串口列表
        portList = CommPortIdentifier.getPortIdentifiers();

        while (portList.hasMoreElements()) {

            // 获取相应串口对象
            portId = (CommPortIdentifier) portList.nextElement();

            System.out.println("设备类型:--->" + portId.getPortType());
            System.out.println("设备名称:---->" + portId.getName());
            // 判断端口类型是否为串口
            if (portId.getPortType() == CommPortIdentifier.PORT_SERIAL) {
                // 判断如果COM4串口存在,就打开该串口
                if (portId.getName().equals("COM3")) {
                    try {
                        // 打开串口名字为COM_3(名字任意),延迟为2毫秒
                        serialPort = (SerialPort) portId.open("COM3", 2000);

                    } catch (PortInUseException e) {
                        e.printStackTrace();
                        return 0;
                    }
                    // 设置当前串口的输入输出流
                    try {
                        inputStream = serialPort.getInputStream();
                        outputStream = serialPort.getOutputStream();
                    } catch (IOException e) {
                        e.printStackTrace();
                        return 0;
                    }
                    // 给当前串口添加一个监听器
                    try {
                        serialPort.addEventListener(this);
                    } catch (TooManyListenersException e) {
                        e.printStackTrace();
                        return 0;
                    }
                    // 设置监听器生效,即:当有数据时通知
                    serialPort.notifyOnDataAvailable(true);

                    // 设置串口的一些读写参数
                    try {
                        // 比特率、数据位、停止位、奇偶校验位
                        serialPort.setSerialPortParams(9600,
                                SerialPort.DATABITS_8, SerialPort.STOPBITS_1,
                                SerialPort.PARITY_NONE);
                    } catch (UnsupportedCommOperationException e) {
                        e.printStackTrace();
                        return 0;
                    }

                    return 1;
                }
            }
        }
        return 0;
    }

    /**
     * 关闭串口
     *
     * @throws
     * @Description: 关闭串口
     * @param:
     * @return: void
     */
    public static void closeSerialPort() {
        if (serialPort != null) {
            serialPort.notifyOnDataAvailable(false);
            serialPort.removeEventListener();
            if (inputStream != null) {
                try {
                    inputStream.close();
                    inputStream = null;
                } catch (IOException e) {
                    System.out.println("关闭输入流时发生IO异常");
                }
            }
            if (outputStream != null) {
                try {
                    outputStream.close();
                    outputStream = null;
                } catch (IOException e) {
                    System.out.println("关闭输出流时发生IO异常");
                }
            }
            serialPort.close();
            serialPort = null;
        }
    }


    @Override
    public void run() {
        // TODO Auto-generated method stub
        try {
            System.out.println("--------------任务处理线程运行了--------------");
            while (true) {
                // 如果堵塞队列中存在数据就将其输出
                if (msgQueue.size() > 0) {
                    String tempStr = msgQueue.take();
                    System.out.println(tempStr);
                    map.put(Integer.valueOf(tempStr.substring(0, 1)), tempStr.substring(1, 2));
                }
            }
        } catch (Exception e) {
            // TODO Auto-generated catch block
            e.printStackTrace();
        }
    }

测试:

public static void main(String[] args) {
        ContinueRead cRead = new ContinueRead();
        int i = cRead.startComPort();
        if (i == 1) {
            // 启动线程来处理收到的数据
            cRead.start();
            try {
                String st = "start";
                System.out.println("发出字节数:" + st.getBytes("gbk").length);
                outputStream.write(st.getBytes("gbk"), 0, st.getBytes("gbk").length);
                System.out.println("成员变量大小:" + map.size());
            } catch (Exception e) {
                // TODO Auto-generated catch block
                e.printStackTrace();
            }
        }
    }

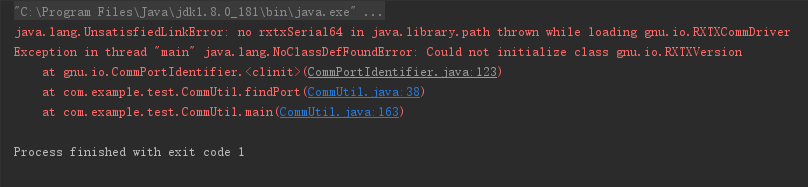
报错了,为什么因为你的电脑找不到它,所以还需要将rxtxSerial.dll放置C:\Windows\System32目录下,然后就ok了。

附上CommPortIdentifier类的一些方法(网上找的):

     addPortName(String, int, CommDriver) ---添加端口名到端口列表里 
     addPortOwnershipListener(CommPortOwnershipListener) ---添加端口拥有的监听器 
     removePortOwnershipListener(CommPortOwnershipListener) ---移除端口拥有的监听器 
     getCurrentOwner() ---得到当前占有端口的对象或应用程序 
     getName()--- 得到端口名称 
     getPortIdentifier(CommPort) ---得到参数打开的端口的CommPortIdentifier类型对象 
     getPortIdentifier(String) ---得到以参数命名的端口的CommPortIdentifier类型对象 
     getPortIdentifiers() ---得到系统中的端口列表 
     getPortType() ---得到端口的类型 
     isCurrentlyOwned() ---判断当前端口是否被占用 
     open(FileDescriptor) ---用文件描述的类型打开端口 
     open(String, int) ---打开端口,两个参数:程序名称,延迟时间(毫秒数) 

  • 2
    点赞
  • 49
    收藏
    觉得还不错? 一键收藏
  • 4
    评论
### 回答1: 我非常乐意为您提供有关Java串口通信类的源代码。下面是一个简单的Java串口通信类示例,其中包含了一些常见的串口通信操作。 ```java import java.io.IOException; import java.io.InputStream; import java.io.OutputStream; import java.util.Enumeration; import gnu.io.CommPort; import gnu.io.CommPortIdentifier; import gnu.io.SerialPort; public class SerialCommunication { private SerialPort serialPort; private InputStream in; private OutputStream out; public void connect(String portName) throws Exception { CommPortIdentifier portIdentifier = CommPortIdentifier.getPortIdentifier(portName); if (portIdentifier.isCurrentlyOwned()) { System.out.println("无法连接到指定串口,该端口已经被占用."); } else { CommPort commPort = portIdentifier.open(this.getClass().getName(), 2000); if (commPort instanceof SerialPort) { serialPort = (SerialPort) commPort; serialPort.setSerialPortParams(9600, SerialPort.DATABITS_8, SerialPort.STOPBITS_1, SerialPort.PARITY_NONE); in = serialPort.getInputStream(); out = serialPort.getOutputStream(); System.out.println("成功连接到串口."); } else { System.out.println("指定端口类型错误."); } } } public void disconnect() { try { if (in != null) in.close(); if (out != null) out.close(); if (serialPort != null) serialPort.close(); System.out.println("已断开与串口的连接."); } catch (IOException e) { e.printStackTrace(); } } public void sendData(String data) throws IOException { out.write(data.getBytes()); out.flush(); System.out.println("已发送数据: " + data); } public String receiveData() throws IOException { byte[] buffer = new byte[1024]; int len = in.read(buffer); return new String(buffer, 0, len); } public static void main(String[] args) { try { SerialCommunication communication = new SerialCommunication(); communication.connect("COM1"); // 连接到COM1串口 communication.sendData("Hello, Serial Port!"); // 发送数据到串口 String receivedData = communication.receiveData(); // 接收来自串口的数据 System.out.println("接收到的数据: " + receivedData); communication.disconnect(); // 断开与串口的连接 } catch (Exception e) { e.printStackTrace(); } } } ``` 以上代码是一个简单的Java串口通信类示例,其中包括了连接、断开连接、发送数据和接收数据等基本操作。在使用时,您需要添加对 `gnu.io` 包的依赖,并根据实际情况修改串口名称、波特率等参数。此外,还要确保您的计算机已经安装了正确的串口驱动程序。 请注意,此代码仅作为示例和参考之用。在实际开发中,建议使用现有的Java串口通信库,例如rxtx或jSerialComm,以简化开发过程并提供更多功能和稳定性。 ### 回答2: 串口通信是指通过串口进行数据传输的一种通信方式。在Java中,可以通过使用串口通信类,来实现串口通信。下面是一个简化的串口通信类的源码示例: ```java import gnu.io.*; public class SerialPortCommunication { private SerialPort serialPort; // 串口对象 public SerialPortCommunication(String portName, int baudRate) { try { CommPortIdentifier portIdentifier = CommPortIdentifier.getPortIdentifier(portName); // 获取串口标识符 serialPort = (SerialPort) portIdentifier.open(this.getClass().getName(), 2000); // 打开串口 serialPort.setSerialPortParams(baudRate, SerialPort.DATABITS_8, SerialPort.STOPBITS_1, SerialPort.PARITY_NONE); // 设置串口参数 } catch (Exception e) { e.printStackTrace(); } } public void sendData(String data) { try { OutputStream outputStream = serialPort.getOutputStream(); // 获取串口输出流 byte[] bytes = data.getBytes(); outputStream.write(bytes); // 发送数据 } catch (Exception e) { e.printStackTrace(); } } public String receiveData() { String result = ""; try { InputStream inputStream = serialPort.getInputStream(); // 获取串口输入流 byte[] buffer = new byte[1024]; int len = inputStream.read(buffer); // 读取串口数据 result = new String(buffer, 0, len); } catch (Exception e) { e.printStackTrace(); } return result; } public void close() { serialPort.close(); // 关闭串口 } } ``` 以上是一个简单的串口通信类的源码示例。通过该类,你可以创建一个串口通信对象,并通过调用 `sendData()` 方法发送数据,通过调用 `receiveData()` 方法接收串口数据,通过 `close()` 方法关闭串口连接。在实际使用时,还需要根据具体项目需求进行更完善的错误处理和数据解析等功能。 ### 回答3: Java 串口通信类的源码实现主要是通过Java内置的Comm API或者使用第三方库来实现串口通信功能。 以下是一个简单的例子,展示了如何使用Comm API来进行串口通信: ```java import java.io.*; import java.util.*; import javax.comm.*; public class SerialCommunication { private static Enumeration portList; private static CommPortIdentifier portId; private static SerialPort serialPort; private static OutputStream outputStream; public static void main(String[] args) { try { // 获取可用的串口列表 portList = CommPortIdentifier.getPortIdentifiers(); // 遍历串口列表并找到需要使用的串口 while (portList.hasMoreElements()) { portId = (CommPortIdentifier) portList.nextElement(); if (portId.getPortType() == CommPortIdentifier.PORT_SERIAL) { if (portId.getName().equals("COM1")) { // 假设需要使用COM1串口 // 打开串口并设置参数 serialPort = (SerialPort) portId.open("SerialCommunication", 2000); serialPort.setSerialPortParams(9600, SerialPort.DATABITS_8, SerialPort.STOPBITS_1, SerialPort.PARITY_NONE); // 获取输出流,用于发送数据 outputStream = serialPort.getOutputStream(); // 发送数据到串口 outputStream.write("Hello, Serial!".getBytes()); serialPort.close(); // 关闭串口 } } } } catch (Exception e) { e.printStackTrace(); } } } ``` 上述代码使用了CommPortIdentifier类来列举可用的串口,并通过SerialPort类来打开指定的串口。然后,通过设置SerialPort的参数,例如波特率、数据位数、停止位和校验位等,在实际应用中应根据具体需求进行配置。接着,获取输出流并将数据发送到打开的串口。最后,关闭串口。 需要注意的是,以上代码仅为示例,实际使用时请根据具体的硬件设备和通信协议进行相应的修改和调整。 此外,还可以使用其他第三方库实现串口通信,例如RXTXcomm或者jSerialComm等。这些库提供了更多的功能和灵活性,让串口通信更加方便和易用。

“相关推荐”对你有帮助么?

  • 非常没帮助
  • 没帮助
  • 一般
  • 有帮助
  • 非常有帮助
提交
评论 4
添加红包

请填写红包祝福语或标题

红包个数最小为10个

红包金额最低5元

当前余额3.43前往充值 >
需支付:10.00
成就一亿技术人!
领取后你会自动成为博主和红包主的粉丝 规则
hope_wisdom
发出的红包
实付
使用余额支付
点击重新获取
扫码支付
钱包余额 0

抵扣说明:

1.余额是钱包充值的虚拟货币,按照1:1的比例进行支付金额的抵扣。
2.余额无法直接购买下载,可以购买VIP、付费专栏及课程。

余额充值