在SpringBoot中,数据的管理缓存依赖于Spring框架中相关的缓存管理器接口。
	如果程序中没有定义类型为cacheManager的Bean组件或者是名为cacheResolver的cacheResolver缓存解析器,
SpringBoot将尝试按照指定顺序选择并启用缓存组件。
	如果没有任何缓存组件,会默认使用Simple缓存组件进行管理,它是默认的缓存管理组件,默认使用内存中的ConcurrentHashMap进行缓存存储。
基于注解的Redis缓存实现
		<dependency>
            <groupId>org.springframework.boot</groupId>
            <artifactId>spring-boot-starter-data-redis</artifactId>
        </dependency>
# Redis服务地址
spring.redis.host=127.0.0.1
# Redis服务连接端口
spring.redis.port=6379
# Redis服务器连接密码(默认为空)
spring.redis.password=
- 使用@Cacheable、@CachePut、@CacheEvict注解定制缓存管理。对先前的CommentService进行修改。
@Service
public class CommentService {
@Autowired
private CommentRepository commentRepository;
@Cacheable(cacheNames="comment",unless = "#result==null")
public Comment findById(int comment_id){
Optional<Comment> optional = commentRepository.findById(comment_id);
return optional.orElse(null);
}
@CachePut(cacheNames="comment",key="#result.id")
public Comment updateComment(Comment comment){
commentRepository.updateComment(comment.getAuthor(),comment.getId());
return comment;
}
@CacheEvict(cacheNames="comment")
public void deleteComment(int comment_id){
commentRepository.deleteById(comment_id);
}
}
- 基于注解的Redis查询缓存测试
- 我们已经添加了Redis的缓存依赖和Redis服务连接配置,@EnableCaching开启了注解的缓存管理
- 此时进行测试会出现IllegalArgumentException非法参数异常,要求对应Comment实体类必须实现序列化
- 在Comment实体类中实现Serializable序列化接口(对实体类对象进行缓存存储必须实现序列化)
public class Comment implements Serializable {
	.....
- 修改后测试通过,效果符合预期
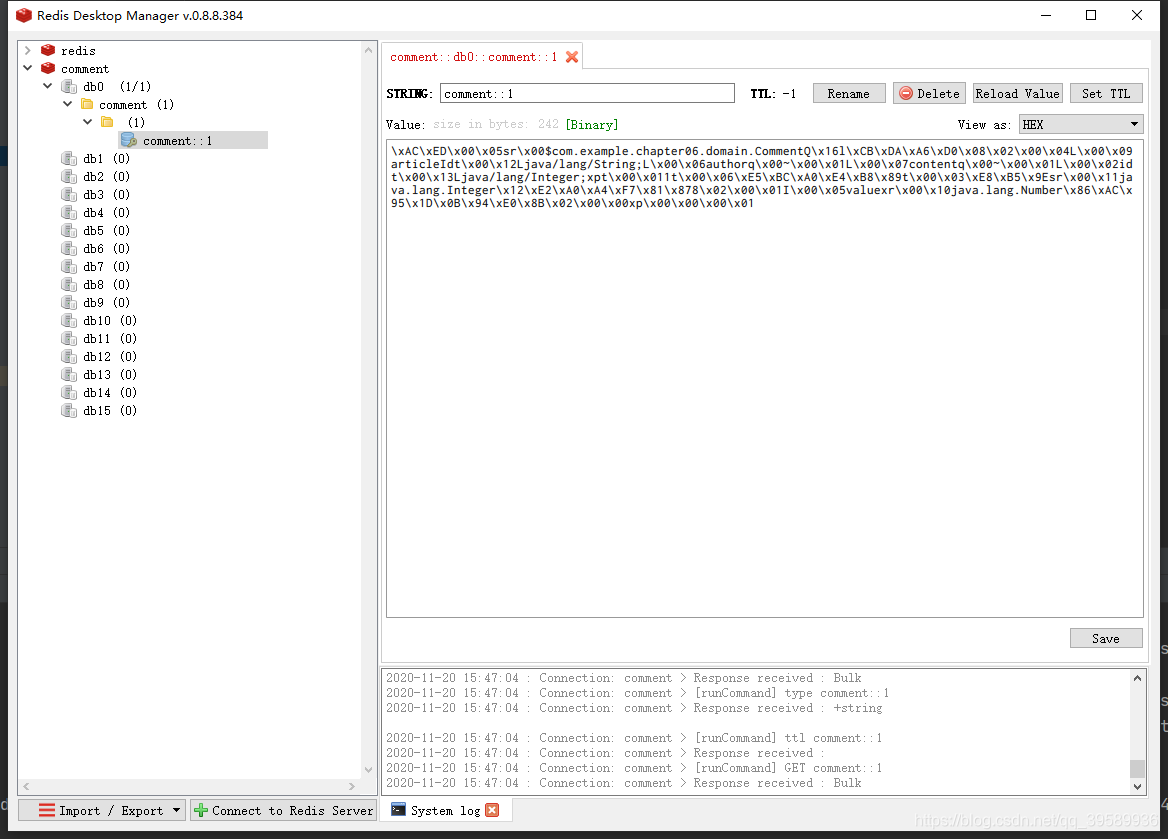
- 可以发现在Redis数据库中,缓存的数据的唯一标识key值是名称空间+参数值的字符串形式出现
- value值是经过JDK默认序列格式化后的HEX格式存储(实际开发中会自定义数据的序列化格式)
基于API的Redis缓存实现
- 除基于注解形式实现外,开发中常用的方式为——基于API的Redis缓存实现
- 使用Redis API进行业务数据缓存管理
- 使用comment_+id方式,避免与上面的注解形式混淆
@Service
public class ApiCommentService {
@Autowired
private CommentRepository repository;
@Autowired
private RedisTemplate redisTemplate;
public Comment findById(int comment_id){
Object object = redisTemplate.opsForValue().get("comment_"+comment_id);
if(object!=null){
return (Comment)object;
}else {
Optional<Comment> optional = repository.findById(comment_id);
if(optional.isPresent()){
Comment comment = optional.get();
redisTemplate.opsForValue().set("comment_"+comment_id,comment,1, TimeUnit.DAYS);
return comment;
}else {
return null;
}
}
}
public Comment updateComment(Comment comment){
repository.updateComment(comment.getAuthor(),comment.getId());
redisTemplate.opsForValue().set("comment_"+comment.getId(),comment);
return comment;
}
public void deleteComment(int comment_id){
repository.deleteById(comment_id);
redisTemplate.delete("comment_"+comment_id);
}
}
- Redis API——RedisTemplate
- RedisTemplate是Spring Data Redis 提供的直接进行Redis操作的Java API,可直接注入使用,更加便捷。
- 可以操作<Object,Object>对象数据类型,其子类StringRedisTemplate是针对<String,String>型操作
- 提供了很多进行数据缓存操作的方法
- 编写Web访问层Controller文件
@RestController
@RequestMapping("/api")
public class ApiCommentController {
@Autowired
private ApiCommentService apiCommentService;
@GetMapping("/get/{id}")
public Comment findById(@PathVariable("id") int comment_id){
Comment comment = apiCommentService.findById(comment_id);
return comment;
}
@GetMapping("/update/{id}/{author}")
public Comment updateComment(@PathVariable("id") int comment_id,@PathVariable("author") String author){
Comment comment = findById(comment_id);
comment.setAuthor(author);
Comment updateComment = apiCommentService.updateComment(comment);
return updateComment;
}
@GetMapping("/delete/{id}")
public void deleteComment(@PathVariable("id") int comment_id){
apiCommentService.deleteComment(comment_id);
}
}
- 测试如注解版测试相同
- 基于API的Redis缓存实现不需要@EnableCaching注解开启Cache支持
- 同样基于API的Redis缓存实现需要引入Redis依赖启动器、配置Redis服务连接、实体类序列化
- 使用API进行数据缓存管理更加灵活。
自定义Redis缓存序列化机制
- 对于上面两种Redis缓存整合方式,分别进行序列化设置,并自定义JSON格式的数据序列化机制进行数据缓存管理
自定义RedisTemplate
- 基于Redis API的Redis缓存实现是使用RedisTemplate模板进行数据缓存管理的
public class RedisTemplate<K, V> extends RedisAccessor implements RedisOperations<K, V>, BeanClassLoaderAware {
...
private RedisSerializer keySerializer = null;
@Nullable
private RedisSerializer valueSerializer = null;
@Nullable
private RedisSerializer hashKeySerializer = null;
@Nullable
private RedisSerializer hashValueSerializer = null;
...
public void afterPropertiesSet() {
super.afterPropertiesSet();
boolean defaultUsed = false;
if (this.defaultSerializer == null) {
this.defaultSerializer = new JdkSerializationRedisSerializer(this.classLoader != null ? this.classLoader : this.getClass().getClassLoader());
}
...
}
- 打开RedisTemplate类,查看源码
- 从如下代码可以看出,如果序列号参数defaultSerializer为null,则数据序列化方式为JdkSerializationRedisSerializer
- 1)使用RedisTemplate对Redis数据进行缓存操作时,内部使用的JdkSerializationRedisSerializer序列化方式要求被序列化的实体类继承Serializable接口
- 2)使用RedisTemplate时,如果没有特殊设置,key和value都是使用defaultSerializer=new JdkSerializationRedisSerializer()进行序列化的。
- 3)查看RedisSerializer类型,发现其支持的序列化方式有如下七种,默认为JdkSerializationRedisSerializer

- 自定义RedisTemplate序列化机制
查看RedisAutoConfiguration类,核心代码如下:
@ConditionalOnMissingBean(
name = {"redisTemplate"}
)
public RedisTemplate<Object, Object> redisTemplate(RedisConnectionFactory redisConnectionFactory) throws UnknownHostException {
RedisTemplate<Object, Object> template = new RedisTemplate();
template.setConnectionFactory(redisConnectionFactory);
return template;
}
从代码中我们可以发现,如果想要使用自定义序列化的RedisTemplate进行数据缓存操作,可以创建一个名为redisTemplate的Bean组件,并在
该组件中设置对应的序列化方式即可
@Configuration
public class RedisConfig {
@Bean
public RedisTemplate<Object,Object> redisTemplate(RedisConnectionFactory redisConnectionFactory){
RedisTemplate<Object,Object> template = new RedisTemplate<>();
template.setConnectionFactory(redisConnectionFactory);
Jackson2JsonRedisSerializer jsonRedisSerializer = new Jackson2JsonRedisSerializer(Object.class);
ObjectMapper om = new ObjectMapper();
om.setVisibility(PropertyAccessor.ALL, JsonAutoDetect.Visibility.ANY);
om.activateDefaultTyping(LaissezFaireSubTypeValidator.instance,ObjectMapper.DefaultTyping.NON_FINAL,
JsonTypeInfo.As.PROPERTY);
jsonRedisSerializer.setObjectMapper(om);
template.setDefaultSerializer(jsonRedisSerializer);
return template;
}
}
- 效果测试,发现缓存到redis的数据以JSON格式存储的,序列化成功。

自定义RedisCacheManager
- 针对基于注解的Redis缓存机制进行自动序列化
- 查看RedisCacheConfiguration源码
- 发现同RedisTemplate核心代码类似,其内部同样通过Redis连接工厂RedisConnectionFactory定义了一个缓存管理器RedisCacheManager;同时定制RedisCacheManager时,使用了默认的JdkSerializationRedisSerializer序列化方式
- 如果想要使用自定义序列化方式的RedisCacheManager进行缓存操作,可以创建一个cacheManager的Bean组件。
- (1.x的SpringBoot版本,RedisCacheManager时在RedisTemplate的基础上进行构建的)
- (2.x的SpringBoot版本,RedisCacheManager是单独进行构建的)
class RedisCacheConfiguration {
    RedisCacheConfiguration() {
    }

    @Bean
    RedisCacheManager cacheManager(CacheProperties cacheProperties, CacheManagerCustomizers cacheManagerCustomizers, ObjectProvider<org.springframework.data.redis.cache.RedisCacheConfiguration> redisCacheConfiguration, ObjectProvider<RedisCacheManagerBuilderCustomizer> redisCacheManagerBuilderCustomizers, RedisConnectionFactory redisConnectionFactory, ResourceLoader resourceLoader) {
        RedisCacheManagerBuilder builder = RedisCacheManager.builder(redisConnectionFactory).cacheDefaults(this.determineConfiguration(cacheProperties, redisCacheConfiguration, resourceLoader.getClassLoader()));
        List<String> cacheNames = cacheProperties.getCacheNames();
        if (!cacheNames.isEmpty()) {
            builder.initialCacheNames(new LinkedHashSet(cacheNames));
        }

        redisCacheManagerBuilderCustomizers.orderedStream().forEach((customizer) -> {
            customizer.customize(builder);
        });
        return (RedisCacheManager)cacheManagerCustomizers.customize(builder.build());
    }
    ...
    private org.springframework.data.redis.cache.RedisCacheConfiguration createConfiguration(CacheProperties cacheProperties, ClassLoader classLoader) {
        Redis redisProperties = cacheProperties.getRedis();
        org.springframework.data.redis.cache.RedisCacheConfiguration config = org.springframework.data.redis.cache.RedisCacheConfiguration.defaultCacheConfig();
        config = config.serializeValuesWith(SerializationPair.fromSerializer(new JdkSerializationRedisSerializer(classLoader)));
        if (redisProperties.getTimeToLive() != null) {
            config = config.entryTtl(redisProperties.getTimeToLive());
        }
- 编写自定义RedisCacheManager的Bean组件
@Bean
public RedisCacheManager redisCacheManager(RedisConnectionFactory redisConnectionFactory){
RedisSerializer<String> stringRedisSerializer = new StringRedisSerializer();
Jackson2JsonRedisSerializer jsonRedisSerializer = new Jackson2JsonRedisSerializer(Object.class);
ObjectMapper om = new ObjectMapper();
om.setVisibility(PropertyAccessor.ALL, JsonAutoDetect.Visibility.ANY);
om.activateDefaultTyping(LaissezFaireSubTypeValidator.instance,ObjectMapper.DefaultTyping.NON_FINAL,
JsonTypeInfo.As.PROPERTY);
jsonRedisSerializer.setObjectMapper(om);
RedisCacheConfiguration config = RedisCacheConfiguration.defaultCacheConfig()
.entryTtl(Duration.ofDays(1))
.serializeKeysWith(RedisSerializationContext.SerializationPair.fromSerializer(stringRedisSerializer))
.serializeValuesWith(RedisSerializationContext.SerializationPair.fromSerializer(jsonRedisSerializer))
.disableCachingNullValues();
RedisCacheManager cacheManager = RedisCacheManager.builder(redisConnectionFactory).cacheDefaults(config).build();
return cacheManager;
}


 19万+
19万+

 被折叠的 条评论
为什么被折叠?
被折叠的 条评论
为什么被折叠?
 到【灌水乐园】发言


