


NFS
环境准备
端口占用:TCP 111和2049
| 角色 | IP |
|---|---|
| NFS服务端 | 192.168.31.120 |
| NFS客户端 | 192.168.31.125 |
NFS服务端
-
安装NFS服务器
yum install -y rpcbind nfs-utils -
关闭防火墙和selinux
systemctl stop firewalld setenforce 0 -
创建共享目录
mkdir /home/data chmod -Rf 777 /home/data -
修改NFS的配置文件
vim /etc/exports

/home/data 192.168.31.0/24(rw,sync,root_squash)
参数 说明 ro 只读 rw 读写 root_squash 当NFS客户端以root管理员访问时,映射为NFS服务器的匿名用户 no_root_squash 当NFS客户端以root管理员访问时,映射为NFS服务器的root用户 all_squash 无论NFS客户端使用什么账户访问,均映射为NFS服务器的匿名用户 sync 同时将数据写入到内存与硬盘中,保证不丢失数据 async 优先将数据保存到内存,然后再写入硬盘;这样效率更高,但可能会丢失数据 [外链图片转存失败,源站可能有防盗链机制,建议将图片保存下来直接上传(img-RXvP7QK9-1659076236875)(https://raw.githubusercontent.com/zhouwei1997/Image/master/202205181638763.png)]
-
启动nfs服务
systemctl start rpcbind systemctl enable rpcbind systemctl start nfs-server systemctl enable nfs-server -
查看是否有节点
showmount -e 192.168.31.120
NFS客户端
-
安装NFS服务器
yum install -y rpcbind nfs-utils -
关闭防火墙和selinux
systemctl stop firewalld setenforce 0 -
启动rpcbind
systemctl enable rpcbind.service systemctl start rpcbind.service -
检查是否能找到NFS-Server
showmount -e 192.168.31.120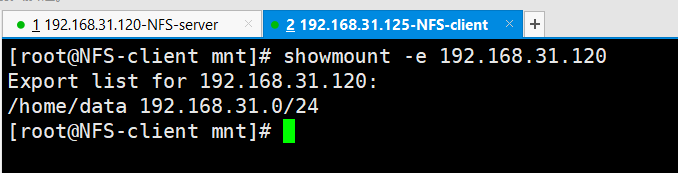
-
挂载nfs
mount -t nfs 192.168.31.120:/home/data /home/test -
开机自动挂载
# 在/etc/fstab中添加挂载信息
192.168.31.120:/home/data   /home/test      nfs  defaults 0  0

# 在rc.local中添加(rc.local需要有可执行权限)
mount -t nfs 192.168.31.120:/home/data /home/test


 1764
1764


 被折叠的 条评论
为什么被折叠?
被折叠的 条评论
为什么被折叠?
 到【灌水乐园】发言


