


一、安装php环境(二进制安装)
1.安装php依赖包及rpm包
yum install https://dl.fedoraproject.org/pub/epel/epel-release-latest-7.noarch.rpm
yum install http://rpms.remirepo.net/enterprise/remi-release-7.rpm
yum install yum-utils
yum-config-manager --enable remi-php56
yum install php php-mcrypt php-cli php-gd php-curl php-mysql php-ldap php-zip php-fileinfo php-fpm php-xml php-mbstring
2.新建运行php程序用户
groupadd -g 1000 www
useradd -g 1000 -u 1000 -s /sbin/nologin www
3.修改php-fpm配置文件
cp -rf /etc/php-fpm.d/www.conf /etc/php-fpm.d/www.conf.bak
vim /etc/php-fpm.d/www.conf
[www]
user = www
group = www
listen = /dev/shm/php-fpm56.sock
listen.backlog = 2048
listen.owner = www
listen.group = www
listen.mode = 0660
listen.allowed_clients = 127.0.0.1
pm = dynamic
pm.max_children = 512
pm.start_servers = 128
pm.min_spare_servers = 64
pm.max_spare_servers = 128
pm.max_requests = 10240
pm.status_path = /php_status
slowlog = /var/log/php-fpm/www-slow.log
4.修改内核配置
echo 1000 > /proc/sys/net/core/somaxconn
5.修改php的session缓存属主
chown -R www:www /var/lib/php/session
6.启动php-fpm
systemctl enable php-fpm
systemctl start php-fpm
二、源码安装nginx
1.安装gcc等编译工具
yum install -y gcc gcc-c++
yum install -y pcre pcre-devel openssl openssl-devel zlib zlib-devel unzip patch wget
2.源码安装nginx
wget http://nginx.org/download/nginx-1.12.2.tar.gz ./
tar xf nginx-1.12.2.tar.gz
wget https://codeload.github.com/yaoweibin/nginx_upstream_check_module/zip/master
unzip master
cd nginx-1.12.2
patch -p1 < ../nginx_upstream_check_module-master/check_1.12.1+.patch
cd ..
wget https://github.com/vozlt/nginx-module-vts/archive/master.zip
unzip master.zip
mkdir -p /webser/www
chown -R www:www /webser/www
mkdir /webser/nginx
cd nginx-1.12.2
./configure --prefix=/webser/nginx --user=www --group=www --with-http_ssl_module --with-http_stub_status_module --with-file-aio --with-stream --with-stream_ssl_module --with-stream_realip_module --with-stream_ssl_preread_module --with-http_slice_module --with-http_stub_status_module --with-http_v2_module --with-http_gzip_static_module --with-http_sub_module --add-module=../nginx_upstream_check_module-master --add-module=../nginx-module-vts-master && make && make install
3.配置nginx
Vim /webser/nginx/conf/nginx.conf
4.检查nginx 配置并启动
/webser/nginx/sbin/nginx -t
/webser/nginx/sbin/nginx
三、安装mysql
(由于yum源上没有mysql-server。所以必须去官网下载,这里 我们用wget命令,直接获取)
wget https://dev.mysql.com/get/mysql57-community-release-el7-10.noarch.rpm
-bash: wget: 未找到命令
我们先安装下wget
yum -y install wget
然后再执行
wget https://dev.mysql.com/get/mysql57-community-release-el7-10.noarch.rpm
yum -y install mysql57-community-release-el7-10.noarch.rpm
yum -y install mysql-community-server
systemctl restart mysqld
此时MySQL已经开始正常运行,不过要想进入MySQL还得先找出此时root用户的密码,通过如下命令可以在日志文件中找出密码:
grep "password" /var/log/mysqld.log
复制密码进入数据库
直接修改密码:ALTER USER 'root'@'localhost' IDENTIFIED BY '123';
会出现报错:ERROR 1819 (HY000): Your password does not satisfy the current policy requirements
以上报错是说新设置的密码过于简单,
解决方式就是修改密码策略和长度
mysql> set global validate_password_policy=0;
mysql> set global validate_password_policy=LOW;
mysql> SET GLOBAL validate_password_length=4;
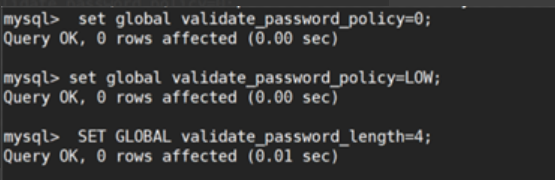
再输入命令:ALTER USER 'root'@'localhost' IDENTIFIED BY 'root';
即可成功!
四、安装禅道
wget http://dl.cnezsoft.com/zentao/11.5.1/ZenTaoPMS.11.5.1.zip
unzip ZenTaoPMS.11.5.1.zip
修改项目执行组和用户:
chown www.www zentaopms/ -R
五、修改配置文件
vim /webser/nginx/conf/nginx.conf
添加server
server {
listen 80;
root /opt/zentaopms/www;
index index.html index.php;
location /
{
try_files $uri $uri/ /index.php?$query_string;
}
location ~ .*\.(php|php5)?$
{
try_files $uri /index.php =404;
#fastcgi_pass unix:/dev/shm/php-fpm56.sock;
fastcgi_pass 127.0.0.1:9000;
fastcgi_index index.php;
include fastcgi.conf;
proxy_set_header Host $host;
proxy_set_header X-Real-IP $remote_addr;
proxy_set_header X-Forwarded-For $proxy_add_x_forwarded_for;
}
}
重启nginx:
/webser/nginx/sbin/nginx -s reload


 1164
1164


 被折叠的 条评论
为什么被折叠?
被折叠的 条评论
为什么被折叠?
 到【灌水乐园】发言


