


 本文介绍了WPF中用于创建控件效果的Effect,特别是DropShadowEffect(投影效果)和BlurEffect(模糊效果)。通过代码示例展示了如何设置不同属性来实现各种阴影和模糊效果,并提醒了使用Effect时可能导致字体模糊的问题。
总目录
文章目录
前言
WPF中的控件效果主要通过Effect来实现,而Effect有DropShadowEffect(投影效果)和BlurEffect(模糊效果)两个派生类,本文将主要介绍Effect的运用!
一、DropShadowEffect
1、DropShadowEffect各属性效果图
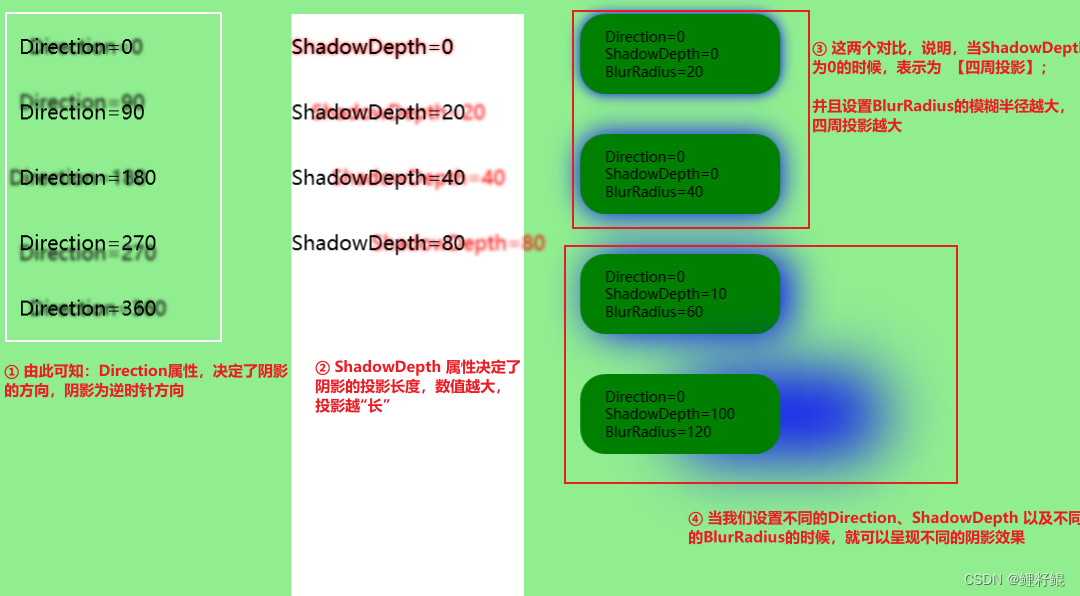
另外还有两个常用的属性,没有在上图介绍
- Color 属性 设置阴影的颜色
- Opacity 属性 设置阴影的透明度
2、实现代码
    <UniformGrid Background="LightGreen" Columns="4">
        <StackPanel Margin="20">
            <TextBlock Text="Direction=0" Margin="0,20">
                <TextBlock.Effect>
                    <DropShadowEffect Color="Black" Direction="0" ShadowDepth="10"/>
                </TextBlock.Effect>
            </TextBlock>
            <TextBlock Text="Direction=90" Margin="0,20">
                <TextBlock.Effect>
                    <DropShadowEffect Color="Black" Direction="90" ShadowDepth="10"/>
                </TextBlock.Effect>
            </TextBlock>
            <TextBlock Text="Direction=180" Margin="0,20">
                <TextBlock.Effect>
                    <DropShadowEffect Color="Black" Direction="180" ShadowDepth="10"/>
                </TextBlock.Effect>
            </TextBlock>
            <TextBlock Text="Direction=270" Margin="0,20">
                <TextBlock.Effect>
                    <DropShadowEffect Color="Black" Direction="270" ShadowDepth="10"/>
                </TextBlock.Effect>
            </TextBlock>
            <TextBlock Text="Direction=360" Margin="0,20">
                <TextBlock.Effect>
                    <DropShadowEffect Color="Black" Direction="360" ShadowDepth="10"/>
                </TextBlock.Effect>
            </TextBlock>

        </StackPanel>
        <StackPanel Margin="20" Background="White">
            <TextBlock Text="ShadowDepth=0" Margin="0,20">
                <TextBlock.Effect>
                    <DropShadowEffect Color="Red" Direction="0" ShadowDepth="0"/>
                </TextBlock.Effect>
            </TextBlock>
            <TextBlock Text="ShadowDepth=20" Margin="0,20">
                <TextBlock.Effect>
                    <DropShadowEffect Color="Red" Direction="0" ShadowDepth="20"/>
                </TextBlock.Effect>
            </TextBlock>
            <TextBlock Text="ShadowDepth=40" Margin="0,20">
                <TextBlock.Effect>
                    <DropShadowEffect Color="Red" Direction="0" ShadowDepth="40"/>
                </TextBlock.Effect>
            </TextBlock>
            <TextBlock Text="ShadowDepth=80" Margin="0,20">
                <TextBlock.Effect>
                    <DropShadowEffect Color="Red" Direction="0" ShadowDepth="80"/>
                </TextBlock.Effect>
            </TextBlock>

        </StackPanel>
        <StackPanel>
            <Border Height="80" Width="200" CornerRadius="25" Background="Green" Margin="0,20">
                <Border.Effect>
                    <DropShadowEffect Color="Blue" Direction="0" ShadowDepth="0" BlurRadius="20"/>
                </Border.Effect>
                <TextBlock Text="Direction=0 ShadowDepth=0 BlurRadius=20" FontSize="14" VerticalAlignment="Center" TextWrapping="Wrap" Width="150"></TextBlock>
            </Border>

            <Border Height="80" Width="200" CornerRadius="25" Background="Green" Margin="0,20">
                <Border.Effect>
                    <DropShadowEffect Color="Blue" Direction="0" ShadowDepth="0" BlurRadius="40"/>
                </Border.Effect>
                <TextBlock Text="Direction=0 ShadowDepth=0 BlurRadius=40" FontSize="14" VerticalAlignment="Center" TextWrapping="Wrap" Width="150"></TextBlock>
            </Border>

            <Border Height="80" Width="200" CornerRadius="25" Background="Green" Margin="0,20">
                <Border.Effect>
                    <DropShadowEffect Color="Blue" Direction="0" ShadowDepth="10" BlurRadius="60"/>
                </Border.Effect>
                <TextBlock Text="Direction=0 ShadowDepth=10 BlurRadius=60" FontSize="14" VerticalAlignment="Center" TextWrapping="Wrap" Width="150"></TextBlock>
            </Border>

            <Border Height="80" Width="200" CornerRadius="25" Background="Green" Margin="0,20">
                <Border.Effect>
                    <DropShadowEffect Color="Blue" Direction="0" ShadowDepth="100" BlurRadius="120"/>
                </Border.Effect>
                <TextBlock Text="Direction=0 ShadowDepth=100 BlurRadius=120" FontSize="14" VerticalAlignment="Center" TextWrapping="Wrap" Width="150"></TextBlock>
            </Border>
        </StackPanel>
    </UniformGrid>
二、BlurEffect
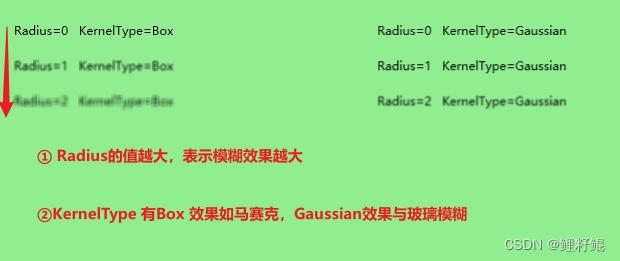
1、BlurEffect各属性效果图
2、实现代码
    <UniformGrid Background="LightGreen" Columns="3">
        <StackPanel Margin="20">
            <TextBlock Text="Radius=0   KernelType=Box" Margin="0,10">
                <TextBlock.Effect>
                    <BlurEffect Radius="0"  KernelType="Box"/>
                </TextBlock.Effect>
            </TextBlock>
            <TextBlock Text="Radius=1   KernelType=Box" Margin="0,10">
                <TextBlock.Effect>
                    <BlurEffect Radius="1"  KernelType="Box"/>
                </TextBlock.Effect>
            </TextBlock>
            <TextBlock Text="Radius=2   KernelType=Box" Margin="0,10">
                <TextBlock.Effect>
                    <BlurEffect Radius="2"  KernelType="Box"/>
                </TextBlock.Effect>
            </TextBlock>
        </StackPanel>
        <StackPanel Margin="20">
            <TextBlock Text="Radius=0   KernelType=Gaussian" Margin="0,10">
                <TextBlock.Effect>
                    <BlurEffect Radius="0"  KernelType="Gaussian"/>
                </TextBlock.Effect>
            </TextBlock>
            <TextBlock Text="Radius=1   KernelType=Gaussian" Margin="0,10">
                <TextBlock.Effect>
                    <BlurEffect Radius="1"  KernelType="Gaussian"/>
                </TextBlock.Effect>
            </TextBlock>
            <TextBlock Text="Radius=2   KernelType=Gaussian" Margin="0,10">
                <TextBlock.Effect>
                    <BlurEffect Radius="2"  KernelType="Gaussian"/>
                </TextBlock.Effect>
            </TextBlock>
        </StackPanel>

    </UniformGrid>
三、进阶使用
详情可查:[WPF] 使用 Effect 玩玩阴影、内阴影、 长阴影
四、注意事项
1、 由于使用Effect 导致字体模糊

        <StackPanel HorizontalAlignment="Center" VerticalAlignment="Center" Orientation="Horizontal">

            <Border Width="200" Height="100" Background="#5Eb978">
                <Border.Effect>
                    <DropShadowEffect BlurRadius="10" ShadowDepth="0"/>
                </Border.Effect>
                <TextBlock Text="这个是错误示范" HorizontalAlignment="Center" VerticalAlignment="Center" FontSize="25"></TextBlock>
            </Border>

            <Grid Width="200" Height="100" Margin="30,0,0,0">
                <Border Width="200" Height="100" Background="#5Eb978">
                    <Border.Effect>
                        <DropShadowEffect BlurRadius="10" ShadowDepth="0"/>
                    </Border.Effect>
                </Border>
                <TextBlock Text="正确示范" VerticalAlignment="Center" HorizontalAlignment="Center" FontSize="25"></TextBlock>
            </Grid>


        </StackPanel>
提示:当对Border 使用 Effect 的时候,最好不要在Border 内部添加TextBlock等展示元素,否则会造成 TextBlock 模糊。
结语
以上就是本文的内容,希望以上内容可以帮助到您,如文中有不对之处,还请批评指正。
参考资料:
WPF 实现阴影效果
[WPF] 使用 Effect 玩玩阴影、内阴影、 长阴影
WPF Effect 造成的字体模糊


 329
329

 被折叠的 条评论
为什么被折叠?
被折叠的 条评论
为什么被折叠?
 到【灌水乐园】发言


