


提示:文章写完后,目录可以自动生成,如何生成可参考右边的帮助文档
目录
1.1 在pom.xml文件中添加redisson-spring-boot-starter依赖
1.3 在springBoot项目中使用redisson实现分布式锁
2.1 在pom.xml文件中追加spring-boot-starter-cache依赖
2.2 在application.yml文件中追加cache配置
2.3 在springBoot项目中的启动类中为指定缓存名称添加cache配置
一、redis简介
1、reids是什么
Redis 全称 Remote Dictionary Server(即远程字典服务),它是一个基于内存实现的键值型非关系(NoSQL)数据库,由意大利人 Salvatore Sanfilippo 使用 C 语言编写。
2、redis优点
- 性能极高:Redis 基于内存实现数据存储,它的读取速度是 110000次/s,写速度是 81000次/s;
- 多用途工具: Redis 有很多的用途,比如可以用作缓存、消息队列、搭建 Redis 集群等;
- 命令提示功能:Redis 客户端拥有强大的命令提示功能,使用起来非常的方便,降低了学习门槛;
- 可移植性:Redis 使用用标准 C语言编写的,能够在大多数操作系统上运行,比如 Linux,Mac,Solaris 等。
- Redis 不仅可以将数据完全保存在内存中,还可以通过磁盘实现数据的持久存储;
- Redis 支持丰富的数据类型,包括 string、list、set、zset、hash 等多种数据类型,因此它也被称为“数据结构服务器”;
- Redis 支持多种编程语言,包括 C、C++、Python、Java、PHP、Ruby、Lua 等语言。
3、常用数据结构及应用场景
String:使用场景
存储json字符串
计数器
分布式锁
Hash
短网址生成器
用户登录会话存储
存储对象(缓存)
List(有序列表)
队列(先进先出)
分页
微信朋友圈点赞
Set(无序不重复集合)
随机点名 -> 重复点名srandmember / 不重复点名spop
关注模型 -> 交集sinter / 差集sdiff
唯一计数器 -> 不可录入重复数据
SortedSet
热搜榜
了解redis相关命令及技术![]() http://c.biancheng.net/redis/lists.html
http://c.biancheng.net/redis/lists.html
与 SQL 型数据库截然不同,Redis 没有提供新建数据库的操作,因为它自带了 16 (0—15)个数据库(默认使用 0 库)。在同一个库中,key 是唯一存在的、不允许重复的,它就像一把“密钥”,只能打开一把“锁”。键值存储的本质就是使用 key 来标识 value,当想要检索 value 时,必须使用与 value 相对应的 key 进行查找。
二、redis在springBoot项目中的简单应用
以下示例使用jdk1.8版本进行测试
1、用redisson实现分布式锁
1.1 在pom.xml文件中添加redisson-spring-boot-starter依赖
<!--导入redisson-spring-boot-starter-->
<dependency>
    <groupId>org.redisson</groupId>
    <artifactId>redisson-spring-boot-starter</artifactId>
    <version>3.19.1</version>
</dependency>
1.2 在application.yml文件中服务端配置
spring:
  redis:
    port: 6379  #redis服务器端口(根据实际地址配置)
    host: 192.168.90.66   #redis服务器ip(根据实际地址配置)
1.3 在springBoot项目中使用redisson实现分布式锁
示例代码如下:
@RestController
@Slf4j
public class RedissionLockTest {

    @Autowired
    private RedissonClient redissonClient;  //redis客户端
    @Autowired
    private StringRedisTemplate redisTemplate;  //redis中的String数据结构

    @GetMapping("/get")
    public String get() {
        RLock lock = redissonClient.getLock("lockTest");
        String getStock;
        String tipText = null;
        try {
            log.info("开始上锁");
            //当后续业务执行到此处时,如果当前线程没有执行解锁操作,则会阻塞在此处
            lock.lock();
            log.info("执行业务");
            //尝试从redis中获取stock的值
            getStock = redisTemplate.opsForValue().get("stock");
            //如果没有存入stock,那么向redis中存入stock,并且值为10
            if (getStock == null) {
                getStock = "10";
                redisTemplate.opsForValue().set("stock", getStock);
            }
            if (Integer.parseInt(getStock) == 0) {
                //没有库存时,提示库存不足,不可在此处直接返回,因为未解锁
                tipText = "提交失败,库存不足!";
            } else {
                //库存足够时,将库存量减1,并提示当前库存量
                getStock = (Integer.parseInt(getStock) - 1) + "";
                redisTemplate.opsForValue().set("stock", getStock);
                tipText = "提交成功,当前库存为:" + getStock;
            }
        } finally {
            log.info("开始解锁");
            lock.unlock();
            //在解锁后才向前端返回信息
            return tipText;
        }
    }
在项目中添加html页面,用于简单测试并发场景
<!DOCTYPE html>
<html lang="en">
    <head>
        <meta charset="UTF-8">
        <title>Title</title>
    </head>
    <body>
        <input type="text" value="并发次数:" style="width: 60px" disabled>
        <input type="text" style="width: 50px">
        <input type="button" onclick="submit()" value="测试分布式锁"></input>
    </body>

    <script src="../js/jquery-1.12.4.js" type="text/javascript"></script>
    <script>
        function submit() {
            var textValue = $("input:text:last").val()
            for (let i = 0; i < textValue; i++) {
                //使用jquery发起请求
                $.getJSON('http://localhost:8080/get',function (resp) {
                    console.log(resp)
                })
            }
        }
    </script>
</html>
前端运行结果如下:
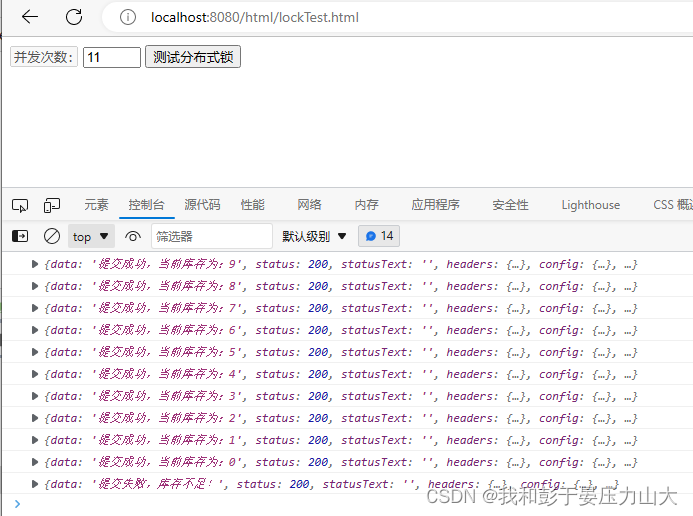
结果:数据没有出现访问错误
2、用redisson实现spring缓存
2.1 在pom.xml文件中追加spring-boot-starter-cache依赖
<dependency>
    <groupId>org.springframework.boot</groupId>
    <artifactId>spring-boot-starter-cache</artifactId>
</dependency>
2.2 在application.yml文件中追加cache配置
spring:
  redis:
    port: 6379  #redis服务器端口
    host: 192.168.90.66   #redis服务器ip

  #以下为追加部分
  cache:  #spring项目开启缓存的配置
    type: redis
    redis:  #缓存key的有效期,单位为秒,如果在此处配置则适用于所有缓存
      time-to-live: 60  #如不设置,则永久有效。如需单独为每一个key配置有效期,见下文
2.3 在springBoot项目中的启动类中为指定缓存名称添加cache配置
示例代码如下:
@SpringBootApplication
@MapperScan(basePackages = "com.woniuxy.redistest.dao")
@EnableCaching  //必须添加此注解开启spring缓存
public class RedisTestApplication {

    public static void main(String[] args) {
        SpringApplication.run(RedisTestApplication.class, args);
    }

    //添加cache配置,如果不用为指定缓存名称设定有效期,可忽略下列代码
    @Bean
    CacheManager cacheManager(RedissonClient redissonClient){
        HashMap<String, CacheConfig> configHashMap = new HashMap<>();
        //为指定缓存名称设置有效期,单位为毫秒
        configHashMap.put("accountCache",new CacheConfig(30*1000,30*1000));
        return new RedissonSpringCacheManager(redissonClient,configHashMap);
    }

}
注:即使不为指定缓存名称设置有效期,也要在springBoot启动类中添加@EnableCaching注解
2.4 在springBoot项目中使用缓存
示例代码如下:
@RestController
public class SpringCacheTestController {

    @Autowired
    private AccountService accountService;

    @GetMapping("/getAccountInfo")
    //@Cacheable开启缓存,key = "#id"中的id字段需与传入方法中的id字段保持一致
    //在redis中便保存了类似于以id的值作为key,以account对象作为value的map对象
    //后续调用此接口时便以id的值向redis中获取account对象
    @Cacheable(cacheNames = "accountCache",key = "#id")
    public Account getAccountInfo(Integer id){
        Account account = accountService.getById(id);
        return account;
    }

    @PutMapping("/modifyAccountInfo")
    @CachePut(cacheNames = "accountCache",key = "#account.id")
    //@CachePut修改缓存中的数据,根据account.id来修改内容
    // 其中id为Account类中的属性名,请根据实际情况修改,目的是获取到上个接口中产生的key
    //修改的内容就是返回的account对象中的属性
    public Account modifyAccountInfo(@RequestBody Account account){
        accountService.updateById(account);
        return account;
    }

    @GetMapping("/logoutAccountInfo")
    @CacheEvict(cacheNames = "accountCache",key = "#id")
    //@CacheEvict删除缓存中的数据,根据key = "#id"中id的值来删除指定缓存
    //不需要有返回值
    public void logoutAccountInfo(Integer id){}
}


 5106
5106


 被折叠的 条评论
为什么被折叠?
被折叠的 条评论
为什么被折叠?
 到【灌水乐园】发言


