


一、准备工作
1、新建web project
2、添加spring开发支持
此时会自动配置上web包,其中包含了springMVC支持。也就是说可以直接在项目中使用Spring MVC了
3、定义相关配置
(1)Spring MVC的所有配置都要在applicationContext.xml文件
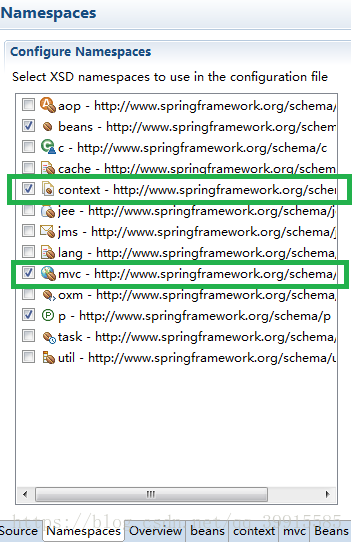
    <!-- mvc的配置也是基于annotation实现的 -->
    <context:annotation-config/>
    <context:component-scan base-package="cn.mldn"/>
    <!-- 定义Spring MVC的处理 -->
    <mvc:annotation-driven/>
    <mvc:default-servlet-handler/>
(2)配置web.xml文件
最好的MVC设计,所有的控制器的处理使用Servlet完成,springMVC也是的
从下面的程序代码可以看出:使用了Servlet进行所有Action的分配处理,也就证明,开发之中,过滤器可以用于所有的验证操作。
  <!-- 此部分是负责Spring容器启动的,即使有spring MVC,这部分也不可少-->
  <listener>
    <listener-class>org.springframework.web.context.ContextLoaderListener
    </listener-class>
  </listener>
  <context-param>
    <param-name>contextConfigLocation</param-name>
    <param-value>classpath:applicationContext.xml</param-value>
  </context-param>

  <!-- 配置springMVC中要用的控制器 -->
  <servlet>
  <servlet-name>springmvc</servlet-name>
  <servlet-class>org.springframework.web.servlet.DispatcherServlet</servlet-class>
  <init-param>
      <param-name>contextConfigLocation</param-name>
      <param-value>classpath:applicationContext.xml</param-value>
  </init-param>
  </servlet>
  <servlet-mapping>
      <servlet-name>springmvc</servlet-name>
      <url-pattern>*.action</url-pattern>
  </servlet-mapping>


</web-app>
4、演示一下代码
(1)新建一个action类
package cn.mldn.action;

import javax.xml.ws.Dispatch;

import org.springframework.web.servlet.DispatcherServlet;

public class MessageAction {
	public void print() {
	}

}
(2)将项目发布到TOMCAT上:暂时不会
二、Spring MVC的基本操作
用最原始的方式来实现。数据类型全是vo类型
1、建立一个Message.java类
public class Type {
	private String title;
//生成setter/getter/toString
public class Message {
private Integer mid;
private String title;
private Double priceDouble;
private Date pubDate;
//生成setter/getter/toString2、定义action
定义MessageAction,进行数据的接收
@Controller //定义了一个控制器
@RequestMapping("/pages/back/message/*") //整体访问路径
public class MessageAction {
	@RequestMapping("hello_demo") //为demo方法定义映射子空间
	public void demo(Message msg) {
		System.out.println(msg);
	}
}
3、由于是第一次执行,可以利用地址重写的方式传递所要的数据
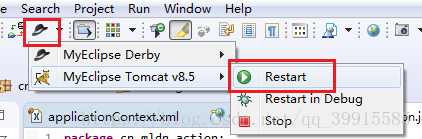
(1)点击图示的那个按键:

(2)将项目添加到Tomcat,myeclipse好像自己有Tomcat,不过我事先也已经装好了,如果不知道怎么下载安装,请点击此链接

(3)选择start
(4)观察到结果栏有数据,年月日一堆字母等等,就对了。再点击绿色开始按键。
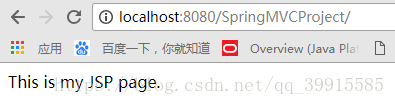
(5)在浏览器中输入:http://localhost:8080//SpringMVCProject 。出现如下界面
(6)继续打开拼凑路径:http://localhost:8080//SpringMVCProject/pages/back/message/hello_demo.action

此时,观察myeclipse结果栏

说明请求有被传过来
(7)输入属性:http://localhost:8080//SpringMVCProject/pages/back/message/hello_demo.action?mid=10&title=晚上好

- http://localhost:8080//SpringMVCProject/pages/back/message/:表示整个action的父路径
- hello_demo.action:表示的是配置的方法路径
- mid=10&title=晚上好:表示Message对象的组成
特点:控制器中不需要再编写类属性来接收参数,所有的参数都直接放到了处理的业务方法上,同时避免了实例化对象的问题。
传递的参数只需要传递属性名称即可,如果传递的是引用的数据类型,则要按照“.”排列即可(例如:type.title)
4、后台可以输出信息,但是前台显示404,原因:对于返回值的处理,在springMVC中有一些要求
在正常的开发环境之中,往往提供一个forward.jsp页面,功能是进行操作完成后的信息提示。
(1)建立一个forward.jsp界面,并修改内容(重点看body部分),一般情况下,都这么写的
<%@ page language="java" import="java.util.*" pageEncoding="ISO-8859-1"%>
<%
String path = request.getContextPath();
String basePath = request.getScheme()+"://"+request.getServerName()+":"+request.getServerPort()+path+"/";
%>

<!DOCTYPE HTML PUBLIC "-//W3C//DTD HTML 4.01 Transitional//EN">
<html>
  <head>
    <base href="<%=basePath%>">

    <title>My JSP 'index.jsp' starting page</title>
	<meta http-equiv="pragma" content="no-cache">
	<meta http-equiv="cache-control" content="no-cache">
	<meta http-equiv="expires" content="0">
	<meta http-equiv="keywords" content="keyword1,keyword2,keyword3">
	<meta http-equiv="description" content="This is my page">
	<!--
	<link rel="stylesheet" type="text/css" href="styles.css">
	-->
  </head>

  <body>
    <script type="text/javascript">
        window.alert("${msg}")
        window.location="<%=basePath%>${url}"
    </script>
  </body>
</html>
要想由一个控制器跳转到forward界面,至少需要两个东西
- 控制器要知道forward界面的路径
- 需要传递若干个request属性
在springMVC中提供一个类:org.springframework.web.servlet.ModelAndView,很重要!使用ModelAndView类用来存储处理完后的结果数据,以及显示该数据的视图
- 构造方法:ModelAndView()
- 构造方法:ModelAndView(String viewName) 传递的就是跳转的地址
- 保存方法:ModelAndView addObject(String attributeName, Object attributeValue)
5、更好地处理跳转
import cn.mldn.vo.Message;

@Controller //定义了一个控制器
@RequestMapping("/pages/back/message/*") //整体访问路径
public class MessageAction {
	@RequestMapping("hello_demo") //为demo方法定义映射子空间,没有指定请求方法(有GET/POST两种)
	public ModelAndView demo(Message msg) {
		ModelAndView mav=new ModelAndView("/pages/forward.jsp");
		mav.addObject("msg", "消息信息添加成功");
		mav.addObject("url","/index.jsp");
		System.out.println(msg);
		return mav;
	}
}
重新运行项目
总结:springMVC的优势
- 避免了过于复杂的页面跳转路径的配置操作
- 避免了项目之中出现过多的“.”作为参数的情况


 1186
1186


 被折叠的 条评论
为什么被折叠?
被折叠的 条评论
为什么被折叠?
 到【灌水乐园】发言


