


文章目录
项目架构
SpringBoot创建maven多模块项目

该项目名称为springboot-maven-multi,由
user-dao、user-domain、user-service、user-web
4个模块组成.
其中springboot-maven-multi模块是其他模块的父模块。
一、新建父模块:springboot-maven-multi项目
File -> New -> Project -> Spring Initializr

如下图:输入Group、Artifact等信息,Type选择Maven Pom

添加依赖,初始化pom文件。


最后finish即可。
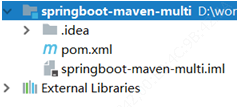
最后项目生成后结构只有一个pom.xml文件,无src目录,如下图
二、新建user-model、user-dao、user-service、user-controller模块
如:新建user-model模块
File -> New -Module -> Maven


在下图的Module name中输入 user-model
Next

点击Finish即可。
user-dao、user-service、user-web模块新建步骤也相同,只需修改模块名称即可。
三、编写user-model模块代码
创建User实体类
package com.bean;

import lombok.AllArgsConstructor;
import lombok.Data;
import lombok.NoArgsConstructor;

@Data
@NoArgsConstructor
@AllArgsConstructor
public class User {
	private String id;
	private String name;
	private String password;
}
四、编写user-dao模块代码
创建UserDao类(此处只是演示创建多模块,所以没有连接数据库),user-dao模块依赖于user-domain模块,所以需在pom.xml文件中引入user-model依赖
import com.bean.User;
import org.springframework.stereotype.Component;

import java.util.ArrayList;
import java.util.List;

@Component
public class UserDao {
    public List<User> query() {
        List<User> list = new ArrayList<>();
        User user = new User();
        user.setId(1L);
        user.setName("lnj");
        user.setPassword("123456");
        list.add(user);
        return list;
    }
}
先引入依赖,再引入类。
在User(这时爆红),按ALT+ENTER快捷键,上面有显示

点击第二个后,查看本模块的pom文件。

已经导入,再次按ALT+ENTER导入类

五、编写user-service模块代码
创建UserService类,user-service模块依赖于user-dao和user-model模块,所以需在pom.xml文件中引入user-dao和user-model依赖
package com.service;

import com.bean.User;
import com.dao.UserDao;
import org.springframework.beans.factory.annotation.Autowired;
import org.springframework.stereotype.Service;

import java.util.List;

@Service
public class UserService {
    @Autowired
    private UserDao userDao;

    public List<User> query() {
        return userDao.query();
    }
}
六、编写user-controller模块代码
创建UserController类,user-controller模块依赖于user-service和user-model模块,所以需在pom.xml文件中引入user-service和user-model依赖。
import com.bean.User;
import com.service.UserService;
import org.springframework.beans.factory.annotation.Autowired;
import org.springframework.web.bind.annotation.GetMapping;
import org.springframework.web.bind.annotation.RequestMapping;
import org.springframework.web.bind.annotation.ResponseBody;
import org.springframework.web.bind.annotation.RestController;

import java.util.List;

@RestController
@RequestMapping("user")
public class UserController {
    @Autowired
    private UserService userService;

    @GetMapping("/list")
    @ResponseBody
    public List<User> list() {
        return userService.query();
    }
}
七、创建UserApplication启动类
创建启动类时不可乱建,容易出错。
Springboot会默认将启动类同一级的包扫描进spring容器中,所以这里的启动类应和controller包在一个级别内。
当然也可以自动配置扫描包(不推荐),如下,加上如下几种配置方式。以下三种皆可。推荐使用默认扫描。
//@SpringBootApplication(scanBasePackages = {"com"})
//@ComponentScan(basePackages = {"com.service","com.dao","com.controller"})
//@ComponentScan(basePackages = {"com"})
package com;

import org.springframework.boot.SpringApplication;
import org.springframework.boot.autoconfigure.SpringBootApplication;


//@SpringBootApplication(scanBasePackages = {"com"})
@SpringBootApplication
//@ComponentScan(basePackages = {"com.service","com.dao","com.controller"})
//@ComponentScan(basePackages = {"com"})
public class UserApplication {

    public static void main(String[] args) {
        SpringApplication.run(UserApplication.class, args);
    }
}
注意启动类目录,容易出错。

八、启动user-web项目
运行UserApplication类,启动成功

九、打包测试

打包成功。
在浏览器请求 localhost:8080/user/list,

出现数据,则请求成功。


 597
597


 被折叠的 条评论
为什么被折叠?
被折叠的 条评论
为什么被折叠?
 到【灌水乐园】发言


