


Vue初探
语法糖
const { zhi } = Gao;
//等价于
const zhi = Gao.zhi
v-if&v-show(控制html标签显示与否)
v-if=true,标签显示,v-if=false,标签隐藏,实现原理是这个标签节点删除了
v-show=true,标签显示,v-show=false,标签隐藏,实现原理是设置了这个标签的style=“display:none;”,标签还在
<body>
    <div id="root">
    </div>
</body>
<script>
    const app = Vue.createApp({
        data () {
            return {
              show:false
            }
        },
        template:`
            <div v-if="show">
                hello world1
            </div>
            <div v-show="show">
                hello world2
            </div>
        `
    });
    app.mount('#root');
</script>

v-if&v-else-if&v-else
<body>
    <div id="root">
    </div>
</body>
<script>
    const app = Vue.createApp({
        data () {
            return {
              conditionOne:false,
              conditionTwo:true
            }
        },
        template:`
            <div v-if="conditionOne">
                if
            </div>
            <div v-else-if="conditionTwo">
                else if
            </div>
            <div v-else>
                else
            </div>
        `
    });
    app.mount('#root');
</script>
v-on:click(点击触发事件)
<body>
    <div id="root">
        <span v-if="show">{{content}}</span>
        <button v-on:click="visbleBtnClick">显示/隐藏</button>
    </div>
</body>
<script>
    Vue.createApp({
        data () {
            return {
                show:true,
                content:'hello world'
            }
        },
        methods: {
            visbleBtnClick(){
                this.show = !this.show;
            }
        }
    }).mount('#root');

</script>
v-for(for循环数据)
循环数组和对象
循环时最好写一个唯一key, v-bind:key=“index”,此处使用下标,因为每次循环下标是唯一的;这样更改数据时,下次vue渲染页面时,不必把原来的dom摧毁重建
<body>
    <div id="root">
    </div>
</body>
<script>
    const app = Vue.createApp({
        data () {
            return {
              listArr:['1','2','3'],
              listObj:{
                  first:1,
                  two:2,
                  three:3
              }
            }
        },
        methods: {
          handleAddItem(){
              // 数组变更函数
              this.listArr.push(4)
              // 从尾部删除内容
              this.listArr.pop;
              // 从头部删除内容
              this.listArr.shift();
              // 开头添加内容
              this.listArr.unshift(4);
              // splite,sort,reverse
          }
        },
        template:`
            <div v-for="(item,index) in listArr"  v-bind:key="index">
                {{item}} --{{index}}
            </div>
            <button v-on:click="handleAddItem">新增</button>
            <div v-for="(value,key,index) in listObj">
                {{value}} --{{key}} -- {{index}}
            </div>
        `
    });
    app.mount('#root');
</script>
v-model(数据双向绑定)
<body>
    <div id="root">

    </div>
</body>
<script>
<body>
    <div id="root">

    </div>
</body>
<script>

    Vue.createApp({
        data () {
            return {
                inputValue:'',
                list:[]
            }
        },
        methods: {
          addItem(){
              this.list.push(this.inputValue);
              this.inputValue = '';
          }
        },
        template:`
            <div>
                <input v-model="inputValue"/>
                <button v-on:click=addItem>增加</button>
                <ul>
                    <li v-for="(item,index) of list">{{item}}-{{index}}</li>
                </ul>
            </div>
        `
    }).mount('#root');
</script>
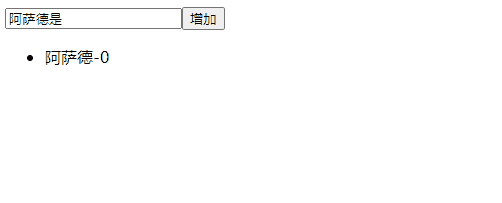
实现效果:点击增加会把输入框内容增加到下面的列表中,同时清空输入框
v-bind(标签上的属性对应值进行动态数据绑定)
一般的数据绑定发生在标签之间,如 < span>{{content}}</ span>
但是如果想让属性和数据发生绑定,则使用v-bind,且数据无需使用{{}}括起来
<body>
    <div id="root">

    </div>
</body>
<script>

    Vue.createApp({
        data () {
            return {
                inputValue:'',
                list:[]
            }
        },
        methods: {
          addItem(){
              this.list.push(this.inputValue);
              this.inputValue = '';
          }
        },
        template:`
            <div>
                <input v-model="inputValue"/>
                <button v-bind:title="inputValue" v-on:click=addItem>增加</button>
                <ul>
                    <li v-for="(item,index) of list">{{item}}-{{index}}</li>
                </ul>
            </div>
        `
    }).mount('#root');
</script>
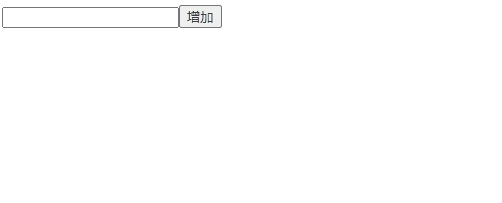
实现效果:

组件初探(双向绑定)
<body>
    <div id="root">

    </div>
</body>
<script>
    // 创建实例
    const app = Vue.createApp({
        data () {
            return {
                inputValue:'',
                list:[]
            }
        },
        methods: {
          addItem(){
              this.list.push(this.inputValue);
              this.inputValue = '';
          }
        },
        template:`
            <div>
                <input v-model="inputValue"/>
                <button v-bind:title="inputValue" v-on:click=addItem>增加</button>
                <ul>
                    <todo-item v-for="(item,index) of list" v-bind:content="item" />
                </ul>
            </div>
        `
    });
    // 定义组件
    app.component('todo-item',{
        props: ['content'],
        template: '<li>{{content}}</li>'
    });
    // 挂载实例到节点下
    app.mount('#root');

</script>
实现效果:
Vue基础语法
组件基本概念
mvvm设计模式:
m -> model 数据层(data),v -> view 视图层(template),vm -> viewModel 视图数据连接层
  <body>
    <div id="root"></div>
  </body>

  <script>
    // MVVM设计模式 m -> model 数据层(data),v -> view 视图层(template),vm -> viewModel 视图数据连接层
    // 创建vue应用
    const app = Vue.createApp({
      data() {
        return {
          message: "hello world",
        };
      },
      template: `
        <div>{{message}}</div>
      `,
    });

    // vue应用挂载到root节点上
    // vm代表的就是vue应用的根组件
    const vm = app.mount("#root");

    // 可通过vm操作数据,再反映到视图展示上,注意data前加$
    vm.$data.message = "bbb";
  </script>
Vue生命周期函数

常用模板语法
简写(v-on及v-bind简写)
 <div v-on:click="handleClike" v-bind:title="message">{{message}}</div>
 // 可简写成
  <div @click="handleClike" :title="message">{{message}}</div>
动态属性(标签上的属性进行动态数据绑定)
  <body>
    <div id="root"></div>
  </body>
  <script>
    // 生命周期函数:在某一时刻会自动执行的函数
    const app = Vue.createApp({
      data() {
        return {
          message: "hello world",
          name:"title",
          event:"click"
        };
      },
      methods: {
        handleClike() {
          alert("aaa");
        },
      },
      template: `
        <div v-on:[event]="handleClike" v-bind:[name]="message">
          {{message}}
        </div>
      `,
    });

    const vm = app.mount("#root");
  </script>
v-html(当成html标签进行解析,而不是字符串)
  <body>
    <div id="root"></div>
  </body>
  <script>
    const app = Vue.createApp({
      data() {
        return {
          message: "<strong>hello world</strong>",
        };
      },
      template: `
        <div v-html="message"></div>
      `,
    });
    const vm = app.mount("#root");
  </script>
v-once(只渲染一次,再通过外部修改数据则不能修改)
再通过vm.$data.message=“aaa”也不能更改显示值,减少无用渲染
  <body>
    <div id="root"></div>
  </body>
  <script>
    const app = Vue.createApp({
      data() {
        return {
          message: "hello world",
        };
      },
      template: `
        <div v-once>{{message}}</div>
      `,
    });
    const vm = app.mount("#root");
  </script>
修饰符语法(提前做一些工作)
阻止默认行为(下面代码不会跳转百度了)
 <body>
   <div id="root"></div>
 </body>
 <script>
   const app = Vue.createApp({
     data() {
       return {
         message: "hello world",
         name:"title",
         event:"click"
       };
     },
     methods: {
       handleClick(e) {
         e.preventDefault();
         alert("aa");
       },
     },
     template: `
       <form action="http://www.baidu.com" @click="handleClick">
           <button type="submit">提交</button>
       </form>
     `,
   });
   const vm = app.mount("#root");
 </script>

// 可被替换为============================================================

 <body>
   <div id="root"></div>
 </body>
 <script>
   const app = Vue.createApp({
     data() {
       return {
         message: "hello world",
         name:"title",
         event:"click"
       };
     },
     methods: {
       handleClick() {
         alert("aa");
       },
     },
     template: `
       <form action="http://www.baidu.com" @click.prevent="handleClick">
           <button type="submit">提交</button>
       </form>
     `,
   });
   const vm = app.mount("#root");
 </script>
{{}}中写表达式
  <body>
    <div id="root"></div>
  </body>
  <script>
    const app = Vue.createApp({
      data() {
        return {
          message: "hello world",
        };
      },
      methods: {
        formatStr(string){
          return string.toUpperCase();
        }
      },
      template: `
        <div>{{formatStr(message)}}</div>
      `,
    });
    const vm = app.mount("#root");
  </script>
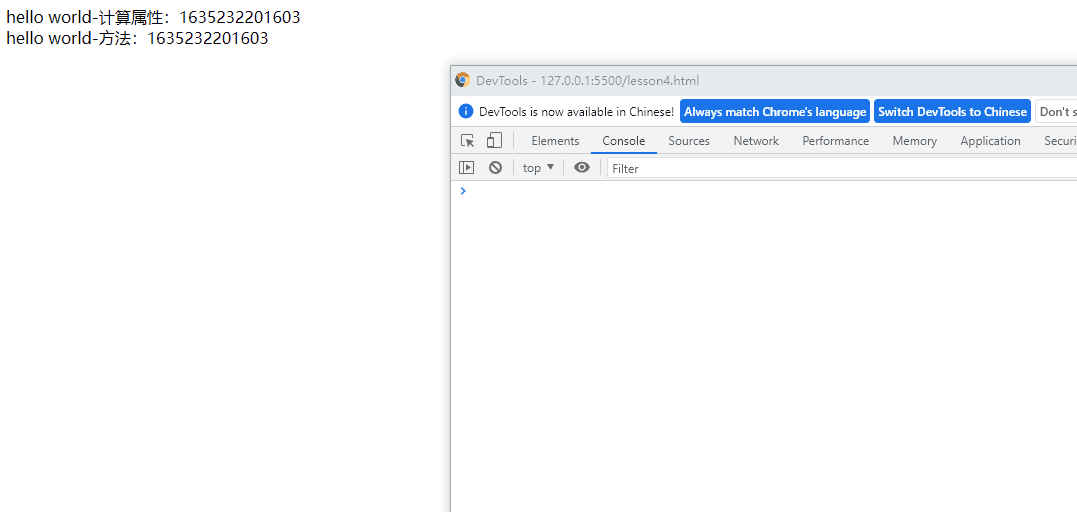
计算属性
计算属性和方法的区别:
计算属性依赖的内容发生变更时,才会重新执行计算,当计算属性返回当前日期时,其他数据更改时,是不会重新计算的,所以值不会变。
只要页面重新渲染,才会重新计算,当方法返回当前日期时,其他数据更改时会导致页面重新渲染,会发生重新计算
  <body>
    <div id="root"></div>
  </body>
  <script>
    const app = Vue.createApp({
      data() {
        return {
          message:"hello world"
        };
      },
      computed: {
        total(){
          return "计算属性:"+Date.now();
        }
      },
      methods: {
        formatStr(string){
          return string.toUpperCase();
        },
        getTotal(){
          return "方法:"+ Date.now();
        }
      },
      template: `
        <div>{{message}}-{{total}}</div>
        <div>{{message}}-{{getTotal()}}</div>
      `,
    });
    const vm = app.mount("#root");
  </script>
  </script>
实现效果:
侦听器(watch监听data中数据的改变)
  <body>
    <div id="root"></div>
  </body>
  <script>
    const app = Vue.createApp({
      data() {
        return {
          count:1,
          price:5
        };
      },
      watch: {
      	// count发生变化时,会执行
        count(current,pre){
          setInterval(() => {
            console.log("count changed");
          }, 3000);
        }
      },
      computed: {
        total(){
          return this.count*this.price;
        }
      },
      template: `
        <div>{{total}}</div>
      `,
    });
    const vm = app.mount("#root");
  </script>
实现效果:
样式绑定语法(子组件引用父组件属性$attrs)
class绑定三种方式
行内样式绑定两种方式
子组件引用父组件属性
<style>
    .red{
        color:red;
    }
    .green{
        color: green;
    }
</style>
<body>
    <div id="root">
    </div>
</body>
<script>
    const app = Vue.createApp({
        data () {
            return {
                classStr:'red',
                classObj:{red:true,green:true},
                classArr:['red','green',{brown:true}]
            }
        },
        template:`
            <div v-bind:class="classStr">
                hello world1
            </div>
            <div v-bind:class="classObj">
                hello world2
            </div>
            <div v-bind:class="classArr">
                hello world3
            </div>
            <demo class="green"/>
        `
    });
    // attrs.class 子组件上的值是父组件上的值
    app.component('demo',{
        template:`
            <div v-bind:class="$attrs.class">one</div>
            <div v-bind:class="$attrs.class">two</div>
        `
    });
    // 挂载实例到节点下
    app.mount('#root');
</script>

列表渲染
< template></ template> 占位符的概念,不做任何渲染
<body>
    <div id="root">
    </div>
</body>
<script>
    const app = Vue.createApp({
        data () {
            return {
              listArr:['1','2','3'],
              listObj:{
                  first:1,
                  two:2,
                  three:3
              }
            }
        },
        methods: {
          handleAddItem(){
              // 1. 数组变更函数
              // 尾部添加元素
              this.listArr.push(4)
              // 从尾部删除内容
              this.listArr.pop;
              // 从头部删除内容
              this.listArr.shift();
              // 开头添加内容
              this.listArr.unshift(4);
              // 翻转
              this.listArr.reverse();
              // 2. 直接替换数组
              this.listArr = ['7','9'];
              // 筛出等于9的元素
              this.listArr = ['7'].conncat(['9']).filter(item =>item==='7');
              // 3. 直接更新数组
              this.listArr[1] = '0';

          }
        },
        template:`
            <div v-for="(item,index) in listArr"  v-bind:key="index">
                {{item}} --{{index}}
            </div>
            <button v-on:click="handleAddItem">新增</button>
            <div v-for="(value,key,index) in listObj">
                {{value}} --{{key}} -- {{index}}
            </div>
        `
    });
    app.mount('#root');
</script>
事件绑定
基础
同时传递参数和获取原生时间对象,tempalte需要传递$event
同一个标签可以绑定多个事件,逗号隔开,方法名一定要有括号
<body>
    <div id="root">
    </div>
</body>
<script>
    const app = Vue.createApp({
        data () {
            return {
              counter:0
            }
        },
        methods: {
            // 同时传递参数和获取原生时间对象,tempalte需要传递$event
            // 同一个标签可以绑定多个事件,逗号隔开,方法名一定要有括号
            handleItem(num,event){
                console.log(event);
                this.counter+=num;
          },
          handleItem2(){
                alert(2);
          }
        },
        template:`
        <div>
            {{counter}}
            <button v-on:click="handleItem(2,$event),handleItem2()">button</button>
        </div>
        `
    });
    app.mount('#root');
</script>
进阶(事件、按键、鼠标、精确修饰符)
事件修饰符:
事件冒泡和事件捕获
冒泡:事件又内往外传递
捕获:事件由外往内传递
v-on:click.stop:阻止冒泡
v-on:click.capture:阻止捕获
v-on:click.self:只要点击自己的标签才触发
v-on:click.once:事件只执行一次
v-on:scoll.passive:滚动时,通俗点说就是每次滚动事件产生,浏览器都会去查询一下是否有preventDefault阻止该次事件的默认动作。我们加上passive就是为了告诉浏览器,不用查询了,我们没用preventDefault阻止默认动作
按键修饰符:
当按键是对应按键的时候才会执行,例如enter、tab、delete、esc、up、down
<body>
    <div id="root">
    </div>
</body>
<script>
    // 当按键是enter的时候才会执行,例如enter、tab、delete、esc、up、down
    const app = Vue.createApp({

        methods: {
            handleKeyDown(){
                console.log("handleKeyDown")
            }
        },
        template:`
        <div>
            <input @keydown.enter="handleKeyDown"/>
        </div>
        `
    });
    app.mount('#root');
</script>
鼠标修饰符
v-on:click.left
v-on:click.right
v-on:click.middle
精确修饰符
exact
按住ctrl键,再按住其他键,再点击就会执行
v-on:click.ctrl
如果想要精确只按住ctrl键再点击才会执行
v-on:click.ctrl.exact
表单双向绑定
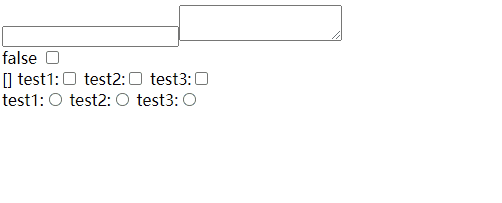
基础(input、testarea、checkbox、radio)
input、testarea、checkbox、radio
如果checkbox 是数组,标签上一定要写value,不然数组不知道显示什么
<body>
    <div id="root">

    </div>
</body>
<script>
    const app = Vue.createApp({
        data () {
            return {
                inputValue:'',
                checkBoxFlag:false,
                checkBoxArr:[],
                radioValue:''
            }
        },
        template:`
            <div>
                {{inputValue}}
                <input v-model="inputValue"/>
                <textarea v-model="inputValue"/>
                <br/>
                {{checkBoxFlag}}
                <input type="checkbox" v-model="checkBoxFlag" />
                <br/>
                {{checkBoxArr}}
                test1:<input type="checkbox" v-model="checkBoxArr" value="test1" />
                test2:<input type="checkbox" v-model="checkBoxArr" value="test2" />
                test3:<input type="checkbox" v-model="checkBoxArr" value="test3" />
                <br/>
                {{radioValue}}
                test1:<input type="radio" v-model="radioValue" value="test1" />
                test2:<input type="radio" v-model="radioValue" value="test2" />
                test3:<input type="radio" v-model="radioValue" value="test3" />
            </div>
        `
    });
    // 挂载实例到节点下
    app.mount('#root');
</script>
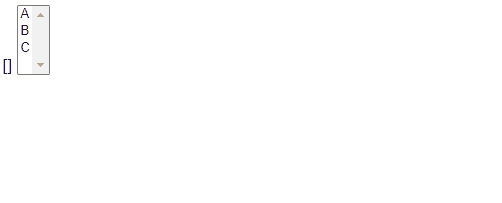
进阶
<body>
    <div id="root">

    </div>
</body>
<script>
    const app = Vue.createApp({
        data () {
            return {
                selectValue:[],
                options:[
                    {
                        text:'A',value:'A'
                    },
                    {
                        text:'B',value:'B'
                    },
                    {
                        text:'C',value:'C'
                    }
                ]
            }
        },
        template:`
            <div>
                {{selectValue}}
                <select v-model="selectValue" multiple>
                    <option v-for="(item,index) in options " v-bind:value="item.value">{{item.text}}</option>
                </select>
            </div>
        `
    });
    // 挂载实例到节点下
    app.mount('#root');
</script>
深入(checkbox用自定义表示选中与否,不是用true/false)
<body>
    <div id="root">

    </div>
</body>
<script>
    const app = Vue.createApp({
        data () {
            return {
                checkBoxFlag:'hello'
            }
        },
        template:`
            <div>
                {{checkBoxFlag}}
                <input type="checkbox" v-model="checkBoxFlag" true-value="hello" false-value="world" />
            </div>
        `
    });
    // 挂载实例到节点下
    app.mount('#root');
</script>

其他(v-model修饰符)
<body>
    <div id="root">

    </div>
</body>
<script>
    // v-model.lazy失去焦点时触发;
    // v-model.number写入message值时变成number类型的
    // v-model.trim去除前后空格
    const app = Vue.createApp({
        data () {
            return {
                message:'111'
            }
        },
        template:`
            <div>
                {{message}}
                <input  v-model.lazy="message"  />
                {{typeof message}}
                <input  v-model.number="message" type="number" />
            </div>
        `
    });
    // 挂载实例到节点下
    app.mount('#root');
</script>

其他(v-model自定义修饰符)
modelModifiers 接收父组件v-model后面自定义的修饰符
<body>
  <div id="root"></div>
</body>
<script>
  const app = Vue.createApp({
    data() {
      return {
        count: 'a',
      }
    },
    template: `
      <counter v-model.uppercase="count" />
    `
  });

  app.component('counter', {
    props: {
      'modelValue': String,
      'modelModifiers': {
        default: ()=> ({})
      }
    },
    methods: {
      handleClick() {
        let newValue = this.modelValue + 'b';
        if(this.modelModifiers.uppercase) {
          newValue = newValue.toUpperCase();
        }
        this.$emit('update:modelValue', newValue);
      },
    },
    template: `
      <div @click="handleClick">{{modelValue}}</div>
    `
  });

  const vm = app.mount('#root');
</script>
组件
全局组件和局部组件
局部组件 首字母最好大写
<body>
    <div id="root">

    </div>
</body>
<script>
    const app = Vue.createApp({
        template:`
            <counter />
        `
    });
    app.component('counter',{
        data () {
            return {
                count:1
            }
        },
        template:`<div v-on:click = "count+=1">
                    {{count}}
                </div>`
    });
    // 挂载实例到节点下
    app.mount('#root');
</script>
<body>
    <div id="root">

    </div>
</body>
<script>
    const Counter = {
        data () {
            return {
                count:1
            }
        },
        template:`<div v-on:click = "count+=1">
                    {{count}}
                </div>`
    };

    const app = Vue.createApp({
        components: {
            counterValueue:Counter
        },
        template:`
            <counterValueue />
        `
    });
    // 挂载实例到节点下
    app.mount('#root');
</script>
父子组件传值
基本应用
// type: String ,Boolean,Array Object,Function,Symbol。。。
    // required 必传
    // default: 默认值
    // validator
<body>
    <div id="root">

    </div>
</body>
<script>
    const counter = {
        // type: String ,Boolean,Array Object,Function,Symbol。。。
        // required 必传
        // default: 默认值
        // validator
        props: {
            count:{
                type:String,
                required:true,
                default:function(value){
                    return 456;
                },
                validator:function(value){
                    return value<1000;
                }
            }
        },
        template:`<div>
                    {{typeof count}}
                </div>`
    };
    const app = Vue.createApp({
        components: {
            counterValueue:counter
        },
        data () {
            return {
                num:1
            }
        },
        template:`
            <div >
                <counterValueue v-bind:count="num" />
            </div>
        `
    });
    // 挂载实例到节点下
    app.mount('#root');
</script>
进阶应用
注意:
v-bind=“params” 等价于 v-bind:a=“params.a” v-bind:b=“params.b” v-bind:b=“params.c”
属性传值的时候,使用content-abc这种命名,接的时候,使用contentAbc
<body>
    <div id="root">

    </div>
</body>
<script>
    // v-bind="params" 等价于 v-bind:a="params.a" v-bind:b="params.b"  v-bind:b="params.c"
    const counter = {
        props: ['a','b','c'],
        template:`<div>
                    {{a}}--{{b}}--{{c}}
                </div>`
    };
    const app = Vue.createApp({
        components: {
            counterValueue:counter
        },
        data () {
            return {
                params:{
                    a:1,
                    b:2,
                    c:3
                }
            }
        },
        template:`
            <div >
                <counterValueue v-bind="params" />
            </div>
        `
    });
    // 挂载实例到节点下
    app.mount('#root');
</script>
单项数据流
子组件可以使用父组件的数据,但不能反向修改父组件的数据
如果想要更改,子组件可以复制一份
<body>
    <div id="root">

    </div>
</body>
<script>
    const counter = {
        props: ['count'],
        data () {
            return {
                myCount:this.count
            }
        },
        template:`<div v-on:click="myCount+=1">
                    {{myCount}}
                </div>`
    };
    const app = Vue.createApp({
        components: {
            counterValueue:counter
        },
        data () {
            return {
                num:1
            }
        },
        template:`
            <div>
                <counterValueue v-bind:count="num" />
            </div>
        `
    });
    // 挂载实例到节点下
    app.mount('#root');
</script>
父子组件传值(Non-props)
<body>
  <div id="root"></div>
</body>
<script>
  // Non-prop 属性
  const app = Vue.createApp({
    template: `
      <div>
        <counter msg="hello" msg1="hello1" />
      </div>
    `
  });

  app.component('counter', {
    // inheritAttrs: false,
    mounted() {
      console.log(this.$attrs.msg);
    },
    template: `
      <div :msg="$attrs.msg">Counter</div>
      <div v-bind="$attrs">Counter</div>
      <div :msg1="$attrs.msg1">Counter</div>
    `
  });

  const vm = app.mount('#root');
</script>

组件之间通过事件通信
初级
注意:对应关系,必须是-

<body>
    <div id="root"></div>
</body>
  <script>
    const app = Vue.createApp({
      data() {
        return { count: 1 }
      },
      methods: {
        handleItemClick(param){
            this.count+=param;
        }
      },
      template: `
        <counter v-bind:count="count" v-on:handle-click="handleItemClick"/>
      `
    });

    app.component('counter', {
      props: ['count'],
      methods: {
        handleClick() {
          this.$emit('handleClick', 3);
        }
      },
      template: `
        <div @click="handleClick">{{count}}</div>
      `
    });
    const vm = app.mount('#root');
  </script>
进阶(父子组件存在双向绑定)
接收v-model的值时,下面的两个参数是固定的
modelValue
update:modelValue
<body>
  <div id="root"></div>
</body>
<script>
  const app = Vue.createApp({
    data() {
      return { count: 1 }
    },
    template: `
      <counter v-model="count" />
    `
  });

  app.component('counter', {
    props: ['modelValue'],
    methods: {
      handleClick() {
        this.$emit('update:modelValue', this.modelValue + 3);
      }
    },
    template: `
      <div @click="handleClick">{{modelValue}}</div>
    `
  });

  const vm = app.mount('#root');
</script>
使用插槽和具名插槽解决组件内容传递问题
插槽
<body>
    <div id="root"></div>
  </body>
  <script>
    // slot 插槽
    // slot 中使用的数据,作用域的问题
    // 父模版里调用的数据属性,使用的都是父模版里的数据
    // 子模版里调用的数据属性,使用的都是子模版里的数据
    const app = Vue.createApp({
        data () {
            return {
                text:'提交'
            }
        },
        template: `

            <myform>
                <div>{{text}}</div>
            </myform>
            <myform>
                <button>{{text}}</button>
            </myform>

        `
    });

    app.component('myform', {
        methods: {
            handleClick(){
                alert("11");
            }
        },
        template: `
            <div>
                <input />
                <span @click="handleClick">
                    <slot></slot>
                </span>
            </div>
        `
    });

    const vm = app.mount('#root');
  </script>
具名插槽
<body>
  <div id="root"></div>
</body>
<script>
  // slot 插槽
  // slot 中使用的数据,作用域的问题
  // 父模版里调用的数据属性,使用的都是父模版里的数据
  // 子模版里调用的数据属性,使用的都是子模版里的数据
  // 具名插槽
  const app = Vue.createApp({
    template: `
      <layout>
        <template v-slot:header>
          <div>header</div>
        </template>
        <template v-slot:footer>
          <div>footer</div>
        </template>
      </layout>
    `
  });

  app.component('layout', {
    template: `
      <div>
        <slot name="header"></slot>
        <div>content</div>
        <slot name="footer"></slot>
      </div>
    `
  });

  const vm = app.mount('#root');
</script>
作用域插槽
父组件使用子组件的数据
  // 作用域插槽
  const app = Vue.createApp({
    template: `
      <list v-slot="{item}">
        <div>{{item}}</div>
      </list>
    `
  });

  app.component('list', {
    data() {return {list: [1, 2, 3]}},
    template: `
      <div>
        <slot v-for="item in list" :item="item" />
      </div>
    `
  });

  const vm = app.mount('#root');
</script>
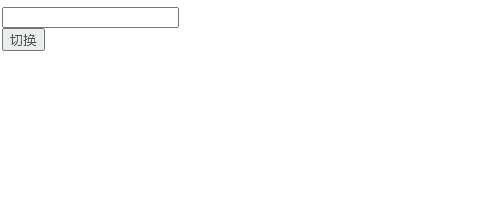
动态组件和异步组件
动态组件
:is 根据数据的切换显示不同组件
keep-alive 缓存,防止每次切换数据没有
<body>
    <div id="root"></div>
  </body>
  <script>
    const app = Vue.createApp({
        data () {
            return {
                currentItem:'input-item'
            }
        },
        methods: {
            handle(){
               this.currentItem = this.currentItem=="input-item" ? "common-item" :"input-item"
            }
        },
        template: `
            <keep-alive>
                <component :is="currentItem"/>
            </keep-alive>
            <button @click="handle">切换</button>
        `
    });

    app.component('input-item', {
        template: `
            <div> <input /></div>
        `
    });
    app.component('common-item', {
        template: `
            <div>hello world</div>
        `
    });
    const vm = app.mount('#root');
  </script>
异步组件
<body>
  <div id="root"></div>
</body>
<script>
  // 动态组件: 根据数据的变化,结合 compoent 这个标签,来随时动态切换组件的现实
  // 异步组件: 是异步执行某些组件的逻辑,这叫做异步组件

  const app = Vue.createApp({
    template: `
      <div>
        <common-item />
        <async-common-item />
      </div>
    `
  });

  app.component('common-item', {
    template: `<div>hello world</div>`
  });

  app.component('async-common-item', Vue.defineAsyncComponent(() => {
    return new Promise((resolve, reject) => {
      setTimeout(() => {
        resolve({
          template: `<div>this is an async component</div>`
        })
      }, 4000)
    })
  }))

  const vm = app.mount('#root');
</script>
查漏补缺(ref(对dom进行操作)、 provide / inject)
// ref 实际上是获取 Dom 节点 / 组件引用 的一个语法
// provide / inject 对父组件的data传值,provide: {count:this.count}这样的语法是不可行的
通过 provide / inject 传递的值是一次性的,所以说更改父组件的值,子组件不会改变
<body>
    <div id="root"></div>
  </body>
  <script>
    // ref 实际上是获取 Dom 节点 / 组件引用 的一个语法
    // provide / inject  对父组件的data传值,provide: {count:this.count}这样的语法是不可行的
    const app = Vue.createApp({
      data() {
        return { count: 1}
      },
      provide() {
        return {
          count: this.count,
        }
      },
      mounted () {
        console.log(this.$refs.count.innerHTML);
        console.log(this.$refs.common);
      },
      template: `
        <div>
          <div ref="count">{{count}}</div>
          <child ref="common" :count="count" />
          <button @click="count += 1">Add</button>
        </div>
      `
    });

    app.component('child', {
      template: `<child-child />`
    });

    app.component('child-child', {
      inject: ['count'],
      template: `<div>{{count}}</div>`
    });

    const vm = app.mount('#root');
  </script>
动画
过渡:一个元素状态的变更
动画:一个元素的运动情况
高级语法
Mixin混入
下面是局部Mixin,如果是全局,下面myMixin 对应的对象放入app.mixix()括号里即可
注意:
// 组件 data, methods 优先级高于 mixin data, methods 优先级
// 生命周期函数,先执行 mixin 里面的,再执行组件里面的
<body>
    <div id="root"></div>
  </body>
  <script>
  const myMixin = {
    data () {
      return {
        number:1
      }
    }
  }
  const app = Vue.createApp({
    mixins: [myMixin],
    data () {
      return {
        number:2
      }
    },
    template: `
      <div>
        <div>{{number}}</div>
      </div>
    `
  });
  const vm = app.mount('#root');
  </script>
注意:
// 自定义的属性,组件种的属性优先级高于 mixin 属性的优先级
this.$options 获取自定义属性值
<body>
    <div id="root"></div>
  </body>
  <script>
  // mixin 混入
  // 组件 data, methods 优先级高于 mixin data, methods 优先级
  // 生命周期函数,先执行 mixin 里面的,再执行组件里面的
  // 自定义的属性,组件种的属性优先级高于 mixin 属性的优先级
  const myMixin = {
    number: 1
  }

  const app = Vue.createApp({
    mixins: [myMixin],
    number: 2,
    template: `
      <div>
        <div>{{this.$options.number}}</div>
      </div>
    `
  });
	// 修改优先级,如果有mixin值,优先返回混入中的,再返回app中的
  app.config.optionMergeStrategies.number = (mixinVal, appValue) => {
    return mixinVal || appValue;
  }

  const vm = app.mount('#root');
  </script>
Vue自定义指令
局部指令和全局指令
如果使用全局Vue.createApp不用再引入directives属性了,
<body>
    <div id="root"></div>
  </body>
  <script>
    // 局部自定义指令
  const directives =  {
    focus:{
      mounted (el) {
        el.focus();
      }
    }
  }

  const app = Vue.createApp({
    directives: directives,
    template: `
      <div>
        <div><input v-focus /></div>
      </div>
    `
  });
  // 全局自定义指令,使用全局Vue.createApp不用再引入directives属性了,
  // app.directive('focus',{
  //   mounted (el) {
  //       el.focus();
  //     }
  // })

  const vm = app.mount('#root');
  </script>
自定义指令传值
  <style>
    .header { position: absolute}
  </style>
<body>
  <div id="root"></div>
</body>
<script>
  // 自定义指令 directive

  const app = Vue.createApp({
    data() {
      return {
        distance: 110
      }
    },
    template: `
      <div>
        <div v-pos:right="distance" class="header">
          <input />
        </div>
      </div>
    `
  });

  app.directive('pos', (el, binding) => {
    el.style[binding.arg] = (binding.value + 'px');
  })

  const vm = app.mount('#root');
</script>
Teleport传送门
<!DOCTYPE html>
<html lang="en">
<head>
  <meta charset="UTF-8">
  <meta name="viewport" content="width=device-width, initial-scale=1.0">
  <title>lesson 30</title>
  <style>
    .area {
      position: absolute;
      left: 50%;
      top: 50%;
      transform: translate(-50%, -50%);
      width: 200px;
      height: 300px;
      background: green;
    }
    .mask {
      position: absolute;
      left: 0;
      right: 0;
      top: 0;
      bottom: 0;
      background: #000;
      opacity: 0.5;
      color: #fff;
      font-size: 100px;
    }
  </style>
  <script src="https://unpkg.com/vue@next"></script>
</head>
<body>
  <div id="root"></div>
  <div id="hello"></div>
</body>
<script>
  // teleport 传送门
  const app = Vue.createApp({
    data() {
      return {
        show: false,
        message: 'hello'
      }
    },
    methods: {
      handleBtnClick() {
        this.show = !this.show;
      }
    },
    template: `
      <div class="area">
        <button @click="handleBtnClick">按钮</button>
        <teleport to="#hello">
          <div class="mask" v-show="show">{{message}}</div>
        </teleport>
      </div>
    `
  });

  const vm = app.mount('#root');
</script>
</html>
render函数(虚拟DOM)
<body>
  <div id="root"></div>
</body>
<script>
  // render function
  // template -> render -> h -> 虚拟DOM(JS对象)-> 真实 DOM -> 展示到页面上
  const app = Vue.createApp({
    template: `
      <my-title :level="2">
        hello dell
      </my-title>
    `
  });

  app.component('my-title', {
    props: ['level'],
    render() {
      const { h } = Vue;
      return h('h' + this.level, {}, [
        this.$slots.default(),
        h('h4', {}, 'dell')
      ])
    }
  })

  const vm = app.mount('#root');
</script>
插件的定义与使用
定义
<body>
  <div id="root"></div>
</body>
<script>
  // plugin 插件, 也是把通用性的功能封装起来
  const myPlugin = {
    install(app, options) {
      app.provide('name', 'Dell Lee');
      app.directive('focus', {
        mounted(el) {
          el.focus();
        }
      })
      app.mixin({
        mounted(){
          console.log('mixin')
        }
      })
      app.config.globalProperties.$sayHello = 'hello world';
    }
  }

  const app = Vue.createApp({
    template: `
      <my-title />
    `
  });

  app.component('my-title', {
    inject: ['name'],
    mounted() {
      console.log(this.$sayHello);
    },
    template: `<div>{{name}}<input v-focus /></div>`
  })

  app.use(myPlugin, { name: 'dell'});

  const vm = app.mount('#root');
</script>
使用
<body>
  <div id="root"></div>
</body>
<script>
  // 对数据做校验的插件
  const app = Vue.createApp({
    data() {
      return { name: 'dell', age: 23}
    },
    rules: {
      age: {
        validate: age => age > 25,
        message: 'too young, to simple'
      },
      name: {
        validate: name => name.length >= 4,
        message: 'name too short'
      }
    },
    template: `
      <div>name:{{name}}, age:{{age}}</div>
    `
  });

  const validatorPlugin = (app, options) => {
    app.mixin({
      created() {
        for(let key in this.$options.rules) {
          const item = this.$options.rules[key];
          this.$watch(key, (value) => {
            const result = item.validate(value);
            if(!result) console.log(item.message);
          })
        }
      }
    })
  }

  app.use(validatorPlugin);
  const vm = app.mount('#root');
</script>
Composition API
Setup函数使用
setup中的return的内容,会直接暴露在外部,可以直接使用,setup中因为是在实例化之前调用的,所以this这样的关键词是不能用的,因为data、template…还没有实例化呢
<body>
  <div id="root"></div>
</body>
<script>
  const app = Vue.createApp({
    template: `
      <div @click="handleClick">{{name}}</div>
    `,
    methods: {
      test() {
        console.log(this.$options.setup());
      }
    },
    mounted() {
      this.test();
    },
    // created 实例被完全初始化之前
    setup(props, context) {
      return {
        name: 'dell',
        handleClick: () => {
          alert(123)
        }
      }
    }
  });
  const vm = app.mount('#root');
</script>
ref、reactive、toRefs(把setup中普通的变量变成响应式变量)
// ref, reactive 响应式的引用
// 原理,通过 proxy 对数据进行封装,当数据变化时,触发模版等内容的更新
// ref 处理基础类型的数据
// reactive 处理非基础类型的数据
// readonly 处理非基础类型的数据,而且此响应式变量不能更改
// toRefs 用于将响应式对象转换为结果对象,其中结果对象的每个属性都是指向原始对象相应属性的ref,常用于es6的解构赋值操作,因为在对一个响应式对象直接解构时解构后的数据将不再有响应式,而使用toRefs可以方便解决这一问题
<body>
    <div id="root"></div>
  </body>
  <script>

  const app = Vue.createApp({
    template: `
      <div>{{name}}</div>
      <div>{{nameObj.name}}</div>
      <div>{{nameArr[0]}}</div>
      <div>{{nameByRefs}}</div>
      <div>{{nameOnly.name}}</div>
    `,
    setup(props, context) {
      const { ref,reactive,readonly, toRefs } = Vue;
      // proxy ,把这个值 'dell' 变成 proxy({value: 'dell'}) 这样的一个响应式引用,赋值用name.value
      let name = ref('第一段代码');
      setTimeout(() => {
        name.value = '第一段代码change'
      }, 2000)

       // proxy , { name: 'dell'} 变成 proxy({ name: 'dell'}) 这样的一个响应式引用
      const nameObj = reactive({name: '第二段代码', age: 28});
      setTimeout(() => {
        nameObj.name = '第二段代码change'
      }, 2000)
      // 数组变成响应式引用
      const nameArr = reactive([123]);
      setTimeout(() => {
        nameArr[0] = 456
      }, 2000)
      // toRefs proxy({ name: 'dell', age: 28}),变成下面这样的
      // {
      //  name: proxy({ value: 'dell'}),
      //  age: proxy({value: 28})
      // }
      const nameRefs = reactive({nameByRefs: '最后一段代码', ageByRefs: 28});
      setTimeout(() => {
        nameRefs.nameByRefs = '最后一段代码change'
      }, 2000)
      const { nameByRefs, ageByRefs } = toRefs(nameRefs);

      // 不能更改的响应式变量
      const nameOnly = readonly({name: 'dell', age: 28});
      setTimeout(() => {
        nameOnly.name = 'lee'
      }, 2000)


      return { name,nameObj,nameArr,nameOnly,nameByRefs }
    }
  });
  const vm = app.mount('#root');
  </script>
toRef
// 避免toRefs 中取变量取不到,可以使用toRef,toRef(data,''age')的意思就是
如果age有值,则取age作为变量作为响应式变量,如果没有age变量,则创建一个age的响应式变量

setUp(content参数)
attrs 获取父组件上的属性
slots 获取父组件的插槽
emit 调用父组件方法


<body>
  <div id="root"></div>
</body>
<script>
  const app = Vue.createApp({
    methods: {
      handleChange() {
        alert('change');
      }
    },
    template: `<child @change="handleChange">parent</child>`,
  });

  app.component('child', {
    template: '<div @click="handleClick">123123</div>',
    setup(props, context) {
      const { h } = Vue;
      const { attrs, slots, emit } = context;
      function handleClick() { emit('change'); }
      return { handleClick }
    }
  })
  const vm = app.mount('#root');
</script>
实现todolist
<body>
  <div id="root"></div>
</body>
<script>
  // 关于 list 操作的内容进行了封装
  const listRelativeEffect = () => {
    const { reactive } = Vue;
    const list = reactive([]);
    const addItemToList = (item) => {
      list.push(item);
    }
    return { list, addItemToList }
  }

  // 关于 inputValue 操作的内容进行了封装
  const inputRelativeEffect = () => {
    const { ref } = Vue;
    const inputValue = ref('');
    const handleInputValueChange = (e) => {
      inputValue.value = e.target.value
    }
    return { inputValue, handleInputValueChange}
  }

  const app = Vue.createApp({
    setup() {
      // 流程调度中转
      const { list, addItemToList } = listRelativeEffect();
      const { inputValue, handleInputValueChange} = inputRelativeEffect();
      return {
        list, addItemToList,
        inputValue, handleInputValueChange
      }
    },
    template: `
      <div>
        <div>
          <input :value="inputValue" @input="handleInputValueChange" />
          <button @click="() => addItemToList(inputValue)">提交</button>
        </div>
        <ul>
          <li v-for="(item, index) in list" :key="index">{{item}}</li>
        </ul>
      </div>
    `,
  });

  const vm = app.mount('#root');
</script>
computed计算属性
<script>
  // computed 计算属性
  const app = Vue.createApp({
    setup() {
      const { reactive, computed } = Vue;
      const countObj = reactive({ count: 0});
      const handleClick = () => {
        countObj.count += 1;
      }
      let countAddFive = computed({
        get: () => {
          return countObj.count + 5;
        },
        set: (param) => {
          countObj.count = param - 5;
        }
      })

      setTimeout(() => {
        countAddFive.value = 100;
      }, 3000)

      return { countObj, countAddFive, handleClick }
    },
    template: `
      <div>
        <span @click="handleClick">{{countObj.count}}</span> -- {{countAddFive}}
      </div>
    `,
  });

  const vm = app.mount('#root');
</script>
watch和watchEffect 的使用和差异性(侦听器)
<body>
  <div id="root"></div>
</body>
<script>
  // watch 侦听器
  // watchEffect 侦听器,偏向于 effect
  const app = Vue.createApp({
    setup() {
      const { reactive, watch, watchEffect, toRefs } = Vue;
      const nameObj = reactive({
        name: 'dell', englishName: 'lee'
      })
      // 具备一定的惰性 lazy
      // 参数可以拿到原始和当前值
      // 可以侦听多个数据的变化,用一个侦听器承载
      // immediate 惰性
      watch([() => nameObj.name, () => nameObj.englishName], ([curName, curEng], [prevName, preEng]) => {
        console.log('watch', curName, prevName, '---', curEng, preEng);
      }, { immediate: true })

      // 立即执行,没有惰性 immediate
      // 不需要传递你要侦听的内容,自动会感知代码依赖,不需要传递很多参数,只要传递一个回调函数
      // 不能获取之前数据的值
      // const stop = watchEffect(() => {
      //   console.log(nameObj.name);
      //   console.log(nameObj.englishName);
      //   setTimeout(() => {
      //     stop();
      //   }, 5000)
      // })

      const { name, englishName } = toRefs(nameObj);

      return { name, englishName }
    },
    template: `
      <div>
        <div>
          Name: <input v-model="name">
        </div>
        <div>
          Name is {{name}}
        </div>
        <div>
          EnglishName: <input v-model="englishName">
        </div>
        <div>
          EnglishName is {{englishName}}
        </div>
      </div>
    `,
  });

  const vm = app.mount('#root');
</script>
生命周期函数

<body>
  <div id="root"></div>
</body>
<script>
  const app = Vue.createApp({
    setup() {
      const {
        ref, onBeforeMount, onMounted, onBeforeUpdate, onUpdated,
        onRenderTracked, onRenderTriggered
      } = Vue;
      const name = ref('dell')
      onBeforeMount(() => {
        console.log('onBeforeMount')
      })
      onMounted(() => {
        console.log('onMounted')
      })
      onBeforeUpdate(() => {
        console.log('onBeforeUpdate')
      })
      onUpdated(() => {
        console.log('onUpdated')
      })
      // 每次渲染后重新收集响应式依赖
      onRenderTracked(() => {
        console.log('onRenderTracked')
      })
      // 每次触发页面重新渲染时自动执行
      onRenderTriggered(() => {
        console.log('onRenderTriggered')
      })
      const handleClick = () => {
        name.value = 'lee'
      }
      return { name, handleClick }
    },
    template: `
      <div @click="handleClick">
        {{name}}
      </div>
    `,
  });

  const vm = app.mount('#root');
</script>
provide、inject
<body>
  <div id="root"></div>
</body>
<script>
  // provide, inject
  // dom ref
  // const app = Vue.createApp({
  //   setup() {
  //     const { provide, ref, readonly } = Vue;
  //     const name = ref('dell');
  //     provide('name', readonly(name));
  //     provide('changeName', (value) => {
  //       name.value = value;
  //     });
  //     return { }
  //   },
  //   template: `
  //     <div>
  //       <child />
  //     </div>
  //   `,
  // });

  // app.component('child', {
  //   setup() {
  //     const { inject } = Vue;
  //     const name = inject('name');
  //     const changeName = inject('changeName');
  //     const handleClick = () => {
  //       changeName('lee');
  //     }
  //     return { name, handleClick }
  //   },
  //   template: '<div @click="handleClick">{{name}}</div>'
  // })

  // CompositionAPI 的语法下,获取真实的 DOM 元素节点
  const app = Vue.createApp({
    setup() {
      const { ref, onMounted } = Vue;
      const hello = ref(null);
      onMounted(() => {
        console.log(hello.value);
      })
      return { hello }
    },
    template: `
      <div>
        <div ref="hello">hello world</div>
      </div>
    `,
  });

  const vm = app.mount('#root');
</script><body>
  <div id="root"></div>
</body>
<script>
  // provide, inject
  const app = Vue.createApp({
    setup() {
      const { provide, ref} = Vue;
      const name = ref('dell');
      provide('name', name);
      provide('changeName', (value) => {
        name.value = value;
      });
      return { }
    },
    template: `
      <div>
        <child />
      </div>
    `,
  });

  app.component('child', {
    setup() {
      const { inject } = Vue;
      const name = inject('name');
      const changeName = inject('changeName');
      const handleClick = () => {
        changeName('lee');
      }
      return { name, handleClick }
    },
    template: '<div @click="handleClick">{{name}}</div>'
  })

  const vm = app.mount('#root');
</script>
ref 获取dom节点
固定写法:命名一致
const hello = ref(null);
return { hello }
ref=“hello”
<body>
  <div id="root"></div>
</body>
<script>

  // CompositionAPI 的语法下,获取真实的 DOM 元素节点
  const app = Vue.createApp({
    setup() {
      const { ref, onMounted } = Vue;
      const hello = ref(null);
      onMounted(() => {
        console.log(hello.value);
      })
      return { hello }
    },
    template: `
      <div>
        <div ref="hello">hello world</div>
      </div>
    `,
  });

  const vm = app.mount('#root');
</script>
路由
<template>
  <div id="nav">
    <!-- router-link 是跳转路由的标签 -->
    <router-link to="/">Home</router-link> |
    <router-link to="/about">About</router-link> |
    <router-link to="/login">Login</router-link>
  </div>
  <!-- router-view 负责展示当前路由对应的组件内容 -->
  <router-view/>
</template>

<style></style>
import { createRouter, createWebHashHistory } from 'vue-router'
import Home from '../views/Home.vue'
import Login from '../views/Login.vue'

const routes = [
  {
    path: '/',
    name: 'Home',
    component: Home
  },
  {
    path: '/login',
    name: 'Login',
    component: Login
  },
  {
    path: '/about',
    name: 'About',
    // 异步加载路由
    component: () => import(/* webpackChunkName: "about" */ '../views/About.vue')
  }
]

const router = createRouter({
  history: createWebHashHistory(),
  routes
})

export default router
VueX
应用
import { createStore } from 'vuex'
// VueX 数据管理框架
// VueX 创建了一个全局唯一的仓库,用来存放全局的数据
export default createStore({
  state: { name: 'dell' },
  // mutation 里面只允许写同步代码,不允许写异步代码,比如setTimeout就不能写
  // commit 和 mutation 做关联
  mutations: {
    change(state, str) {
      state.name = str;
    }
  },
  // dispatch 和 actions 做关联
  actions: {
    change(store, str) {
      setTimeout(() => {
        store.commit('change', str)
      }, 2000)
    }
  }
})
<template>
  <div class="about">
    <h1 @click="handleClick">This is an about page</h1>
    <h1>{{myName}}</h1>
  </div>
</template>

<script>
export default {
  name: 'Home',
  computed: {
    myName() {
      return this.$store.state.name;
    }
  },
  methods: {
    handleClick() {
      // 1. dispatch 方法,派发一个 action,名字叫做change
      // 2. 感知到 change 这个action,执行store 中 actions 下面的 change 方法
      // 3. commit 提交一个叫做 change 的数据改变
      // 4. mutation 感知到提交的change改变,执行 change 方法改变数据
      this.$store.dispatch('change', 'hello world');
    }
  }
}
</script>
composition 使用vuex
import { createStore } from 'vuex'
export default createStore({
  state: { name: 'dell' },
  mutations: {
    changeName(state, str) {
      state.name = str;
    }
  },
  actions: {
    getData(store) {
      setTimeout(() => {
        store.commit('changeName', 'hello')
      }, 2000)
    }
  }
})
<template>
  <div class="about">
    <h1 @click="handleClick">This is an about page</h1>
    <h1>{{name}}</h1>
  </div>
</template>

<script>
import { toRefs } from 'vue';
import { useStore } from 'vuex';
export default {
  name: 'Home',
  setup() {
    const store = useStore();
    const { name } = toRefs(store.state);
    const handleClick = () => {
      store.dispatch('getData')
    }
    return { name, handleClick }
  }
}
</script>·


 815
815


 被折叠的 条评论
为什么被折叠?
被折叠的 条评论
为什么被折叠?
 到【灌水乐园】发言


