


今天学习了Spring 框架中Spring Web MVC的配置,趁热打铁整理一下:
一、首先是了解什么是Spring Web MVC:
原文:Spring Web MVC is the original web framework built on the Servlet API and has been included in the Spring Framework from the very beginning. The formal name, “Spring Web MVC,” comes from the name of its source module (spring-webmvc), but it is more commonly known as “Spring MVC”.
翻译:Spring Web MVC是Spring Framework中最开始就有的,它建立在Servlet API 的基础上,它的名字来源于它原始的项目模块(spring-webmvc),后来通常被人们称为“Spring MVC”。
二、DispatcherServlet(前端控制器,中央控制器)
原文:Spring MVC, as many other web frameworks, is designed around the front controller pattern where a central Servlet, the DispatcherServlet, provides a shared algorithm for request processing, while actual work is performed by configurable delegate components. This model is flexible and supports diverse workflows.
翻译:
与其他许多Web框架一样,Spring MVC是围绕前端控制器模式设计的,其中中央Servlet(DispatcherServlet)提供用于请求处理的共享算法,而实际工作由可配置的代表组件执行。该模型是灵活的,支持不同的工作流程。
原文:The DispatcherServlet, as any Servlet, needs to be declared and mapped according to the Servlet specification by using Java configuration or in web.xml. In turn, the DispatcherServlet uses Spring configuration to discover the delegate components it needs for request mapping, view resolution, exception handling, and more.
翻译:
DispatcherServlet跟其他的servlet一样,需要通过使用Java配置或Web.xml来根据servlet规范声明和映射。然后,DispatcherServlet使用Spring配置来发现请求映射、视图解析、异常处理等所需的委托组件。
三、开始配置DispatcherServlet
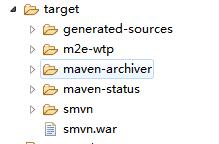
1.首先创建一个maven项目,目录结构大致是这样的(target中的不用管,这个是打包后才会有的)

2.改造pom.xml,添加依赖
<packaging>war</packaging>这个是将项目打包后的文件类型改成war型
<finalName>smvn</finalName>将打包后的文件名设置为:smvn
<dependency>
<groupId>org.springframework</groupId>
<artifactId>spring-context</artifactId>
<version>5.1.2.RELEASE</version>
</dependency>
添加Spring核心组件的依赖
<dependency>
<groupId>org.springframework</groupId>
<artifactId>spring-webmvc</artifactId>
<version>5.1.2.RELEASE</version>
</dependency>
添加spring-webmvc的依赖
<dependency>
<groupId>javax.servlet</groupId>
<artifactId>javax.servlet-api</artifactId>
<version>4.0.1</version>
<scope>provided</scope>
</dependency>
添加Servlet的依赖这个不能忘
<project xmlns="http://maven.apache.org/POM/4.0.0" xmlns:xsi="http://www.w3.org/2001/XMLSchema-instance"
  xsi:schemaLocation="http://maven.apache.org/POM/4.0.0 http://maven.apache.org/xsd/maven-4.0.0.xsd">
  <modelVersion>4.0.0</modelVersion>

  <groupId>com.xintoucloud</groupId>
  <artifactId>spring-servlet</artifactId>
  <version>0.0.1-SNAPSHOT</version>
  <packaging>war</packaging>

  <name>spring-servlet</name>
  <url>http://maven.apache.org</url>

  <properties>
    <project.build.sourceEncoding>UTF-8</project.build.sourceEncoding>
  </properties>

  <dependencies>
    <dependency>
      <groupId>junit</groupId>
      <artifactId>junit</artifactId>
      <version>4.8.1</version>
      <scope>test</scope>
    </dependency>
	<!-- https://mvnrepository.com/artifact/org.springframework/spring-context -->
	<dependency>
	    <groupId>org.springframework</groupId>
	    <artifactId>spring-context</artifactId>
	    <version>5.1.2.RELEASE</version>
	</dependency>
	<!-- https://mvnrepository.com/artifact/org.springframework/spring-context -->
	<dependency>
	    <groupId>org.springframework</groupId>
	    <artifactId>spring-webmvc</artifactId>
	    <version>5.1.2.RELEASE</version>
	</dependency>
	<!-- https://mvnrepository.com/artifact/org.aspectj/aspectjweaver -->
	<dependency>
	    <groupId>org.aspectj</groupId>
	    <artifactId>aspectjweaver</artifactId>
	    <version>1.9.2</version>
	</dependency>
	<!-- https://mvnrepository.com/artifact/javax.servlet/javax.servlet-api -->
	<dependency>
	    <groupId>javax.servlet</groupId>
	    <artifactId>javax.servlet-api</artifactId>
	    <version>4.0.1</version>
	    <scope>provided</scope>
	</dependency>

  </dependencies>
    <build>
    <finalName>smvn</finalName>
    <plugins>
      <plugin>
        <groupId>org.apache.maven.plugins</groupId>
        <artifactId>maven-compiler-plugin</artifactId>
        <version>3.8.0</version>
        <configuration>
          <source>1.8</source>
          <target>1.8</target>
        </configuration>
      </plugin>
    </plugins>
  </build>
</project>
3创建相应的目录,src-main下创建webapp-WEB-INF-web.xml
.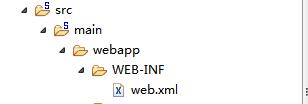
web.xml配置:
<?xml version="1.0" encoding="UTF-8"?>
<web-app xmlns:xsi="http://www.w3.org/2001/XMLSchema-instance" xmlns="http://xmlns.jcp.org/xml/ns/javaee" xsi:schemaLocation="http://xmlns.jcp.org/xml/ns/javaee http://xmlns.jcp.org/xml/ns/javaee/web-app_3_1.xsd" id="WebApp_ID" version="3.1">
  <servlet>
        <servlet-name>app</servlet-name>
        <servlet-class>org.springframework.web.servlet.DispatcherServlet</servlet-class>
        <init-param>
            <param-name>contextConfigLocation</param-name>
            <param-value>classpath:app-servlet.xml</param-value>
        </init-param>
        <load-on-startup>1</load-on-startup>
    </servlet>

    <servlet-mapping>
        <servlet-name>app</servlet-name>
        <url-pattern>/</url-pattern>
    </servlet-mapping>
</web-app>
app-servlet.xml
<?xml version="1.0" encoding="UTF-8"?>
<beans xmlns="http://www.springframework.org/schema/beans"
	xmlns:xsi="http://www.w3.org/2001/XMLSchema-instance"
	xmlns:aop="http://www.springframework.org/schema/aop"
	xmlns:context="http://www.springframework.org/schema/context"
	xsi:schemaLocation="http://www.springframework.org/schema/beans http://www.springframework.org/schema/beans/spring-beans.xsd
		http://www.springframework.org/schema/context http://www.springframework.org/schema/context/spring-context-4.3.xsd
		http://www.springframework.org/schema/aop http://www.springframework.org/schema/aop/spring-aop-4.3.xsd">
	<context:component-scan base-package="com.xintoucloud.spring"></context:component-scan>
</beans>
4.创建一个包,创建一个测试类,一些测试页面

package com.xintoucloud.spring.controller;

import org.springframework.stereotype.Controller;
import org.springframework.ui.Model;
import org.springframework.web.bind.annotation.RequestMapping;

@Controller
public class HelloTest {
	@RequestMapping("/hello1")
	public String hello(String name,Model m) {
		//1.获取参数
		System.out.println("name:"+name);
		//2.业务处理
		m.addAttribute("msg", "欢迎"+name+"访问页面");
		System.out.println("欢迎界面");
		//3.专向
		return "hello1.jsp";
	}
	@RequestMapping("/hello2")
	public String hello2(String name,int age,Model m) {
		//1.获取参数
		System.out.println("name:"+name+",age:"+age);
		//2.业务处理
		m.addAttribute("msg", "欢迎"+name+"访问页面,年龄为:"+age);
		//3.专向
		return "hello2.jsp";
	}
	@RequestMapping("/login")
	public String login(String name,String password,Model m) {
		//1.获取参数
		System.out.println("name:"+name+",password:"+password);
		//2.业务处理
		m.addAttribute("msg", "欢迎"+name+"访问页面,密码为:"+password);
		//3.专向
		return "loginsuccess.jsp";
	}
}
在webapp下创建测试的jsp页面。
hello1.jsp
<%@ page language="java" contentType="text/html; charset=utf-8"
    pageEncoding="utf-8"%>
<!DOCTYPE html PUBLIC "-//W3C//DTD HTML 4.01 Transitional//EN" "http://www.w3.org/TR/html4/loose.dtd">
<html>
<head>
<meta http-equiv="Content-Type" content="text/html; charset=ISO-8859-1">
<title>Insert title here</title>
</head>
<body>
	<h1>hollo:${msg }</h1>
</body>
</html>
hello2.jsp
<%@ page language="java" contentType="text/html; charset=utf-8"
    pageEncoding="utf-8"%>
<!DOCTYPE html PUBLIC "-//W3C//DTD HTML 4.01 Transitional//EN" "http://www.w3.org/TR/html4/loose.dtd">
<html>
<head>
<meta http-equiv="Content-Type" content="text/html; charset=ISO-8859-1">
<title>Insert title here</title>
</head>
<body>
	<h1>hollo:${msg }</h1>
</body>
</html>
login.jsp
<%@ page language="java" contentType="text/html; charset=utf-8"
    pageEncoding="utf-8"%>
<!DOCTYPE html PUBLIC "-//W3C//DTD HTML 4.01 Transitional//EN" "http://www.w3.org/TR/html4/loose.dtd">
<html>
<head>
<meta http-equiv="Content-Type" content="text/html; charset=ISO-8859-1">
<title>Insert title here</title>
</head>
<body>
	<form method="post" action="login" target="_self">
	<input type="text" name="name"/><br/>
	<input type="password" name="password"/>
	<input type="submit" value="提交">
	</form>
</body>
</html>
loginsuccess.jsp
<%@ page language="java" contentType="text/html; charset=utf-8"
    pageEncoding="utf-8"%>
<!DOCTYPE html PUBLIC "-//W3C//DTD HTML 4.01 Transitional//EN" "http://www.w3.org/TR/html4/loose.dtd">
<html>
<head>
<meta http-equiv="Content-Type" content="text/html; charset=ISO-8859-1">
<title>Insert title here</title>
</head>
<body>
	登录成功界面
	${msg }
</body>
</html>
5.打包
项目根目录,点击鼠标右键Run As-Maven install就可以打包了,打包完会在target下出现一个smvn.war文件,这就是打好的包
6.测试:
将这个smvn.war文件粘贴到D:\apache-tomcat-8.5.32-windows-x64\apache-tomcat-8.5.32\webapps(tomcat的webapps下)

开启tomcat服务器:

开启成功后:在服务器上输入地址:http://localhost:8080/smvn/login.jsp
出现页面如下:

点击提交:

ok了,成功
另外一种测试方法:
在开发Java web项目时候,可以在项目中嵌入Jetty服务的方式来运行web程序。
-
采用Jetty Plugin
http://www.eclipse.org/jetty/documentation/9.4.x/jetty-maven-plugin.html
<plugin>
  <groupId>org.eclipse.jetty</groupId>
  <artifactId>jetty-maven-plugin</artifactId>
  <version>9.4.13-SNAPSHOT</version>
  <configuration>
    <scanIntervalSeconds>10</scanIntervalSeconds>
    <webApp>
      <contextPath>/test</contextPath>
    </webApp>
  </configuration>
</plugin>
在pom.xml中加入这样的配置就可以了。
鼠标右键点击pom.xml-Run As-Maven build

控制台输出这样的提示,就证明启动成功了, 可以在服务器上运行了。

测试也没有问题。


 224
224


 被折叠的 条评论
为什么被折叠?
被折叠的 条评论
为什么被折叠?
 到【灌水乐园】发言


