


目录
三层架构
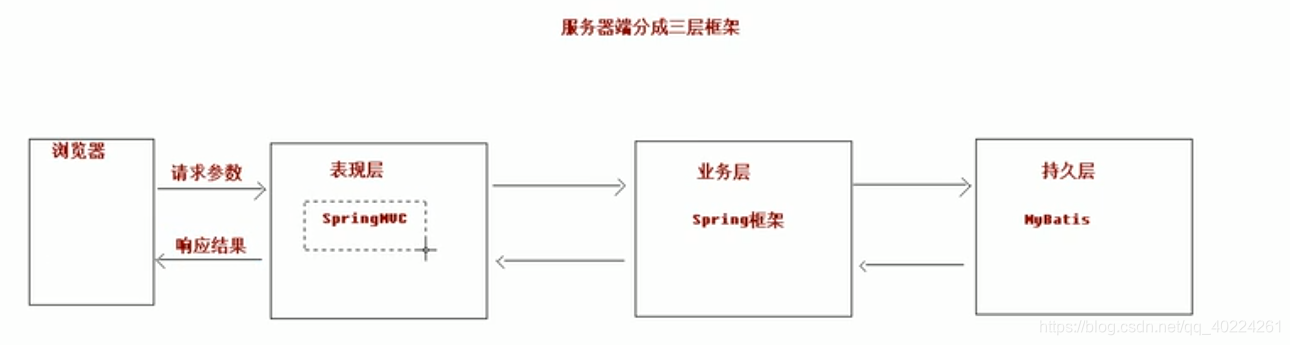
我们的开发一般有两种形式:C/S架构,B/S架构,在JavaEE开发中,几乎都是基于B/S架构的开发。那么在B/S架构中,服务器端,系统标准的三层架构包括:表现层,业务层,持久层。
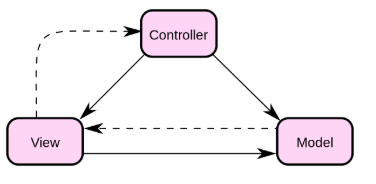
MVC模型
MVC 模式代表 Model-View-Controller(模型-视图-控制器) 模式。这种模式用于应用程序的分层开发。
-
Model(模型)
代表一个存取数据的java对象,也就是javaBean。 -
Vide(视图)
通常是我们的jsp或html,用于展示数据,一般依据数据模型创建的 -
Controller(控制器)
-
控制器作用于模型和视图上。它控制数据流向模型对象,并在数据变化时更新视图。它使视图与模型分离开。
SpringMVC概述
springmvc是什么
srpingmvc是一种基于java的实现mvc设计模型的请求驱动类型的轻量级web框架,属于spring framework的后续产品。支持resrful编程风格的请求。
springmvc和structs2比较
共同点:
1)都是表现层框架,都是基于mvc模型编写的
2)底层都是原始servletAPI
3)处理请求的机制都是一个核心控制器
区别:
1)spring mvc的入口是servllet,而structs2是filter
2)spring mvc(对象单例)是基于方法设计的,而structs(多例) 是基于类,structs是每次执行都会创建一个动作类,因此spring mvc 会比较快
3)spring mvc 使用更简洁,支持JSR303,处理ajax更方便
(JSR303 是一套javabean参数校验的标准,它定义了很多常用的校验注解,我们可以直接将这些注解加在我们javabean的属性上,就可以在需要校验的时候进行校验了)
4)structs的OGNL表达式使页面的开发效率优于spring mvc,但是执行效率并没有比JSTL提升,尤其是strucrs2的表单标签,远没有html执行效率高
springmvc 环境搭建
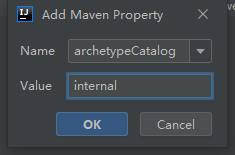
1)创建maven工程,选择

2):在创建Maven工程时加上 archetypeCatalog=internal参数
3)导入依赖
  <dependency>
      <groupId>org.springframework</groupId>
      <artifactId>spring-context</artifactId>
      <version>5.1.5.RELEASE</version>
    </dependency>


    <dependency>
      <groupId>org.springframework</groupId>
      <artifactId>spring-web</artifactId>
      <version>5.1.5.RELEASE</version>
    </dependency>


    <dependency>
      <groupId>javax.servlet</groupId>
      <artifactId>javax.servlet-api</artifactId>
      <version>3.1.0</version>
      <scope>provided</scope>
    </dependency>


    <dependency>
      <groupId>javax.servlet</groupId>
      <artifactId>jsp-api</artifactId>
      <version>2.0</version>
      <scope>provided</scope>
    </dependency>


    <dependency>
      <groupId>org.springframework</groupId>
      <artifactId>spring-webmvc</artifactId>
      <version>5.1.5.RELEASE</version>
    </dependency>


    <dependency>
      <groupId>junit</groupId>
      <artifactId>junit</artifactId>
      <version>4.11</version>
      <scope>test</scope>
    </dependency>
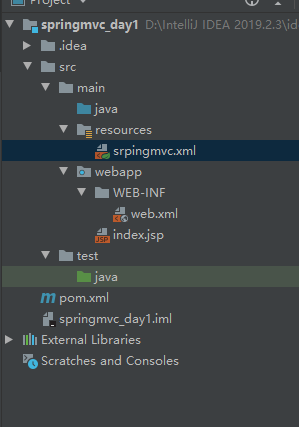
4)补全目录结构
5)在web.xml中配置拦截
  <servlet>
    <servlet-name>dispatcherServlet</servlet-name>
    <servlet-class>org.springframework.web.servlet.DispatcherServlet</servlet-class>
  </servlet>
  <servlet-mapping>
    <servlet-name>dispatcherServlet</servlet-name>
    <url-pattern>/</url-pattern>
  </servlet-mapping>
spring的配置文件头部
<?xml version="1.0" encoding="UTF-8"?>
<beans xmlns="http://www.springframework.org/schema/beans"
       xmlns:mvc="http://www.springframework.org/schema/mvc"
       xmlns:aop="http://www.springframework.org/schema/aop"
       xmlns:context="http://www.springframework.org/schema/context"
       xmlns:xsi="http://www.w3.org/2001/XMLSchema-instance"
       xsi:schemaLocation="
        http://www.springframework.org/schema/beans
        https://www.springframework.org/schema/beans/spring-beans.xsd
        http://www.springframework.org/schema/aop
        https://www.springframework.org/schema/aop/spring-aop.xsd
        http://www.springframework.org/schema/context
        https://www.springframework.org/schema/context/spring-context.xsd
        http://www.springframework.org/schema/mvc
        https://www.springframework.org/schema/mvc/spring-mvc.xsd">

    <mvc:annotation-driven/>

</beans>
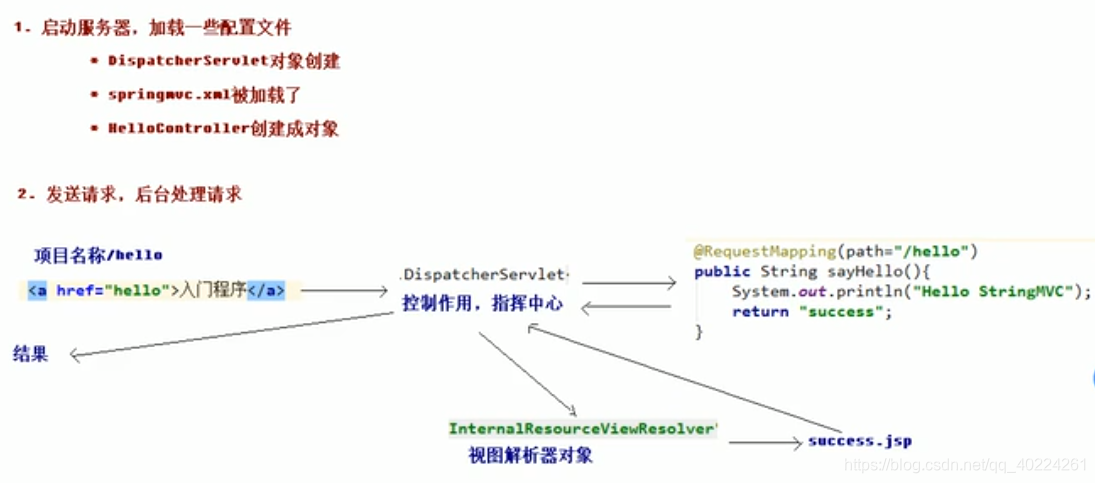
入门程序编写
实现点击页面链接,跳转页面
- web.xml
<!DOCTYPE web-app PUBLIC
 "-//Sun Microsystems, Inc.//DTD Web Application 2.3//EN"
 "http://java.sun.com/dtd/web-app_2_3.dtd" >

<web-app>
  <display-name>Archetype Created Web Application</display-name>

  <servlet>
    <!--配置前端可控制器-->
    <servlet-name>dispatcherServlet</servlet-name>
    <servlet-class>org.springframework.web.servlet.DispatcherServlet</servlet-class>
    <!--添加属性,加载springmvc.xml-->
    <init-param>
      <param-name>contextConfigLocation</param-name>
      <param-value>classpath:springmvc.xml</param-value>
    </init-param>
    <!--使springmvc.xml在程序一运行就加载-->
    <load-on-startup>1</load-on-startup>
  </servlet>
  <servlet-mapping>
    <servlet-name>dispatcherServlet</servlet-name>
    <url-pattern>/</url-pattern>
  </servlet-mapping>
</web-app>
- springmvc.xml
 <?xml version="1.0" encoding="UTF-8"?>
<beans xmlns="http://www.springframework.org/schema/beans"
       xmlns:mvc="http://www.springframework.org/schema/mvc"
       xmlns:aop="http://www.springframework.org/schema/aop"
       xmlns:context="http://www.springframework.org/schema/context"
       xmlns:xsi="http://www.w3.org/2001/XMLSchema-instance"
       xsi:schemaLocation="
        http://www.springframework.org/schema/beans
        https://www.springframework.org/schema/beans/spring-beans.xsd
        http://www.springframework.org/schema/aop
        https://www.springframework.org/schema/aop/spring-aop.xsd
        http://www.springframework.org/schema/context
        https://www.springframework.org/schema/context/spring-context.xsd
        http://www.springframework.org/schema/mvc
        https://www.springframework.org/schema/mvc/spring-mvc.xsd">

    <!--开启spring的注解扫描-->
    <context:component-scan base-package="com.hwh"></context:component-scan>
    <!--开启springmvc的注解扫描-->
    <mvc:annotation-driven/>

    <!--配置视图解析器-->
    <bean id="internalResourceViewResolver" class="org.springframework.web.servlet.view.InternalResourceViewResolver">
        <property name="prefix" value="/WEB-INF/pages/"></property>
        <property name="suffix" value=".jsp"></property>
    </bean>

</beans>
- HelloController.java
package com.hwh.controller;


import org.springframework.stereotype.Controller;
import org.springframework.web.bind.annotation.RequestMapping;

import javax.xml.ws.RequestWrapper;

/**
 * @Description TODO
 * @Author hwh
 * @Date 2020/1/5 16:14
 **/
@Controller
public class HelloController {

    @RequestMapping(path = "/hello")
    public String first(){
        System.out.println("success");

        return "success";
    }
}
- index.jsp
<%--
  Created by IntelliJ IDEA.
  User: AIR
  Date: 2020/1/5
  Time: 16:12
  To change this template use File | Settings | File Templates.
--%>
<%@ page contentType="text/html;charset=UTF-8" language="java" %>
<html>
<head>
    <title>Title</title>
</head>
<body>
    <h1>入门程序11</h1>
    <a href="hello">点击入门程序</a>
</body>
</html>
- success.jsp
<%--
  Created by IntelliJ IDEA.
  User: AIR
  Date: 2020/1/5
  Time: 16:13
  To change this template use File | Settings | File Templates.
--%>
<%@ page contentType="text/html;charset=UTF-8" language="java" %>
<html>
<head>
    <title>Title</title>
</head>
<body>
    <h1>成功</h1>
</body>
</html>
springmvc工作流程(原理)
springmvc是基于组件方式执行流程,所谓组件就是各个器,如处理器映射器等
- 根据代码进行简单分析
- 详细介绍
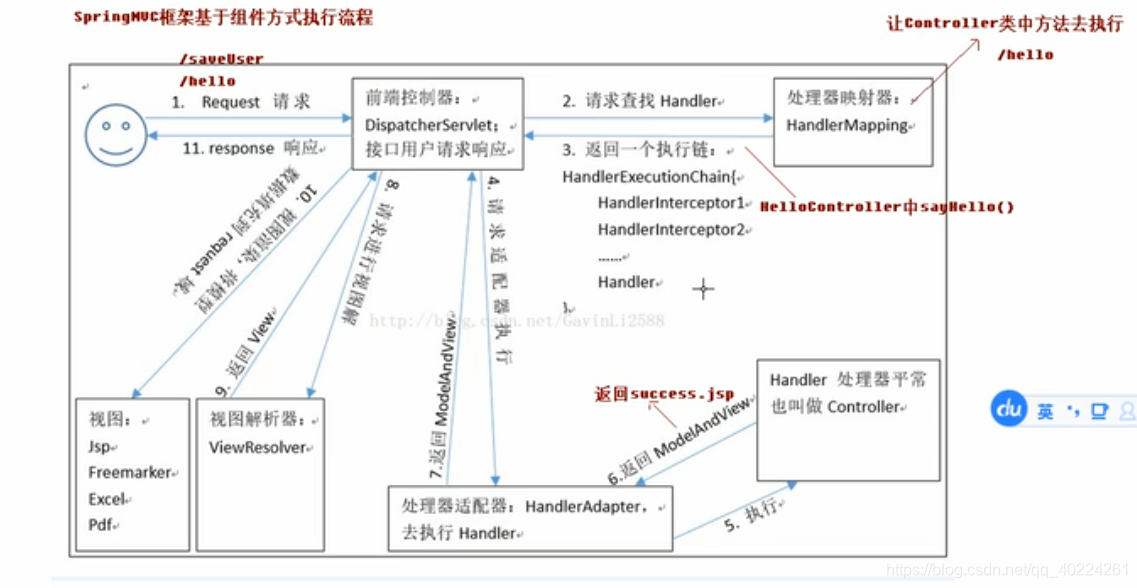
1)客户端发送请求到前端控制器
2)前端控制器让处理器映射器(HandlerMapping)去查找handler(也就是controller类中的方法),并返回一个执行链
3)通过处理器适配器,找到响应的Handler(处理器),执行handler方法,并返回一个modelandview
4)通过视图解析器去解析modelandview并返回一个view
5)渲染到视图,展示给客户
- 各个组件
1)DispatherServlet(前端控制器):
整个流程的控制中心,它的存在可以降低各个组件间的耦合性
2)HandlerMapping(处理器映射器)
根据用户请求,找到响应的处理器(hander)
3)Handler(处理器)
开发中要编写的具体业务控制器
4)HandlAdapter(处理器适配器)
找到响应的适配器
5)View Resolver (视图解析器)
将处理结果生成view
6)View(视图)
渲染页面
注意:
<mvc:annotation-driven/> 自动加载处理器映射器和处理器适配器
解决post请求中文乱码问题(使用过滤器filter)
  <!--解决中文乱码问题-->
  <filter>
    <filter-name>characterEncodingFilter</filter-name>
    <filter-class>org.springframework.web.filter.CharacterEncodingFilter</filter-class>
    <init-param>
      <param-name>encoding</param-name>
      <param-value>utf-8</param-value>
    </init-param>
  </filter>
  <filter-mapping>
    <filter-name>characterEncodingFilter</filter-name>
    <url-pattern>/*</url-pattern>
  </filter-mapping>
请求参数绑定
- 传递对象以及对象中包含对象的情况
jsp发送请求:
 <form action="test" method="post">
        姓名:
        <input type="text" name="userName"><br>
        密码:
        <input type="text" name="password"><br>
        用户姓名:
        <input type="text" name="user.uname"><br>
        性别:
        <input type="text" name="user.sex"><br>
        <input type="submit" value="提交">

    </form>
controller层接受请求:
 @RequestMapping(path = "/test")
    private String testParam(Account account){
        System.out.println(account);
        System.out.println(account.getUser());
        return "success";
    }
- 参数绑定集合类型
account类
 	private Integer id;
    private String userName;
    private String password;

    private List<User> userList;
    private Map<String,User> userMap;
jsp
<form action="test" method="post">
        姓名:
        <input type="text" name="userName"><br>
        密码:
        <input type="text" name="password"><br>


        用户姓名:
        <input type="text" name="userList[0].uname"><br>
        性别:
        <input type="text" name="userList[0].sex"><br>

        用户姓名:
        <input type="text" name="userMap['one'].uname"><br>
        性别:
        <input type="text" name="userMap['one'].sex"><br>
        <input type="submit" value="提交">

    </form>
controller类
 @RequestMapping(path = "/test")
    private String testParam(Account account){
        System.out.println(account);
        return "success";
    }
自定义类型转换器
步骤:
1、编写转换类,继承于converter接口、
package com.hwh.utils;


import javafx.scene.input.DataFormat;
import org.springframework.core.convert.converter.Converter;

import java.text.DateFormat;
import java.text.ParseException;
import java.text.SimpleDateFormat;
import java.util.Date;

/**
 * @Description TODO
 * @Author hwh
 * @Date 2020/1/7 11:14
 **/
public class StringConverter implements Converter<String, Date> {
    @Override
    public Date convert(String s) {
        if(s==null){
            throw new RuntimeException("没有参数传入");
        }
        try {
            DateFormat df = new SimpleDateFormat("yy-MM-dd");
            return df.parse(s);
        } catch (ParseException e) {
            throw new RuntimeException("数据类型转换出现错误");
        }
    }
}
2、在xml中创建ConversionServiceFactoryBean的bean对象,并将自定义转换器注入
   <!--注册自定义类型转换器-->
    <bean id="conversionServiceFactoryBean" class="org.springframework.context.support.ConversionServiceFactoryBean">
       <property name="converters">
           <set>
               <bean class="com.hwh.utils.StringConverter"></bean>
           </set>
       </property>
    </bean>
3、让方法生效
<mvc:annotation-driven conversion-service="conversionServiceFactoryBean"/>
获取原生servlet的API
/**
     * 获取原生servlet的API
     * @param request
     * @param response
     * @return
     */
    @RequestMapping(path = "/selvet")
    private String getServletAPI(HttpServletRequest request, HttpServletResponse response){
        System.out.println(request);
        HttpSession session = request.getSession();
        System.out.println(session);
        System.out.println(response);
        return "success";
    }
常见注解
@RequestMapping
- 作用
建立请求url和处理请求方法之间的对应关系 - 位置
可以添加在类上或者方法上,添加在类上相当于建立一级目录,而添加在方法上相当于建立二级目录,有利于分模块开发 - 属性
1)path:配置映射路径
2)value:与path作用同
3)method:当前的方法可以接受什么样的请求方式,get或post
method = {RequestMethod.GET}
4)params:指定限制请求参数的条件
params = {"username"} 表示所发送的请求必须传username属性,否则方法不执行
5)headers:发送的请求必须包含请求头
@RequestParam
当插入参数名称与接收时名称不一致的情况下使用
示例:
<a href="requestParam?username=hh">点击入门程序</a>
    @RequestMapping(path = "/requestParam")
    private String requestParam(@RequestParam("username") String name){
        System.out.println(name);
        return "success";
    }
@RequestBody
作用:用于获得请求体内容,直接使用得到的是key=value&key=value…结构的数据。
get方法不适用
用法:
@RequestMapping(path = "/RequestBody")
    private String testRequestBody(@RequestBody User user){
        System.out.println(user);
        return "success";
    }
@PathVariable
作用:用于绑定url中的占位符,获取占位符中内容,在使用restful的编程风格的时候通常会用到。
代码示例:
<a href="PathVariable/10">点击入门程序</a>
 @RequestMapping(path = "/PathVariable/{uid}")
    private String testPathVariable(@PathVariable(value = "uid") Integer id){
        System.out.println(id);
        return "success";
    }
@RequestHeader(用的较少)
作用:用于获取请求消息头,可以用于反爬虫
属性:
value:提供消息头名称(如Accpet)
required:是否必须有此消息头
代码示例:
    @RequestMapping(path = "/PathVariable")
    private String testPathVariable(@RequestHeader(value = "Accept") String header){
        System.out.println(header);
        return "success";
    }
@CookieValue
作用:获取指定cookie名称的值
属性:
value 指定cookie的名称
required 是否不许有此cookie
示例代码:
 @RequestMapping(path = "/CookieValue")
    private String testCookieValue(@CookieValue(value = "JSESSIONID") String cookie){
        System.out.println(cookie);
        return "success";
    }
@ModelAttribute
作用:
该注解是springmvc4.3版本以后新加入的,他可以用于修饰方法和参数
出现在方法上,表示当前方法会在控制器方法执行之前先执行。它可以修饰没有返回值的方法,也可以修饰具有返回值的方法。
出现在参数上,获取指定的数据给参数赋值
属性:
value:用于获取数据的key,key可以是POJO的属性名称,也可以是map结构的key
应用场景:
当表单提交不是完整的实体类数据时,保证没有提交数据的字段使用数据库对象原来的数据
代码示例:
jsp代码:
<%--
  Created by IntelliJ IDEA.
  User: AIR
  Date: 2020/1/5
  Time: 16:12
  To change this template use File | Settings | File Templates.
--%>
<%@ page contentType="text/html;charset=UTF-8" language="java" %>
<html>
<head>
    <title>Title</title>
</head>
<body>
    <h1>入门程序11</h1>
    <form action="user" method="post">
        用户名:
        <input type="text" name="uname"><br>
        性别:
        <input type="text" name="sex"><br>
        <input type="submit" value="提交">

    </form>
</body>
</html>
- 当用在方法上时(也就是方法有返回值的情况)
controller类方法
@RequestMapping(path = "/user")
    public String getUser(User user){
        System.out.println("------getUser执行了-------");
        System.out.println(user);

        return "success";
    }

    @ModelAttribute
    public User beforeUser(String username){
        System.out.println("------beforeUser执行了-------");
        //模拟通过username从数据库中读取user
        User user = new User();
        user.setUname(username);
        user.setSex("女");
        user.setBirthday(new Date());

        return user;
    }
- 当用在参数上时(也就是方法没有返回值的情况)
controller类方法
  @RequestMapping(path = "/user")
    public String getUser(@ModelAttribute(value = "one") User user){
        System.out.println("------getUser1执行了-------");
        System.out.println(user);

        return "success";
    }

    @ModelAttribute
    public void beforeUser(String username, Map<String,User> map){
        System.out.println("------beforeUser1执行了-------");
        //模拟通过username从数据库中读取user
        User user = new User();
        user.setUname(username);
        user.setSex("女");
        user.setBirthday(new Date());
        map.put("one",user);

//        return user;
    }
运行结果:

@SessionAttributes
作用:
用于多次执行控制器方法见的参数共享
属性:
value:用于指定存入的属性名称
type:用于指定存入的数据类型
代码示例:
jsp中的代码:
<%--
  Created by IntelliJ IDEA.
  User: AIR
  Date: 2020/1/5
  Time: 16:12
  To change this template use File | Settings | File Templates.
--%>
<%@ page contentType="text/html;charset=UTF-8" language="java"  %>
<html>
<head>
    <title>Title</title>
</head>
<body>
    <h1>入门程序</h1>
<%--    <a href="requestParam?username=hh">点击入门程序</a>--%>
    <a href="putSession">putSession</a>
    <a href="getSession">getSession</a>
    <a href="clearSession">clearSession</a>

    </form>
</body>
</html>
controller类代码:
 /**
     * 将map值传入session阈中
     * @param model
     * @return
     */
    @RequestMapping(path = "/putSession")
    public String putSession(Model model){
        System.out.println("------putSession执行了-------");
        Map<String,String> map = new HashMap<>();
        //存入到request域对象中
        model.addAttribute("msg","name");

        return "success";
    }

    /**
     * 获取session的值
     * @param modelMap
     * @return
     */
    @RequestMapping(path = "/getSession")
    public String getSession(ModelMap modelMap){
        System.out.println("------getSession执行了-------");
        String msg = (String) modelMap.get("msg");
        System.out.println(msg);
        return "success";
    }

    /**
     * 清除session值
     * @param status
     * @return
     */
    @RequestMapping(path = "/clearSession")
    public String clearSession(SessionStatus status){
        System.out.println("------clearSession执行了-------");
        status.setComplete();
        return "success";
    }
restful编程风格
-
什么是restful
是一种设计风格 -
优点
结构清晰,易于理解、扩展方便 -
特性
资源:网络上的一个具体信息,每个资源有一个URI(统一资源定位符)。获取这个资源,访问他的URI就可以,因此URI为每一个资源的独一无二的识别符
表现层:把资源呈现出来的形式,叫做它的表现层
比如,文本可以用txt或者json,xml等格式展现
状态转化:
http协议里面,四种请求方式:get,post,put和delete。
get用来获取资源,post用来新建资源,post用来更新资源,delete用来删除资源 -
图解
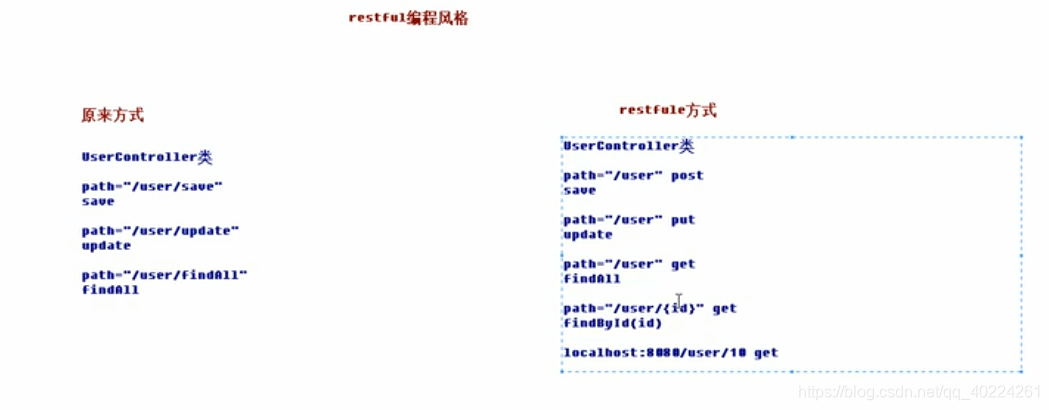
普通的方式可以通过请求路径的不同,从而让不同的方法去接受这个请求,而restful风格的设计是路径相同,通过请求方法不同的形式,让不同的方法处理请求,以及将需要传递的参数也放在路径已达到目的。
响应请求的四种方式
响应之后返回值是string类型
    /**
     * 响应之后返回string类型
     * @param model
     * @return
     */
    @RequestMapping("/testGetUser")
    public String getUser(Model model){
        System.out.println("---------getUser方法执行了-----------");
        //模拟从数据库中取出user对象
        User user = new User();
        user.setUserName("zhangsan");
        user.setPassword("123");
        user.setAge(12);
        model.addAttribute("user",user);
        return "success";
    }
响应之后返回值是void类型
/**
     * 响应之后返回值是void类型
     * @param request
     * @param response
     * @throws ServletException
     * @throws IOException
     */
    @RequestMapping("/testVoid")
    public void testVoid(HttpServletRequest request, HttpServletResponse response) throws ServletException, IOException {
        System.out.println("---------testVoid方法执行了-----------");
        //转发,一次请求
//        request.getRequestDispatcher("/WEB-INF/pages/success.jsp").forward(request,response);
        //重定向,两次请求,不能访问WEB-INF下的jsp文件
//        response.sendRedirect(request.getContextPath()+"/response.jsp");
        //解决中文乱码问题
        response.setCharacterEncoding("utf-8");
        response.setContentType("text/html;charset=utf-8");
        //直接进行响应
        response.getWriter().print("你好");

    }
响应之后返回值是ModelAndVies类型
  /**
     * 响应之后返回值是ModelAndView类型
     * @return
     */
    @RequestMapping("/testModelAndView")
    public ModelAndView testModelAndView(){
        System.out.println("---------testModelAndView方法执行了-----------");
        //模拟从数据库中取出user对象
        ModelAndView modelAndView = new ModelAndView();
        User user = new User();
        user.setUserName("zhangsan");
        user.setPassword("123");
        user.setAge(12);

        modelAndView.addObject("user",user);
        modelAndView.setViewName("success");
        return modelAndView;
    }
使用forward和redirect关键字进行页面跳转
注意:使用关键字的方式不会经过视图解析器,因此在路径的填写上需要填写完整路径。
代码示例:
    @RequestMapping("/testForward")
    public String testForward() {
        System.out.println("---------testForward方法执行了-----------");
        //转发
//        return "forward:/WEB-INF/pages/success.jsp";
        //重定向
        return "redirect:/response.jsp";
    }
发送ajax请求并响应(数据传输以json格式进行传输)
首先需要导入jackson相关的jar包
    <!-- jackson-->
    <dependency>
      <groupId>com.fasterxml.jackson.core</groupId>
      <artifactId>jackson-core</artifactId>
      <version>2.9.8</version>
    </dependency>


    <dependency>
      <groupId>com.fasterxml.jackson.core</groupId>
      <artifactId>jackson-annotations</artifactId>
      <version>2.9.8</version>
    </dependency>

    <dependency>
      <groupId>com.fasterxml.jackson.core</groupId>
      <artifactId>jackson-databind</artifactId>
      <version>2.9.8</version>
    </dependency>
发送ajax请求代码:
<%@ page contentType="text/html;charset=UTF-8" language="java" %>
<html>
<head>
    <title>index</title>

<%--    <script src="http://ajax.aspnetcdn.com/ajax/jQuery/jquery-1.8.0.js"></script>--%>

    <script src="js/jquery-min.js"></script>
    <script>
        //页面加载绑定单击事件
        $(function () {
                $("#btn").click(function () {
                // alert("发送请求222")
                    //发送ajax请求
                    $.ajax({
                        url:"user/testAjax",
                        contentType:"application/json;charset=utf-8",
                        data:'{"userName":"Tom","password":"123","age":1}',
                        dataType:"json",
                        type:"post",
                        success:function (data) {
                            alert(data)
                            alert(data.userName)
                        }
                    })
            })
        })
    </script>

</head>
<body>

    <button id="btn">发送ajax请求</button>


</body>
</html>
响应请求代码:
    /**
     * 响应ajax请求
     * 通过@RequestBody获取请求体,并塞入user中
     * @ResponseBody将返回的uer转化为json格式
     * @param user
     * @return
     */
    @RequestMapping(value = "/testAjax",method = RequestMethod.POST)
    @ResponseBody
    public User testAjax(@RequestBody User user) {
        System.out.println("---------testAjax方法执行了-----------");
        System.out.println(user.toString());
        user.setUserName("Jerry");
        return user;
    }
文件上传
传统方式
文件上传的必要前提
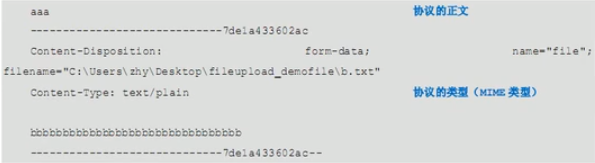
1)form表单的enctype取值为multipart/form-data(将请求内容分部分)
2)method的属性为post
3)提供一个文件选择域
文件上传原理

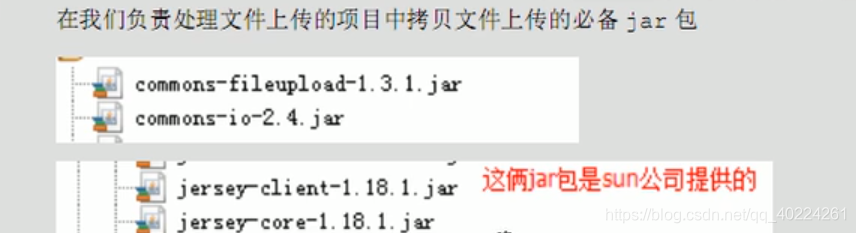
传统文件上传方式需借助第三方组组件实现文件上传

主要代码:
- 导入的jar包
 <!-- 第三方jar包实现文件上传 -->
    <dependency>
      <groupId>commons-io</groupId>
      <artifactId>commons-io</artifactId>
      <version>2.4</version>
    </dependency>


    <dependency>
      <groupId>commons-fileupload</groupId>
      <artifactId>commons-fileupload</artifactId>
      <version>1.3.1</version>
    </dependency>
- jsp文件代码:
<body>
    <form action="testFile" method="post" enctype="multipart/form-data">
        选择文件:<input type="file" name="upload"><br><br>
        <input type="submit" value="上传">
    </form>
</body>
- 控制层代码:
    @RequestMapping("/testFile")
    public String testFile(HttpServletRequest request) throws Exception {
        System.out.println("--------testFile方法执行了-------");
        //上传路径
        String path = request.getSession().getServletContext().getRealPath("/upload");
        System.out.println(path);
        File file = new File(path);
        //判断文件夹是否存在,若不存在,则创建一个
        if(!file.exists()){
            file.mkdir();
        }
        //解析上传文件,获取上传资源
        DiskFileItemFactory factory = new DiskFileItemFactory();
        ServletFileUpload upload = new ServletFileUpload(factory);
        //解析request
        List<FileItem> fileItems = upload.parseRequest(request);

        for (FileItem item:fileItems){
            //判断当前item是否为文件上传项
            if(item.isFormField()){

            }else {
                //获取上传文件的名称
                String filename = item.getName();
                String uuid = UUID.randomUUID().toString().replace("-","");
                filename = uuid+"-"+filename;

                //完成文件上传
                item.write(new File(path,filename));
                //删除临时文件
                item.delete();
            }
        }
        return "success";
    }
springmvc文件上传
实现原理:
springmvc框架为我们提供了一个文件解析器,帮助我们解析request,然后通过MultipartFile的transfor方法实现文件上传。
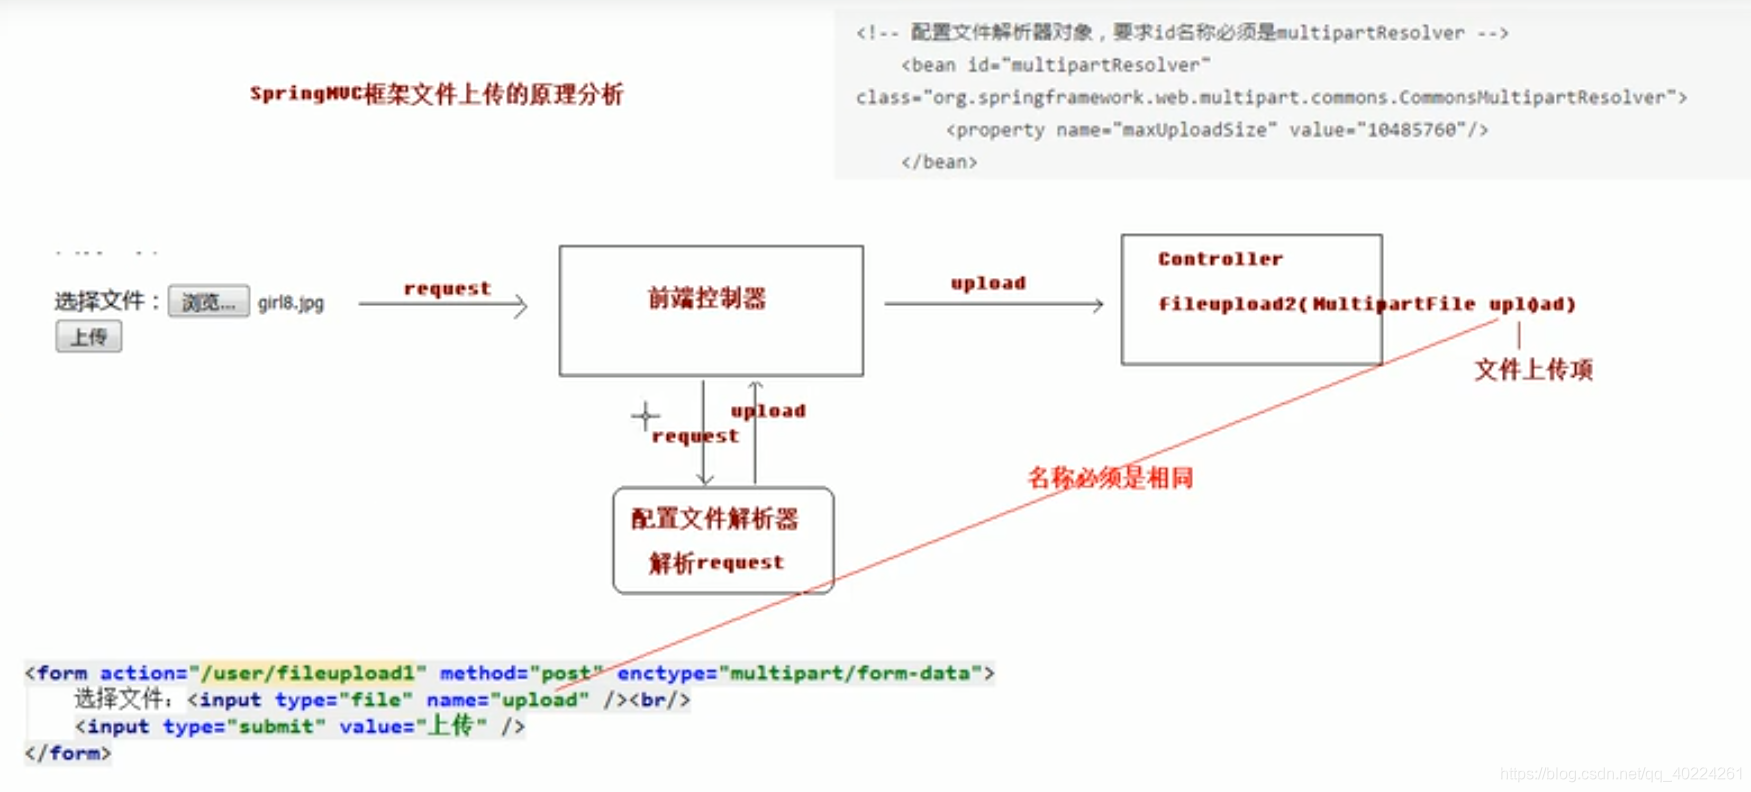
注意点:
1)文件解析器(CommonsMultipartResolver)的bean 的id必须为multipartResolver
2)MultipartFile 类名字需要与form表单中<input type="file" name="upload">的name名称相一致
代码示例:
- 文件解析器配置:
  <!--配置文件解析器,id必须为multipartResolver-->
    <bean id="multipartResolver" class="org.springframework.web.multipart.commons.CommonsMultipartResolver">
        <property name="maxUploadSize" value="10485760"></property>
    </bean>
- 控制层代码:
    /**
     * @param request
     * @param upload  需要与表单中文件名字相同
     * @return
     * @throws Exception
     */
    @RequestMapping("/testSpringMvcFile")
    public String testSpringMvcFile(HttpServletRequest request, MultipartFile upload) throws Exception {
        System.out.println("--------testSpringMvcFile1方法执行了-------");
        //上传路径

        String path = request.getSession().getServletContext().getRealPath("/upload");
        System.out.println(path);
        File file = new File(path);
        //判断文件夹是否存在,若不存在,则创建一个
        if (!file.exists()) {
            file.mkdir();
        }

        //解析request

        //获取上传文件的名称
        String filename = upload.getOriginalFilename();
        String uuid = UUID.randomUUID().toString().replace("-", "");
        filename = uuid + "-" + filename;

        //完成文件上传
        upload.transferTo(new File(path,filename));

        return"success";
    }
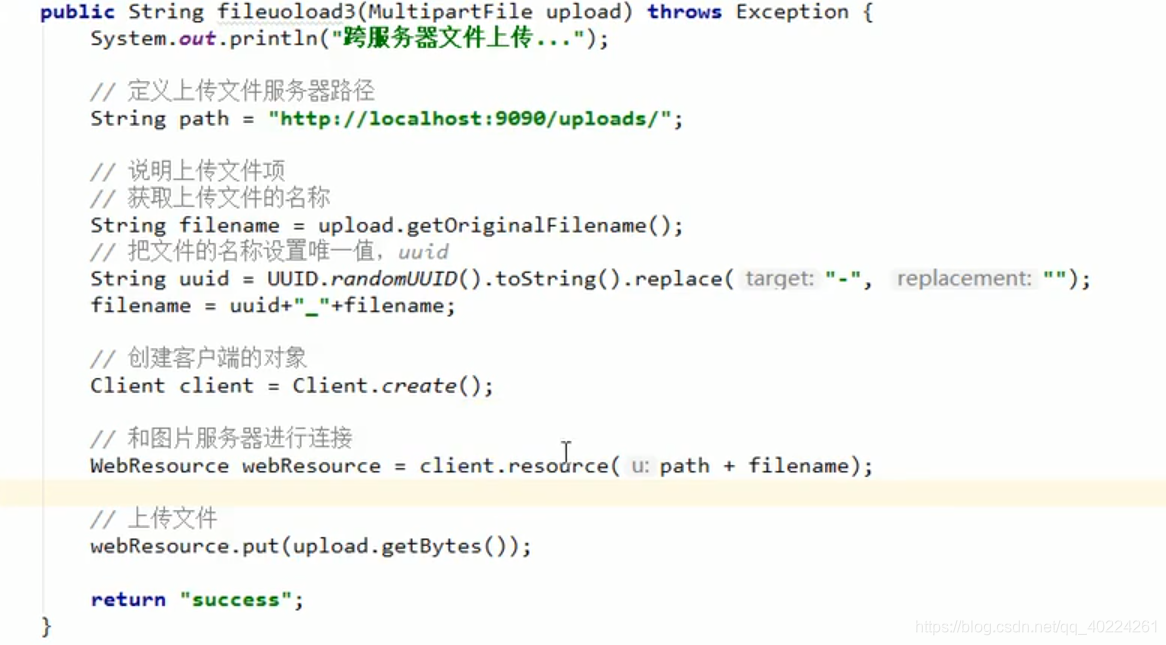
跨服务器实现文件上传
springmvc的异常处理
异常处理思路
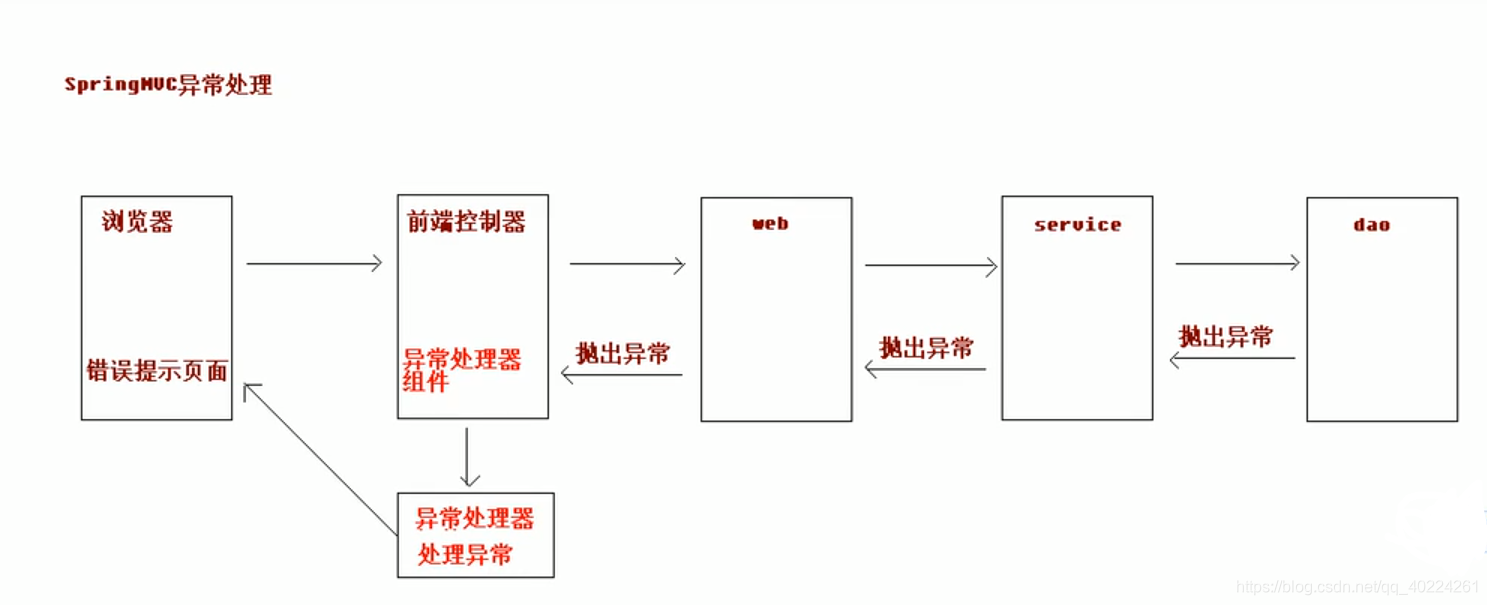
controller调用service,service调用dao,异常都是向上抛出的,最终有前端处理器找到异常处理器进行异常处理
springmvc异常处理示例小代码
- 步骤
1)编写自定义异常类(做提示信息)
2)编写异常处理器
3)配置异常处理器(跳转到提示页面)
示例代码:
- index.jsp
<%--
  Created by IntelliJ IDEA.
  User: AIR
  Date: 2020/1/9
  Time: 15:13
  To change this template use File | Settings | File Templates.
--%>
<%@ page contentType="text/html;charset=UTF-8" language="java" %>
<html>
<head>
    <title>Title</title>
</head>
<body>
    <h1>方法执行</h1>
    <a href="error/testError">异常执行</a>
</body>
</html>
- error.jsp
<%--
  Created by IntelliJ IDEA.
  User: AIR
  Date: 2020/1/9
  Time: 15:13
  To change this template use File | Settings | File Templates.
--%>
<%@ page contentType="text/html;charset=UTF-8" language="java" isELIgnored="false" %>
<html>
<head>
    <title>Title</title>
</head>
<body>
    <h1>异常页面</h1>
    ${error}
</body>
</html>
- 自定义异常类
package com.hwh.entity;

/**
 * @Description 自定义异常类
 * @Author hwh
 * @Date 2020/1/9 15:32
 **/
public class SysException extends Exception {
    private String message;

    public SysException(String message) {
        this.message = message;
    }

    public String getMessage() {
        return message;
    }

    public void setMessage(String message) {
        this.message = message;
    }
}
- 异常处理器类
package com.hwh.exceprion;

import com.hwh.entity.SysException;
import org.springframework.stereotype.Controller;
import org.springframework.web.servlet.HandlerExceptionResolver;
import org.springframework.web.servlet.ModelAndView;

import javax.servlet.http.HttpServletRequest;
import javax.servlet.http.HttpServletResponse;

/**
 * @Description 异常处理器
 * @Author hwh
 * @Date 2020/1/9 15:34
 **/
@Controller
public class ExceptionResolver implements HandlerExceptionResolver {

    @Override
    public ModelAndView resolveException(HttpServletRequest httpServletRequest, HttpServletResponse httpServletResponse, Object o, Exception e) {
        SysException sysException = null;
        if(e instanceof SysException){
            sysException = (SysException)e;
        }else {
            sysException = new SysException("系统正在维护");
        }
        ModelAndView mv = new ModelAndView();
        mv.addObject("error", sysException.getMessage());
        mv.setViewName("error");
        return mv;
    }
}
- 控制层类
package com.hwh.controller;

import com.hwh.entity.SysException;
import org.omg.CORBA.SystemException;
import org.springframework.stereotype.Controller;
import org.springframework.web.bind.annotation.RequestMapping;

/**
 * @Description TODO
 * @Author hwh
 * @Date 2020/1/9 15:14
 **/
@Controller
@RequestMapping("/error")
public class ErrorController {

    @RequestMapping("/testError")
    public String testError() throws SysException {
        System.out.println("--------testError方法执行了--------");
        try {
            int i= 10/0;
        } catch (Exception e) {
            e.printStackTrace();
            throw new SysException("发生错误");
        }
        return "error";
    }
}
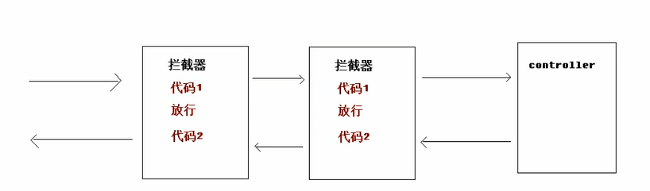
springmvc拦截器
spring mvc中的拦截器类似于servlet中的过滤器filter,用于对处理器进行预处理和后处理。我们要自定义拦截器,必须实现HandlerInterceptor接口
拦截器和过滤器的区别:
1)过滤器是servlet规范中的一部分,任何java web工程都可以使用
过滤器是springmvc框架自己的,只有使用了springmvc框架的工程才能使用
2)过滤器在url-pattern中配置了/*之后,可以对所有要访问的资源拦截。
拦截器只会拦截访问的控制器方法,如果访问的是jsp,html,css,image或者js是不会进行拦截的
总结:拦截器能做的事,过滤器全部能做,过滤器能做的事,拦截器不一定能做。
拦截器链:
其实就是多个拦截器,一个拦截器执行完后去执行下一个
springmvc拦截器入门小程序
主要代码:
- index.jsp
<body>
    <h1>拦截器</h1>
    <a href="interceptor/testInterceptor">拦截器</a>
</body>
- success.jsp
<body>
<h1>方法执行成功</h1>
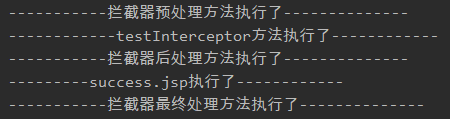
<% System.out.println("---------success.jsp执行了------------"); %>
</body>
- error.jsp
<body>
    <h1>错误页面</h1>
</body>
- InterceptorController.java
package com.hwh.controller;

import org.springframework.stereotype.Controller;
import org.springframework.web.bind.annotation.RequestMapping;

/**
 * @Description TODO
 * @Author hwh
 * @Date 2020/1/9 19:20
 **/
@Controller
@RequestMapping("/interceptor")
public class InterceptorController {

    @RequestMapping("/testInterceptor")
    public String testInterceptor(){
        System.out.println("------------testInterceptor方法执行了------------");

        return "success";
    }
}
- Interceptor.java(重写拦截器方法)
package com.hwh.utils;

import org.springframework.lang.Nullable;
import org.springframework.web.servlet.HandlerInterceptor;
import org.springframework.web.servlet.ModelAndView;

import javax.servlet.http.HttpServletRequest;
import javax.servlet.http.HttpServletResponse;

/**
 * @Description 自定义拦截器类
 * @Author hwh
 * @Date 2020/1/9 19:24
 **/
public class Interceptor implements HandlerInterceptor {

    /**
     * 预处理,在contoller方法前执行
     * return true方形,执行下一个拦截器方法,若没有,执行controller中的方法
     * return false 不放行
     * @param request
     * @param response
     * @param handler
     * @return
     * @throws Exception
     */
    public boolean preHandle(HttpServletRequest request, HttpServletResponse response, Object handler) throws Exception {
        System.out.println("-----------拦截器预处理方法执行了--------------");
        return true;
    }

    /**
     * 在controller方法之执行
     * @param request
     * @param response
     * @param handler
     * @param modelAndView
     * @throws Exception
     */
    public void postHandle(HttpServletRequest request, HttpServletResponse response, Object handler, @Nullable ModelAndView modelAndView) throws Exception {
        System.out.println("-----------拦截器后处理方法执行了--------------");
        //跳到error页面之后就不会再跳到success的页面了,但是success仍会执行
//        request.getRequestDispatcher("/WEB-INF/pages/error.jsp").forward(request,response);
    }

    /**
     * 在最终执行
     * @param request
     * @param response
     * @param handler
     * @param ex
     * @throws Exception
     */
    public void afterCompletion(HttpServletRequest request, HttpServletResponse response, Object handler, @Nullable Exception ex) throws Exception {
        System.out.println("-----------拦截器最终处理方法执行了--------------");
    }
}
- springmvc.xml
    <!--配置拦截器-->
    <mvc:interceptors>
        <mvc:interceptor>
            <!--配置要拦截的方法-->
            <mvc:mapping path="/interceptor/**"/>
            <!--配置不拦截的方法-->
<!--            <mvc:exclude-mapping path=""/>-->
            <bean class="com.hwh.utils.Interceptor"></bean>
        </mvc:interceptor>
    </mvc:interceptors>
- 运行结果:
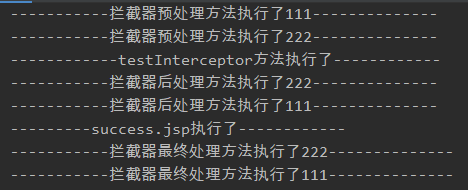
配置多个拦截器
 <!--配置拦截器-->
    <mvc:interceptors>

        <mvc:interceptor>
            <!--配置要拦截的方法-->
            <mvc:mapping path="/interceptor/**"/>
            <!--配置不拦截的方法-->
<!--            <mvc:exclude-mapping path=""/>-->
            <bean class="com.hwh.utils.Interceptor"></bean>
        </mvc:interceptor>

        <!--配置第二个拦截器-->
        <mvc:interceptor>
            <!--配置要拦截的方法-->
            <mvc:mapping path="/interceptor/**"/>
            <!--配置不拦截的方法-->
            <!--            <mvc:exclude-mapping path=""/>-->
            <bean class="com.hwh.utils.Interceptor2"></bean>
        </mvc:interceptor>
    </mvc:interceptors>
- 运行结果:


 1万+
1万+


 被折叠的 条评论
为什么被折叠?
被折叠的 条评论
为什么被折叠?
 到【灌水乐园】发言


