


 本文详细介绍了如何在iOS项目中集成JPush服务,包括安装npm包,申请和配置推送证书,更新Pod库,以及在AppDelegate.mm中设置初始化配置和处理通知事件。同时,文章还提及了在M1MBP上可能遇到的架构问题及解决办法。
阅读前须知
文章分为两部分,【iOS接入流程】与【无法接入的解决方案】,按照自己的需求来选择。
如要了解安卓接入方法,点这里
iOS接入流程
其他文档时间较为久远,这里对最新版本的rn与jpush做一接入流程记录
xcode版本:14.3.1
react-native 版本:0.72.1
react版本:18.2.0
JPush: 2.9.9
JCore:2.1.3
文档集合
JPush 官方案例,建议先跑这个git文件下的example项目
官方案例接入文档,写得依托狗矢;
JPush库接入文档npm 访问不了git的可以看这个,重要的地方一处没写,极光开发也是一字千金
1.安装相关包
// 在项目根目录安装npm包
npm install jcore-react-native jpush-react-native

// 在ios文件夹下更新pod库,这里很坑,出现gem和cocoapods的问题请自行查阅解决
// 首先清理pod,官方说以前安装过的推荐清理,我建议无论你安装过jpush与否都请清理
pod deintegrate
// 更新pod库
pod install
2.申请iOS推送证书
请查阅这篇,写的巨细
tips: 如果证书生成时出错,确保你电脑登录的apple id和你keychain中申请证书的apple id是一个,我在这里解决了很久;其他问题自行查询解决。
3.配置极光选项
将导出的p12证书上传到极光的ios证书配置上,没有特殊要求的话就勾选【是否将生产证书用于开发环境】,配置于两个环境
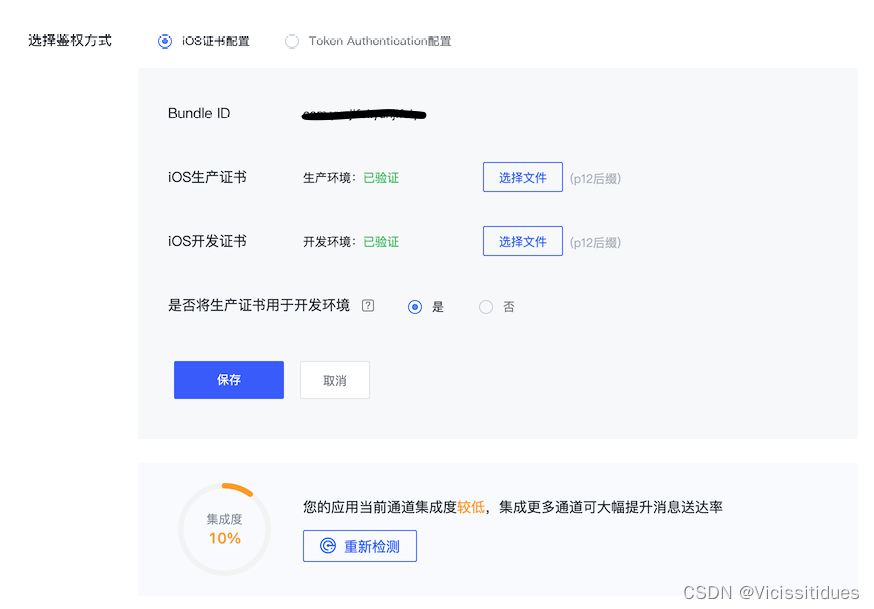
tips: 你配置好之后极光后台还要反应好一会,如果在发送消息那里ios还没启用,依然让你去配置的话,等一段时间就行。
4. 配置项目设置
AppDelegate.mm
位置: 你的项目名/ios/你的项目名/AppDelegate.mm
增加依赖
#import <RCTJPushModule.h>
#import <React/RCTBridge.h>
#import <React/RCTRootView.h>
#ifdef NSFoundationVersionNumber_iOS_9_x_Max
#import <UserNotifications/UserNotifications.h>
#endif
@interface AppDelegate ()<JPUSHRegisterDelegate>
@end
初始化配置
- (BOOL)application:(UIApplication *)application didFinishLaunchingWithOptions:(NSDictionary *)launchOptions
{
   // JPush初始化配置 可以延时初始化 不再强制在此初始化,在js里可以直接调用init
 [JPUSHService setupWithOption:launchOptions appKey:@"你的key"
                       channel:@"dev" apsForProduction:YES];
  // APNS
  JPUSHRegisterEntity * entity = [[JPUSHRegisterEntity alloc] init];
  if (@available(iOS 12.0, *)) {
    entity.types = JPAuthorizationOptionNone; //JPAuthorizationOptionAlert|JPAuthorizationOptionBadge|JPAuthorizationOptionSou//nd|JPAuthorizationOptionProvidesAppNotificationSettings;
  }
  [JPUSHService registerForRemoteNotificationConfig:entity delegate:self];

   // ReactNative环境配置
  RCTBridge *bridge = [[RCTBridge alloc] initWithDelegate:self launchOptions:launchOptions];
  RCTRootView *rootView = [[RCTRootView alloc] initWithBridge:bridge
                                                   moduleName:@"yunjifeiy"
                                            initialProperties:nil];
  rootView.backgroundColor = [[UIColor alloc] initWithRed:1.0f green:1.0f blue:1.0f alpha:1];
  self.window = [[UIWindow alloc] initWithFrame:[UIScreen mainScreen].bounds];
  UIViewController *rootViewController = [UIViewController new];
  rootViewController.view = rootView;
  self.window.rootViewController = rootViewController;
  [self.window makeKeyAndVisible];
  return YES;
}
在文件末尾的@end 前加如下内容
//************************************************JPush start************************************************

//注册 APNS 成功并上报 DeviceToken
- (void)application:(UIApplication *)application didRegisterForRemoteNotificationsWithDeviceToken:(NSData *)deviceToken {
  [JPUSHService registerDeviceToken:deviceToken];
}

//iOS 7 APNS
- (void)application:(UIApplication *)application didReceiveRemoteNotification:  (NSDictionary *)userInfo fetchCompletionHandler:(void (^)(UIBackgroundFetchResult))completionHandler {
  // iOS 10 以下 Required
  NSLog(@"iOS 7 APNS");
  [JPUSHService handleRemoteNotification:userInfo];
  [[NSNotificationCenter defaultCenter] postNotificationName:J_APNS_NOTIFICATION_ARRIVED_EVENT object:userInfo];
  completionHandler(UIBackgroundFetchResultNewData);
}

//iOS 10 前台收到消息
- (void)jpushNotificationCenter:(UNUserNotificationCenter *)center  willPresentNotification:(UNNotification *)notification withCompletionHandler:(void (^)(NSInteger))completionHandler {
  NSDictionary * userInfo = notification.request.content.userInfo;
  if([notification.request.trigger isKindOfClass:[UNPushNotificationTrigger class]]) {
    // Apns
    NSLog(@"iOS 10 APNS 前台收到消息");
    [JPUSHService handleRemoteNotification:userInfo];
    [[NSNotificationCenter defaultCenter] postNotificationName:J_APNS_NOTIFICATION_ARRIVED_EVENT object:userInfo];
  }
  else {
    // 本地通知 todo
    NSLog(@"iOS 10 本地通知 前台收到消息");
    [[NSNotificationCenter defaultCenter] postNotificationName:J_LOCAL_NOTIFICATION_ARRIVED_EVENT object:userInfo];
  }
  //需要执行这个方法,选择是否提醒用户,有 Badge、Sound、Alert 三种类型可以选择设置
  completionHandler(UNNotificationPresentationOptionAlert);
}

//iOS 10 消息事件回调
- (void)jpushNotificationCenter:(UNUserNotificationCenter *)center didReceiveNotificationResponse:(UNNotificationResponse *)response withCompletionHandler: (void (^)(void))completionHandler {
  NSDictionary * userInfo = response.notification.request.content.userInfo;
  if([response.notification.request.trigger isKindOfClass:[UNPushNotificationTrigger class]]) {
    // Apns
    NSLog(@"iOS 10 APNS 消息事件回调");
    [JPUSHService handleRemoteNotification:userInfo];
    // 保障应用被杀死状态下,用户点击推送消息,打开app后可以收到点击通知事件
    [[RCTJPushEventQueue sharedInstance]._notificationQueue insertObject:userInfo atIndex:0];
    [[NSNotificationCenter defaultCenter] postNotificationName:J_APNS_NOTIFICATION_OPENED_EVENT object:userInfo];
  }
  else {
    // 本地通知
    NSLog(@"iOS 10 本地通知 消息事件回调");
    // 保障应用被杀死状态下,用户点击推送消息,打开app后可以收到点击通知事件
    [[RCTJPushEventQueue sharedInstance]._localNotificationQueue insertObject:userInfo atIndex:0];
    [[NSNotificationCenter defaultCenter] postNotificationName:J_LOCAL_NOTIFICATION_OPENED_EVENT object:userInfo];
  }
  // 系统要求执行这个方法
  completionHandler();
}

//自定义消息
- (void)networkDidReceiveMessage:(NSNotification *)notification {
  NSDictionary * userInfo = [notification userInfo];
  [[NSNotificationCenter defaultCenter] postNotificationName:J_CUSTOM_NOTIFICATION_EVENT object:userInfo];
}

//************************************************JPush end************************************************
@end //<-这里是文件自带的那个end
这里贴上文件完整版,可以详细对比,但是别整个复制,我们的RN版本不一定一样
// #import "AppDelegate.h"

// #import <React/RCTBundleURLProvider.h>

// —————————————— 极光依赖start ————————————————————
#import "AppDelegate.h"

#import <RCTJPushModule.h>

#import <React/RCTBridge.h>
#import <React/RCTBundleURLProvider.h>
#import <React/RCTRootView.h>

#ifdef NSFoundationVersionNumber_iOS_9_x_Max
#import <UserNotifications/UserNotifications.h>
#endif

@interface AppDelegate ()<JPUSHRegisterDelegate>

@end
// —————————————— 极光依赖end —————————————————

@implementation AppDelegate

- (BOOL)application:(UIApplication *)application didFinishLaunchingWithOptions:(NSDictionary *)launchOptions
{
   // JPush初始化配置 可以延时初始化 不再强制在此初始化,在js里可以直接调用init
 [JPUSHService setupWithOption:launchOptions appKey:@"你的key"
                       channel:@"dev" apsForProduction:YES];
  // APNS
  JPUSHRegisterEntity * entity = [[JPUSHRegisterEntity alloc] init];
  if (@available(iOS 12.0, *)) {
    entity.types = JPAuthorizationOptionNone; //JPAuthorizationOptionAlert|JPAuthorizationOptionBadge|JPAuthorizationOptionSou//nd|JPAuthorizationOptionProvidesAppNotificationSettings;
  }
  [JPUSHService registerForRemoteNotificationConfig:entity delegate:self];

   // ReactNative环境配置
  RCTBridge *bridge = [[RCTBridge alloc] initWithDelegate:self launchOptions:launchOptions];
  RCTRootView *rootView = [[RCTRootView alloc] initWithBridge:bridge
                                                   moduleName:@"yunjifeiy"
                                            initialProperties:nil];
  rootView.backgroundColor = [[UIColor alloc] initWithRed:1.0f green:1.0f blue:1.0f alpha:1];
  self.window = [[UIWindow alloc] initWithFrame:[UIScreen mainScreen].bounds];
  UIViewController *rootViewController = [UIViewController new];
  rootViewController.view = rootView;
  self.window.rootViewController = rootViewController;
  [self.window makeKeyAndVisible];
  return YES;
  //------------------jgend----------------


  self.moduleName = @"yunjifeiy";
  // You can add your custom initial props in the dictionary below.
  // They will be passed down to the ViewController used by React Native.
  self.initialProps = @{};

  return [super application:application didFinishLaunchingWithOptions:launchOptions];
}

- (NSURL *)sourceURLForBridge:(RCTBridge *)bridge
{
#if DEBUG
  return [[RCTBundleURLProvider sharedSettings] jsBundleURLForBundleRoot:@"index"];
#else
  return [[NSBundle mainBundle] URLForResource:@"main" withExtension:@"jsbundle"];
#endif
}
//************************************************JPush start************************************************

//注册 APNS 成功并上报 DeviceToken
- (void)application:(UIApplication *)application didRegisterForRemoteNotificationsWithDeviceToken:(NSData *)deviceToken {
  [JPUSHService registerDeviceToken:deviceToken];
}

//iOS 7 APNS
- (void)application:(UIApplication *)application didReceiveRemoteNotification:  (NSDictionary *)userInfo fetchCompletionHandler:(void (^)(UIBackgroundFetchResult))completionHandler {
  // iOS 10 以下 Required
  NSLog(@"iOS 7 APNS");
  [JPUSHService handleRemoteNotification:userInfo];
  [[NSNotificationCenter defaultCenter] postNotificationName:J_APNS_NOTIFICATION_ARRIVED_EVENT object:userInfo];
  completionHandler(UIBackgroundFetchResultNewData);
}

//iOS 10 前台收到消息
- (void)jpushNotificationCenter:(UNUserNotificationCenter *)center  willPresentNotification:(UNNotification *)notification withCompletionHandler:(void (^)(NSInteger))completionHandler {
  NSDictionary * userInfo = notification.request.content.userInfo;
  if([notification.request.trigger isKindOfClass:[UNPushNotificationTrigger class]]) {
    // Apns
    NSLog(@"iOS 10 APNS 前台收到消息");
    [JPUSHService handleRemoteNotification:userInfo];
    [[NSNotificationCenter defaultCenter] postNotificationName:J_APNS_NOTIFICATION_ARRIVED_EVENT object:userInfo];
  }
  else {
    // 本地通知 todo
    NSLog(@"iOS 10 本地通知 前台收到消息");
    [[NSNotificationCenter defaultCenter] postNotificationName:J_LOCAL_NOTIFICATION_ARRIVED_EVENT object:userInfo];
  }
  //需要执行这个方法,选择是否提醒用户,有 Badge、Sound、Alert 三种类型可以选择设置
  completionHandler(UNNotificationPresentationOptionAlert);
}

//iOS 10 消息事件回调
- (void)jpushNotificationCenter:(UNUserNotificationCenter *)center didReceiveNotificationResponse:(UNNotificationResponse *)response withCompletionHandler: (void (^)(void))completionHandler {
  NSDictionary * userInfo = response.notification.request.content.userInfo;
  if([response.notification.request.trigger isKindOfClass:[UNPushNotificationTrigger class]]) {
    // Apns
    NSLog(@"iOS 10 APNS 消息事件回调");
    [JPUSHService handleRemoteNotification:userInfo];
    // 保障应用被杀死状态下,用户点击推送消息,打开app后可以收到点击通知事件
    [[RCTJPushEventQueue sharedInstance]._notificationQueue insertObject:userInfo atIndex:0];
    [[NSNotificationCenter defaultCenter] postNotificationName:J_APNS_NOTIFICATION_OPENED_EVENT object:userInfo];
  }
  else {
    // 本地通知
    NSLog(@"iOS 10 本地通知 消息事件回调");
    // 保障应用被杀死状态下,用户点击推送消息,打开app后可以收到点击通知事件
    [[RCTJPushEventQueue sharedInstance]._localNotificationQueue insertObject:userInfo atIndex:0];
    [[NSNotificationCenter defaultCenter] postNotificationName:J_LOCAL_NOTIFICATION_OPENED_EVENT object:userInfo];
  }
  // 系统要求执行这个方法
  completionHandler();
}

//自定义消息
- (void)networkDidReceiveMessage:(NSNotification *)notification {
  NSDictionary * userInfo = [notification userInfo];
  [[NSNotificationCenter defaultCenter] postNotificationName:J_CUSTOM_NOTIFICATION_EVENT object:userInfo];
}

//************************************************JPush end************************************************

@end
App.js / App.jsx / App.tsx
位置:你的文件名/App.js
import JPush from 'jpush-react-native';
export default class App extends Component {
	componentDidMount() {
		JPush.init({"appKey":"你的极光key","channel":"default","production":1});
	}
}
剩下有一些例如获取设备jpush-sn号的方法,在example文档中都有写,这里不再赘述
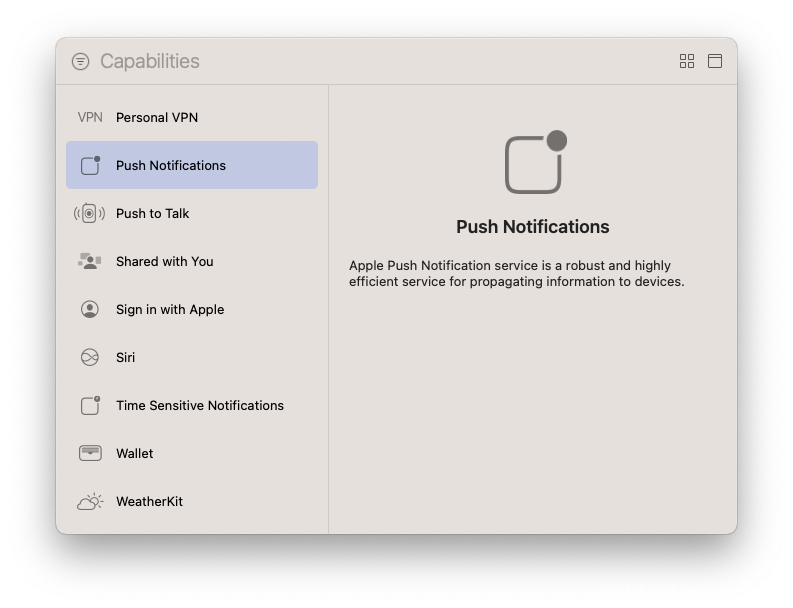
打开PushNotification
位置:你的xcode,打开你项目ios文件夹中的.xcworkspace文件
- 点击你左侧菜单栏项目文件
- 点击旁边菜单栏TARGETS下的项目,是你applogo的那个
- 点击上侧Signing & Capabilities
- 点击 + Capability

- 双击添加 Push Notifications
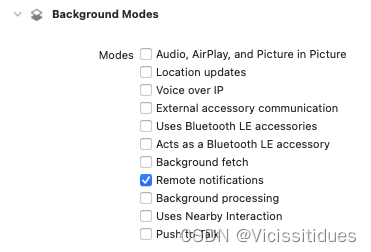
 - 打勾Backgrounds Modes 下的 Remote notifications
无法接入的解决方法
我的电脑是M1 MBP,因为架构(arm环境不兼容x86)问题出了无数bug,这里做一总结
注意:如果你是已经下载过example文件并且尝试运行且报了好几页错误(例如:JPush版本过期),可以按我的方法试一下
- 关闭所有代理,sidecar等
- 完全清理pod库与node库
- 重新安装并编译
- 在终端去编译项目,方便查错,切记终端不要勾选【使用Rosetta打开】
- M芯片的电脑不支持运行虚拟机,用真机去调试。intel的不清楚
- 确保你配置极光SDK的包名和 xcode中的 Bundle Identifier是一样的
最后,如果你遇到问题可以评论和我交流,看到尽量回复,处理这个东西浪费一周时间,不忍心你吃这个苦。


 8025
8025

 被折叠的 条评论
为什么被折叠?
被折叠的 条评论
为什么被折叠?
 到【灌水乐园】发言


