


ElasticSearch简介
我们的应用经常需要添加检索功能,开源的 ElasticSearch 是目前全文搜索引擎的首选。他可以快速的存储、搜索和分析海量数据。Spring Boot通过整合Spring Data ElasticSearch为我们提供了非常便捷的检索功能支持。
Elasticsearch是一个分布式搜索服务,提供Restful API,底层基于Lucene,采用多shard(分片)的方式保证数据安全,并且提供自动resharding的功能,github等大型的站点也是采用了ElasticSearch作为其搜索服务。
核心概念
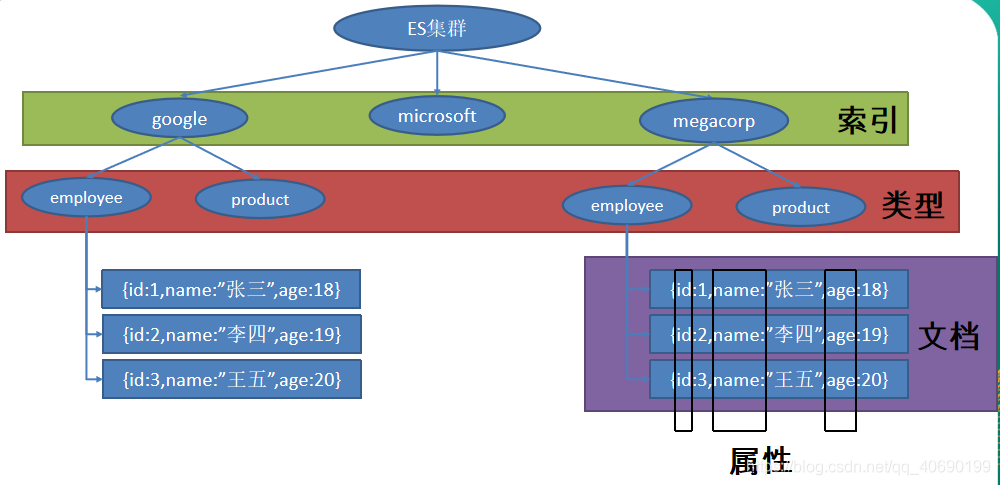
以 员工文档 的形式存储为例:一个文档代表一个员工数据。存储数据到 ElasticSearch 的行为叫做 索引 ,但在索引一个文档之前,需要确定将文档存储在哪里。一个 ElasticSearch 集群可以 包含多个 索引 ,相应的每个索引可以包含多个 类型 。 这些不同的类型存储着多个 文档 ,每个文档又有 多个 属性 。
类似关系:
索引-数据库
类型-表
文档-表中的记录
属性-列
Cluster和Node,集群与节点。由于ElasticSearch可以存放并检索PB级别的数据,一台服务器是存放不了这么多数据的,而且从ElasticSearch的高可用以及容灾性来考虑,必定是用多个服务器协调存储数据的。节点就是具备ElasticSearch环境并存放有数据的单个服务器。集群就是所有可用的节点组成的网状图。
注意:ElasticSearch不推荐使用类型
ElasticSearch安装
在linux服务器上使用docker命令下载ElasticSearch,前提是已经安装过docker,安装docker可以参考docker下载安装教程
docker pull elasticsearch下载完成以后如下可以看到elasticsearch版本号以及镜像id等信息
 第一次启动运行以下命令
docker run -d -e ES_JAVA_OPTS="-Xms256m -Xmx256m" -p 9200:9200 -p 9300:9300 --name myelasticsearch ffa00077159c以后启动运行以下
docker start myelasticsearchElasticSearch基本操作
基本操作包括增删改查具体参照elasticsearch基本操作
SpringBoot整合ElasticSearch
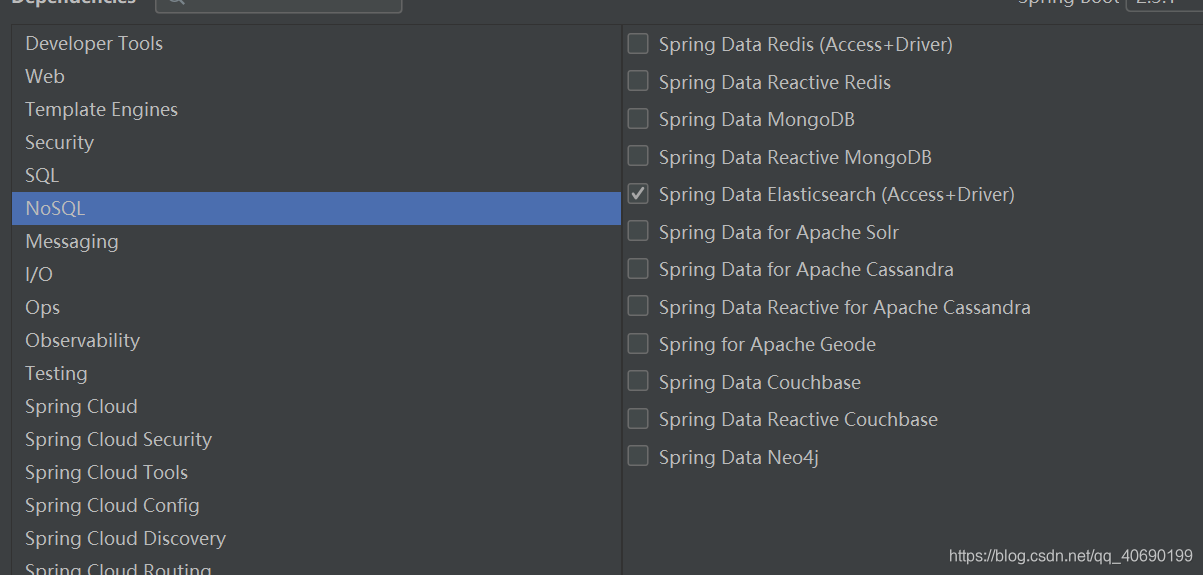
1.新建项目选择web模块和ElasticSearch模块
2.在application.properties配置文章中必须要指定elasticsearch集群以及当前存活的任意一个节点的9300端口。
spring.elasticsearch.rest.uris=ip:93003.使用ElasticsearchRestTemplate对数据进行增删改查操作
import org.elasticsearch.index.reindex.UpdateByQueryRequestBuilder;
import org.junit.jupiter.api.Test;
import org.springframework.beans.factory.annotation.Autowired;
import org.springframework.boot.test.context.SpringBootTest;
import org.springframework.data.elasticsearch.core.ElasticsearchRestTemplate;
import org.springframework.data.elasticsearch.core.mapping.IndexCoordinates;
import org.springframework.data.elasticsearch.core.query.*;
import top.zbawq.testel.bean.Student;

import javax.swing.text.Document;
import java.util.ArrayList;
import java.util.HashMap;
import java.util.List;
import java.util.Map;


@SpringBootTest
class TestelApplicationTests {
    @Autowired
    ElasticsearchRestTemplate elasticsearchTemplate;

    // 添加数据
    @Test
    void contextLoads() {
        // IndexQuery query, IndexCoordinates index
        // 对索引名为teststudent的索引添加数据,如果不存在索引名为teststudent的索引则创建索引之后执行插入,如果存在直接插入
        Student student = new Student(1, "张三", 18);
        IndexQuery indexQuery = new IndexQueryBuilder()
                .withId("1")
                .withObject(student).build();
        IndexCoordinates indexCoordinates = IndexCoordinates.of("testemp");
        elasticsearchTemplate.index(indexQuery, indexCoordinates);
    }

    // 删除索引中的数据
    @Test
    void test01() {
        IndexCoordinates indexCoordinates = IndexCoordinates.of("testemp");
        elasticsearchTemplate.delete("1", indexCoordinates);
    }

    @Test
    void test02() {
        ArrayList<String> strings = new ArrayList<>();
        strings.add("1");
        strings.add("2");
        NativeSearchQuery query = new NativeSearchQueryBuilder().withIds(strings).build();
        IndexCoordinates indexCoordinates = IndexCoordinates.of("testemp");
        elasticsearchTemplate.delete(query, Student.class, indexCoordinates);
    }

    // 修改数据  更新涉及到版本控制以便维护数据一致性,其实分为两个操作:get和reindex,大致步骤是:首先取到相应的document,然后执行更新script,最后返回执行的结果。至于具体的多版本控制机制将在第6部分解释。
    /**
    @Test
    void test03() {
        //UpdateQuery query, IndexCoordinates index
        Map<String,Object> map=new HashMap<String,Object>();
        map.put("name","王五");
        String script="ctx._source.name='王五'";
        UpdateQuery updateQuery = UpdateQuery.builder("1").withParams(map).withScript(script).build();
        IndexCoordinates indexCoordinates=IndexCoordinates.of("testemp");
        elasticsearchTemplate.update(updateQuery,indexCoordinates);
    }*/
    // 查数据
    @Test
    void test04() {
        //Query query, Class<T> clazz, IndexCoordinates index
        ArrayList<String> strings = new ArrayList<>();
        strings.add("1");
        strings.add("2");
        NativeSearchQuery query = new NativeSearchQueryBuilder().withIds(strings).build();
        IndexCoordinates indexCoordinates = IndexCoordinates.of("testemp");
        List<Student> ts = elasticsearchTemplate.multiGet(query, Student.class, indexCoordinates);
        for (Student student:ts){
            System.out.println(student);
        }
    }

}


 296
296


 被折叠的 条评论
为什么被折叠?
被折叠的 条评论
为什么被折叠?
 到【灌水乐园】发言


