


从0到1搭建一个自己的脚手架
什么是脚手架
顾名思义,脚手架就是帮助我们配置一些环境、工具,能够让我们方便的直接开始开发,专注于我们的业务,不用花时间去配置开发环境。例如常见的vue-cli,我们只需要通过npm i vue-cli -g全局安装脚手架后再进行vue init即可初始化一个自己的项目,真是高大上呢。
接下来我们就要实现一个属于自己的cli脚手架,虽然可能有点简陋, 但是怎么说也是属于自己的啊
准备工作
我们在这里简单介绍一下需要依赖的包,熟悉每个包的作用。
commander
用来编写指令和处理命令行的:
const program = require("commander");
// 定义指令
program
  .version('0.0.1')
  .command('init', 'Generate a new project from a template')
  .action(() => {
    // 回调函数
  })
// 解析命令行参数
program.parse(process.argv);
类比我们用过的vue init
chalk
修改控制台输出内容样式,在这里可以发挥一下你的艺术细菌了~
const chalk = require('chalk');
console.log(chalk.green('success'));
console.log(chalk.red('error'));
当然它有很多颜色选择,还有背景色,不一一列举了,到github上一看就知道了~
inquirer
一个用来设计交互式命令行的工具,非常强大
const inquirer = require('inquirer');
inquirer
  .prompt([
    // 交互式的问题,例如名字,是否使用ts
  ])
  .then(answers => {
    // 回调函数,answers 就是用户输入的内容,是个对象
  });
类比我们在进行完vue init后他是不是会问你用不用ts啊,eslint,CSS预处理器等等,就是它完成的
ora
介个东西,就是为了美观,下载的时候会有转圈特效。
const ora = require('ora')
let spinner = ora('downloading template ...')
spinner.start()
同样的,它也有很多样式,自行查阅文档
download-git-repo
顾名思义,这是用来下载远程仓库的,也就是我们的模版
const download = require('download-git-repo')
download(repository, destination, options, callback)
repository 是远程仓库地址;destination 是存放下载的文件路径,也可以写文件名,默认当前目录;options 是选项,比如 { clone:boolean } 表示用 http download 还是 git clone 。
目录搭建
当我们了解了上面的知识,就开始我们的工作吧~
- 创建一个文件夹,这里我叫
moe-cli - 在该目录下执行
npm init -y,生成package.json文件,在文件里复制下面的依赖,然后执行npm i
"dependencies": {
    "chalk": "^3.0.0",
    "commander": "^5.0.0",
    "download-git-repo": "^3.0.2",
    "inquirer": "^7.1.0",
    "ora": "^4.0.3"
  }
- 新建一个bin文件夹,在bin文件夹下新建一个文件
moe.js,这个文件夹就是我们脚手架的入口文件,我们可以尝试写几句代码执行一下:
#!/usr/bin/env node
console.log('hello')
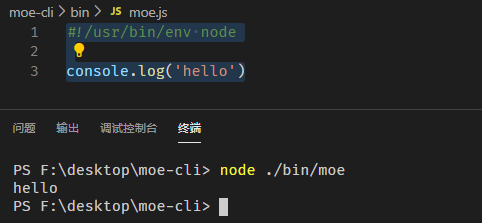
相信你们已经注意到了开头的#!/usr/bin/env node,它的作用是当 系统看到这行时,能够沿着该路径查找node并执行,主要是为了兼容mac电脑,确保执行
bin目录初始化
现在bin目录下只有这个文件,即入口文件,所以我们先完善这歌文件:
#!/usr/bin/env node
const program = require('commander')

// 定义当前版本
// 定义使用方法
// 定义四个指令
program
  .version(require('../package').version)
  .usage('<command> [options]')
  .command('add', 'add a new template')
  .command('delete', 'delete a template')
  .command('list', 'list all the templates')
  .command('init', 'generate a new project from a template')

// 解析命令行参数
program.parse(process.argv)
写完代码是不是觉得有点眼熟,对!他就是用来定义指令的,运行一下:
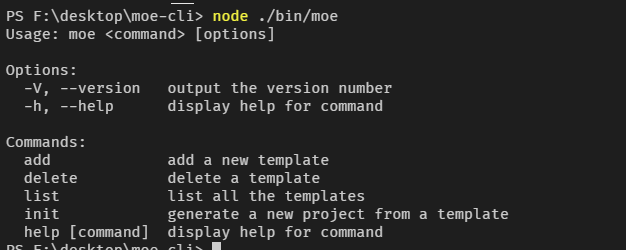
你曾经一定看到过这样的界面,但是我们每次输入node ./bin/moe太过麻烦,我们可以在package.json里定义一个命令:
"bin": {
    "moe": "bin/moe.js"
  },
bin用来指定每个命令所对应的可执行文件地位置
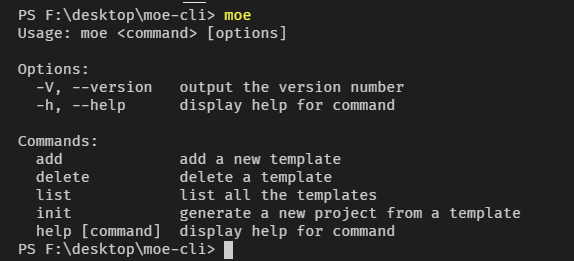
然后在根目录下执行npm link将命令挂载到全局,这样我们只要输入moe,就能直接运行了~
是不是非常的斯国一呢😄,接下来我们完善一下bin目录,将我们入口文件中定义过的四个指令都对应的建立一个js文件,如图:
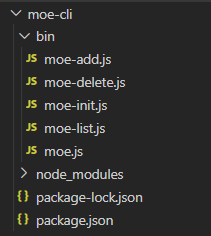
同样的,我们也得修改一下package.json里的bin:
"bin": {
    "moe": "bin/moe.js",
    "moe-add": "bin/moe-add.js",
    "moe-delete": "bin/moe-delete.js",
    "moe-list": "bin/moe-list.js",
    "moe-init": "bin/moe-init.js"
  },
然后先npm unlink解绑一下,再执行npm link重新绑定命令。最后我们在根目录下新建一个template.json文件,内容为{},作为我们存放模版的仓库。
编写命令
这里提供代码,写好了注释,代码不是很难,对照注释一看就能明白,不需要过多讲解
moe-add
#!/usr/bin/env node

// 交互式命令行
const inquirer = require('inquirer')
// 修改控制台字符串的样式
const chalk = require('chalk')
// node 内置文件模块
const fs = require('fs')
// 读取根目录下的 template.json
const tplObj = require(`${__dirname}/../template`)

// 自定义交互式命令行的问题及简单的校验
let question = [
  {
    name: "name",
    type: 'input',
    message: "请输入模板名称",
    validate (val) {
      if (val === '') {
        return 'Name is required!'
      } else if (tplObj[val]) {
        return 'Template has already existed!'
      } else {
        return true
      }
    }
  },
  {
    name: "url",
    type: 'input',
    message: "请输入模板地址",
    validate (val) {
      if (val === '') return 'The url is required!'
      return true
    }
  }
]

inquirer
  .prompt(question).then(answers => {
    // answers 就是用户输入的内容,是个对象
    let { name, url } = answers;
    // 过滤 unicode 字符
    tplObj[name] = url.replace(/[\u0000-\u0019]/g, '')
    // 把模板信息写入 template.json 文件中
    fs.writeFile(`${__dirname}/../template.json`, JSON.stringify(tplObj), 'utf-8', err => {
      if (err) console.log(err)
      console.log('\n')
      console.log(chalk.green('Added successfully!\n'))
      console.log(chalk.grey('The latest template list is: \n'))
      console.log(tplObj)
      console.log('\n')
    })
  })
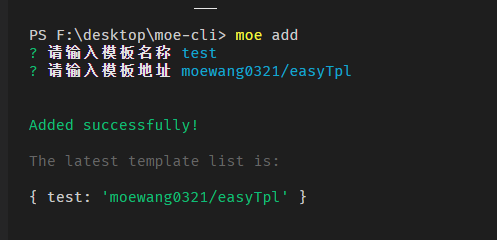
它的目的是要添加模板并进行存储,存储位置就是我们定义过的template.json了。我们执行看一下效果:
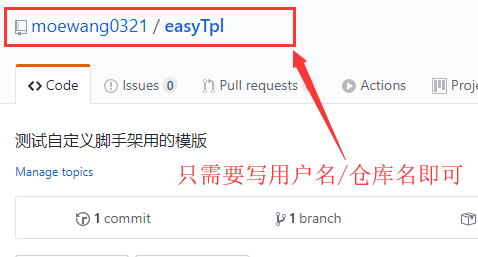
注意这里的模版地址,不需要写全部链接,如图:
有些人可能会问,我们在入口文件定义program.command('add').action(() => {})的时候没有写action这个回调函数,为什么能够执行moe add?
其实当我们执行moe add时,commander会尝试在入口文件的目录内寻找可执行文件,找到形如program-command的命令来执行(moe-add),下面几个命令也是同样的道理
moe-delete
#!/usr/bin/env node

const inquirer = require('inquirer')
const chalk = require('chalk')
const fs = require('fs')
const tplObj = require(`${__dirname}/../template`)

let question = [
  {
    name: "name",
    message: "请输入要删除的模板名称",
    validate (val) {
      if (val === '') {
        return 'Name is required!'
      } else if (!tplObj[val]) {
        return 'Template does not exist!'
      } else  {
        return true
      }
    }
  }
]

inquirer
  .prompt(question).then(answers => {
    let { name } = answers;
    delete tplObj[name]
    // 更新 template.json 文件
    fs.writeFile(`${__dirname}/../template.json`, JSON.stringify(tplObj), 'utf-8', err => {
      if (err) console.log(err)
      console.log('\n')
      console.log(chalk.green('Deleted successfully!\n'))
      console.log(chalk.grey('The latest template list is: \n'))
      console.log(tplObj)
      console.log('\n')
    })
  })
运行看结果: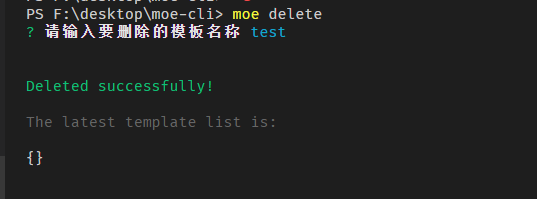
moe-list
这个最简单了
#!/usr/bin/env node

const tplObj = require(`${__dirname}/../template`)
console.log(tplObj)
运行看结果:

moe-init
这是最重要的一步,我们通过这个命令来初始化一个项目,说的通俗易懂点就是通过它下载我们存储过的模版。
#!/usr/bin/env node

const program = require('commander')
const chalk = require('chalk')
const ora = require('ora')
const download = require('download-git-repo')
const tplObj = require(`${__dirname}/../template`)

program
    .usage('<template-name> [project-name]')
program.parse(process.argv)
// 当没有输入参数的时候给个提示
if (program.args.length < 1) return program.help()

// 好比 vue init webpack project-name 的命令一样,第一个参数是 webpack,第二个参数是 project-name
let templateName = program.args[0]
let projectName = program.args[1]
// 小小校验一下参数
if (!tplObj[templateName]) {
    console.log(chalk.red('\n Template does not exit! \n '))
    return
}
if (!projectName) {
    console.log(chalk.red('\n Project should not be empty! \n '))
    return
}

url = tplObj[templateName]

console.log(chalk.white('\n Start generating... \n'))
// 出现加载图标
const spinner = ora("Downloading...");
spinner.start();
// 执行下载方法并传入参数
download(
    url,
    projectName,
    err => {
        if (err) {
            spinner.fail();
            console.log(chalk.red(`Generation failed. ${err}`))
            return
        }
        // 结束加载图标
        spinner.succeed();
        console.log(chalk.cyan('\n Generation completed!'))
        console.log(chalk.cyan('\n To get started'))
        console.log(chalk.cyan(`\n    cd ${projectName} \n`))
    }
)
运行看结果:
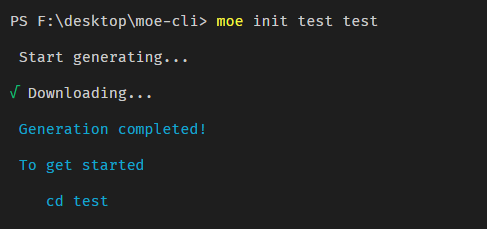
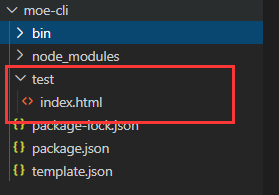
我们的根目录下会多出一个test文件夹
至此,简单的脚手架就做好了!如果你看到这的话,能否留下一个👍鼓励一下窝~
番外
我们脚手架搭建好了,是不是可以尝试着发到npm上?想想就刺激~
- 删除 test 文件夹。
- 在根目录下新建 README.md 文件,写上声明之类的。
- 在根目录下新建 .npmignore 文件,并写入 /node_modules,发布的时候忽略 node_modules 文件夹。
- 去 npm 官网注册个账号,同时搜索一下 moe-cli 这个名字,npm不允许重名的包出现。
一切准备就绪后,我们在根目录下执行npm login登录npm帐号

注意红框标注的地方!一定是npm源
执行npm publish 一键发布

然后过一会你就可以看到你的包了,我这里报错是因为我为了写这篇博客把我发过的包删掉了,需要等待24小时以后才能重新发布。
接下来你就可以尝试使用npm安装你发布的包,并进行使用,是不是很爽!我这里没有办法做演示,所以你可以自己动手操作一下。
最后
上面的操作,如果你熟悉了,再去看看vue-cli的源码,可能就不会那么闭塞了,当然它的功能比我们要完善的多~


 1053
1053


 被折叠的 条评论
为什么被折叠?
被折叠的 条评论
为什么被折叠?
 到【灌水乐园】发言


