


1. 图文并茂说明raid0,raid1, raid10, raid01, raid5等原理。
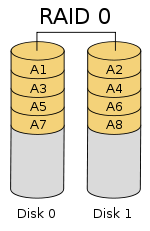
1.1 raid0
raid0中文名为条带卷,最低磁盘需要两个,空间的利用率为100%,读写速度非常快,它的读写性能是所有raid中最高的,如果有N块硬盘组成raid0,那么它的读写效率是一块硬盘的N倍。它的缺点是没有容错性。如果一块硬盘损坏会导致所有的数据丢失。所以raid0适用于对读写性能很高,但对数据安全性或可靠性不高的服务器上适用。
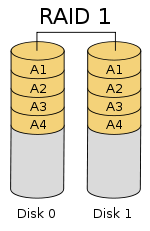
1.2 raid1
raid1又被叫做镜像卷。由两块硬盘组成,空间的利用率为50%,对于写的速度一般,但读取性能和单硬盘没有区别。优点是冗余性好,可以容错。RAID1 提供了最佳的数据保护,一旦工作磁盘发生故障,系统自动从镜像磁盘读取数据,不会影响用户工作。AID1 拥有完全容错的能力,但实现成本高。 RAID1 应用于对顺序读写性能要求高以及对数据保护极为重视的应用,如对邮件系统的数据保护。它和raid的要求特点基本相反。
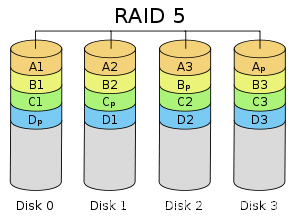
1.3 raid5
raid5是带奇偶校验的条带卷。最低组成的硬盘为3块,磁盘空间利用率为(n-1)/n,读写的速度有所提升,有容错性,允许损坏一块硬盘。它的原理与 RAID4 相似,区别在于校验数据分布在阵列中的所有磁盘上,而没有采用专门的校验磁盘。对于数据和校验数据,它们的写操作可以同时发生在完全不同的磁盘上。因此, RAID5 不存在 RAID4 中的并发写操作时的校验盘性能瓶颈问题。另外, RAID5 还具备很好的扩展性。当阵列磁盘 数量增加时,并行操作量的能力也随之增长,可比 RAID4 支持更多的磁盘,从而拥有更高的容量以及更高的性能。
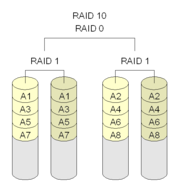
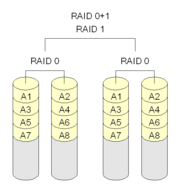
1.4 raid10
read10是将read1和read0进行了组合,兼备了 RAID0 和 RAID1 的优点。需要最少四块硬盘。现将硬盘两两组成read1,在在两个read1的基础上做read0,这样就形成了既能提升读写性能也能拥有冗余性的阵列。当RAID10 有一个硬盘受损其余硬盘会继续工作,这个时候受影响的硬盘只有 2 块,不会影响生产环境的使用。因为内部含有reid1,所以磁盘的利用率仅为50%。
1.4 raid01
raid01和raid10类似,执行在制作的过程中,先做了raid0,在做了raid1,所以它的特点和raid10是一样的。只不过它的损坏率要比raid10更高,raid10的在损坏一块的情况下,第二块磁盘损坏导致所有数据丢失的概率为1/3,而raid01丢失所有数据的概率为1/2。所以raid10比raid01更安全。更推荐在生产环境中使用。
2. 创建一个至少有两个PV组成的大小为20G的名为testvg的VG,要求PE大小为16M,而后在卷组中创建大小为5G的逻辑卷testlv;挂载至/users目录
2.1 准备好块磁盘,这里准备的磁盘大小为20G
[root@localhost ~]# lsblk
NAME   MAJ:MIN RM  SIZE RO TYPE MOUNTPOINT
sda      8:0    0   50G  0 disk
├─sda1   8:1    0    1G  0 part /boot
├─sda2   8:2    0    1G  0 part [SWAP]
└─sda3   8:3    0   48G  0 part /
sdb      8:16   0   20G  0 disk
sdc      8:32   0   20G  0 disk
sr0     11:0    1 10.5G  0 rom
2.2 创建PV
[root@localhost ~]# pvcreate /dev/sdb /dev/sdc
  Physical volume "/dev/sdb" successfully created.
  Physical volume "/dev/sdc" successfully created.
[root@localhost ~]# pvs
  PV         VG Fmt  Attr PSize  PFree
  /dev/sdb      lvm2 ---  20.00g 20.00g
  /dev/sdc      lvm2 ---  20.00g 20.00g
2.3 创建逻辑卷组vg,PE大小为16M
[root@localhost ~]# vgcreate -s 16M testvg /dev/sdb /dev/sdc
  Volume group "testvg" successfully created
[root@localhost ~]# vgs
  VG     #PV #LV #SN Attr   VSize   VFree
  testvg   2   0   0 wz--n- <39.97g <39.97g
2.4 创建大小为5G的逻辑卷testlv
[root@localhost ~]# lvcreate -L 5G -n testlv testvg
  Logical volume "testlv" created.
[root@localhost ~]# lvs
  LV     VG     Attr       LSize Pool Origin Data%  Meta%  Move Log Cpy%Sync Convert
  testlv testvg -wi-a----- 5.00g
[root@localhost ~]# lvdisplay
  --- Logical volume ---
  LV Path                /dev/testvg/testlv
  LV Name                testlv
  VG Name                testvg
  LV UUID                veW7Kv-bkKQ-2km6-RHXB-jsM1-S2EC-sWuVqh
  LV Write Access        read/write
  LV Creation host, time localhost.localdomain, 2022-11-30 00:02:55 +0800
  LV Status              available
  # open                 0
  LV Size                5.00 GiB
  Current LE             320
  Segments               1
  Allocation             inherit
  Read ahead sectors     auto
  - currently set to     8192
  Block device           253:0
2.5 挂载至/users目录
#创建挂载目录
[root@localhost ~]# mkdir /users

#创建文件系统
[root@localhost ~]# mkfs.ext4 /dev/testvg/testlv
mke2fs 1.45.6 (20-Mar-2020)
创建含有 1310720 个块(每块 4k)和 327680 个inode的文件系统
文件系统UUID:5c4961f0-5928-4c3c-9537-c475f71743d5
超级块的备份存储于下列块:
	32768, 98304, 163840, 229376, 294912, 819200, 884736

正在分配组表: 完成
正在写入inode表: 完成
创建日志(16384 个块)完成
写入超级块和文件系统账户统计信息: 已完成

#挂载目录:
[root@localhost ~]# mount /dev/testvg/testlv /users

#查看挂载信息:
[root@localhost ~]# df -h
文件系统                   容量  已用  可用 已用% 挂载点
devtmpfs                   955M     0  955M    0% /dev
tmpfs                      973M     0  973M    0% /dev/shm
tmpfs                      973M  8.7M  965M    1% /run
tmpfs                      973M     0  973M    0% /sys/fs/cgroup
/dev/sda3                   48G  3.8G   45G    8% /
/dev/sda1                 1014M  184M  831M   19% /boot
tmpfs                      195M     0  195M    0% /run/user/0
/dev/mapper/testvg-testlv  4.9G   20M  4.6G    1% /users
3. 新建用户archlinux,要求其家目录为/users/archlinux,而后su切换至archlinux用户,复制/etc/pam.d/目录至自己的家目录。
[root@localhost ~]# useradd -d /users/archlinux archlinux
[root@localhost ~]# id archlinux
uid=1000(archlinux) gid=1000(archlinux) 组=1000(archlinux)
[root@localhost ~]# su - archlinux
[archlinux@localhost ~]$ pwd
/users/archlinux
[archlinux@localhost ~]$ cp -r /etc/pam.d/ .
[archlinux@localhost ~]$ ls
pam.d
[archlinux@localhost ~]$ ll
总用量 4
drwxr-xr-x. 2 archlinux archlinux 4096 11月 30 00:17 pam.d
4. 扩展testlv至7G,要求archlinux用户的文件不能丢失
[root@localhost ~]# lvresize -r -L +2G /dev/testvg/testlv
  Size of logical volume testvg/testlv changed from 5.00 GiB (320 extents) to 7.00 GiB (448 extents).
  Logical volume testvg/testlv successfully resized.
resize2fs 1.45.6 (20-Mar-2020)
/dev/mapper/testvg-testlv 上的文件系统已被挂载于 /users;需要进行在线调整大小

old_desc_blocks = 1, new_desc_blocks = 1
/dev/mapper/testvg-testlv 上的文件系统现在为 1835008 个块(每块 4k)。

#查看磁盘是否扩容成功
[root@localhost ~]# df -h|grep "/users"
/dev/mapper/testvg-testlv  6.9G   23M  6.5G    1% /users
5. 收缩testlv至3G,要求archlinux用户的文件不能丢失
#为保证数据安全,先做了备份
[root@localhost ~]# cp -r  /users/* /mnt/

#取消挂载
[root@localhost ~]# umount /users

#检查数据完整性
[root@localhost ~]# fsck -f /dev/testvg/testlv
fsck,来自 util-linux 2.32.1
e2fsck 1.45.6 (20-Mar-2020)
第 1 步:检查inode、块和大小
第 2 步:检查目录结构
第 3 步:检查目录连接性
第 4 步:检查引用计数
第 5 步:检查组概要信息
/dev/mapper/testvg-testlv:44/458752 文件(0.0% 为非连续的), 50971/1835008 块

#收缩文件系统
[root@localhost ~]# resize2fs /dev/testvg/testlv 3G
resize2fs 1.45.6 (20-Mar-2020)
将 /dev/testvg/testlv 上的文件系统调整为 786432 个块(每块 4k)。
/dev/testvg/testlv 上的文件系统现在为 786432 个块(每块 4k)。

#收缩逻辑盘,这里一开始操作错了,错误的收缩到了4G,然后再次操作收缩到3G,所以显示的为4G收缩到3G
[root@localhost ~]# lvreduce -L 3G /dev/testvg/testlv
  WARNING: Reducing active logical volume to 3.00 GiB.
  THIS MAY DESTROY YOUR DATA (filesystem etc.)
Do you really want to reduce testvg/testlv? [y/n]: y
  Size of logical volume testvg/testlv changed from 4.00 GiB (256 extents) to 3.00 GiB (192 extents).
  Logical volume testvg/testlv successfully resized.

#检查盘的大小,和文件是否丢失
[root@localhost ~]# mount /dev/testvg/testlv /users
[root@localhost ~]# df -h
文件系统                   容量  已用  可用 已用% 挂载点
devtmpfs                   955M     0  955M    0% /dev
tmpfs                      973M     0  973M    0% /dev/shm
tmpfs                      973M  8.7M  965M    1% /run
tmpfs                      973M     0  973M    0% /sys/fs/cgroup
/dev/sda3                   48G  3.8G   45G    8% /
/dev/sda1                 1014M  184M  831M   19% /boot
tmpfs                      195M     0  195M    0% /run/user/0
/dev/mapper/testvg-testlv  2.9G   16M  2.8G    1% /users
[root@localhost ~]# ls /users/
archlinux  lost+found
6. 对testlv创建快照,并尝试基于快照备份数据,验正快照的功能6. 对testlv创建快照,并尝试基于快照备份数据,验正快照的功能
#创建大小为2G,权限为只读的快照逻辑卷
[root@localhost ~]# lvcreate -L +2G -s -n testsnap -p r /dev/testvg/testlv
Logical volume "testsnap" created.
#将快照逻辑卷挂载
[root@localhost ~]# mkdir -p /mnt/snap
[root@localhost ~]# mount -o ro /dev/testvg/testsnap /mnt/snap/
#删除/users下的文件,并取消挂载,也取消挂载快照逻辑卷
[root@localhost ~]# rm -rf /users/*
[root@localhost ~]# umount /users
[root@localhost ~]# umount /mnt/snap
#恢复
[root@localhost ~]# lvconvert --merge /dev/testvg/testsnap
Merging of volume testvg/testsnap started.
testvg/testlv: Merged: 100.00
#重新挂载,并查看是否恢复成功
[root@localhost ~]# mount /dev/testvg/testlv /users/
[root@localhost ~]# df -h
文件系统 容量 已用 可用 已用% 挂载点
devtmpfs 955M 0 955M 0% /dev
tmpfs 973M 0 973M 0% /dev/shm
tmpfs 973M 8.7M 965M 1% /run
tmpfs 973M 0 973M 0% /sys/fs/cgroup
/dev/sda3 48G 3.8G 45G 8% /
/dev/sda1 1014M 184M 831M 19% /boot
tmpfs 195M 0 195M 0% /run/user/0
/dev/mapper/testvg-testlv 2.9G 16M 2.8G 1% /users
[root@localhost ~]# ls /users/
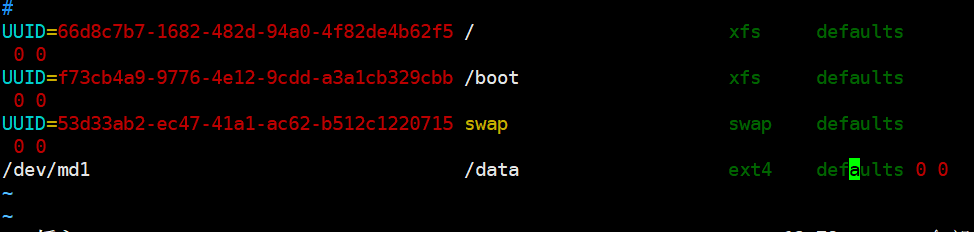
archlinux lost+found7. 创建10G的RAID1,要求CHUNK为128K,文件系统为ext4,有一个空闲盘,开机可自动挂载至/backup目录
#这里使用sdb,sdc,sdd做实验
NAME   MAJ:MIN RM  SIZE RO TYPE MOUNTPOINT
sda      8:0    0   50G  0 disk
├─sda1   8:1    0    1G  0 part /boot
├─sda2   8:2    0    1G  0 part [SWAP]
└─sda3   8:3    0   48G  0 part /
sdb      8:16   0   20G  0 disk
sdc      8:32   0   20G  0 disk
sdd      8:48   0   20G  0 disk
sde      8:64   0   20G  0 disk
sr0     11:0    1  4.4G  0 rom

#分区三个硬盘
[root@ly01 network-scripts]# fdisk /dev/sdb
欢迎使用 fdisk (util-linux 2.23.2)。

更改将停留在内存中,直到您决定将更改写入磁盘。
使用写入命令前请三思。

Device does not contain a recognized partition table
使用磁盘标识符 0x927bcff7 创建新的 DOS 磁盘标签。

命令(输入 m 获取帮助):n
Partition type:
   p   primary (0 primary, 0 extended, 4 free)
   e   extended
Select (default p): p
分区号 (1-4,默认 1):1
起始 扇区 (2048-41943039,默认为 2048):
将使用默认值 2048
Last 扇区, +扇区 or +size{K,M,G} (2048-41943039,默认为 41943039):+10G
分区 1 已设置为 Linux 类型,大小设为 10 GiB

命令(输入 m 获取帮助):w
The partition table has been altered!

Calling ioctl() to re-read partition table.
正在同步磁盘。


#lsblk查看分区
[root@ly01 network-scripts]# lsblk
NAME   MAJ:MIN RM  SIZE RO TYPE MOUNTPOINT
sda      8:0    0   50G  0 disk
├─sda1   8:1    0    1G  0 part /boot
├─sda2   8:2    0    1G  0 part [SWAP]
└─sda3   8:3    0   48G  0 part /
sdb      8:16   0   20G  0 disk
└─sdb1   8:17   0   10G  0 part
sdc      8:32   0   20G  0 disk
└─sdc1   8:33   0   10G  0 part
sdd      8:48   0   20G  0 disk
└─sdd1   8:49   0   10G  0 part
sde      8:64   0   20G  0 disk
sr0     11:0    1  4.4G  0 rom

#将三个盘做成raid1,起名叫做md1
[root@ly01 network-scripts]# mdadm -C /dev/md1 -a yes -l 1 -n 2 -x 1 -c 128K /dev/sd{b,c,d}1
mdadm: Note: this array has metadata at the start and
    may not be suitable as a boot device.  If you plan to
    store '/boot' on this device please ensure that
    your boot-loader understands md/v1.x metadata, or use
    --metadata=0.90
Continue creating array? y
mdadm: Defaulting to version 1.2 metadata
mdadm: array /dev/md1 started.

#创建文件系统为ext4
[root@ly01 network-scripts]# mkfs.ext4 /dev/md1
mke2fs 1.42.9 (28-Dec-2013)
文件系统标签=
OS type: Linux
块大小=4096 (log=2)
分块大小=4096 (log=2)
Stride=0 blocks, Stripe width=0 blocks
655360 inodes, 2619136 blocks
130956 blocks (5.00%) reserved for the super user
第一个数据块=0
Maximum filesystem blocks=2151677952
80 block groups
32768 blocks per group, 32768 fragments per group
8192 inodes per group
Superblock backups stored on blocks:
	32768, 98304, 163840, 229376, 294912, 819200, 884736, 1605632

Allocating group tables: 完成
正在写入inode表: 完成
Creating journal (32768 blocks): 完成
Writing superblocks and filesystem accounting information: 完成

#挂载,并查看是否成功  这里没太注意让挂载的名称是/backup。自建了一个/data
[root@ly01 network-scripts]# mount /dev/md1 /data
[root@ly01 network-scripts]# df -h
文件系统        容量  已用  可用 已用% 挂载点
devtmpfs        980M     0  980M    0% /dev
tmpfs           991M     0  991M    0% /dev/shm
tmpfs           991M  9.6M  981M    1% /run
tmpfs           991M     0  991M    0% /sys/fs/cgroup
/dev/sda3        48G  2.4G   46G    5% /
/dev/sda1      1014M  132M  883M   13% /boot
tmpfs           199M     0  199M    0% /run/user/0
/dev/md1        9.8G   37M  9.2G    1% /data
设置开机自动挂载:
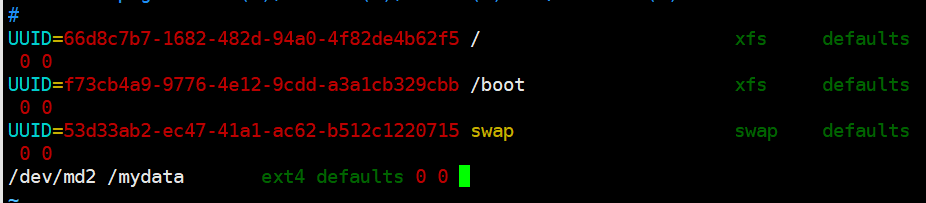
8. 创建一个可用空间为10G的RAID10设备,要求CHUNK为256K,文件系统为ext4,开机可自动挂载至/mydata目录
#准备四个磁盘分区,每个为5G
[root@ly01 ~]# lsblk
NAME   MAJ:MIN RM  SIZE RO TYPE MOUNTPOINT
sda      8:0    0   50G  0 disk
├─sda1   8:1    0    1G  0 part /boot
├─sda2   8:2    0    1G  0 part [SWAP]
└─sda3   8:3    0   48G  0 part /
sdb      8:16   0   20G  0 disk
└─sdb1   8:17   0    5G  0 part
sdc      8:32   0   20G  0 disk
└─sdc1   8:33   0    5G  0 part
sdd      8:48   0   20G  0 disk
└─sdd1   8:49   0    5G  0 part
sde      8:64   0   20G  0 disk
└─sde1   8:65   0    5G  0 part
sr0     11:0    1  4.4G  0 rom

#创建raid10
[root@ly01 ~]# mdadm -C /dev/md2 -l 10 -n 4 -c 256K /dev/sd[b-e]1
mdadm: Defaulting to version 1.2 metadata
mdadm: array /dev/md2 started.

#创建文件系统:
[root@ly01 ~]# mkfs.ext4 /dev/md2
mke2fs 1.42.9 (28-Dec-2013)
文件系统标签=
OS type: Linux
块大小=4096 (log=2)
分块大小=4096 (log=2)
Stride=64 blocks, Stripe width=128 blocks
655360 inodes, 2618880 blocks
130944 blocks (5.00%) reserved for the super user
第一个数据块=0
Maximum filesystem blocks=2151677952
80 block groups
32768 blocks per group, 32768 fragments per group
8192 inodes per group
Superblock backups stored on blocks:
	32768, 98304, 163840, 229376, 294912, 819200, 884736, 1605632

Allocating group tables: 完成
正在写入inode表: 完成
Creating journal (32768 blocks): 完成
Writing superblocks and filesystem accounting information: 完成

挂载分区:
[root@ly01 ~]# mkdir /mydata
[root@ly01 ~]# mount /dev/md2 /mydata
[root@ly01 ~]# df -h
文件系统        容量  已用  可用 已用% 挂载点
devtmpfs        980M     0  980M    0% /dev
tmpfs           991M     0  991M    0% /dev/shm
tmpfs           991M  9.6M  981M    1% /run
tmpfs           991M     0  991M    0% /sys/fs/cgroup
/dev/sda3        48G  2.4G   46G    5% /
/dev/sda1      1014M  132M  883M   13% /boot
tmpfs           199M     0  199M    0% /run/user/0
/dev/md2        9.8G   37M  9.2G    1% /mydata
配置开机自启:
9. 静态配置网卡IP,centos/ubuntu实现
#centos网卡配置:
[root@ly01 ~]# cd /etc/sysconfig/network-scripts/
[root@ly01 network-scripts]# vim ifcfg-eth0
DEVICE=eth0
NAME=eth0
BOOTPROTO=static
IPADDR=10.0.0.129
PREFIX=24
GATEWAT=10.0.0.2
DNS1=8.8.8.8
DNS2=108.76.76.76
ONBOOT=yes

#重启网卡:
[root@ly01 network-scripts]# nmcli c reload
[root@ly01 network-scripts]# nmcli c up eth0
#ubuntu网卡配置
vim /etc/default/grub
GRUB_CMDLINE_LINUX="net.ifnames=0 biosdevname=0"
#加载配置:
root@ubuntu2004:~# grub-mkconfig -o /boot/grub/cfg
Sourcing file `/etc/default/grub'
Sourcing file `/etc/default/grub.d/init-select.cfg'
Generating grub configuration file ...
Found linux image: /boot/vmlinuz-5.4.0-132-generic
Found initrd image: /boot/initrd.img-5.4.0-132-generic
Found linux image: /boot/vmlinuz-5.4.0-131-generic
Found initrd image: /boot/initrd.img-5.4.0-131-generic
done
#重启
root@ubuntu2004:~# reboot
#先备份网卡配置文件
root@ubuntu2004:~# mv /etc/netplan/00-installer-config.yaml /etc/netplan/00-installer-config.yaml.bak
#配置网卡固定IP地址
root@ubuntu2004:~# vim /etc/netplan/00-installer-config.yaml
network:
version: 2
ethernets:
eth0:
dhcp4: no
dhcp6: no
addresses:
- 10.0.0.131/24
nameservers:
addresses:
- 8.8.8.8
- 114.114.114.114
gateway4: 10.0.0.2
#重载网卡
root@ubuntu2004:~# netplan apply
#查看ip地址
root@ubuntu2004:~# ifconfig eth0
eth0: flags=4163<UP,BROADCAST,RUNNING,MULTICAST> mtu 1500
inet 10.0.0.131 netmask 255.255.255.0 broadcast 10.0.0.255
inet6 fe80::20c:29ff:fe8c:1ca2 prefixlen 64 scopeid 0x20<link>
ether 00:0c:29:8c:1c:a2 txqueuelen 1000 (Ethernet)
RX packets 31398 bytes 42959616 (42.9 MB)
RX errors 0 dropped 0 overruns 0 frame 0
TX packets 4138 bytes 330346 (330.3 KB)
TX errors 0 dropped 0 overruns 0 carrier 0 collisions 010. 图文并茂解释TCP/IP 3次握手4次断开。
三次握手:
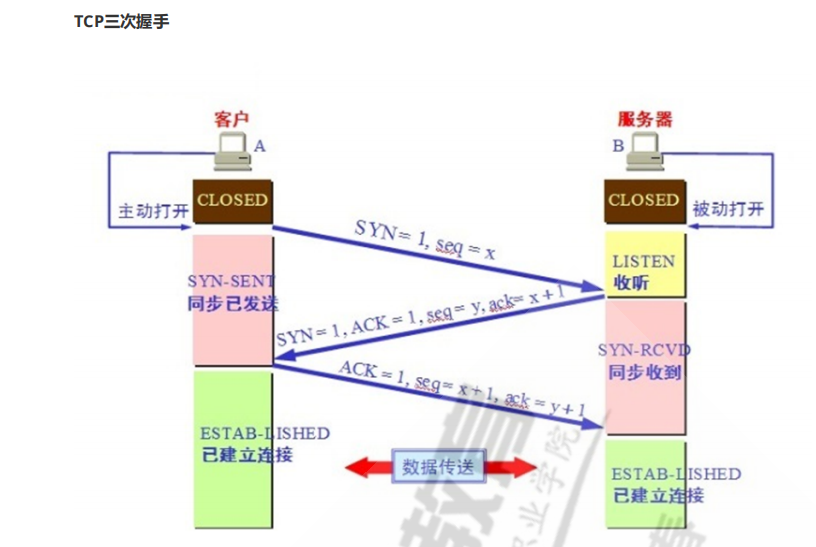
借上图:
在发送数据的准备阶段,服务器和客户端之间建立连接需要的三次交互。
第一次握手:由客户端发送建立连接请求,发送的SYN=1,seq=x ,状态由closed状态变成SYN=SENT状态。
第二次握手:当服务器接收到客户端请求后,给客服端回应一个SYN=1,ACK=0,seq=y,ack=x+1的包,其中ack的值是由接收到的seq值+1所得出的确认号。自身状态有LISTEN转变为SYN-RCVD状态。
第三次握手:有客户端发送,启动ACK=1,seq=x+1,ack=y+1。其中seq比起客户端第一次发起握手的请求+1,而ack的值由服务器端发送的seq确认号+1所得出。自身由SYN-SENT转换成ESTAB-LISHED状态。服务器端在接收到后也同时转换为ESTAB-LISHED状态。正式建立连接。
四次挥手:
借上图:
四次挥手就是说关闭TCP连接的过程,当断开一个TCP连接时,需要客户端和服务器共发送四个包确认。
第一次挥手:客户端发送一个FIN,用来关闭客户端到服务器的数据传输,客户端进入FIN_WAIT_1状态。
第二次挥手:服务器收到FIN后,发送一个ACK给客户端,确认序号为收到序号+1(与SYN相同,一个FIN占用一个序 号),服务器进入CLOSE_WAIT状态。
第三次挥手:服务器发送一个FIN,用来关闭服务器到客户端的数据传输,服务器进入LAST_ACK状态。
第四次挥手:客户端收到FIN后,客户端进入TIME_WAIT状态,接着发送一个AKC给服务器,确认序号为收到序号+1,服务器进入CLOSED状态,完成四次挥手,进入一个等待时间,超时后会自动关闭。
11. 网卡绑定bond0的实现
#准备两块网卡:
[root@Rocky8 ~]# ifconfig
eth0: flags=4163<UP,BROADCAST,RUNNING,MULTICAST>  mtu 1500
        inet 10.0.0.132  netmask 255.255.255.0  broadcast 10.0.0.255
        ether 00:0c:29:8b:46:75  txqueuelen 1000  (Ethernet)
        RX packets 36377  bytes 43445506 (41.4 MiB)
        RX errors 0  dropped 0  overruns 0  frame 0
        TX packets 15390  bytes 1016850 (993.0 KiB)
        TX errors 0  dropped 0 overruns 0  carrier 0  collisions 0

eth1: flags=4163<UP,BROADCAST,RUNNING,MULTICAST>  mtu 1500
        inet 10.0.0.136  netmask 255.255.255.0  broadcast 10.0.0.255
        inet6 fe80::abd6:6b91:f553:1827  prefixlen 64  scopeid 0x20<link>
        ether 00:0c:29:8b:46:7f  txqueuelen 1000  (Ethernet)
        RX packets 7  bytes 1016 (1016.0 B)
        RX errors 0  dropped 0  overruns 0  frame 0
        TX packets 21  bytes 2086 (2.0 KiB)
        TX errors 0  dropped 0 overruns 0  carrier 0  collisions 0

#创建bind网卡
[root@Rocky8 ~]# cat /etc/sysconfig/network-scripts/ifcfg-bind0
NAME=bind0
TYPE=bond
DEVICE=bind0
BOOTPROTO=none
IPADDR=10.0.0.140
PREFIX=8
BONDING_OPTS="mode=1.miimon=100"

#修改eth0网卡
[root@Rocky8 ~]# cat /etc/sysconfig/network-scripts/ifcfg-eth0
NAME=eth0
DEVICE=eth0
BOOTPROTO=none
MASTER=bind0
SLAVE=yes
ONBOOT=yes

#修改eth1网卡
[root@Rocky8 ~]# cat /etc/sysconfig/network-scripts/ifcfg-eth1
NAME=eth1
DEVICE=eth1
BOOTPROTO=none
MASTER=bind0
SLAVE=yes
ONBOOT=yes
由于网卡一重启就会导致Xshell掉线,所以下面由截图展示:
12. 实现免密登陆脚本, expect登陆远程主机,将生成的密钥写入到目标主机, expect测试远程登陆。
1)通过shift读取脚本参数
2)通过select来选择功能.例如功能有
- 安装mysql
- 安装apache
- 免密钥登陆主机
当前我们只实现免密钥登陆主机
3)通过函数封装每个功能
4)将免密钥登陆的过程可以重复进行, while 循环实现重复,需要有退出过程。当用户输入exit时,退出免密钥功能。
5)支持输入一批主机免密钥,使用数组 实现
#!bin/bash
#实现ssh自动登录
ssh_host() {
while true;do
	read -p "请输入ip(q退出):" IP
		[[ $IP =~ ^(q|Q)$  ]] && exit;
		[[ $IP =~ ^([0-9]{1,3}\.){3}[0-9]{1,3}$ ]] || { echo "IP不合法,请重新输入";continue; }
		break;
done
read -p "请输入用户名:" USER
read -p "请输入密码:" PASSWD

expect <<EOF
set timeout 20
spawn ssh-copy-id $IP
expect {
	"yes/no" { send "yes\n";exp_continue }
	"password" {send  "$PASSWD\n" }
}
expect eof
EOF

#while true;do
	read -p "是否继续登录$IP(y/q):" Y
       		[[ $Y =~ y|Y ]]	&& ssh $IP || continue;
		[[ $Y =~ q|Q ]] && break;
}
install_mysql(){
	echo "install mysql"
}
install_apache(){
	echo "install apache"
}


menu() {
while true;do
	PS3="请输入指令(1-4):"
	select MENU in 安装mysql 安装apache 登录远程主机 退出脚本;do
		case $REPLY in
			1)
				install_mysql
				break
				;;
			2)
				install_apache
				break
				;;
			3)
				ssh_host
				break
				;;
			4)
				echo "您已退出。"
				exit
				;;
	esac
	done
done
}
menu


 6214
6214


 被折叠的 条评论
为什么被折叠?
被折叠的 条评论
为什么被折叠?
 到【灌水乐园】发言


