


一起探讨学习

每天给大家提供技术干货

博主技术笔记 https://notes.xiyankt.com
博主开源微服架构前后端分离技术博客项目源码地址,欢迎各位star https://gitee.com/bright-boy/xiyan-blog
一. 预处理机器
1.修改节点主机名:一定要避免节点重名,否则会导致加入节点后,master 无法发现node节点
master 节点
hostnamectl --static set-hostname k8s-master
node节点
hostnamectl --static set-hostname k8s-noden
执行完毕后重启或执行下面的命令即可生效
hostname $hostname
修改hosts (master和node都添加)
vim /etc/hosts
k8s-master 192.168.176.128
k8s-noden 192.168.176.129
- (1)临时关闭swap分区, 重启失效;
swapoff -a
- (2)永久关闭swap分区
sed -ri 's/.*swap.*/#&/' /etc/fstab
关闭防火墙
ufw status
ufw disable
二. 安装 docker-ce
已经安装 docker 的先删除本机原有的 docker 或直接跳过本节
apt update

apt install -y apt-transport-https ca-certificates curl gnupg-agent  software-properties-common

sudo curl -fsSL https://mirrors.aliyun.com/docker-ce/linux/ubuntu/gpg | sudo apt-key add -

add-apt-repository \
   "deb [arch=amd64] https://mirrors.aliyun.com/docker-ce/linux/ubuntu \
   $(lsb_release -cs) \
   stable"

apt update

apt install -y docker-ce docker-ce-cli containerd.io

docker version
配置 docker-hub 源国内网络拉取国外源时可能会失败
vim /etc/docker/daemon.json
{
  "registry-mirrors": [
    "https://hub-mirror.c.163.com",
    "https://ustc-edu-cn.mirror.aliyuncs.com",
    "https://ghcr.io",
    "https://mirror.baidubce.com"
  ],"exec-opts": ["native.cgroupdriver=systemd"]
}
重启 docker
systemctl daemon-reload && systemctl restart docker
三. 安装指定版本的kubeadm
* 这里安装的是v1.24.3版本,*
apt update && apt install apt-transport-https

curl -fsSL https://mirrors.aliyun.com/kubernetes/apt/doc/apt-key.gpg | apt-key add -

add-apt-repository "deb [arch=amd64] https://mirrors.aliyun.com/kubernetes/apt/ kubernetes-xenial main"

apt-get update

apt-cache madison kubelet kubectl kubeadm |grep '1.24.3-00'

apt install -y kubelet=1.24.3-00 kubectl=1.24.3-00 kubeadm=1.24.3-00
配置禁用 swap
vim /etc/default/kubelet
KUBELET_EXTRA_ARGS="--fail-swap-on=false"
重启服务
systemctl daemon-reload && systemctl restart kubelet
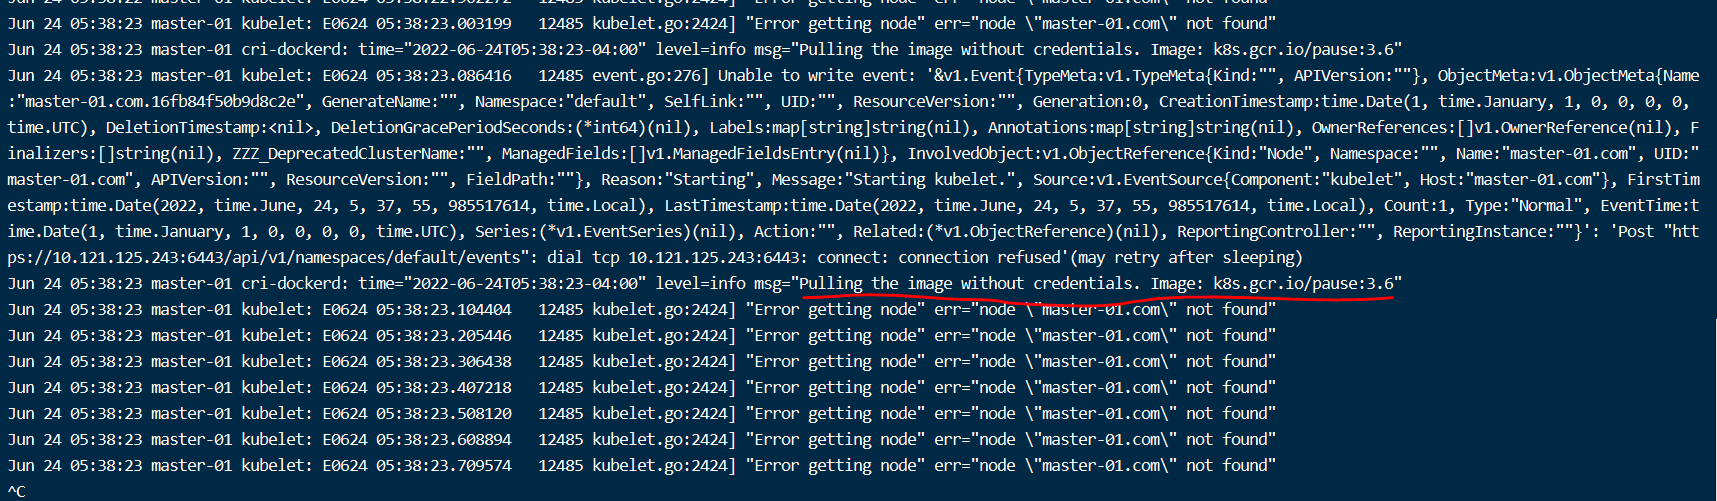
默认是pause:3.7 在kubeadm init 初始化会爆粗,所以需要pause:3.6
ctr -n k8s.io image pull registry.aliyuncs.com/google_containers/pause:3.6
ctr -n k8s.io image tag registry.aliyuncs.com/google_containers/pause:3.6 k8s.gcr.io/pause:3.6
四. 初始化集群
a. master 节点初始化节点
kubeadm init \
  --kubernetes-version=v1.24.3 \
  --image-repository registry.aliyuncs.com/google_containers \
  --pod-network-cidr=10.24.0.0/16 \
  --ignore-preflight-errors=Swap
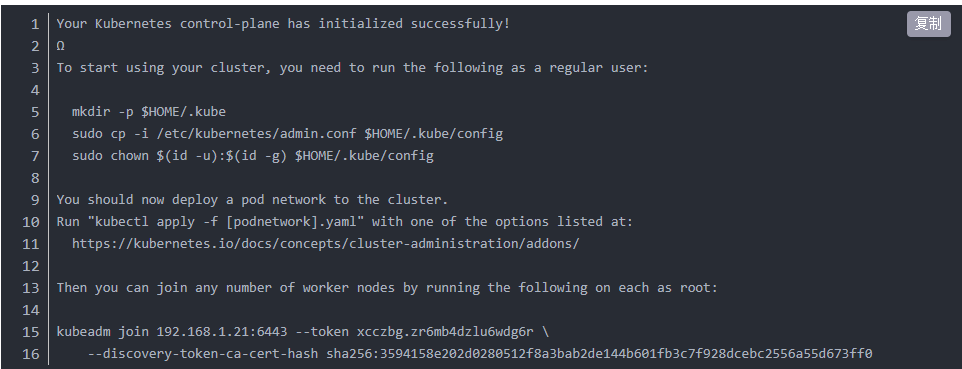
成功后会打印出类似下面的输出,要保存起来
出现异常情况解决方案

rm -rf /etc/containerd/config.toml

systemctl restart containerd
b. 执行,以启动集群
mkdir -p $HOME/.kube
sudo cp -i /etc/kubernetes/admin.conf $HOME/.kube/config
sudo chown $(id -u):$(id -g) $HOME/.kube/config
c. 部署 k8s 网络到集群 (这里node节点也要执行)
这里使用calico v3.22,支持1.21 1.22 1.23 1.24 版本k8s
curl https://projectcalico.docs.tigera.io/manifests/calico.yaml -O

kubectl apply -f calico.yaml
将master的admin.conf和cni拷贝到node上 (拷贝完成需要到node节点进行检查)
scp -r -P22 /etc/cni/net.d  root@192.168.176.129:/etc/cni
scp -r -P22 /etc/kubernetes/admin.conf  root@192.168.176.129:/etc/kubernetes/
添加 node 到集群
集群初始化时打印出来的命令,在所有node节点上输入命令:
kubeadm join 192.168.1.21:6443 --token xcczbg.zr6mb4dzlu6wdg6r \
    --discovery-token-ca-cert-hash sha256:3594158e202d0280512f8a3bab2de144b601fb3c7f928dcebc2556a55d673ff0
node节点出现The connection to the server localhost:8080 was refused - did you specify the right host or port (在master和node都执行以下命令)
echo "export KUBECONFIG=/etc/kubernetes/admin.conf" >> /etc/profile

source /etc/profile
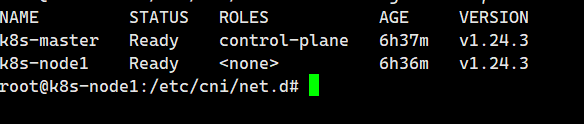
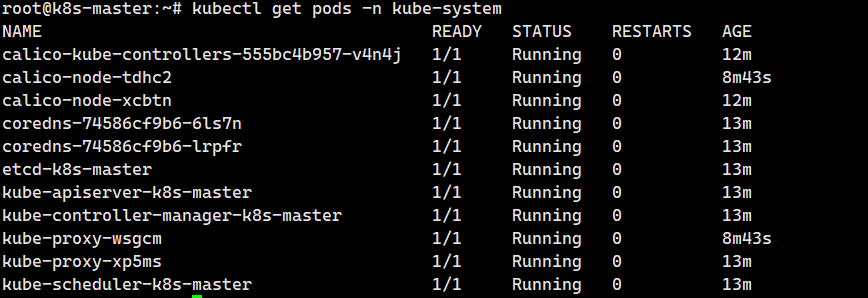
验证节点部署:节点状态均为Ready,成功部署
kubectl get pods -n kube-system
命令
在节点上查看日志
journalctl -f -u kubelet.service
清理上次执行产生的数据
kubeadm reset
自动补全
apt install -y bash-completion
locate bash_completion
source /usr/share/bash-completion/bash_completion
source <(kubectl completion bash)
k8s查看所有容器和进入容器
kubectl get namespace//获得所有命名空间
kubectl get pod --all-namespaces -o wide//获得命名空间下的所有容器

通过kubectl get pods查询,然后通过下面命令进入
kubectl exec -it nas-all-0 /bin/bash

//进入命名空间下的容器,application是命名空间,psqls-0是容器
kubectl exec -it -n application psqls-0 /bin/bash

//拷贝内容内文件,拷贝出来
kubectl cp -n application psqls-0:/var/lib/postgresql/data/pg_wal /home
//拷贝进去
kubectl cp /home/dades/pg_wal -n application psqls-0:/var/lib/postgresql/data/pg_wal


 3013
3013


 被折叠的 条评论
为什么被折叠?
被折叠的 条评论
为什么被折叠?
 到【灌水乐园】发言


