


准备条件:
guacamole server已经安装好
目标远程主机与server服务器可以通信
1、添加pom文件依赖
  <!-- guacamole java核心包-->
  <dependency>
      <groupId>org.apache.guacamole</groupId>
      <artifactId>guacamole-common</artifactId>
      <version>0.9.14</version>
      <scope>compile</scope>
  </dependency>
  <!-- websocket 包-->
  <dependency>
      <groupId>org.springframework.boot</groupId>
      <artifactId>spring-boot-starter-websocket</artifactId>
  </dependency>
官方文档还引入了guacamole-common-js包,这个包其实是前端JavaScript的支持,我们可以手动下载,加入到前端的js库里
2、http连接
http controller
@WebServlet(urlPatterns = "/tunnel")
public class HttpTunnelServlet extends GuacamoleHTTPTunnelServlet {
    @Override
    protected GuacamoleTunnel doConnect(HttpServletRequest httpServletRequest) throws GuacamoleException {
        String hostname = "192.168.5.129"; //guacamole server地址
        int port = 4822; //guacamole server端口

        GuacamoleConfiguration configuration = new GuacamoleConfiguration();
        configuration.setProtocol("rdp"); // 远程连接协议
        configuration.setParameter("hostname", "192.168.5.128");// 连接目标主机的ip
        configuration.setParameter("port", "3389");// 目rdp协议端口

        GuacamoleSocket socket = new ConfiguredGuacamoleSocket(
                new InetGuacamoleSocket(hostname, port),
                configuration
        );

        GuacamoleTunnel tunnel = new SimpleGuacamoleTunnel(socket);

        return tunnel;
    }
}
2、websocket连接
websocket controller
@ServerEndpoint(value = "/webSocket", subprotocols = "guacamole")
@Component
public class WebSocketTunnel extends  GuacamoleWebSocketTunnelEndpoint{
    @Override
    protected GuacamoleTunnel createTunnel(Session session, EndpointConfig endpointConfig) throws GuacamoleException {

        String hostname = "192.168.5.129";
        int port = 4822;

        GuacamoleConfiguration configuration = new GuacamoleConfiguration();
        configuration.setProtocol("rdp");
        configuration.setParameter("hostname", "192.168.5.128");
        configuration.setParameter("port", "3389");

        GuacamoleSocket socket = new ConfiguredGuacamoleSocket(
                new InetGuacamoleSocket(hostname, port),
                configuration
        );

        GuacamoleTunnel tunnel = new SimpleGuacamoleTunnel(socket);
        return tunnel;
    }
}
websocket config
@Configuration
public class WebSocketConfig {

    @Bean
     public ServerEndpointExporter serverEndpointExporter() {
         return new ServerEndpointExporter();
     }
}
websocket 还需要在启动类上加入@ServletComponentScan注解,启动器启动时,扫描本目录以及子目录带有的webservlet注解
@SpringBootApplication
@ServletComponentScan //启动器启动时,扫描本目录以及子目录带有的webservlet注解
public class GuacamoleApplication {

    public static void main(String[] args) {
        SpringApplication.run(GuacamoleApplication.class, args);
    }

}
3、前端展示页面
前端展示页面可以参考官方的demo,我的demo和他基本一致,只是把需要的js包手动打包了过来,修改部分js
// Instantiate client, using an HTTP tunnel for communications.
var guac = new Guacamole.Client(
// new Guacamole.HTTPTunnel("/tunnel") // http 连接时开启
new Guacamole.WebSocketTunnel("/webSocket") // websocket连接时开启
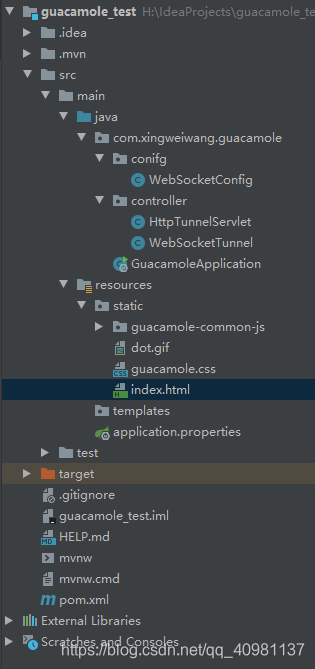
);4、项目目录结构
5、补充说明
如果存在拒绝连接的情况,可以是用telnet 查看是否可以访问server端的端口
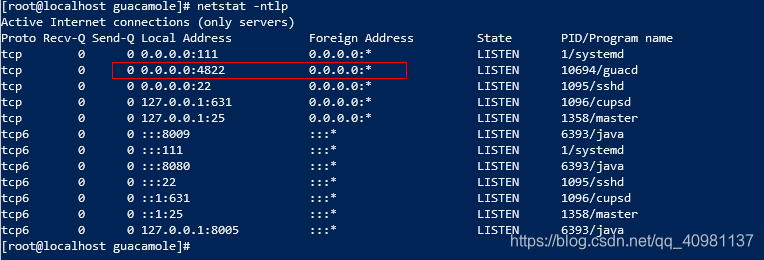
如果4822端口监听的是127.0.0.1本地端口的话,远程ip将无法访问到server
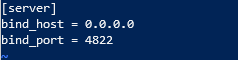
这时修改server端的guacd.conf配置文件,默认在/etc/guacamole 文件夹下,如果没有此文件,就新建这个文件,在里面添加或修改配置,把监听的ip改为0.0.0.0,这样端口就可以监听所有的ip地址


 696
696

 被折叠的 条评论
为什么被折叠?
被折叠的 条评论
为什么被折叠?
 到【灌水乐园】发言


