


三种方法
一. 第一种方式
1、操作步骤:
-
创建项目目录
vue create 项目名称 -
选择配置方式
? Please pick a preset: #选择一个配置 Default ([Vue 3] babel, eslint) Default ([Vue 2] babel, eslint) Manually select features # 手动选择功能 -
选择配置内容,一般为babel,router,Linter / Formatter,vuex等,上下键控制,空格键选择
? Check the features needed for your project: (Press <space> to select, <a> to toggle all, <i> to invert selection, and <enter> to proceed) >(*) Babel ( ) TypeScript ( ) Progressive Web App (PWA) Support ( ) Router ( ) Vuex ( ) CSS Pre-processors (*) Linter / Formatter ( ) Unit Testing ( ) E2E TestingBabel:转码器,可将ES6代码转为ES5 TypeScript: 支持使用 TypeScript (JavaScript超集) Progressive Web App (PWA) Support :支持PWA(渐进式Web应用程序) Router :支持 vue-router (路由) Vuex :支持 vuex (状态管理器) CSS Pre-processors: 支持 CSS 预处理器 Linter / Formatter :支持代码风格检查和格式化 Unit Testing:支持单元测试 E2E Testing: 支持 E2E 测试(end to end) -
选择vue版本:
? Choose a version of Vue.js that you want to start the project with (Use arrow keys) > 3.x 2.x -
使用用history模式来创建路由(根据自身需要选择):一般不建议使用历史模式
? Use history mode for router? (Requires proper server setup for index fallback in production) (Y/n) -
选择CSS预处理器(根据自身需要选择):
-
选择ESlint(我选默认)推荐使用第一项或第三项
? Pick a linter / formatter config: (Use arrow keys) > ESLint with error prevention only ESLint + Airbnb config ESLint + Standard config ESLint + Prettier -
什么时候检测:
? Pick additional lint features: (Press <space> to select, <a> to toggle all, <i> to invert selection, and
 <enter> to proceed)
>(*) Lint on save #我选保存的时候
 ( ) Lint and fix on commit
-
选择配置文件位置(单独保存在各自的配置文件中or放在package.json中)
? Where do you prefer placing config for Babel, ESLint, etc.? (Use arrow keys) > In dedicated config files #一般选择第一项,为的是将文件分离打包 In package.json -
保存本次配置内容:建议选择n
? Save this as a preset for future projects? (y/N) -
选择包管理工具,这里选择 npm,也可以选择 Yarn 来管理你的项目。
? Pick the package manager to use when installing dependencies: (Use arrow keys)
❯ Use Yarn
  Use NPM
运行项目
# 方式一
npm run serve
# 方式二
yarn serve
配置记录
D:\project\java\web\flyme>vue create front


Vue CLI v5.0.8
? Please pick a preset: Manually select features
? Check the features needed for your project: (Press <space> to select, <a> to toggle all, <i> to invert
selection, and <enter> to proceed)
 (*) Babel
? Please pick a preset: Manually select features
? Check the features needed for your project: (Press <space
> to select, <a> to toggle all, <i> to invert
selection, and <enter> to proceed)
 (*) Babel
? Check the features needed for your project: Babel,
Router, Vuex, Linter
? Choose a version of Vue.js that you want to start the
project with 3.x
? Use history mode for router? (Requires proper server
setup for index fallback in production) No
? Pick a linter / formatter config: Basic
? Pick a linter / formatter config: Basic
? Pick additional lint features: (Press <space> to select, ? Pick additional lint features: (Press <space>? Pick additional lint features: (Press <space> to select, ? Pick additional lint features: Lint on save
? Where do you prefer placing config for Babel, ESLint,
etc.? In dedicated config files
? Save this as a preset for future projects? n
? Pick the package manager to use when installing dependencies: (Use arrow keys) Use Yarn
二. 第二种方式(推荐) 详情
-
基于可视化面板创建项目,终端面板输入vue ui,待网页窗口打开选择vue项目管理
-
此后的步骤与第一种方法相类似,基于页面图形按钮的方式经行创建
第三种方式
在安装之前需要确保终端运行过npm i -g @vue/cli-init命令,然后运行 vue init webpack项目名
(1) 确定项目名,回车

(2) 项目描述,回车

(3) 确定作者信息,回车

(4) 一般情况依次如下配置,回车

(5) 创建完成,进入并运行项目

目录结构
├── .vscode 目录。
│ ├── v
│ ├── v
│ └── v
│
├── node_modules 目录 (vue 项目的文件依赖存放在这个文件夹。)
│ ├── 所有在package.json中定义的第三方包都会被自动下载,保存在该文件夹下。
│ ├── v
│ └── v
│
│
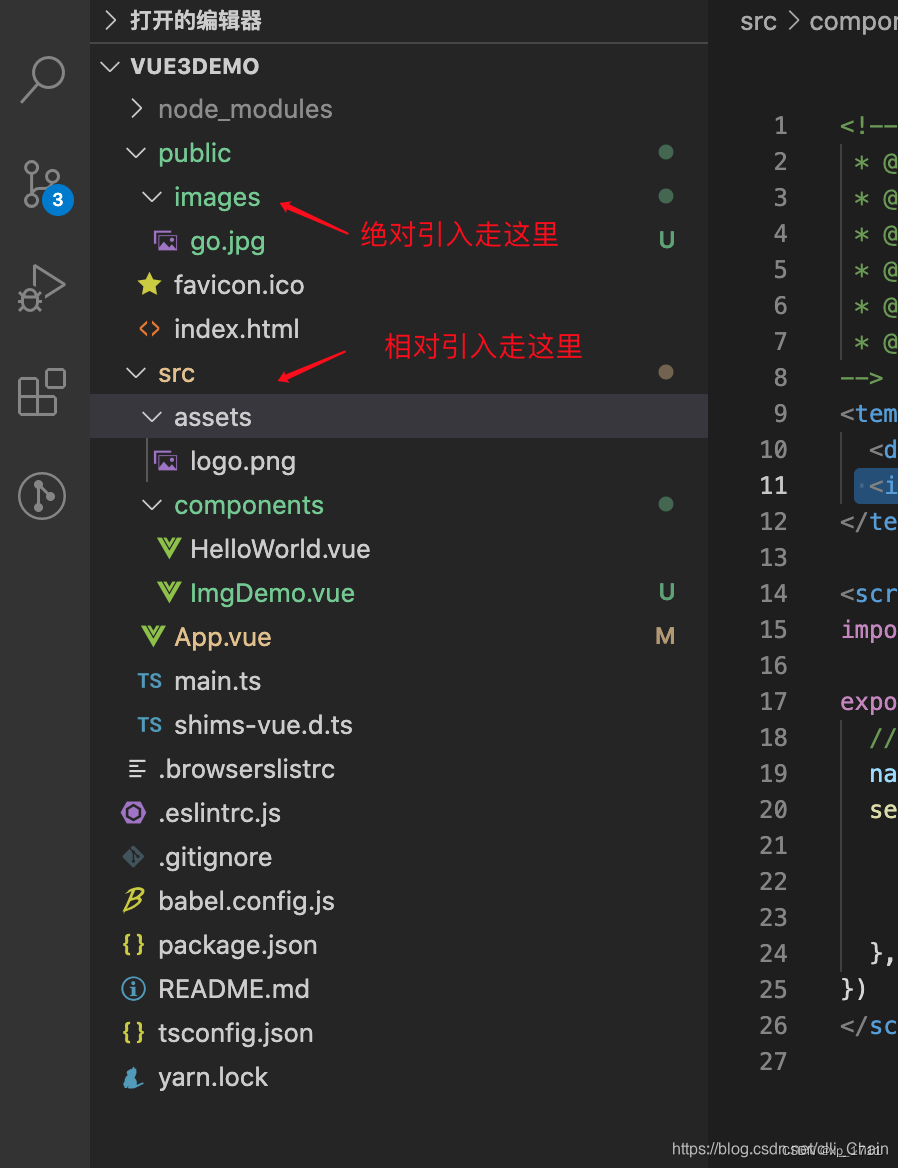
├── public 目录:存放项目公共资源。如网站LOGO,第三方插件等。需要绝对引用
│ │ 通常我们不需要对public文件夹内的资源做任何修改。
│ │ 后续在构建打包时,public内容会直接放到dist文件夹内plugins插件资源;
│ ├── v
│ ├── v
│ └── v
│
│
├── src 目录 :存放 vue 项目的源代码。其下的各个文件(文件夹)分别为:
│ ├── assets 目录 :资源文件,多用来存放业务级的js、css等,如一些全局的scss样式文件、全局的工具类js文件等。相对引用
│ ├── component 目录 :组件文件夹,存放 vue 的公共组件(核心)
│ │ (注册于全局,在整个项目中通过关键词便可直接输出)。
│ │
│ ├── router 目录 :用来存放 index.js,用来配置路由,定义各个页面对应的URL。
│ ├── store 目录 :组件文件夹,存放 vue 的公共组件
│ ├── views 目录:放主体页面,vue 文件是可以用来充当路由 view 的。
│ ├── tool:用来存放工具类 js,
│ │ 将 js 代码封装好放入这个文件夹可以全局调用
│ │ (如api.js,http.js 是对 http 方法和 api 方法的封装)。
│ ├── main.js:是项目的入口文件,初始化 vue 实例,并引入所需要的插件。
│ ├── app.vue:是项目的主组件,所有页面都是在该组件下进行切换的。
│ ├──
│ └── v
│
│
├── babel.config.js
├── jsconfig.json
├── package.json 存放项目的依赖配置
├── README.md
├── vue.config.js 全局配置
└──yarn.lock
node_modules文件夹,文件夹中往往会有几百个文件夹,Node项目所用到的第三方包特别多,也特别大。这些文件是由$ npm install命令产生的。所有在package.json中定义的第三方包都会被自动下载,保存在该文件夹下。
src文件夹是核心源代码的所在目录,展开后如下所示(不同版本的vue-cli生成的目录会稍有不同,不过核心都是一样的),正常开发的时候一般只修改 src 文件夹下的文件。
dist —— 项目构建打包后的默认输出目录。
index.html 与项目根目录,在一个 Vite 项目中,index.html 在项目最外层而不是在 public 文件夹内。这是有意而为之的:在开发期间 Vite 是一个服务器,而 index.html 是该 Vite 项目的入口文件。


 218
218


 被折叠的 条评论
为什么被折叠?
被折叠的 条评论
为什么被折叠?
 到【灌水乐园】发言


