


自定义布局
(一) 展示Text
package com.example.liushi;

import android.content.Context;
import android.util.AttributeSet;
import android.view.View;
import android.view.ViewGroup;

import java.util.ArrayList;
import java.util.List;

/**
 * Created by Administrator on 2017/12/29 0029.
 */

class XCFlowLayout extends ViewGroup {
    //存储所有子View
    private List<List<View>> mAllChildViews = new ArrayList<>();
    //每一行的高度
    private List<Integer> mLineHeight = new ArrayList<>();

    public XCFlowLayout(Context context) {
        this(context, null);
        // TODO Auto-generated constructor stub
    }
    public XCFlowLayout(Context context, AttributeSet attrs) {
        this(context, attrs, 0);
        // TODO Auto-generated constructor stub
    }
    public XCFlowLayout(Context context, AttributeSet attrs, int defStyle) {
        super(context, attrs, defStyle);
        // TODO Auto-generated constructor stub
    }
    @Override
    protected void onMeasure(int widthMeasureSpec, int heightMeasureSpec) {
        // TODO Auto-generated method stub

        //父控件传进来的宽度和高度以及对应的测量模式
        int sizeWidth = MeasureSpec.getSize(widthMeasureSpec);
        int modeWidth = MeasureSpec.getMode(widthMeasureSpec);
        int sizeHeight = MeasureSpec.getSize(heightMeasureSpec);
        int modeHeight = MeasureSpec.getMode(heightMeasureSpec);

        //如果当前ViewGroup的宽高为wrap_content的情况
        int width = 0;//自己测量的 宽度
        int height = 0;//自己测量的高度
        //记录每一行的宽度和高度
        int lineWidth = 0;
        int lineHeight = 0;

        //获取子view的个数
        int childCount = getChildCount();
        for(int i = 0;i < childCount; i ++){
            View child = getChildAt(i);
            //测量子View的宽和高
            measureChild(child, widthMeasureSpec, heightMeasureSpec);
            //得到LayoutParams
            MarginLayoutParams lp = (MarginLayoutParams) getLayoutParams();
            //子View占据的宽度
            int childWidth = child.getMeasuredWidth() + lp.leftMargin + lp.rightMargin;
            //子View占据的高度
            int childHeight = child.getMeasuredHeight() + lp.topMargin + lp.bottomMargin;
            //换行时候
            if(lineWidth + childWidth > sizeWidth){
                //对比得到最大的宽度
                width = Math.max(width, lineWidth);
                //重置lineWidth
                lineWidth = childWidth;
                //记录行高
                height += lineHeight;
                lineHeight = childHeight;
            }else{//不换行情况
                //叠加行宽
                lineWidth += childWidth;
                //得到最大行高
                lineHeight = Math.max(lineHeight, childHeight);
            }
            //处理最后一个子View的情况
            if(i == childCount -1){
                width = Math.max(width, lineWidth);
                height += lineHeight;
            }
        }
        //wrap_content
        setMeasuredDimension(modeWidth == MeasureSpec.EXACTLY ? sizeWidth : width,
                modeHeight == MeasureSpec.EXACTLY ? sizeHeight : height);
        super.onMeasure(widthMeasureSpec, heightMeasureSpec);
    }

    @Override
    protected void onLayout(boolean changed, int l, int t, int r, int b) {
        // TODO Auto-generated method stub
        mAllChildViews.clear();
        mLineHeight.clear();
        //获取当前ViewGroup的宽度
        int width = getWidth();

        int lineWidth = 0;
        int lineHeight = 0;
        //记录当前行的view
        List<View> lineViews = new ArrayList<View>();
        int childCount = getChildCount();
        for(int i = 0;i < childCount; i ++){
            View child = getChildAt(i);
            MarginLayoutParams lp = (MarginLayoutParams) child.getLayoutParams();
            int childWidth = child.getMeasuredWidth();
            int childHeight = child.getMeasuredHeight();

            //如果需要换行
            if(childWidth + lineWidth + lp.leftMargin + lp.rightMargin > width){
                //记录LineHeight
                mLineHeight.add(lineHeight);
                //记录当前行的Views
                mAllChildViews.add(lineViews);
                //重置行的宽高
                lineWidth = 0;
                lineHeight = childHeight + lp.topMargin + lp.bottomMargin;
                //重置view的集合
                lineViews = new ArrayList();
            }
            lineWidth += childWidth + lp.leftMargin + lp.rightMargin;
            lineHeight = Math.max(lineHeight, childHeight + lp.topMargin + lp.bottomMargin);
            lineViews.add(child);
        }
        //处理最后一行
        mLineHeight.add(lineHeight);
        mAllChildViews.add(lineViews);

        //设置子View的位置
        int left = 0;
        int top = 0;
        //获取行数
        int lineCount = mAllChildViews.size();
        for(int i = 0; i < lineCount; i ++){
            //当前行的views和高度
            lineViews = mAllChildViews.get(i);
            lineHeight = mLineHeight.get(i);
            for(int j = 0; j < lineViews.size(); j ++){
                View child = lineViews.get(j);
                //判断是否显示
                if(child.getVisibility() == View.GONE){
                    continue;
                }
                MarginLayoutParams lp = (MarginLayoutParams) child.getLayoutParams();
                int cLeft = left + lp.leftMargin;
                int cTop = top + lp.topMargin;
                int cRight = cLeft + child.getMeasuredWidth();
                int cBottom = cTop + child.getMeasuredHeight();
                //进行子View进行布局
                child.layout(cLeft, cTop, cRight, cBottom);
                left += child.getMeasuredWidth() + lp.leftMargin + lp.rightMargin;
            }
            left = 0;
            top += lineHeight;
        }

    }
    /**
     * 与当前ViewGroup对应的LayoutParams
     */
    @Override
    public LayoutParams generateLayoutParams(AttributeSet attrs) {
        // TODO Auto-generated method stub

        return new MarginLayoutParams(getContext(), attrs);
    }
}
主界面
package com.example.liushi;

import android.graphics.Color;
import android.graphics.drawable.GradientDrawable;
import android.graphics.drawable.StateListDrawable;
import android.support.v7.app.AppCompatActivity;
import android.os.Bundle;
import android.view.Gravity;
import android.view.View;
import android.view.ViewGroup;
import android.widget.TextView;

public class MainActivity extends AppCompatActivity {


    private String mNames[] = {
            "welcome","android","TextView",
            "apple","jamy","kobe bryant",
            "jordan","layout","viewgroup",
            "margin","padding","text",
            "name","type","search","logcat"
    };
    private XCFlowLayout mFlowLayout;
    @Override
    protected void onCreate(Bundle savedInstanceState) {
        super.onCreate(savedInstanceState);
        setContentView(R.layout.activity_main);

        initChildViews();

    }
    private void initChildViews() {
        // TODO Auto-generated method stub
        mFlowLayout = (XCFlowLayout) findViewById(R.id.xc);
        ViewGroup.MarginLayoutParams lp = new ViewGroup.MarginLayoutParams(
                ViewGroup.LayoutParams.WRAP_CONTENT, ViewGroup.LayoutParams.WRAP_CONTENT);
        lp.leftMargin = 5;
        lp.rightMargin = 5;
        lp.topMargin = 5;
        lp.bottomMargin = 5;
        for(int i = 0; i < mNames.length; i ++){
            TextView view = new TextView(this);
            view.setText(mNames[i]);
            view.setTextColor(Color.WHITE);
            view.setBackgroundDrawable(getResources().getDrawable(R.drawable.textview_bg));
            mFlowLayout.addView(view,lp);
        }
    }

}
以及主界面下面的布局
<?xml version="1.0" encoding="utf-8"?>
<LinearLayout xmlns:android="http://schemas.android.com/apk/res/android"
    xmlns:app="http://schemas.android.com/apk/res-auto"
    xmlns:tools="http://schemas.android.com/tools"
    android:layout_width="match_parent"
    android:layout_height="match_parent"
    tools:context="com.example.liushi.MainActivity">
<com.example.liushi.XCFlowLayout
    android:layout_width="wrap_content"
    android:layout_height="wrap_content"
    android:id="@+id/xc"></com.example.liushi.XCFlowLayout>

</LinearLayout>
加上他的形状
<?xml version="1.0" encoding="utf-8"?>
<shape xmlns:android="http://schemas.android.com/apk/res/android">
    <solid android:color="#666666" />
    <corners android:radius="10dp" />
    <padding
        android:left="5dp"
        android:right="5dp"
        android:top="5dp"
        android:bottom="5dp"
        />
</shape>
(二) 流式布局 点击(单选和多选)
Android 流式布局,支持单选、多选等,适合用于产品标签等。
特色
- 以 setAdapter 形式注入数据
- 直接设置 selector 为 background 即可完成标签选则的切换,类似 CheckBox
- 支持控制选择的 Tag 数量,比如:单选、多选
- 支持 setOnTagClickListener,当点击某个 Tag 回调
- 支持 setOnSelectListener,当选择某个 Tag 后回调
- 支持 adapter.notifyDataChanged
- Activity 重建(或者旋转)后,选择的状态自动保存
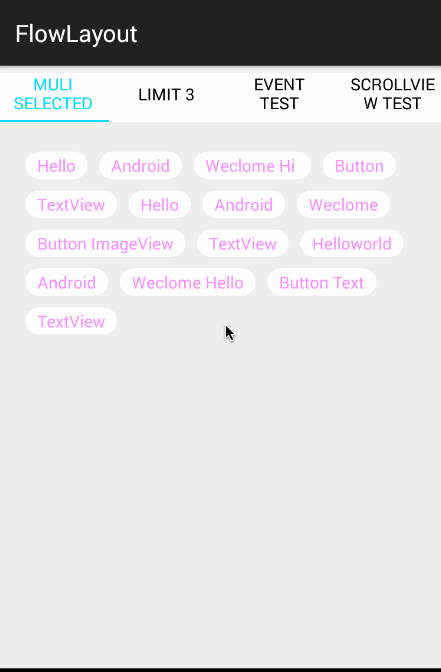
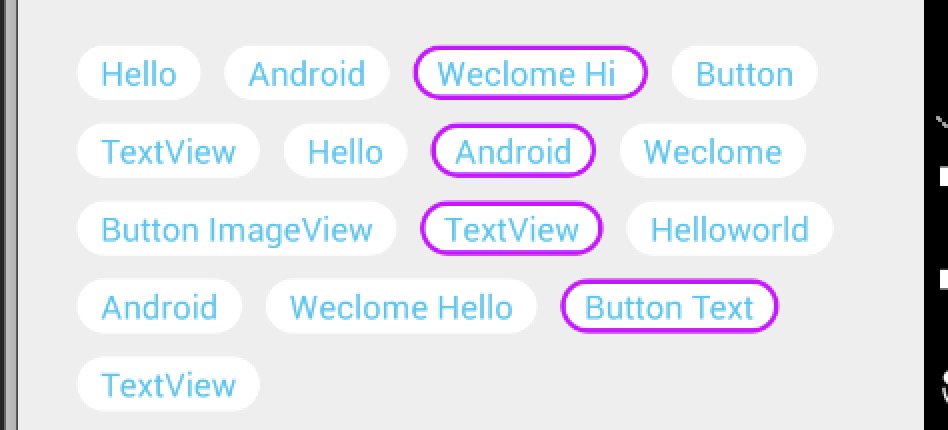
效果图
用法
dependencies {
 compile 'com.hyman:flowlayout-lib:1.1.2'
}
声明
布局文件中声明:
 <com.zhy.view.flowlayout.TagFlowLayout
        android:id="@+id/id_flowlayout"
        zhy:max_select="-1"
        android:layout_width="fill_parent"
        android:layout_height="wrap_content"
        android:padding="20dp">
    </com.zhy.view.flowlayout.TagFlowLayout>
支持属性:
max_select:-1 为不限制选择数量,>=1 的数字为控制选择 tag 的数量
支持通过 state=checked 来控制选中和取消,也可以自己在 Adapter的 onSelected 和 unSelected 中分别处理显示。
填充标签的布局layout->tv.xml
<?xml version="1.0" encoding="utf-8"?>
<TextView xmlns:android="http://schemas.android.com/apk/res/android"
    android:layout_width="wrap_content"
    android:layout_height="wrap_content"
    android:layout_margin="5dp"
    android:background="@drawable/tag_bg"
    android:text="Helloworld"
    android:textColor="@drawable/text_color">

</TextView>
我们可以在这里来设置文字的大小,text_color设置文字的颜色、tag_bg设置标签的背景。
在drawable->text_color中
<?xml version="1.0" encoding="utf-8"?>
<selector xmlns:android="http://schemas.android.com/apk/res/android">

    <item android:color="#ff0000" android:state_checked="true"/>
    <item android:color="#f692ff"/>

</selector>
下方代表默认文字颜色,上方代表点击后的颜色.
在drawable->tag_bg中
<?xml version="1.0" encoding="utf-8"?>
<selector xmlns:android="http://schemas.android.com/apk/res/android">
    <item
        android:drawable="@drawable/checked_bg"
        android:state_checked="true"
        >

    </item>
    <item
        android:drawable="@drawable/normal_bg"></item>
</selector>
存在着两组标签drawable->normal_bg.xml代表的是默认时标签的背景,drawable->checked_bg.xml代表的是点击时的背景.
在drawable->normal_bg.xml中
<?xml version="1.0" encoding="utf-8"?>
<shape xmlns:android="http://schemas.android.com/apk/res/android">
<stroke android:color="@color/black" android:width="1dp"/>
 <corners android:radius="5dp" />
 <padding
     android:left="13dp"
     android:right="13dp"
     android:top="13dp"
     android:bottom="13dp"
     />
</shape>
上面的color 代表背景颜色,下面的color代表边框颜色.
在drawable->checked_bg.xml中
<?xml version="1.0" encoding="utf-8"?>
<shape xmlns:android="http://schemas.android.com/apk/res/android">
<stroke android:color="@color/red" android:width="1dp"/> <corners android:radius="5dp" /> <padding android:left="13dp" android:right="13dp" android:top="13dp" android:bottom="13dp" /></shape>
也是一样的.
然后我们进入到.Java文件,怕亲们乱掉我将会把整个文件内容都给大家,然后以注释的方式为大家讲解.
import android.support.v7.app.AppCompatActivity;
import android.os.Bundle;
import android.view.LayoutInflater;
import android.view.View;
import android.widget.TextView;
import android.widget.Toast;

import com.zhy.view.flowlayout.TagAdapter;
import com.zhy.view.flowlayout.TagFlowLayout;

import java.util.Set;

public class FlowLayout extends AppCompatActivity {
    //放入流式布局标签中的内容
    private String[] mVals = new String[]
            {"有信用卡", "有微粒贷", "我有房", "我有车", "有社保", "有公积金",
                    "有人寿保险", "工资银行卡转账", "啥都没有"};
    private TagFlowLayout mFlowLayout;
    @Override
    protected void onCreate(Bundle savedInstanceState) {
        super.onCreate(savedInstanceState);
        //获取布局填充器,一会将tv.xml文件填充到标签内.
        final LayoutInflater mInflater = LayoutInflater.from(this);
        setContentView(R.layout.activity_flow_layout);
        //初始化布局和适配器,直接粘就行.
        mFlowLayout = (TagFlowLayout) findViewById(R.id.id_flowlayout);
        mFlowLayout.setAdapter(new TagAdapter<String>(mVals)
        {

            @Override
            public View getView(com.zhy.view.flowlayout.FlowLayout parent, int position, String s)
            {
//                将tv.xml文件填充到标签内.
                TextView tv = (TextView) mInflater.inflate(R.layout.tv,
                        mFlowLayout, false);
//               为标签设置对应的内容
                tv.setText(s);
                return tv;
            }
//             为标签设置预点击内容(就是一开始就处于点击状态的标签)
            @Override
            public boolean setSelected(int position, String s)
            {
                return s.equals("Android");
            }
        });
//          为点击标签设置点击事件.
        mFlowLayout.setOnTagClickListener(new TagFlowLayout.OnTagClickListener()
        {
            @Override
            public boolean onTagClick(View view, int position, com.zhy.view.flowlayout.FlowLayout parent)
            {
                Toast.makeText(FlowLayout.this, mVals[position], Toast.LENGTH_SHORT).show();
                //view.setVisibility(View.GONE);
                return true;
            }
        });

//          展示哪些标签处于选中状态,这个很重要我们设置标签可点击就是为了把用户选中状态的标签中的数据上传.
        mFlowLayout.setOnSelectListener(new TagFlowLayout.OnSelectListener()
        {
            @Override
            public void onSelected(Set<Integer> selectPosSet)
            {
               setTitle("choose:" + selectPosSet.toString());


 2654
2654

 被折叠的 条评论
为什么被折叠?
被折叠的 条评论
为什么被折叠?
 到【灌水乐园】发言


