


Salesforce Lightning开发学习(一) : Hello World 开发实践
一 : 什么是Lightning Component framework
这个Lightning Component framework 是Lightning的简称 , 是Salesforce封装的一个前端的框架
二 : 开发Lightning
登录我们的开发者账号
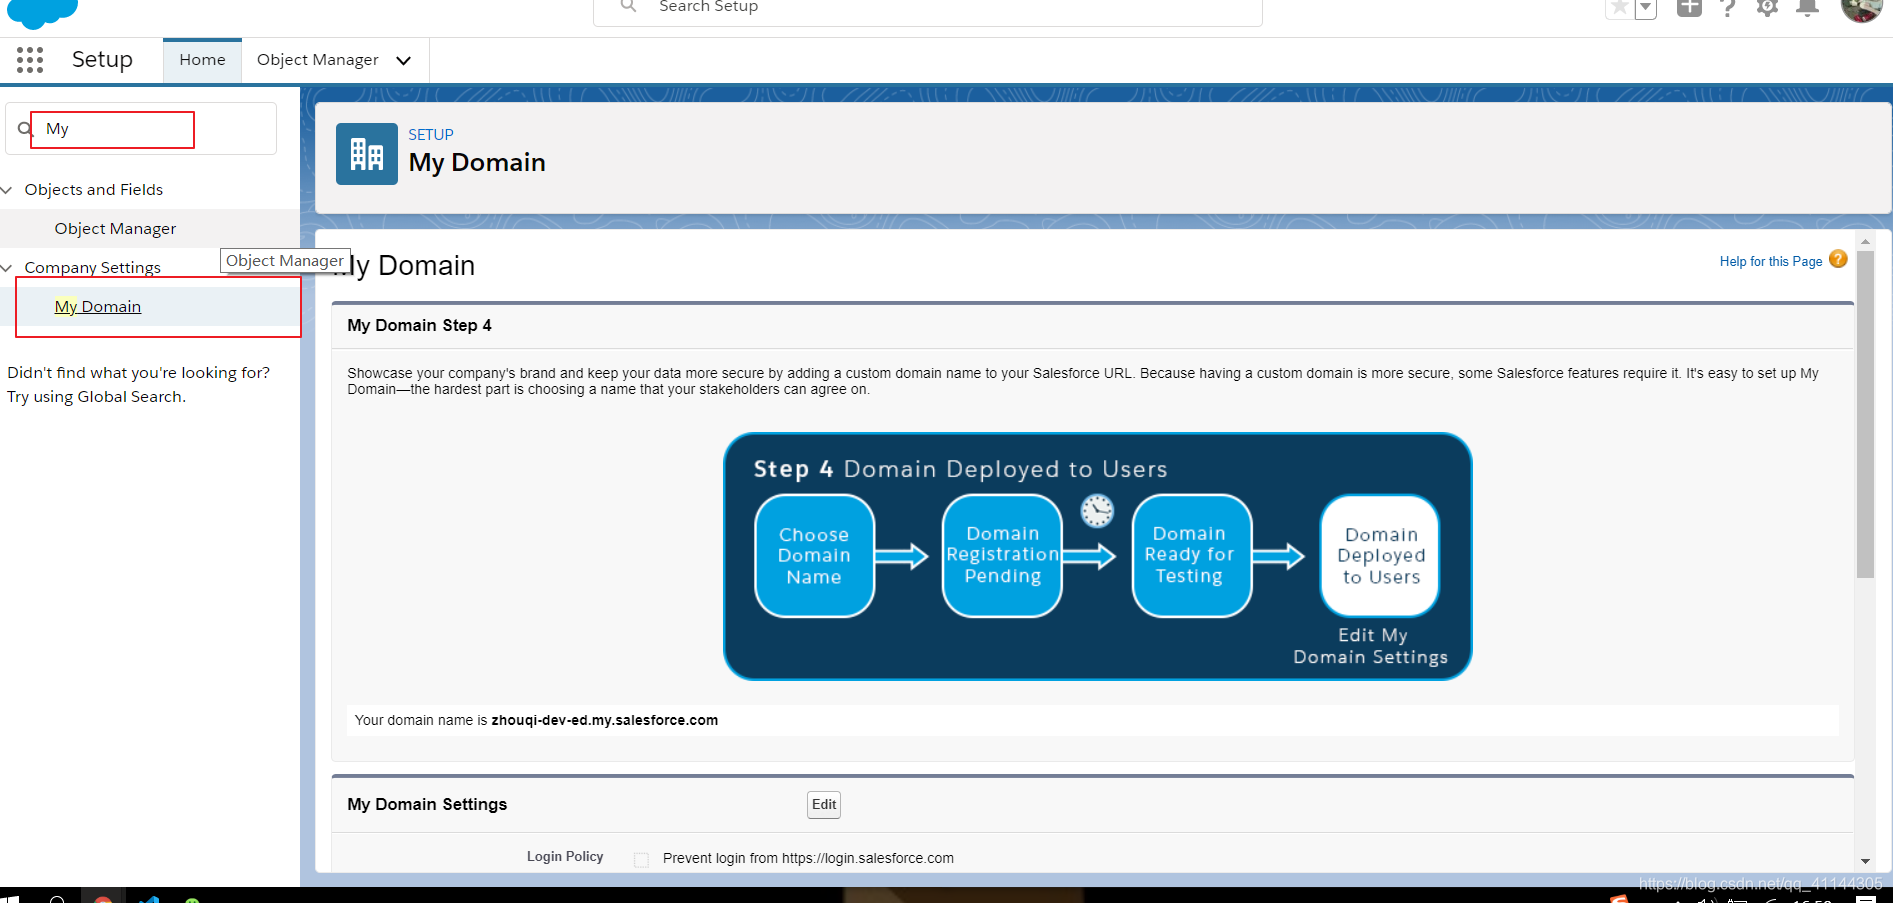
点击:设置→域管理→My Domain
首先设置我的域名是很重要的 , 否则在后面的运行中不会出现你想要的结果
进入闪电模式 在设置中输入 " My "进行模糊搜索 点击我的域名
进行设置即可
若不是自定义的域名 , 后面的浏览器上会显示一下代码:
Lightning components require My Domain. Please contact your system administrator for more information.
三 : Hello World
登录好之后 , 接下来完成我们lightning 的组件的 Hello World 开发 ,
先切换到经典模式 , 进入开发者控制台
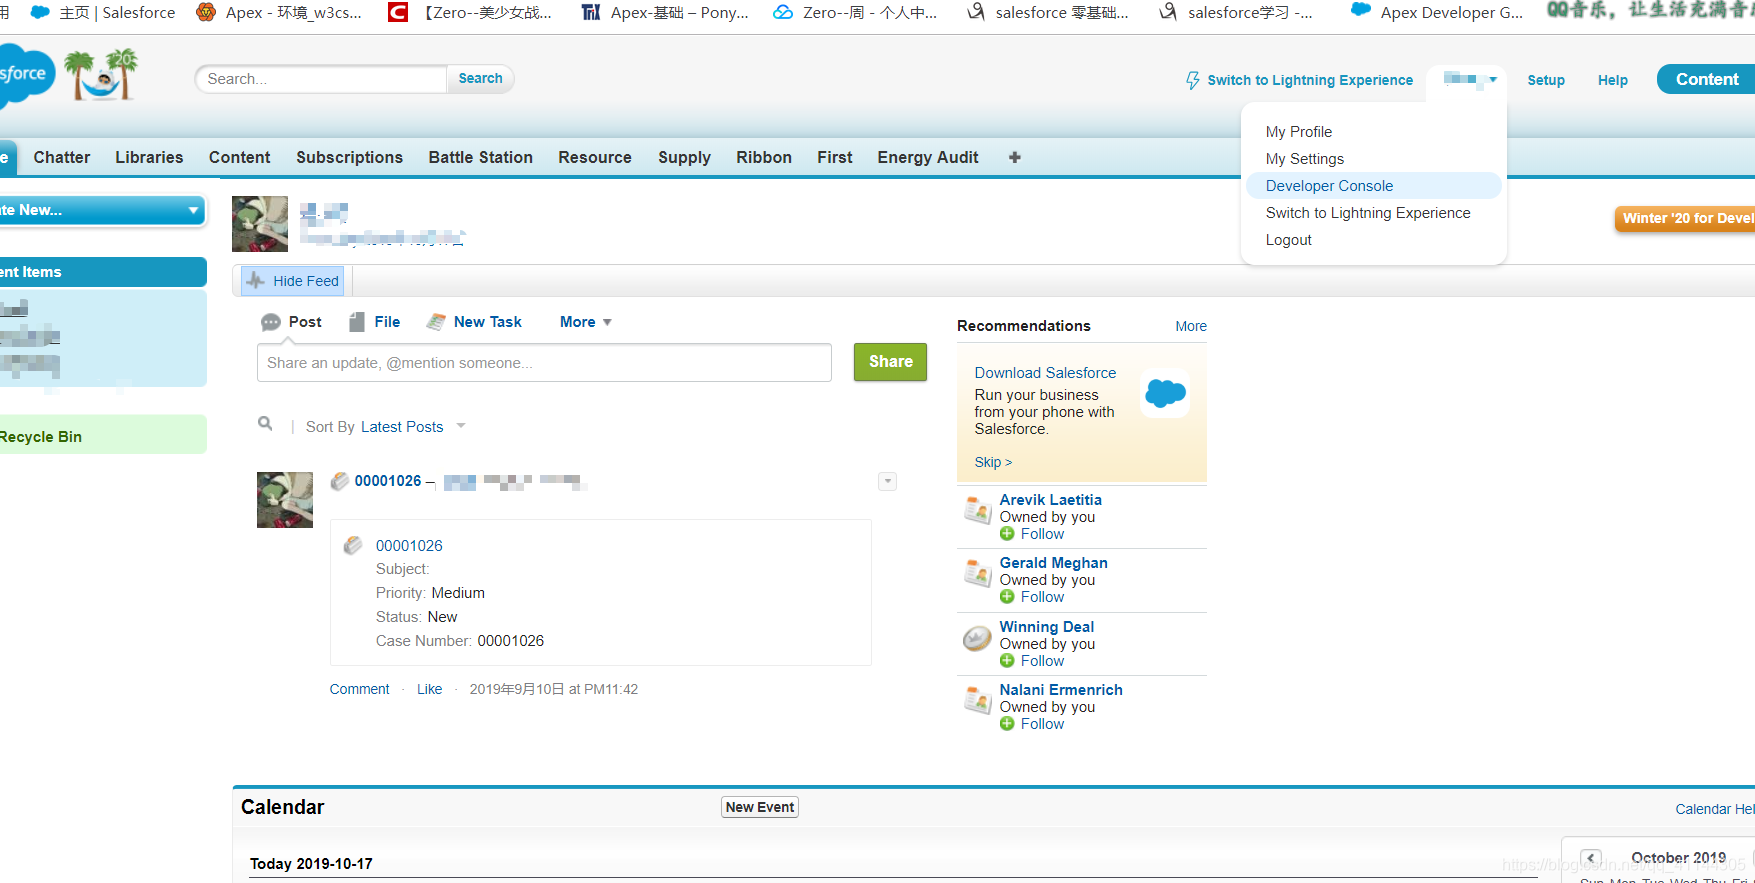
打开Developer Consoles
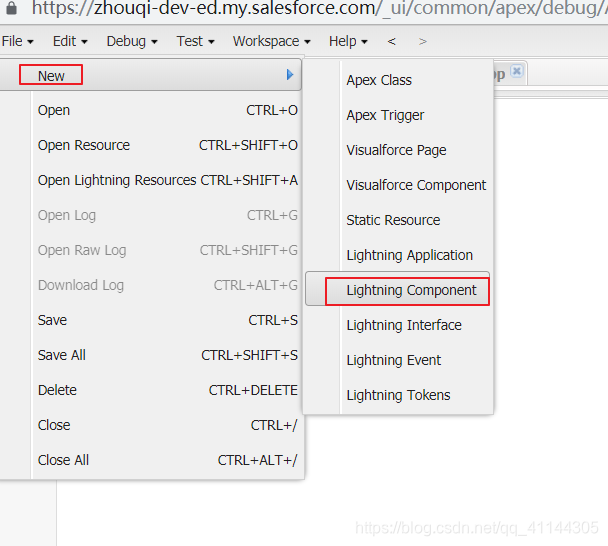
点击 File→New→Lightning Component
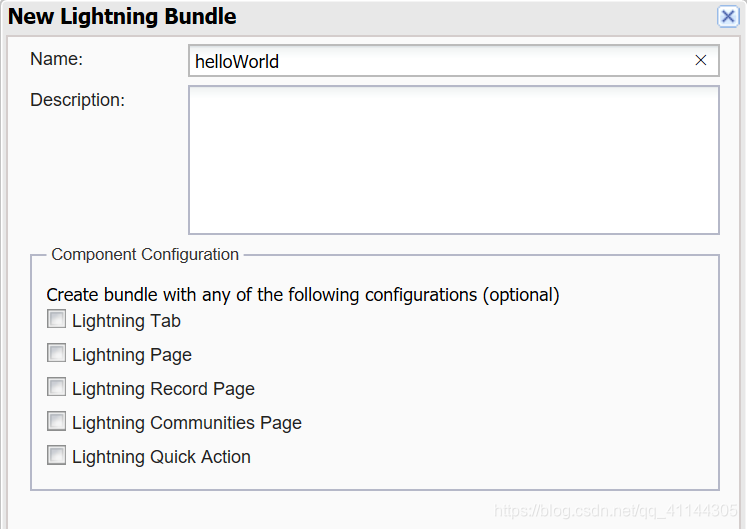
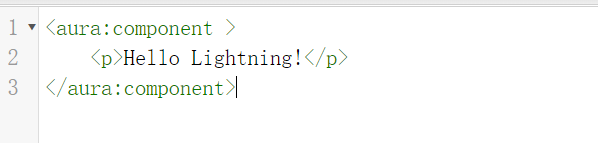
输入
输入代码
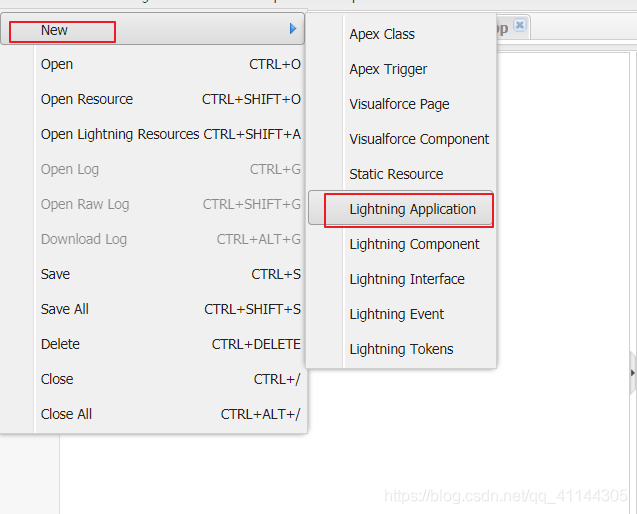
component开发完成后,我们要预览组件效果,但是Lightning是不支持直接预览组件的,所以,我们要创建一个application(应用程序)将helloWorld组件装起来
继续我们的操作File→New→Lightning Application,输入 MyTest_App
输入代码 :
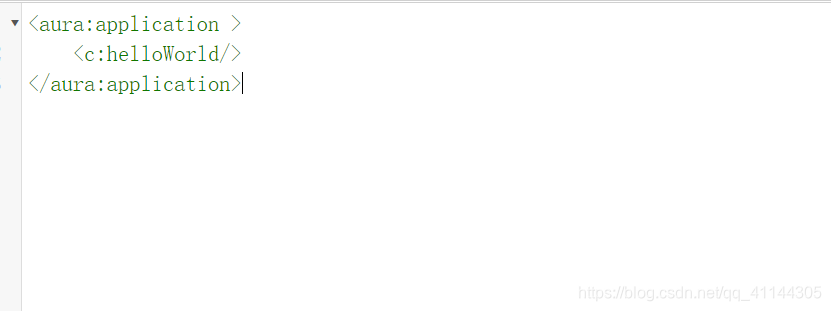
点击右边的用浏览器进行浏览
接着就会打开一个浏览器
注意 : 域名得设置好 , 否则浏览器打开得并不是你输入的内容 ;
如果不设置自定义域名,在后面编写代码时会遇到这样的错误提示:Lightning components require My Domain. Please contact your system administrator for more information.
Salesforce Lightning开发学习(二) : Component组件开发事件
紧接着我们上面的内容
第一步 : 新建一个对象,这里我们就借助别人创建好的就可以了
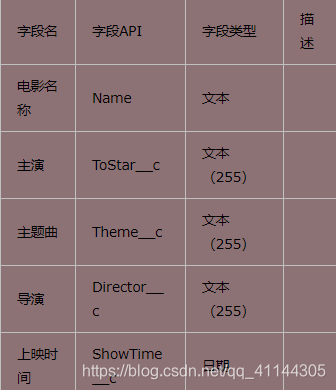
第二步 : 创建一个Component , 命名为MyTest_Movie
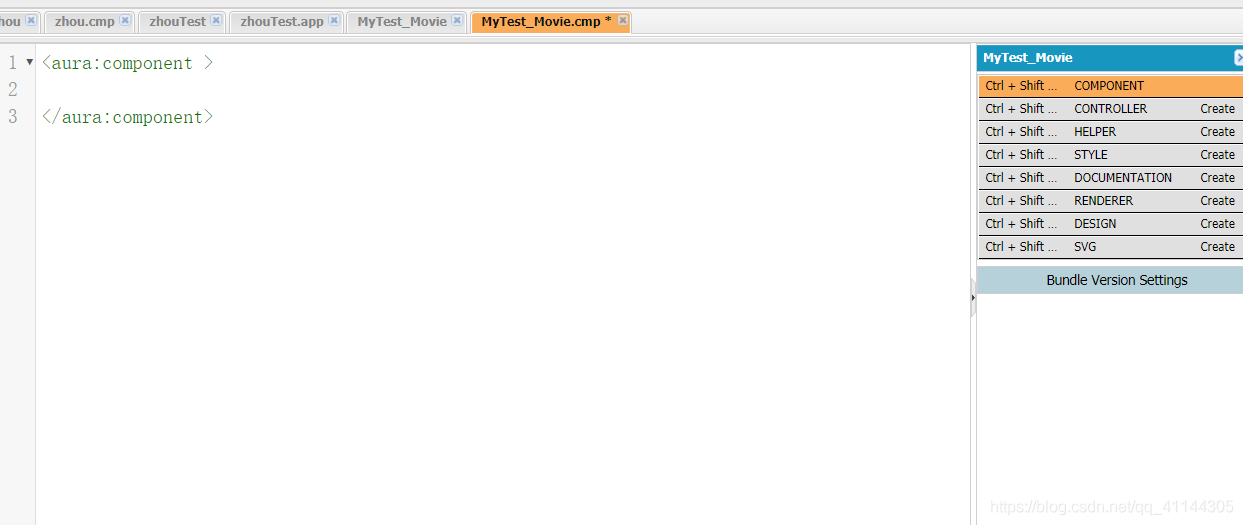
我们根据上图右边的提示来 Create
接下来 , 介绍一下我们右边的内容 :
- COMPONENT:类似我们Java中的HTML5页面 , 将HTML5页面进行框架式(aura) 封装 , 并且还能够将 js Controller 和 Helper 进行交互 , 再通过 CSS 进行渲染
- HELPER:从开发的层度上说 , 这就是我们的逻辑层 ,将逻辑代码封装在此供Js Controller进行调用,可以写一些公共方法,同时可以进行与后台apex类进行交互;
- STYLE:针对cmp组件进行渲染,实现页面效果;
下面我们开始我们的编程 : 完善MyTest_Movie.cmp
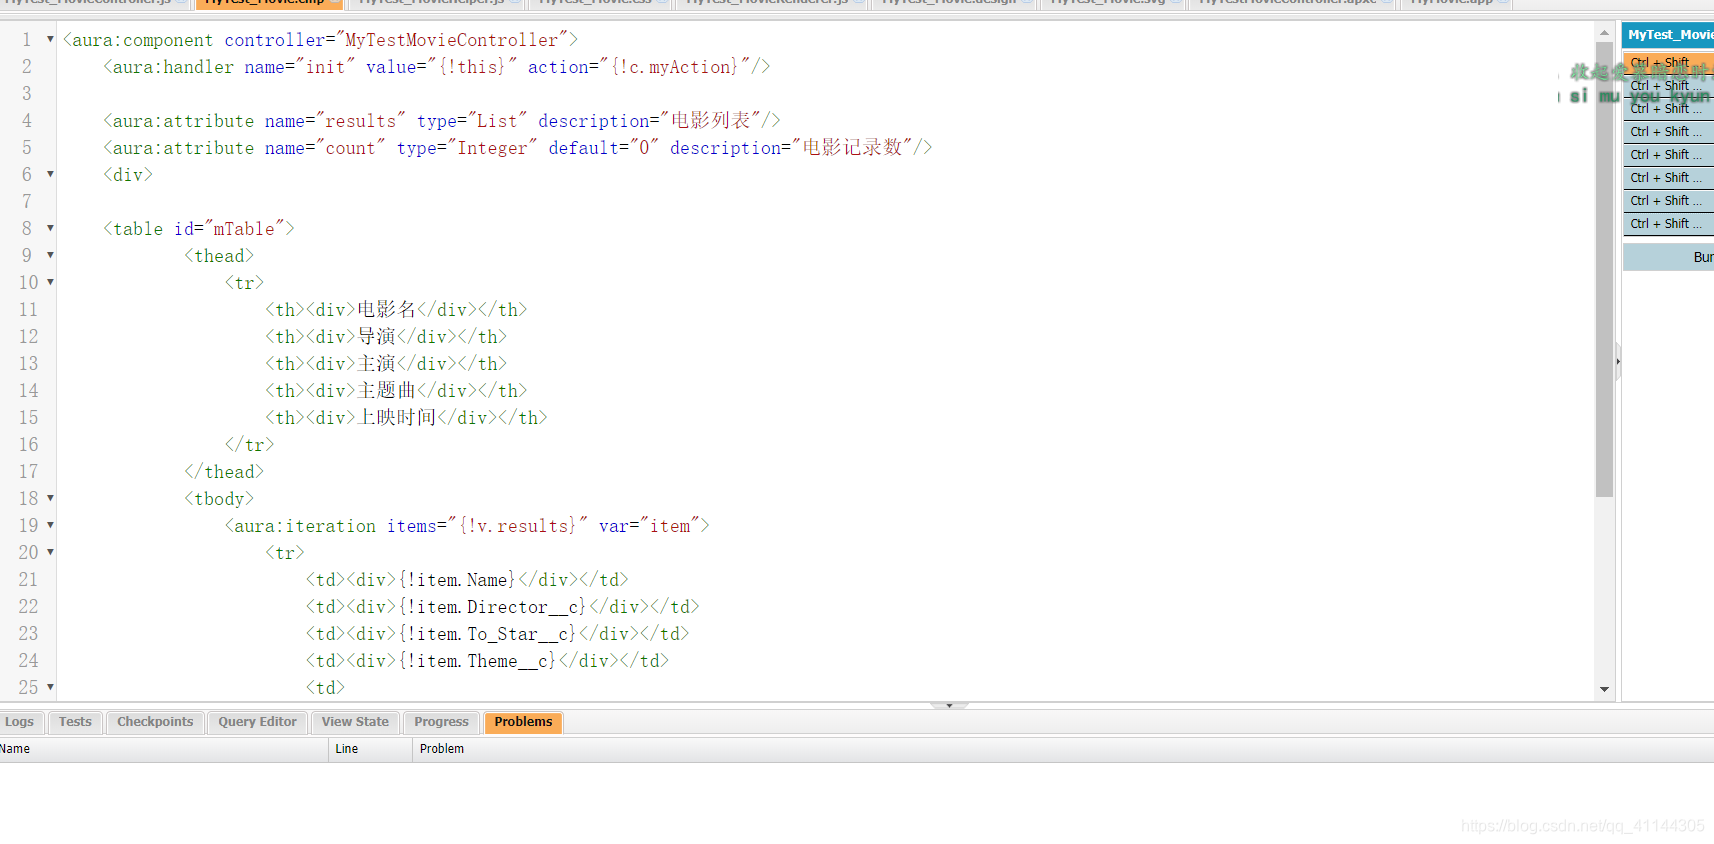
代码如下 :
<aura:component controller="MyTestMovieController">
<aura:handler name="init" value="{!this}" action="{!c.myAction}"/>
<aura:attribute name="results" type="List" description="电影列表"/>
<aura:attribute name="count" type="Integer" default="0" description="电影记录数"/>
<div>
<table id="mTable">
<thead>
<tr>
<th><div>电影名</div></th>
<th><div>导演</div></th>
<th><div>主演</div></th>
<th><div>主题曲</div></th>
<th><div>上映时间</div></th>
</tr>
</thead>
<tbody>
<aura:iteration items="{!v.results}" var="item">
<tr>
<td><div>{!item.Name}</div></td>
<td><div>{!item.Director__c}</div></td>
<td><div>{!item.To_Star__c}</div></td>
<td><div>{!item.Theme__c}</div></td>
<td>
<lightning:formattedDateTime value="{!item.Release_Time__c}" year="numeric" month="numeric" day="numeric" />
</td>
</tr>
</aura:iteration>
</tbody>
</table>
<div> </div>
<span style="float:right;">共{!v.count}条记录</span>
</div>
</aura:component>
其中 "{!c.myAction}"调用了MyTest_MovieController.js中的myAction方法 , "c"代表的
JS文件中的Controller
MyTest_MovieController.js文件如下 :
({
	myAction : function(component, event, helper) {

	}
})
目前myAction方法里面还是空的 , 然后我们将MyTest_Movie添加到应用程序MyTest.app中进行查看***(Ctrl+Shift+A查看当前所有lightning组件)***
先加一个样式吧 : 在MyTest_Movie.css中
.THIS {
    font-size: 12px;
    color:red;
}
.THIS table th{
   border: 1px solid blue;
   color:blue;
   padding:15px;
   border-width:1px 1px 1px 1px;
}
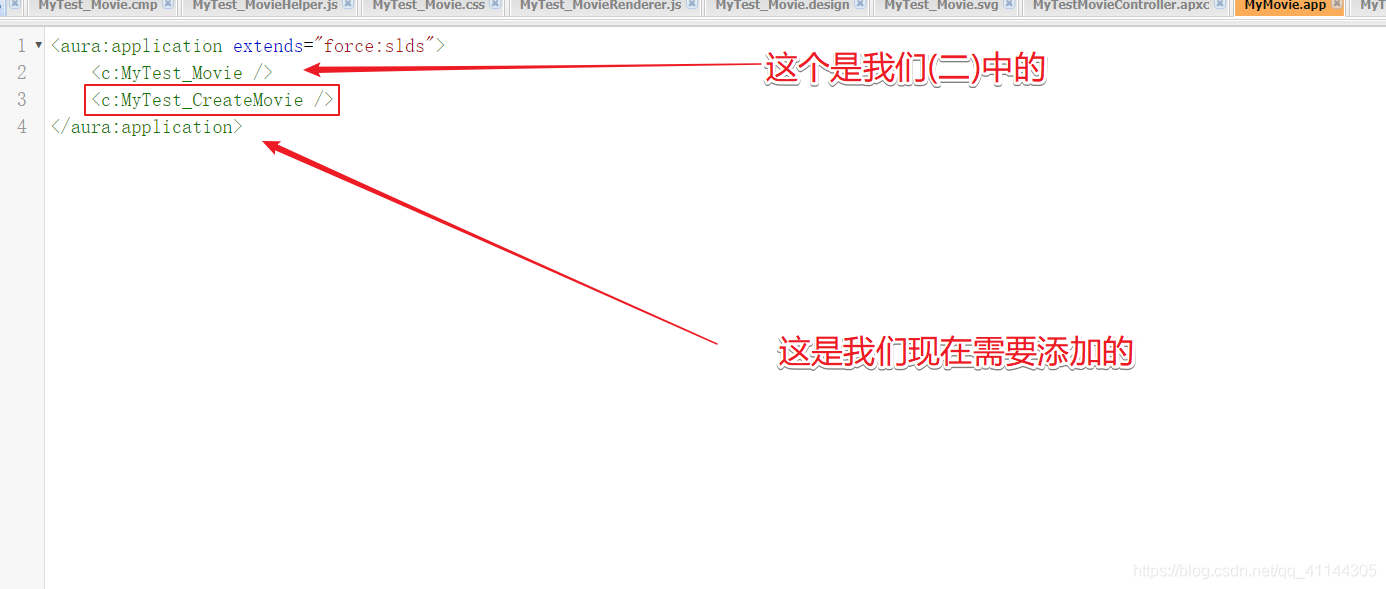
继续 : MyMovie.app
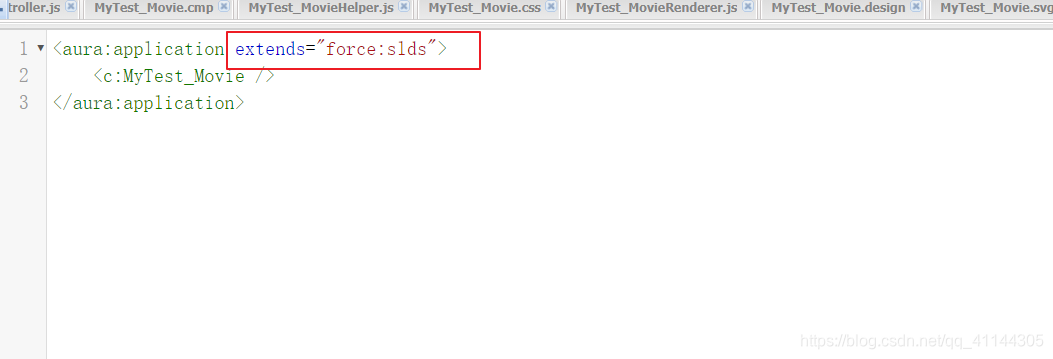
<aura:application >
	<c:MyTest_Movie />
</aura:application>
接着我们点击预览 : 会得到一个界面
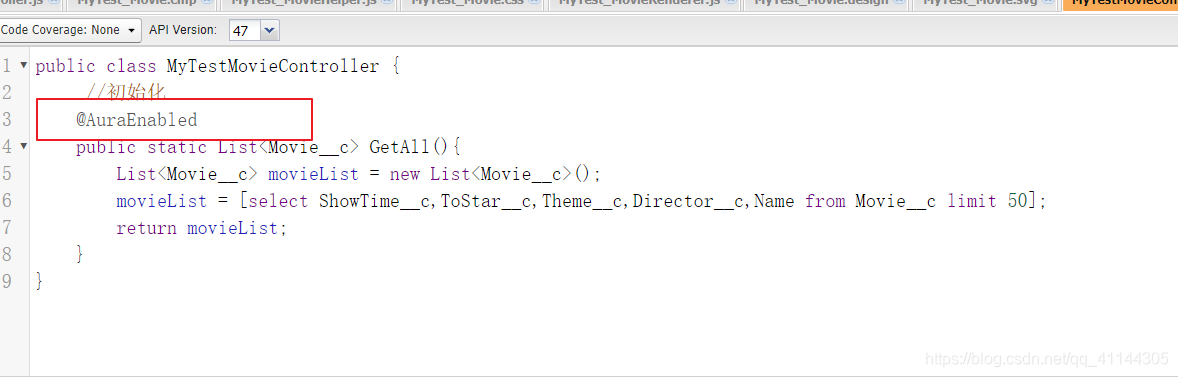
第三步是创建一个Apex类,MyTestMovieController
public class MyTestMovieController {
	 //初始化
    @AuraEnabled
    public static List<Movie__c> GetAll(){
        List<Movie__c> movieList = new List<Movie__c>();
        movieList = [select ShowTime__c,ToStar__c,Theme__c,Director__c,Name from Movie__c limit 50];
        return movieList;
    }
}
接下来完善MyTest_MovieController.js
({
	myAction : function(component, event, helper) {
		helper.Init(component,event);
	}
})
完善MyTest_MovieHelper.js
({
    // 初始化加载
    Init : function(component,event){
        // 调用后台类
        var action = component.get("c.GetAll");
        // 设置回调函数
        action.setCallback(this,function(response){
            // 返回状态
            var state = response.getState();
            if(state == 'SUCCESS'){
                var movieList = response.getReturnValue();
                if(movieList == 0){
                    component.set("v.message",true);
                }else{
                    component.set("v.message",false);
                }
                //参数传递
                component.set("v.results",movieList);
                component.set("v.count",movieList.length);
            }
        });
        // 队列处理
        $A.enqueueAction(action);
    }
})
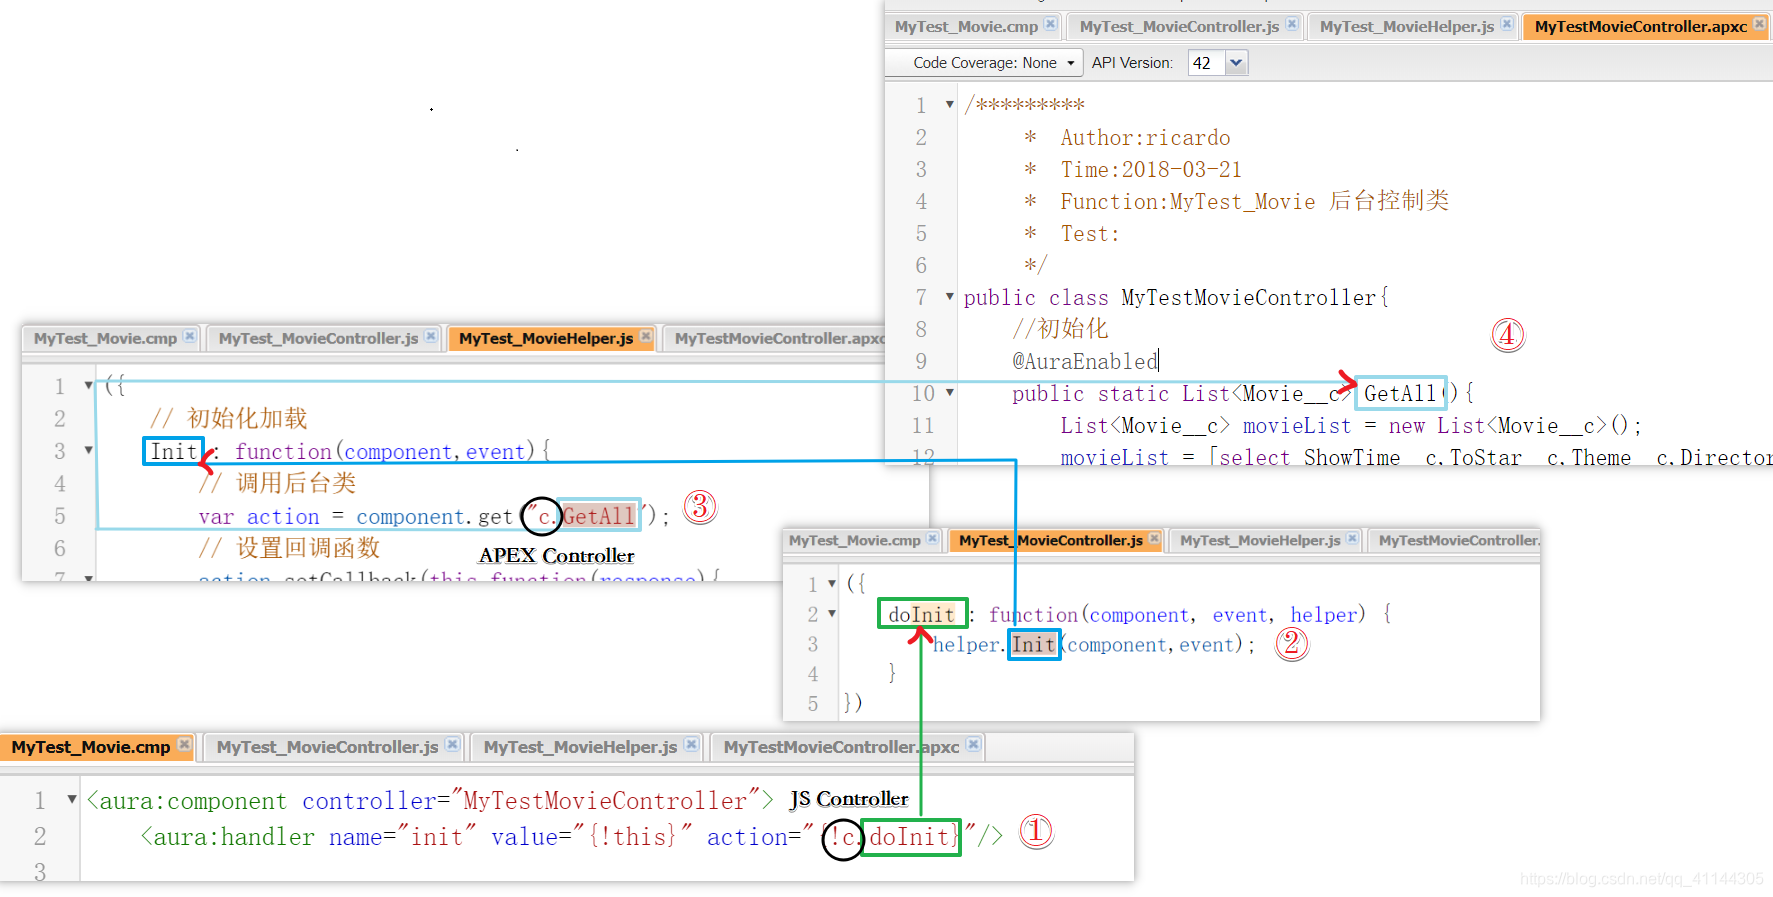
具体的运行过程如图所示,需要注意一点的是,APEX类中的方法需要与lightning组件进行交互,则必须加注解: @AuraEnabled
现在我们的页面出来了 , 但是这个页面过于简陋 , 我们加点修饰吧 :
<aura:component controller="MyTestMovieController">
<aura:handler name="init" value="{!this}" action="{!c.myAction }"/>
<aura:attribute name="results" type="List" description="电影列表"/>
<aura:attribute name="count" type="Integer" default="0" description="电影记录数"/>
<div>
<table class="slds-table slds-table--bordered slds-table--cell-buffer">
<thead>
<tr class="slds-text-title--caps">
<th scope="col"><div class="slds-truncate">电影名</div></th>
<th scope="col"><div class="slds-truncate">导演</div></th>
<th scope="col"><div class="slds-truncate">主演</div></th>
<th scope="col"><div class="slds-truncate">主题曲</div></th>
<th scope="col"><div class="slds-truncate">上映时间</div></th>
</tr>
</thead>
<tbody>
<aura:iteration items="{!v.results}" var="item">
<tr>
<td><div class="slds-truncate">{!item.Name}</div></td>
<td><div class="slds-truncate">{!item.Director__c}</div></td>
<td><div class="slds-truncate">{!item.ToStar__c}</div></td>
<td><div class="slds-truncate">{!item.Theme__c}</div></td>
<td>
<lightning:formattedDateTime value="{!item.ShowTime__c}" year="numeric" month="numeric" day="numeric" />
</td>
</tr>
</aura:iteration>
</tbody>
</table>
<div> </div>
<span class="slds-size_small" style="float:right;">共{!v.count}条记录</span>
</div>
</aura:component>
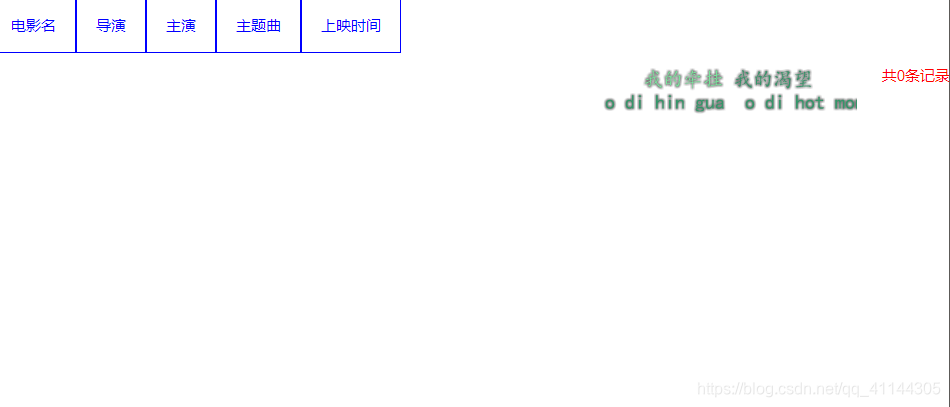
最后 , 需要注意的是 : 给组件加上相关的样式后,在预览之前,要给MyTest.app继承lightning的样式库文件:extends=“force:slds”
那么最后的页面就应该是 :
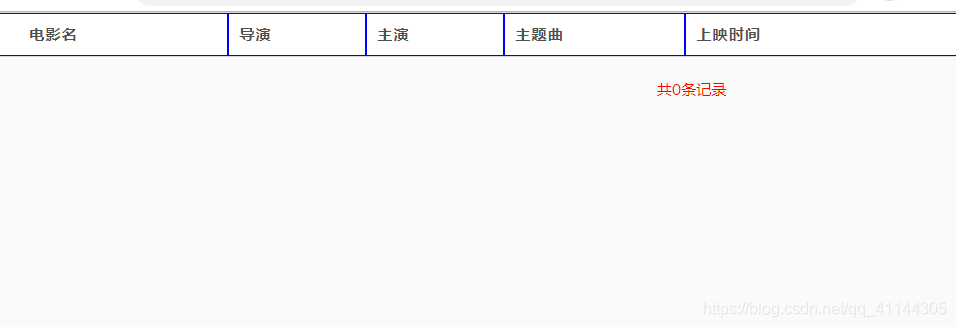
Salesforce Lightning开发学习(三)Component表单初解
继续我们上面的教程
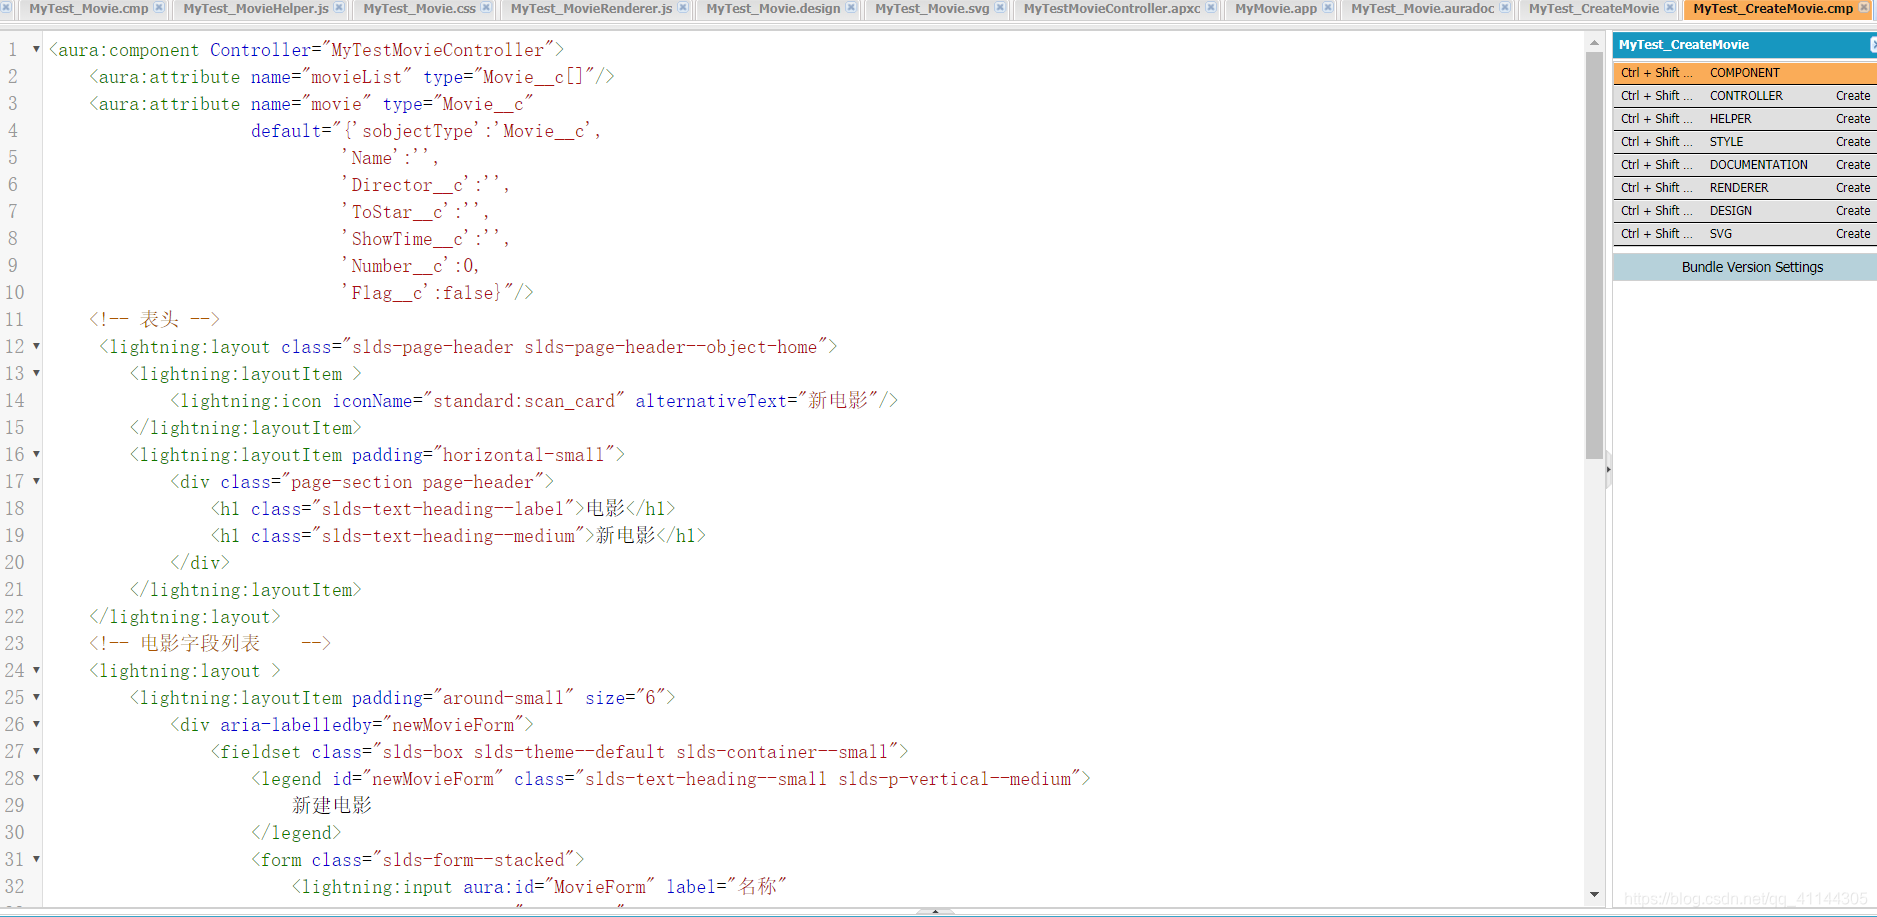
1.创建组件 : MyText_CreateMovie
<aura:component Controller="MyTestMovieController">
    <aura:attribute name="movieList" type="Movie__c[]"/>
    <aura:attribute name="movie" type="Movie__c"
                    default="{'sobjectType':'Movie__c',
                             'Name':'',
                             'Director__c':'',
                             'ToStar__c':'',
                             'ShowTime__c':'',
                             'Number__c':0,
                             'Flag__c':false}"/>
    <!-- 表头 -->
     <lightning:layout class="slds-page-header slds-page-header--object-home">
        <lightning:layoutItem >
            <lightning:icon iconName="standard:scan_card" alternativeText="新电影"/>
        </lightning:layoutItem>
        <lightning:layoutItem padding="horizontal-small">
            <div class="page-section page-header">
                <h1 class="slds-text-heading--label">电影</h1>
                <h1 class="slds-text-heading--medium">新电影</h1>
            </div>
        </lightning:layoutItem>
    </lightning:layout>
    <!-- 电影字段列表    -->
    <lightning:layout >
        <lightning:layoutItem padding="around-small" size="6">
            <div aria-labelledby="newMovieForm">
                <fieldset class="slds-box slds-theme--default slds-container--small">
                    <legend id="newMovieForm" class="slds-text-heading--small slds-p-vertical--medium">
                        新建电影
                    </legend>
                    <form class="slds-form--stacked">
                        <lightning:input aura:id="MovieForm" label="名称"
                                         name="movieName"
                                         value="{!v.movie.Name}"
                                         required="true"/>
                        <lightning:input aura:id="MovieForm" label="导演"
                                         name="movieDirector"
                                         value="{!v.movie.Director__c}"
                                         placeholder="请输入导演名称"/>
                         <lightning:input aura:id="MovieForm" label="主演"
                                         name="movieToStar"
                                         value="{!v.movie.ToStar__c}"
                                         placeholder="请输入主演名称"/>
                        <lightning:input type="number" aura:id="MovieForm" label="票价"
                                         name="movieNumber"
                                         formatter="currency"
                                         min="1"
                                         step="0.5"
                                         value="{!v.movie.Number__c}"
                                         messageWhenRangeUnderflow="票价最低1元"/>
                        <lightning:input type="date" aura:id="MovieForm" label="上映时间"
                                         name="movieShowTime"
                                         value="{!v.movie.ShowTime__c}"/>
                        <lightning:input type="checkbox" aura:id="MovieForm" label="是否上映"
                                         name="movieFlag"
                                         checked="{!v.movie.Flag__c}"/>
                        <lightning:button label="加入电影列表"
                                          class="slds-m-top--medium"
                                          variant="brand"
                                          onclick="{!c.AddToList}"/>
                    </form>
                </fieldset>
            </div>
        </lightning:layoutItem>
    </lightning:layout>
</aura:component>
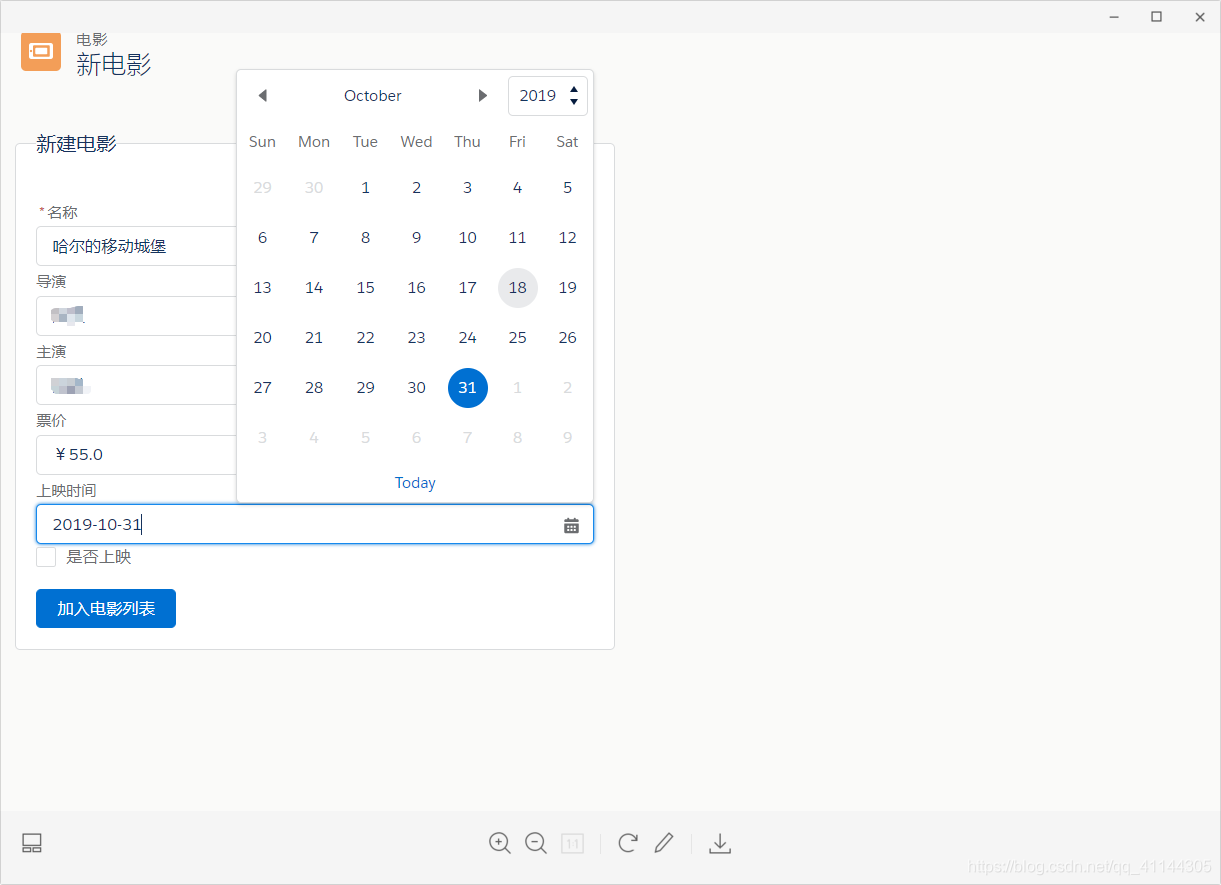
将该组件放在 My_Test.app中并预览
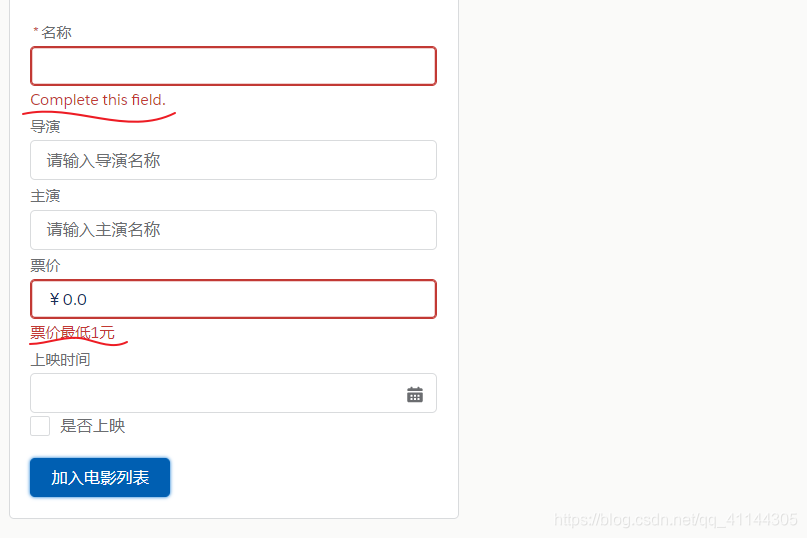
得到的页面展示将是这样的 :

我们继续完成它的创建方法
2.补充MyTest_CreateMovieController.js
({
    AddToList : function(component, event, helper) {
        //系统提供的校验错误信息的标准方法可校验必填项以及最小值等等
        var validExpense = component.find('MovieForm').reduce(function (validSoFar, inputCmp) {
            // 显示填写错误的字段消息
            inputCmp.showHelpMessageIfInvalid();
            return validSoFar && inputCmp.get('v.validity').valid;
        }, true);
         // 通过字段校验后继续创建的逻辑
        if(validExpense){
            // 创建一条记录
            var movie = component.get("v.movie");
            console.log("传入的电影信息: " + JSON.stringify(movie));
            helper.createMovie(component, movie);
            //将表单重置
             component.set("v.movie",{'sobjectType':'Movie__c',
                             'Name':'',
                             'Director__c':'',
                             'ToStar__c':'',
                             'ShowTime__c':'',
                             'Number__c':0,
                             'Flag__c':false});
        }
    }
})
这会给用户更好的体验 , 这就属于表单的验证规则 , 就好比这样
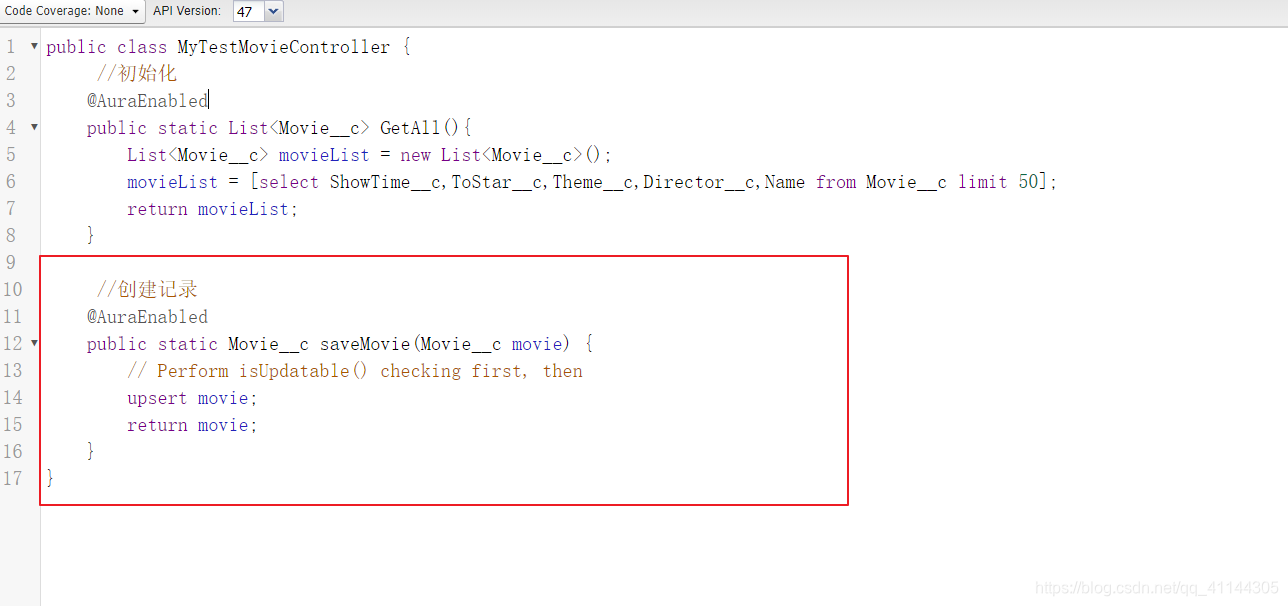
4.更新MyTestMovieController类,在其中加入saveMovie方法
  //创建记录
    @AuraEnabled
    public static Movie__c saveMovie(Movie__c movie) {
        // Perform isUpdatable() checking first, then
        upsert movie;
        return movie;
    }
我们来添加一条数据进行测试吧:
单击加入电影列表 :

这样 , 一个简单的创建电影条目的表单也就完成了 , 看会了吗? 自己试一试呀


 4666
4666

 被折叠的 条评论
为什么被折叠?
被折叠的 条评论
为什么被折叠?
 到【灌水乐园】发言


