


1.什么是IOC/DI
1.1IOC(控制反转)
Ioc—Inversion of Control,即“控制反转”,不是什么技术,而是一种 设计思想。在Java开发中,Ioc意味着将你设计好的对象交给容器控制,而不是传统的在你的对象内部直接控制。
- 谁控制谁,控制什么?
传统Java SE程序设计,我们直接在对象内部通过new进行创建对象,是程序主动去创建依赖对象;而IoC是有专门一个容器来创建这些对象,即由Ioc容器来控制对 象的创建;
谁控制谁?当然是IoC 容器控制了对象;
控制什么?那就是主要控制了外部资源获取(不只是对象包括比如文件等)。
- 为何是反转,哪些方面反转了?
有反转就有正转,传统应用程序是由我们自己在对象中主动控制去直接获取依赖对象,也就是正转;
而反转则是由容器来帮忙创建及注入依赖对象;
为何是反转?因为由容器帮我们查找及注入依赖对象,对象只是被动的接受依赖对象,所以是反转;
哪些方面反转了?依赖对象的获取被反转了。
1.1.1控制反转(IoC)有什么作用
- 管理对象的创建和依赖关系的维护。对象的创建并不是一件简单的事,在对象关系比较复杂时,如果依赖关系需要程序猿来维护的话,那是相当头疼的
- 解耦,由容器去维护具体的对象
- 托管了类的产生过程,比如我们需要在类的产生过程中做一些处理,最直接的例子就是代理,如果有容器程序可以把这部分处理交给容器,应用程序则无需去关心类是如何完成代理的
1.1.2IOC的优点是什么?
- IOC 或 依赖注入把应用的代码量降到最低。
- 它使应用容易测试,单元测试不再需要单例和JNDI查找机制。
- 最小的代价和最小的侵入性使松散耦合得以实现。
- IOC容器支持加载服务时的饿汉式初始化和懒加载。
1.1.3Spring IoC 的实现机制
Spring 中的 IoC 的实现原理就是工厂模式加反射机制。
interface Fruit {
    public abstract void eat();
}

class Apple implements Fruit {
    public void eat() {
        System.out.println("Apple");
    }
}

class Orange implements Fruit {
    public void eat() {
        System.out.println("Orange");
    }
}

class Factory {
    public static Fruit getInstance(String ClassName) {
        Fruit f = null;
        try {
            f = (Fruit) Class.forName(ClassName).newInstance();
        } catch (Exception e) {
            e.printStackTrace();
        }
        return f;
    }
}

class Client {
    public static void main(String[] a) {
        Fruit f = Factory.getInstance("io.github.dunwu.spring.Apple");
        if (f != null) {
            f.eat();
        }
    }
}
1.2DI(依赖注入)
DI—Dependency Injection,即依赖注入:组件之间依赖关系由容器在运行期决定,形象的说,即由容器动态的将某个依赖关系注入到组件之中。依赖注入的目的并非为软件系统带来更多功能,而是为了提升组件重用的频率,并为系统搭建一个灵活、可扩展的平台。通过依赖注入机制,我们只需要通过简单的配置,而无需任何代码就可指定目标需要的资源,完成自身的业务逻辑,而不需要关心具体的资源来自何处。
- 谁依赖于谁?
当然是应用程序依赖于IoC容器;
- 为什么需要依赖?
应用程序需要IoC容器来提供对象需要的外部资源;
- 谁注入谁?
很明显是IoC容器注入应用程序某个对象,应用程序依赖的对象;
- 注入了什么?
就是注入某个对象所需要的外部资源(包括对象、资源、常量数据)。
1.2.1什么是Spring的依赖注入
所谓依赖注入(Dependency Injection),即组件之间的依赖关系由容器在应用系统运行期来决定,也就是由容器动态地将某种依赖关系的目标对象实例注入到应用系统中的各个关联的组件之中。组件不做定位查询,只提供普通的Java方法让容器去决定依赖关系。
1.2.2依赖注入的优势
依赖注入之所以更流行是因为它是一种更可取的方式:让容器全权负责依赖查询,受管组件只需要暴露JavaBean的setter方法或者带参数的构造器或者接口,使容器可以在初始化时组装对象的依赖关系。其与依赖查找方式相比,主要优势为:
- 查找定位操作与应用代码完全无关。
- 不依赖于容器的API,可以很容易地在任何容器以外使用应用对象。
- 不需要特殊的接口,绝大多数对象可以做到完全不必依赖容器。
2.IOC/DI的实现方式
2.1IOC的三种实现方式
2.1.1xml配置
将bean的信息配置.xml文件里,通过Spring加载文件为我们创建bean。这种方式出现很多早前的SSM项目中,将第三方类库或者一些配置工具类都以这种方式进行配置,主要原因是由于第三方类不支持Spring注解。
- 优点: 可以使用于任何场景,结构清晰,通俗易懂
- 缺点: 配置繁琐,不易维护,枯燥无味,扩展性差
<?xml version="1.0" encoding="UTF-8"?>
<beans xmlns="http://www.springframework.org/schema/beans"
       xmlns:xsi="http://www.w3.org/2001/XMLSchema-instance"
       xsi:schemaLocation="http://www.springframework.org/schema/beans
 http://www.springframework.org/schema/beans/spring-beans.xsd">
    <!-- services -->
    <bean id="userService" class="tech.pdai.springframework.service.UserServiceImpl">
        <property name="userDao" ref="userDao"/>
        <!-- additional collaborators and configuration for this bean go here -->
    </bean>
    <!-- more bean definitions for services go here -->
</beans>
2.1.2Java配置
将类的创建交给我们配置的JavcConfig类来完成,Spring只负责维护和管理,采用纯Java创建方式。其本质上就是把在XML上的配置声明转移到Java配置类中
- 优点:适用于任何场景,配置方便,因为是纯Java代码,扩展性高,十分灵活
- 缺点:由于是采用Java类的方式,声明不明显,如果大量配置,可读性比较差
@Configuration
public class BeansConfig {

    /**
     * @return user dao
     */
    @Bean("userDao")
    public UserDaoImpl userDao() {
        return new UserDaoImpl();
    }

    /**
     * @return user service
     */
    @Bean("userService")
    public UserServiceImpl userService() {
        UserServiceImpl userService = new UserServiceImpl();
        userService.setUserDao(userDao());
        return userService;
    }
}
2.1.3注解配置
通过在类上加注解的方式,来声明一个类交给Spring管理,Spring会自动扫描带有@Component,@Controller,@Service,@Repository这四个注解的类,然后帮我们创建并管理,前提是需要先配置Spring的注解扫描器。
- 优点:开发便捷,通俗易懂,方便维护。
- 缺点:具有局限性,对于一些第三方资源,无法添加注解。只能采用XML或JavaConfig的方式配置
@Service
public class UserServiceImpl {

    /**
     * user dao impl.
     */
    @Autowired
    private UserDaoImpl userDao;

    /**
     * find user list.
     *
     * @return user list
     */
    public List<User> findUserList() {
        return userDao.findUserList();
    }

}
2.2DI的三种实现方式
2.2.1setter方式
在XML配置方式中,property都是setter方式注入,比如下面的xml:
<?xml version="1.0" encoding="UTF-8"?>
<beans xmlns="http://www.springframework.org/schema/beans"
       xmlns:xsi="http://www.w3.org/2001/XMLSchema-instance"
       xsi:schemaLocation="http://www.springframework.org/schema/beans
 http://www.springframework.org/schema/beans/spring-beans.xsd">
    <!-- services -->
    <bean id="userService" class="tech.pdai.springframework.service.UserServiceImpl">
        <property name="userDao" ref="userDao"/>
        <!-- additional collaborators and configuration for this bean go here -->
    </bean>
    <!-- more bean definitions for services go here -->
</beans>
本质上包含两步:
- 第一步,需要new UserServiceImpl()创建对象, 所以需要默认构造函数
- 第二步,调用setUserDao()函数注入userDao的值, 所以需要setUserDao()函数
所以对应的Service类是这样的:
public class UserServiceImpl {

    /**
     * user dao impl.
     */
    private UserDaoImpl userDao;

    /**
     * init.
     */
    public UserServiceImpl() {
    }

    /**
     * find user list.
     *
     * @return user list
     */
    public List<User> findUserList() {
        return this.userDao.findUserList();
    }

    /**
     * set dao.
     *
     * @param userDao user dao
     */
    public void setUserDao(UserDaoImpl userDao) {
        this.userDao = userDao;
    }
}
在注解和JAVA的配置下:
public class UserServiceImpl {

    /**
     * user dao impl.
     */
    private UserDaoImpl userDao;

    /**
     * find user list.
     *
     * @return user list
     */
    public List<User> findUserList() {
        return this.userDao.findUserList();
    }

    /**
     * set dao.
     *
     * @param userDao user dao
     */
    @Autowired
    public void setUserDao(UserDaoImpl userDao) {
        this.userDao = userDao;
    }
}
2.2.2构造方法注入(Construct注入)
在XML配置方式中,<constructor-arg>是通过构造函数参数注入,比如下面的xml:
<?xml version="1.0" encoding="UTF-8"?>
<beans xmlns="http://www.springframework.org/schema/beans"
       xmlns:xsi="http://www.w3.org/2001/XMLSchema-instance"
       xsi:schemaLocation="http://www.springframework.org/schema/beans
 http://www.springframework.org/schema/beans/spring-beans.xsd">
    <!-- services -->
    <bean id="userService" class="tech.pdai.springframework.service.UserServiceImpl">
        <constructor-arg name="userDao" ref="userDao"/>
        <!-- additional collaborators and configuration for this bean go here -->
    </bean>
    <!-- more bean definitions for services go here -->
</beans>
本质上是new UserServiceImpl(userDao)创建对象, 所以对应的service类是这样的:
public class UserServiceImpl {

    /**
     * user dao impl.
     */
    private final UserDaoImpl userDao;

    /**
     * init.
     * @param userDaoImpl user dao impl
     */
    public UserServiceImpl(UserDaoImpl userDaoImpl) {
        this.userDao = userDaoImpl;
    }

    /**
     * find user list.
     *
     * @return user list
     */
    public List<User> findUserList() {
        return this.userDao.findUserList();
    }
}
在注解和Java配置方式下:
@Service
public class UserServiceImpl {

    /**
     * user dao impl.
     */
    private final UserDaoImpl userDao;

    /**
     * init.
     * @param userDaoImpl user dao impl
     */
    @Autowired // 这里@Autowired也可以省略
    public UserServiceImpl(final UserDaoImpl userDaoImpl) {
        this.userDao = userDaoImpl;
    }

    /**
     * find user list.
     *
     * @return user list
     */
    public List<User> findUserList() {
        return this.userDao.findUserList();
    }
}
2.2.3注解注入
以@Autowired(自动注入)注解注入为例,修饰符有三个属性:Constructor,byType,byName。默认按照byType注入。
- constructor:通过构造方法进行自动注入,spring会匹配与构造方法参数类型一致的bean进行注入,如果有一个多参数的构造方法,一个只有一个参数的构造方法,在容器中查找到多个匹配多参数构造方法的bean,那么spring会优先将bean注入到多参数的构造方法中。
- byName:被注入bean的id名必须与set方法后半截匹配,并且id名称的第一个单词首字母必须小写,这一点与手动set注入有点不同。
- byType:查找所有的set方法,将符合符合参数类型的bean注入。
@Service
public class UserServiceImpl {

    /**
     * user dao impl.
     */
    @Autowired
    private UserDaoImpl userDao;

    /**
     * find user list.
     *
     * @return user list
     */
    public List<User> findUserList() {
        return userDao.findUserList();
    }

}
3.Spring IOC体系结构
3.1BeanFactory
Spring Bean的创建是典型的工厂模式,这一系列的Bean工厂,也即IOC容器为开发者管理对象间的依赖关系提供了很多便利和基础服务,在Spring中有许多的IOC容器的实现供用户选择和使用,其相互关系如下:
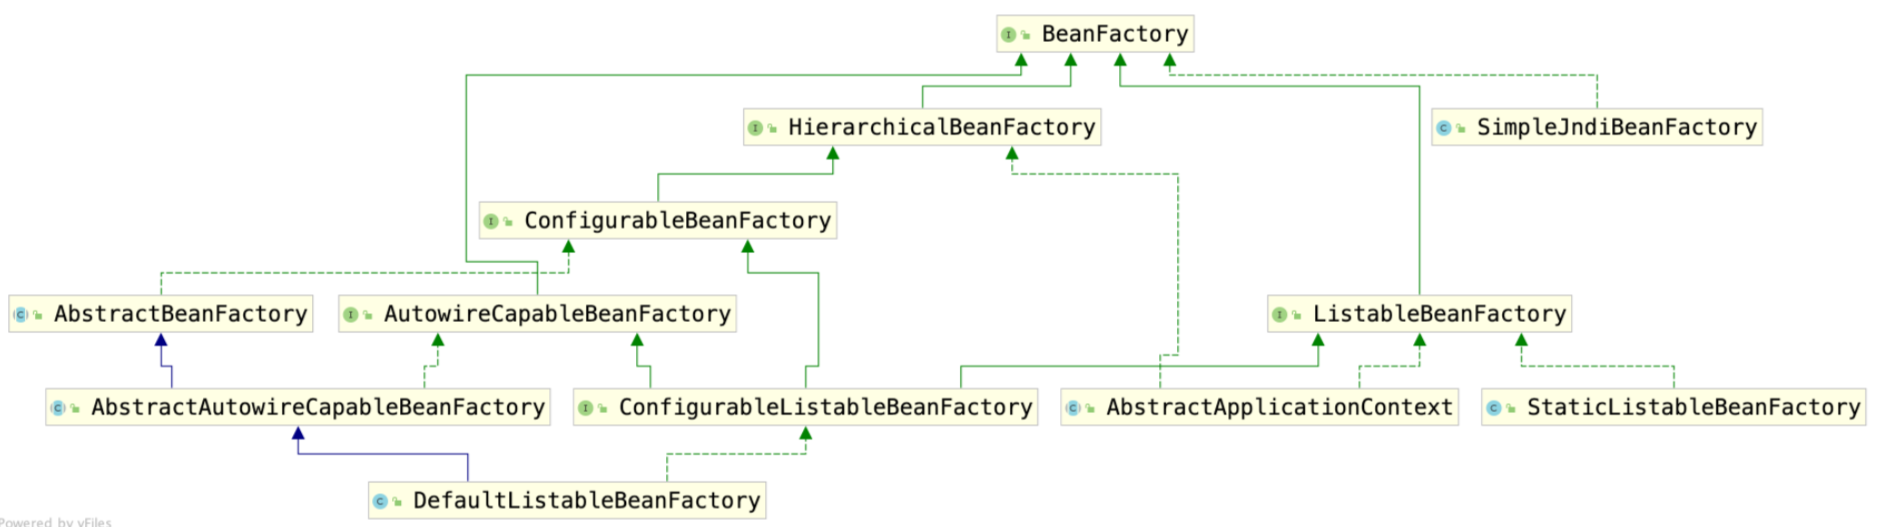
从图中可以看出, BeanFactory 的主要实现类包括 StaticListableBeanFactory、 DefaultListableBeanFactory、 SimpleJndiBeanFactory等三个公共类,分别面向静态场景、默认枚举配置场景和JNDI等场景,对应的实现思路也不尽相同。
StaticListableBeanFactory可以看做是基于Map<String,Object>的简单封装,不包括Bean的实例化过程,需要用户手动注册后才可以使用,不具备依赖注入能力,是BeanFactory最为简单的实现;DefaultListableBeanFactory是SpringBeanFactory的默认实现SimpleJndiBeanFactory则是基于JNDI场景发现对应Bean。
public interface BeanFactory {

    //对FactoryBean的转义定义,因为如果使用bean的名字检索FactoryBean得到的对象是工厂生成的对象,
    //如果需要得到工厂本身,需要转义
    String FACTORY_BEAN_PREFIX = "&";

    //根据bean的名字,获取在IOC容器中得到bean实例
    Object getBean(String name) throws BeansException;

    //根据bean的名字和Class类型来得到bean实例,增加了类型安全验证机制。
    Object getBean(String name, Class requiredType) throws BeansException;

    //提供对bean的检索,看看是否在IOC容器有这个名字的bean
    boolean containsBean(String name);

    //根据bean名字得到bean实例,并同时判断这个bean是不是单例
    boolean isSingleton(String name) throws NoSuchBeanDefinitionException;

    //得到bean实例的Class类型
    Class getType(String name) throws NoSuchBeanDefinitionException;

    //得到bean的别名,如果根据别名检索,那么其原名也会被检索出来
    String[] getAliases(String name);

}
3.2.1BeanFactory为何要定义这么多层次的接口呢?
上图中我们可以发现最终的默认实现类是 DefaultListableBeanFactory,他实现了所有的接口。查阅这些接口的源码和说明发现,每个接口都有他使用的场合,它主要是为了区分在 Spring 内部在操作过程中对象的传递和转化过程中,对对象的数据访问所做的限制。
例如 ListableBeanFactory 接口表示这些 Bean 是可列表的,而 HierarchicalBeanFactory 表示的是这些 Bean 是有继承关系的,也就是每个Bean 有可能有父 Bean。AutowireCapableBeanFactory 接口定义 Bean 的自动装配规则。这三个接口共同定义了 Bean 的集合、Bean 之间的关系、以及 Bean 行为.
3.2ApplicationContext
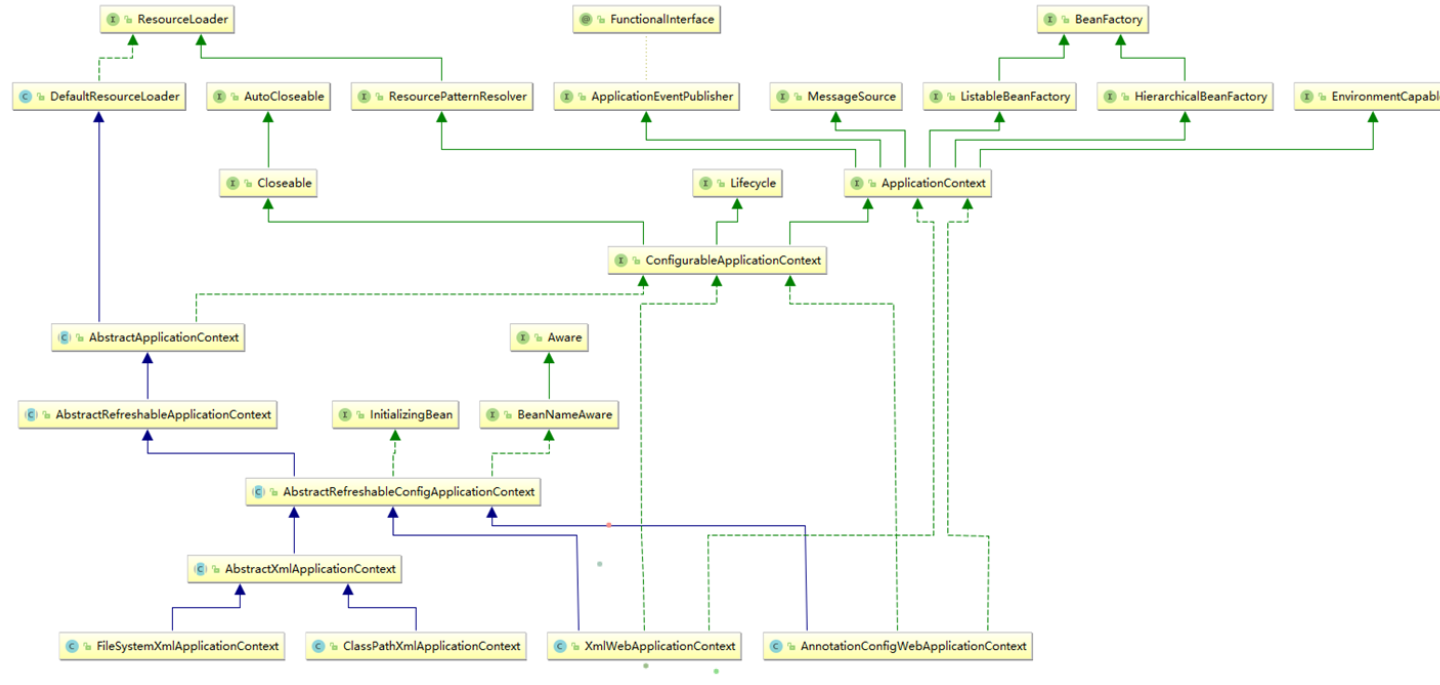
我们知道ApplicationContext容器是扩展BeanFactory容器而来,在BeanFactory的基本让IoC容器功能更加丰富。如说BeanFactory是Sping的心脏(提供了IOC容器的基本功能),那么ApplicationContext就是完整的身躯了(提供更加高级的功能)。所以我们来看一下ApplicationContext和它的基础实现类的体系结构图,如下所示:
3.2.1ApplicationContext的具体实现类
ApplicationContext的中文意思为“应用上下文”,它继承自BeanFactory,给IOC容器提供更加高级的功能,所以我们称它为高级容器,ApplicationContext接口有以下常用的实现类,如下所示:
| 实现类 | 描述 |
|---|---|
| ClassPathXmlApplicationContext | 从系统类路径classpath下加载一个或多个xml配置文件,适用于xml配置的方式 |
| FileSystemXmlApplicationContext | 从系统磁盘下加载一个或多个xml配置文件(必须有访问权限) |
| XmlWebApplicationContext | 从web应用下加载一个或多个xml配置文件,适用于web应用的xml配置方式 |
| AnnotationConfigApplicationContext | 从Java注解的配置类中Spring的ApplicationContext容器。使用注解避免使用application.xml进行配置。相比XML配置,更加便捷 |
| AnnotationConfigWebApplicationContext | 专门为web应用准备的用于读取注解创建容器的类 |
(1)、ClassPathXmlApplicationContext:从系统类路径classpath下加载一个或多个xml配置文件,找到并装载完成ApplicationContext的实例化工作。例如:
ApplicationContext ctx = new ClassPathXmlApplicationContext("applicationContext.xml");
(2)、FileSystemXmlApplicationContext:从系统磁盘下加载一个或多个xml配置文件(必须有访问权限)。也就是读取系统磁盘指定路径的xml文件。例如:
ApplicationContext ac = new FileSystemXmlApplicationContext("c:/applicationContext.xml");
它与ClassPathXmlApplicationContext的区别在于读取Spring配置文件的方式,FileSystemXmlApplicationContext不在从类路径下读取配置文件,而是通过制定参数从系统磁盘读取,前提是有访问权限。
(3)、XmlWebApplicationContext:从web应用下加载一个或多个xml配置文件,适用于web应用的xml配置方式。
在Java项目中提供ClassPathXmlApplicationContext类手工实例化ApplicationContext容器通常是不二之选,但是对于Web项目就不行了,Web项目的启动是由相应的Web服务器负责的,因此,在Web项目中ApplicationContext容器的实例化工作最好交由Web服务器来完成。Spring为此提供了以下两种方式:
- org.springframework.web.context.ContextLoaderListener
- org.springframework.web.context.ContexLoaderServlet(此方法目前以废弃)
ContextLoaderListener方式只适用于Servlet2.4及以上规范的Servlet,并且需要Web环境。我们需要在web.xml中添加如下配置:
<!--从类路径下加载Spring配置文件,classpath特指类路径下加载-->
<context-param>
    <param-name>contextConfigLocation</param-name>
    <param-value>
        classpath:applicationContext.xml
    </param-value>
</context-param>
<!--以Listener的方式启动spring容器-->
<listener>
    <listener-class>org.springframework.web.context.ContextLoaderListener</listener-class>
</listener>
Spring容器启动后就可以在项目中获取对应的实例了。例如:
@WebServlet("/MyServlet")
public class MyServlet {

        public void doGet(HttpServletRequest request, HttpServletResponse response) throws ServletException, IOException {
            //创建XmlWebApplicationContext对象,但这时并没有初始化容器
            XmlWebApplicationContext context = new XmlWebApplicationContext();
            // 指定配置文件路径
            context.setConfigLocation("application.xml");
            // 需要指定ServletContext对象
            context.setServletContext(request.getServletContext());
            // 初始化容器
            context.refresh();
            //获取实例
            Additive additive = (Additive) context.getBean("additive");
            additive.addAdditive();

        }
}
(4)、AnnotationConfigApplicationContext:从Java注解的配置类中加载Spring的ApplicationContext容器。使用注解避免使用application.xml进行配置。相比XML配置,更加便捷。
创建一个AppConfig配置类(OrangeJuice和Additive类参考上一章内容)。例如:
@Configuration
public class AppConfig {

    @Bean(name = "orangeJuice")
    public OrangeJuice orangeJuice(){
        OrangeJuice orangeJuice = new OrangeJuice();
        return orangeJuice;
    }

    @Bean(name = "additive")
    public Additive additive(){
        Additive additive = new Additive();
        return additive;
    }
}
注意:@Configuration和@Bean注解的介绍和理解
- @Configuration可理解为用spring的时候xml里面的标签。
- @Bean可理解为用spring的时候xml里面的标签,默认name为方法名。
使用AnnotationConfigApplicationContext获取Spring容器实例。代码如下:
//创建AnnotationConfigApplicationContext对象,此时并没有初始化容器
AnnotationConfigApplicationContext context = new AnnotationConfigApplicationContext();
//将AppConfig中的配置注册至容器中
context.register(AppConfig.class);
// 初始化容器
context.refresh();

//获取实例对象
OrangeJuice orangeJuice = (OrangeJuice) context.getBean("orangeJuice");
Additive additive = (Additive) context.getBean("additive");
orangeJuice.setAdditive(additive);
orangeJuice.needOrangeJuice();
(5)、AnnotationConfigWebApplicationContext:专门为web应用准备的用于读取注解创建容器的类。
如果是Web项目使用@Configuration的java类提供配置信息的配置 web.xml 配置修改如下:
    <!--通过指定context参数,让Spring使用AnnotationConfigWebApplicationContext启动容器
    而非XmlWebApplicationContext。默认没配置时是使用XmlWebApplicationContext-->
    <context-param>
        <param-name>contextClass</param-name>
        <param-value>
            org.springframework.web.context.support.AnnotationConfigWebApplicationContext
        </param-value>
    </context-param>
    <!--指定标注了@Configuration的类,多个可以用逗号分隔-->
    <context-param>
        <param-name>contextConfigLocation</param-name>
        <param-value>com.thr.AppConfig</param-value>
    </context-param>
    <!--监听器将根据上面的配置使用AnnotationConfigWebApplicationContext
    根据contextConfigLocation指定的配置类启动Spring容器-->
    <listener>
        <listener-class>org.springframework.web.context.ContextLoaderListener</listener-class>
    </listener>
3.2.2ApplicationContext容器扩展功能详解介绍
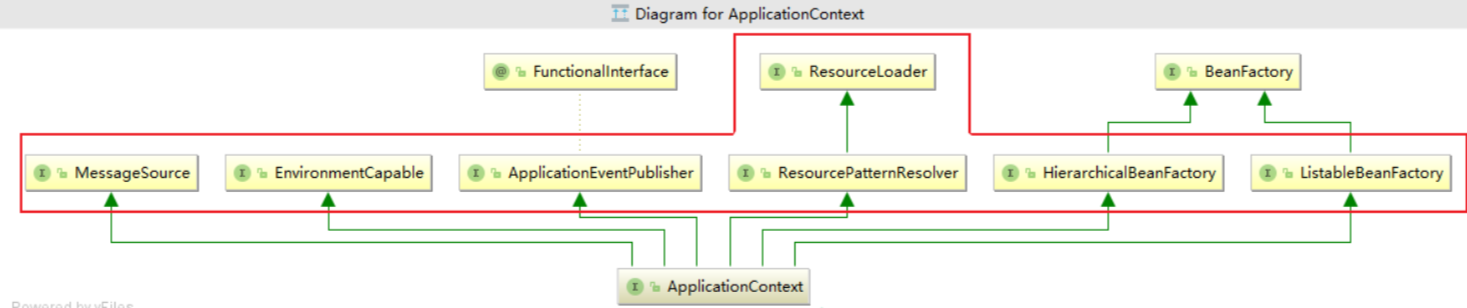
ApplicationContext容器正是因为继承了红框中的这些接口,使用才让ApplicationContext容器有了更加高级的功能。所以下面来详细介绍红框中各个接口:
(1)、ListableBeanFactory——可将Bean逐一列出的工厂
ListableBeanFactory接口能够列出工厂中所有的bean,下面是该接口的源码:
/**
 * ListableBeanFactory源码介绍
 */
public interface ListableBeanFactory extends BeanFactory {
    //判断是否包含给定名字的bean的定义
    boolean containsBeanDefinition(String beanName);
    //获取工厂中bean的定义的数量
    int getBeanDefinitionCount();
    //获取工厂中所有定义了的bean的名字(包括子类)
    String[] getBeanDefinitionNames();

    //获取指定类型的bean的名字(includeNonSingletons为false表示只取单例Bean,true则不是;
    //allowEagerInit为true表示立刻加载,false表示延迟加载。 注意:FactoryBeans都是立刻加载的。)
    String[] getBeanNamesForType(ResolvableType type);
    String[] getBeanNamesForType(ResolvableType type, boolean includeNonSingletons, boolean allowEagerInit);
    String[] getBeanNamesForType(@Nullable Class<?> type);
    String[] getBeanNamesForType(@Nullable Class<?> type, boolean includeNonSingletons, boolean allowEagerInit);

    //根据指定的类型来获取所有的bean名和bean对象的Map集合(包括子类)
    <T> Map<String, T> getBeansOfType(@Nullable Class<T> type) throws BeansException;
    <T> Map<String, T> getBeansOfType(@Nullable Class<T> type, boolean includeNonSingletons, boolean allowEagerInit)
            throws BeansException;

    //根据注解类型,获取所有有这个注解的bean名称
    String[] getBeanNamesForAnnotation(Class<? extends Annotation> annotationType);
    //根据注解类型,获取所有有这个注解的bean名和bean对象的Map集合
    Map<String, Object> getBeansWithAnnotation(Class<? extends Annotation> annotationType) throws BeansException;
    //根据bean名和注解类型查找所有指定的注解(会考虑接口和父类中的注解)
    @Nullable
    <A extends Annotation> A findAnnotationOnBean(String beanName, Class<A> annotationType)
            throws NoSuchBeanDefinitionException;
}
上面的这些方法都不考虑祖先工厂中的bean,只会考虑在当前工厂中定义的bean。
(2)、HierarchicalBeanFactory——分层的Bean工厂
HierarchicalBeanFactory接口定义了BeanFactory之间的分层结构,ConfigurableBeanFactory中的setParentBeanFactory方法能设置父级的BeanFactory,下面列出了HierarchicalBeanFactory中定义的方法:
/**
 * HierarchicalBeanFactory源码介绍
 */
public interface HierarchicalBeanFactory extends BeanFactory {

    //获取本Bean工厂的父工厂
    @Nullable
    BeanFactory getParentBeanFactory();

    //本地的工厂是否包含指定名字的bean
    boolean containsLocalBean(String name);
}
这两个方法都比较直接明了,getParentBeanFactory方法用于获取父级BeanFactory。containsLocalBean用于判断本地的工厂是否包含指定的bean,忽略在祖先工厂中定义的bean。
(3)、MessageSource——消息的国际化
在前面也提到过MessageSource,它主要用于消息的国际化,下面是该接口的源码:
// 获取消息
String getMessage(String code, Object[] args, String defaultMessage, Locale locale);
String getMessage(String code, Object[] args, Locale locale) throws NoSuchMessageException;
String getMessage(MessageSourceResolvable resolvable, Locale locale) throws NoSuchMessageException;
以上的三个方法都是用于获取消息的,第一个方法提供了默认消息,第二个接口如果没有获取到指定的消息会抛出异常。第三个接口中的MessageSourceResolvable参数是对代码、参数值、默认值的一个封装。
(4)、ApplicationEventPublisher
ApplicationEventPublisher接口封装了事件发布功能,提供Spring中事件的机制。接口中的方法定义如下:
// 发布事件
void publishEvent(ApplicationEvent event);
void publishEvent(Object event);
第一个方法用于发布特定于应用程序事件。第二个方法能发布任意的事件,如果事件不是ApplicationEvent,那么会被包裹成PayloadApplicationEvent事件。
(5)、EnvironmentCapable
EnvironmentCapable提供了访问Environment的能力,该接口只有一个方法:
Environment getEnvironment();
Environment表示当前正在运行的应用的环境变量,它分为两个部分:profiles和properties。它的父级接口PropertyResolver提供了property的访问能力。
(6)、ResourceLoader和ResourcePatternResolver
首先来看一下ResourceLoader,听名字就知道该接口是用来加载资源的策略接口(例如类路径或者文件系统中的资源)。该接口中的源码如下:
/**
 * ResourceLoader源码介绍
 */
public interface ResourceLoader {

    //用于从类路径加载的伪URL前缀:" classpath:"。
    String CLASSPATH_URL_PREFIX = ResourceUtils.CLASSPATH_URL_PREFIX;
    //根据指定的位置获取资源
    Resource getResource(String location);
    //获取该资源加载器所使用的类加载器
    ClassLoader getClassLoader();
}
该接口只有简单明了的两个方法,一个是用来获取指定位置的资源,一个用于获取资源加载器所使用的类加载器。
Resource是从实际类型的底层资源(例如文件、类路径资源)进行抽象的资源描述符。再看下Resource的源码:
/**
 * Resource源码介绍
 */
public interface Resource extends InputStreamSource {

    boolean exists(); // 资源实际上是否存在

    boolean isReadable(); // 资源是否可读

    boolean isOpen(); // 检查资源是否为打开的流

    boolean isFile(); // 资源是否为文件系统上的一个文件

    URL getURL() throws IOException; // 获取url

    URI getURI() throws IOException; // 获取URI

    File getFile() throws IOException; // 获取文件

    ReadableByteChannel readableChannel() throws IOException; // 获取ReadableByteChannel

    long contentLength() throws IOException; // 资源的内容的长度

    long lastModified() throws IOException; // 资源的最后修改时间

    // 相对于当前的资源创建一个新的资源
    Resource createRelative(String relativePath) throws IOException;

    String getFilename(); // 获取资源的文件名

    String getDescription(); // 获取资源的描述信息
}
Resource的父级接口为InputStreamSource,可以简单的理解为InputStream的来源,其内部只有一个方法,如下:
// 获取输入流
InputStream getInputStream() throws IOException;
接下来在来看一下ResourcePatternResolver,该接口用于解析一个位置模式(例如Ant风格的路径模式),该接口也只有一个方法,如下:
// 将给定的位置模式解析成资源对象
Resource[] getResources(String locationPattern) throws IOException;
3.3BeanFactory和ApplicationContext的区别
BeanFactory和ApplicationContext是Spring IOC容器的两大核心接口,它们都可以当做Spring的容器。其中ApplicationContext是BeanFactory的子接口,那么它们两者之间的区别在哪呢?
①、提供的功能不同:
BeanFactory:是Spring里面最底层的接口,它只提供了IOC容器最基本的功能,给具体的IOC容器的实现提供了规范。包含了各种Bean的定义,读取bean配置文档,管理bean的加载、实例化,控制bean的生命周期,维护bean之间的依赖关系等。
ApplicationContext:它作为BeanFactory的子接口,除了提供BeanFactory所具有的功能外,还提供了更完整的框架功能。我们看一下ApplicationContext类结构:
public interface ApplicationContext extends
                            EnvironmentCapable,
                            ListableBeanFactory,
                            HierarchicalBeanFactory,
                            MessageSource,
                            ApplicationEventPublisher,
                            ResourcePatternResolver {

}
ApplicationContext额外提供的功能有:
- 支持国际化(MessageSource)
- 统一的资源文件访问方式(ResourcePatternResolver)
- 提供在监听器中注册bean的事件(ApplicationEventPublisher)
- 同时加载多个配置文件
- 载入多个(有继承关系)上下文 ,使得每一个上下文都专注于一个特定的层次,比如应用的web层(HierarchicalBeanFactory)
②、 启动时的状态不同:
BeanFactroy采用的是延迟加载形式来注入Bean的,即只有在使用到某个Bean时(调用getBean()),才对该Bean进行加载实例化。这样,我们就不能发现一些存在的Spring的配置问题。如果Bean的某一个属性没有注入BeanFacotry加载后,直至第一次使用调用getBean方法才会抛出异常。
ApplicationContext,它是在容器启动时,一次性创建了所有的Bean。这样,在容器启动时,我们就可以发现Spring中存在的配置错误,这样有利于检查所依赖属性是否注入。 ApplicationContext启动后预载入所有的单实例Bean,通过预载入单实例bean ,确保当你需要的时候,你就不用等待,因为它们已经创建好了。相对于基本的BeanFactory,ApplicationContext 唯一的不足是占用内存空间。当应用程序配置Bean较多时,程序启动较慢。
③、BeanFactory通常以编程的方式被创建,ApplicationContext还能以声明的方式创建,如使用ContextLoader。
④、BeanFactory和ApplicationContext都支持BeanPostProcessor、BeanFactoryPostProcessor的使用,但两者之间的区别是:BeanFactory需要手动注册,而ApplicationContext则是自动注册。
3.4BeanFactory和 ApplicationContext的关系详解
Spring 作者 Rod Johnson 设计了两个接口用以表示容器。
- BeanFactory
- ApplicationContext
BeanFactory简单粗暴,可以理解为就是个 HashMap,Key 是 BeanName,Value 是 Bean 实例。通常只提供注册(put),获取(get)这两个功能。我们可以称之为 “低级容器”。
ApplicationContext可以称之为 “高级容器”。因为他比 BeanFactory 多了更多的功能。他继承了多个接口。因此具备了更多的功能。例如资源的获取,支持多种消息(例如 JSP tag 的支持),对BeanFactory 多了工具级别的支持等待。所以你看他的名字,已经不是 BeanFactory 之类的工厂了,而是 “应用上下文”, 代表着整个大容器的所有功能。该接口定义了一个 refresh 方法,此方法是所有阅读Spring 源码的人的最熟悉的方法,用于刷新整个容器,即重新加载/刷新所有的 bean。
小结
IoC 在 Spring 里,只需要低级容器就可以实现,2 个步骤:
- 加载配置文件,解析成 BeanDefinition 放在 Map 里。
- 调用 getBean 的时候,从 BeanDefinition 所属的 Map 里,拿出Class 对象进行实例化,同时,如果有依赖关系,将递归调用 getBean 方法 —— 完成依赖注入。
上面就是 Spring 低级容器(BeanFactory)的 IoC。
至于高级容器 ApplicationContext,他包含了低级容器的功能,当他执行 refresh 模板方法的时候,将刷新整个容器的 Bean。同时其作为高级容器,包含了太多的功能。一句话,他不仅仅是 IoC。他支持不同信息源头,支持BeanFactory 工具类,支持层级容器,支持访问文件资源,支持事件发布通知,支持接口回调等等。
3.5ApplicationContext通常的实现
- FileSystemXmlApplicationContext :此容器从一个XML文件中加载beans 的定义,XML Bean 配置文件的全路径名必须提供给它的构造函数。
- ClassPathXmlApplicationContext:此容器也从一个XML文件中加载beans 的定义,这里,你需要正确设置classpath因为这个容器将在classpath里找 bean配置。
- WebXmlApplicationContext:此容器加载一个XML文件,此文件定义了一个WEB应用的所有bean。
4.IOC容器的初始化步骤
IOC 容器初始化包括BeanDefinition的Resource定位、载入和注册三个基本过程,如果我们了解如何编程式的使用 IOC 容器(编程式就是使用DefaultListableBeanFactory来创建容器),就可以清楚的看到Resource定义和载入过程的接口调用。
IOC 容器的初始化包括的三个过程介绍如下:
- Resource定位过程:这个Resource定位指的是BeanDefinition的资源定位,就是对开发者的配置文件(Xml)进行资源的定位,并将其封装成Resource对象。它由ResourceLoader通过统一的Resource接口来完成,这个Resource对各种形式的BeanDefinition的使用都提供了统一接口。比如:在文件系统中的Bean定义信息可以使用FileSystemResource来进行抽象。在类路径中的Bean定义信息可以使用ClassPathResource来进行抽象等等。这个定位过程类似于容器寻找数据的过程,就像用水捅装水先要把水找到一样。
- BeanDefinition的载入:这个载入过程是将Resource 定位到的信息,表示成IOC容器内部的数据结构,而这个容器内部的数据结构就是BeanDefinition。
- BeanDefinition的注册:这个注册过程把上面载入过程中解析得到的BeanDeftnition向IoC容器进行注册。注册过程是通过调用BeanDefinitionRegistry接口的实现来完成的。在IoC容器内部将BeanDefinition注入到一个HashMap中去,IoC容器就是通过这个HashMap来持有这些BeanDefinition数据的。
注意:Bean的定义和初始化在 Spring IoC 容器是两大步骤,它是先定义,然后再是初始化和依赖注入。所以当Spring做完了以上 3 步后,Bean 就在 Spring IoC 容器中被定义了,而没有被初始化,更没有完成依赖注入,所以此时仍然没有对应的 Bean 的实例,也就是没有注入其配置的资源给 Bean,也就是它还不能完全使用。对于初始化和依赖注入,Spring Bean 还有一个配置选项——【lazy-init】,其含义就是:是否默认初始化 Spring Bean。在没有任何配置的情况下,它的默认值为default,实际值为 false(默认非懒加载),也就是 Spring IoC 容器默认会自动初始化 Bean。如果将其设置为 true(懒加载),那么只有当我们使用 Spring IoC 容器的 getBean 方法获取它时,它才会进行 Bean 的初始化,完成依赖注入。
4.1BeanDefinition的Resource定位
在Spring框架中,如果想要获取系统中的配置文件,就必须通过Resource接口的实现来完成,Resource是Sping中用于封装I/O操作的接口。首先是定义一个Resource来定位容器使用的BeanDefinition,这里使用的是Resource的实现类ClassPathResource,这时Spring会在类路径中去寻找以文件形式存在BeanDefinition。
ClassPathResource resource = new ClassPathResource("beans.xml");
但是这里的Resource并不能由 DefaultListableBeanFactory 直接使用,而是需要通过Spring中的 BeanDefinitionReader 来对这些信息进行处理。在这里,我们也可以看到使用 ApplicationContext 相对于直接使用 DefaultListableBeanFactory 的好处,因为在ApplicationContext中,Spring已经为我们提供了一系列加载不同Resource的读取器实现,而在 DefaultListableBeanFactory 只是一个纯粹的IOC容器,需要为它配置配置特定的读取器才能完成这些功能,当然了 利和弊 是共存的,使用 DefaultListableBeanFactory 这样更底层的IOC容器,能提高定制IOC容器的的灵活性。
常用的Resource资源类型如下:
- FileSystemResource:以文件的绝对路径方式进行访问资源,效果类似于Java中的File;
- ClassPathResourcee:以类路径的方式访问资源,效果类似于this.getClass().getResource("/").getPath();
- ServletContextResource:web应用根目录的方式访问资源,效果类似于request.getServletContext().getRealPath("");
- UrlResource:访问网络资源的实现类。例如file: http: ftp:等前缀的资源对象;
- ByteArrayResource: 访问字节数组资源的实现类。
ApplicationContext上来,它给我们提供了一系列加载不同Resource的读取器实现,例如ClassPathXmlApplicationContext、FileSystemXmlApplicationContext以及XmlWebApplicationContext等等,简单的从这些类的名字上分析,可以清楚的看到他们可以提供哪些不同的Resource读入功能,比如:ClassPathXmlApplicationContext可以从 classpath载入Resource,FileSystemXmlApplicationContext可以从文件系统中载入Resource,XmlWebApplicationContext可以在Web容器中载入Resource等。
拿ClassPathXmlApplicationContext来举例,所以这里用它来分析ApplicationContext是如何来完成BeanDefinition的Resource定位,首先来看一下ClassPathXmlApplicationContext的整继承体系:
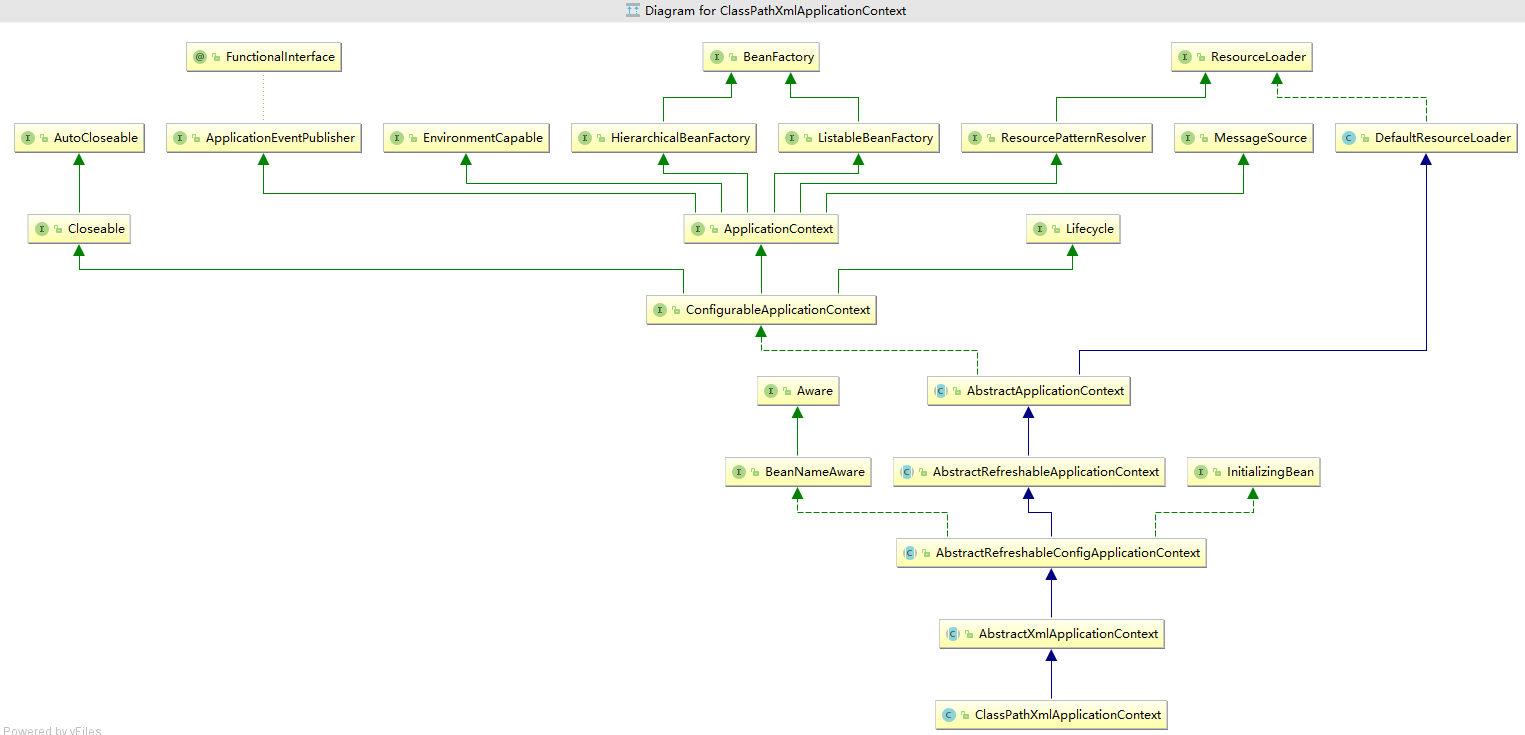
通过上面的图片并且查看继承关系可知,ClassPathXmlApplicationContext继承了AbstractApplicationContext,所以该实现类具备了读取Resource定义的BeanDefinition的能力。因为AbstractApplicationContext的基类是DefaultResourceLoader。而且其它的类如FileSystemXmlApplicationContext、XmlWebApplicationContext等等都如出一辙。也是通过DefaultResourceLoader读取Resource。
①、我们知道IOC容器的启动是从refresh()方法开始的,所以我们先从refresh()方法开始:ClassPathXmlApplicationContext类中调用的refresh()方法是其继承的基类 AbstractApplicationContext中的实现,所以先跟踪AbStractApplicationContext中的refresh()方法:
注意:在refresh()中我们先重点看obtainFreshBeanFactory()这个方法,这是IoC容器初始化的入口。
public void refresh() throws BeansException, IllegalStateException {
    synchronized (this.startupShutdownMonitor) {

        //刷新上下文环境
        prepareRefresh();

        //我们先着重看这个方法 这是初始化容器的地方,是在子类中启动refreshBeanFactory()
        //并且在这里获得新的BeanFactory,解析XML、Java类,并加载BeanDefinition
        ConfigurableListableBeanFactory beanFactory = obtainFreshBeanFactory();

        //准备bean工厂,以便在此上下文中使用
        prepareBeanFactory(beanFactory);

        try {
            //设置 beanFactory 的后置处理
            postProcessBeanFactory(beanFactory);
            //调用 BeanFactory 的后处理器,这些处理器是在Bean 定义中向容器注册的
            invokeBeanFactoryPostProcessors(beanFactory);
            //注册Bean的后处理器,在Bean创建过程中调用
            registerBeanPostProcessors(beanFactory);
            //对上下文中的消息源进行初始化
            initMessageSource();
            //初始化上下文中的事件机制
            initApplicationEventMulticaster();
            //初始化其他特殊的Bean
            onRefresh();
            //检查监听Bean并且将这些监听Bean向容器注册
            registerListeners();
            //实例化所有的(non-lazy-init)单件
            finishBeanFactoryInitialization(beanFactory);
            //发布容器事件,结束Refresh过程
            finishRefresh();
        }

        catch (BeansException ex) {
            if (logger.isWarnEnabled()) {
                logger.warn("Exception encountered during context initialization - " +
                        "cancelling refresh attempt: " + ex);
            }
            destroyBeans();
            cancelRefresh(ex);
            throw ex;
        }
        finally {
            //重置Spring公共的缓存
            resetCommonCaches();
        }
    }
}
②、然后点击obtainFreshBeanFactory()这个方法,它还在AbstractApplicationContext中实现,这个obtainFreshBeanFactory()很关键,这里面有 IoC的Resource定位和载入。
protected ConfigurableListableBeanFactory obtainFreshBeanFactory() {
    refreshBeanFactory();
    return getBeanFactory();
}
进来后发现其调用refreshBeanFactory和getBeanFactory方法,表示重新获取一个新的BeanFactory实例。
③、继续跟踪refreshBeanFactory()方法,点击进入。
protected abstract void refreshBeanFactory() throws BeansException, IllegalStateException;
可以看到这里只是定义了抽象方法,既然是抽象的方法,那么肯定有具体的实现,那这个具体初始化IOC容器的实现在哪呢?在AbstractApplicationContext中没有做具体实现。我们从前面的继承图可知,AbstractApplicationContext还有很多子类,所以肯定是交给其子类完成,实现解耦,让初始化IOC容器变得更加灵活。
所以我们从其子类AbstractRefreshableApplicationContext中找到实现的refreshBeanFactory()方法。
protected final void refreshBeanFactory() throws BeansException {
    //这里判断,如果存在了BeanFactory,则销毁并关闭该BeanFactory
    if (hasBeanFactory()) {
        destroyBeans();
        closeBeanFactory();
    }
    try {
        //这里的创建新的BeanFactory
        DefaultListableBeanFactory beanFactory = createBeanFactory();
        beanFactory.setSerializationId(getId());
        customizeBeanFactory(beanFactory);
        //载入Bean ,抽象方法,委托子类AbstractXmlApplicationContext实现
        //后面会看到一系列重载的loadBeanDefinitions方法
        loadBeanDefinitions(beanFactory);
        synchronized (this.beanFactoryMonitor) {
            this.beanFactory = beanFactory;
        }
    }
    catch (IOException ex) {
        throw new ApplicationContextException("I/O error parsing bean definition source for " + getDisplayName(), ex);
    }
}
上面的代码主要分为这么几个步骤:
-
- 首先判断BeanFactory是否存在,如果存在(不为NULL),则销毁关闭该BeanFactory。也就是清除跟Bean有关的Map或者List等属性集合,并且将BeanFactory设置为null,序列化Id设置为null。
- 然后创建一个新的DefaultListableBeanFactory(这个类是Spring Bean初始化的核心类),所以我们看下创建DefaultListableBeanFactory的地方:createBeanFactory(),这个方法 是在AbstractRefreshableApplicationContext中实现,所以AbstractApplicationContext 让我们可以充分自由的实例化自己想初始化的原始IOC容器。
protected DefaultListableBeanFactory createBeanFactory() {
        //getInternalParentBeanFactory 获取当前容器已有的父亲容器,来作为新容器的父容器,这个方法是在AbstractApplicationContext中实现的。
        return new DefaultListableBeanFactory(getInternalParentBeanFactory());
    }
最后对新建的BeanFactory进行设置,包括bean序列化Id的设置、bean的特殊设置,bean载入操作。然后将beanFactory赋值给本类的beanFactory属性。注意:customizeBeanFactory(beanFactory)里面只做了两件事:一个是设置bean是否允许覆盖,另一个是设置bean是否允许循坏使用。
④、跟踪loadBeanDefinitions(beanFactory)方法。
protected abstract void loadBeanDefinitions(DefaultListableBeanFactory beanFactory)
        throws BeansException, IOException;
这个方法的具体实现是由子类AbstractXmlApplicationContext具体实现的。所以我们知道了该怎么去找这个loadBeanDefinitions的具体实现了吧。
protected void loadBeanDefinitions(DefaultListableBeanFactory beanFactory) throws BeansException, IOException {
    //创建一个xml配置读写器用于解析xml文件中定义的bean
    XmlBeanDefinitionReader beanDefinitionReader = new XmlBeanDefinitionReader(beanFactory);

    //设置BeanDefinitionReader 的相关属性
    //1.设置 Environment,即环境,与容器的环境一致
    beanDefinitionReader.setEnvironment(this.getEnvironment());
    //2.设置 ResourceLoader,即资源加载器,具体加载资源的功能,这个加载器很重要,后面会用到
    //  这里传一个this进去,因为ApplicationContext是实现了ResourceLoader接口
    beanDefinitionReader.setResourceLoader(this);
    //3.设置 EntityResolver,即实体解析器,这里用于解析资源加载器加载的资源内容
    beanDefinitionReader.setEntityResolver(new ResourceEntityResolver(this));

    //这个方法默认实现是空的,允许用户自定义实现读取器的定制化,需要实现接口,可以设置xml解析完成校验,定制化解析器等
    initBeanDefinitionReader(beanDefinitionReader);
    // 这里开始就是 加载、获取BeanDefinition资源定位,并且是载入模块的开始了
    loadBeanDefinitions(beanDefinitionReader);
}
⑤、继续跟踪loadBeanDefinitions(beanDefinitionReader)方法,这个方法在AbstractXMLApplicationContext中有实现,我们看下。
protected void loadBeanDefinitions(XmlBeanDefinitionReader reader) throws BeansException, IOException {
    //以Resource的方式获取所有定位到的resource资源位置(用户定义)
    //但是现在不会走这条路,因为配置文件还没有定位到,也就是没有封装成Resource对象。
    Resource[] configResources = getConfigResources();
    if (configResources != null) {
        reader.loadBeanDefinitions(configResources);//载入resources
    }
    //以String的方式获取所有配置文件的位置(容器自身)
    String[] configLocations = getConfigLocations();
    if (configLocations != null) {
        reader.loadBeanDefinitions(configLocations);//载入resources
    }
}
这里主要是获取到用户定义的resource资源位置以及获取所以本地配置文件的位置。
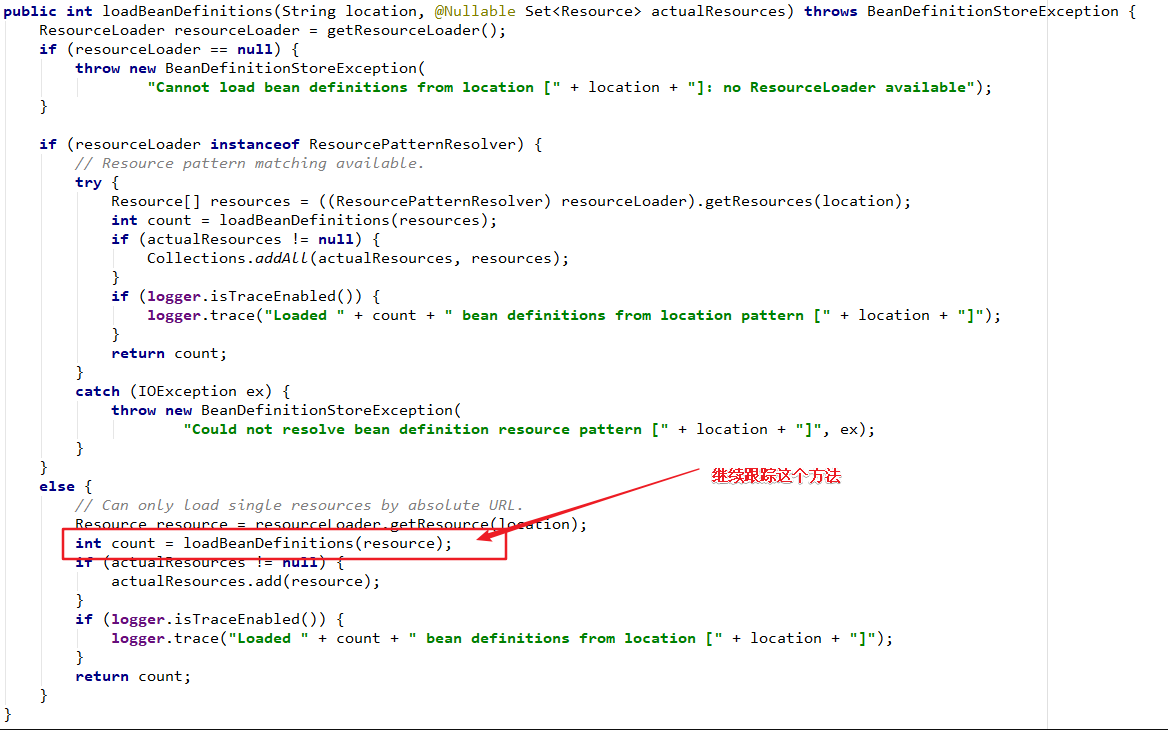
⑥、进入第二个reader.loadBeanDefinitions(configLocations)方法。从这里开始就是BeanDefinitionReader模块的实现了,也就是ApplicationContext上下文将BeanDefinition的定位加载工作交付到了XmlBeanDefinitionReader。这个方法是由XmlBeanDefinitionReader的基类AbstractBeanDefinitionReader来实现的。
public int loadBeanDefinitions(String... locations) throws BeanDefinitionStoreException {
    Assert.notNull(locations, "Location array must not be null");
    int count = 0;
    //循坏加载配置文件
    for (String location : locations) {
        count += loadBeanDefinitions(location);
    }
    return count;
}
这里就是循环加载xml配置文件的路径,然后返回总个数。
⑦、下面我们继续跟踪loadBeanDefinitions(loaction)这个方法,它是还在AbstractBeanDefinitionReader的类中实现。
public int loadBeanDefinitions(String location) throws BeanDefinitionStoreException {
        return loadBeanDefinitions(location, null);
    }
⑧、继续跟踪上面代码中的 loadBeanDefinitions(location, null)。
进入到loadBeanDefinitions(String location, Set actualResources)这个方法,依然在AbstractBeanDefinitionReader类中。
public int loadBeanDefinitions(String location, @Nullable Set<Resource> actualResources) throws BeanDefinitionStoreException {
    //这里取到ResourceLoader对象(其实DefaultResourceLoader对象)
    ResourceLoader resourceLoader = getResourceLoader();
    if (resourceLoader == null) {
        throw new BeanDefinitionStoreException(
                "Cannot load bean definitions from location [" + location + "]: no ResourceLoader available");
    }
    //这里对Resource的路径模式进行解析,比如我们设定的各种Ant格式的路径定义,得到需要的Resource集合,
    //这些Resource集合指定我们已经定义好的BeanDefinition信息,可以是多个文件。
    if (resourceLoader instanceof ResourcePatternResolver) {
        try {
            //把字符串类型的xml文件路径,形如:classpath*:user/**/*-context.xml,转换成Resource对象类型,
            //其实就是用流的方式加载配置文件,然后封装成Resource对象
            Resource[] resources = ((ResourcePatternResolver) resourceLoader).getResources(location);
            //加载Resource资源中的Bean,然后返回加载数量,这个loadBeanDefinitions就是Bean的载入了
            int count = loadBeanDefinitions(resources);
            if (actualResources != null) {
                Collections.addAll(actualResources, resources);
            }
            if (logger.isTraceEnabled()) {
                logger.trace("Loaded " + count + " bean definitions from location pattern [" + location + "]");
            }
            return count;
        }
        catch (IOException ex) {
            throw new BeanDefinitionStoreException(
                    "Could not resolve bean definition resource pattern [" + location + "]", ex);
        }
    }
    else {
        // Can only load single resources by absolute URL.
        // 调用DefaultResourceLoader的getResource(String)方法来获取资源定位,然后封装成Resource对象,这里只能加载一个资源
        Resource resource = resourceLoader.getResource(location);
        //循环加载所有的资源,返回总数,这个loadBeanDefinitions就是Bean的载入了
        int count = loadBeanDefinitions(resource);
        if (actualResources != null) {
            //对于成功找到的Resource定位,都会添加到这个传入的actualResources参数中
            actualResources.add(resource);
        }
        if (logger.isTraceEnabled()) {
            logger.trace("Loaded " + count + " bean definitions from location [" + location + "]");
        }
        return count;
    }
}
这个方法中主要将xml配置文件加载到内存中并封装成为Resource对象。但是它是怎么操作的呢?在上述代码中,loadBeanDefinitions()方法中可能调用ResourcePatternResolver或DefaultResourceLoader中的getResource()方法,这两个类一个是继承、一个是实现ResourceLoader。其中ResourcePatternResolver用于解析资源文件的策略接口,其特殊的地方在于,它应该提供带有*号这种通配符的资源路径。DefaultResourceLoader用于用来加载资源,并且具体实现了ResourceLoader中的方法。而在第④步的时候,在实例化XmlBeanDefinitionReader的时候已经设置ResourceLoader,并且ResourceLoad为ApplicationContext,然后也设置了ResourcePatternResolver。所以XmlBeanDefinitionReader有了加载资源和解析资源的功能。
⑨、所以我们直接来看getResource()方法,DefaultResourceLoader中的 getResource(String)实现。
public Resource getResource(String location) {
    Assert.notNull(location, "Location must not be null");
    //看有没有自定义的ProtocolResolver,如果有则先根据自定义的ProtocolResolver解析location得到Resource
    for (ProtocolResolver protocolResolver : getProtocolResolvers()) {
        Resource resource = protocolResolver.resolve(location, this);
        if (resource != null) {
            return resource;
        }
    }
    //根据路径是否匹配"/"或"classpath:"来解析得到ClassPathResource
    if (location.startsWith("/")) {
        return getResourceByPath(location);
    }
    else if (location.startsWith(CLASSPATH_URL_PREFIX)) {
        return new ClassPathResource(location.substring(CLASSPATH_URL_PREFIX.length()), getClassLoader());
    }
    else {
        try {
            //这里处理带有URL标识的Resource定位
            URL url = new URL(location);
            return (ResourceUtils.isFileURL(url) ? new FileUrlResource(url) : new UrlResource(url));
        }
        catch (MalformedURLException ex) {
            //如果既不是classPath 也不是URL标识的Resource定位(那其实就是自己实现的了).则把getResource的重任交给getResourceByPath来完成,
            //这个方法是一个protected方法,默认的实现是得到一个ClassPathContextResource,这个方法常常会用子类来实现也就是FileSystemXMLApplicationContext
            return getResourceByPath(location);
        }
    }
}
通过上述代码可以看到,getResource最后又调用了子类实现的getResourceByPath方法或是子类传递过来的字符串,从而实现Resource定位。使得整个Resource定位过程就说得通了。总结起来就是,Resource资源通过最外层的实现类传进来的字符串或者直接调用getResourceByPath方法,来获取bean资源路径。
对上面的代码进行四步来进行介绍:
-
第一步:首先看有没有自定义的ProtocolResolver,如果有则先根据自定义的ProtocolResolver解析location得到Resource,这里的protocolResolvers是DefaultResourceLoader类中的成员变量,而这个成员变量是ProtocolResolver类型的Set集合。
for (ProtocolResolver protocolResolver : getProtocolResolvers()) { Resource resource = protocolResolver.resolve(location, this); if (resource != null) { return resource; } } -
第二步:再根据路径是否匹配"/"或"classpath:"来解析得到ClassPathResource。
if (location.startsWith("/")) { return getResourceByPath(location); } else if (location.startsWith(CLASSPATH_URL_PREFIX)) { return new ClassPathResource(location.substring(CLASSPATH_URL_PREFIX.length()), getClassLoader()); } -
第三步:最后处理带有URL标识的Resource定位,加载得到一个UrlResource,如果都不是这些类型,则交给getResourceByPath来完成
else { try { // Try to parse the location as a URL... URL url = new URL(location); return (ResourceUtils.isFileURL(url) ? new FileUrlResource(url) : new UrlResource(url)); } catch (MalformedURLException ex) { // No URL -> resolve as resource path. return getResourceByPath(location); } } -
第四步:上面的getResourceByPath()方法会根据路径加载Resource对象
protected Resource getResourceByPath(String path) {
    return new ClassPathContextResource(path, getClassLoader());
}
上面方法返回的是一个ClassPathContextResource对象,通过这个对象Spring就可以进行相关的I/O操作了。
因为对ProtocolResolver这个类不是很熟悉,所以我去了解了一下,ProtocolResolver翻译过来就是"协议解析器",这个接口类里就只有一个方法,方法如下:
Resource resolve(String location, ResourceLoader resourceLoader);
我们在第一步的时候调用了ProtocolResolver的resolve方法,如果你要使用ProtocolResolver。我们可以自定义一个类实现ProtocolResolver接口,然后实现该resolve方法,就可以解析特定的location得到Resoure。是的,ProtocolResolver是解析location的自定义拓展类,有了它我们才能随意传入不同格式的location,然后根据对应的格式去解析并获得我们的Resource即可。
关于DefaultResourceLoader和ProtocolResolver的区别:
- DefaultResourceLoader类的作用是加载Resource
- ProtocolResolver是解析location获取Resource的拓展
默认情况下,DefaultResourceLoader类中的protocolResolvers成员变量是一个空的Set,即默认情况下是没有ProtocolResolver可以去解析的,只能走ClassPath和URL两种方式获得Resource。
至此我们的Resource定位已经全部完成了。饶了这么远就是为了拿到这个Resource对象,拿到这个对象后,就可以通过AbstractBeanDefinitionReader流操作来实现Resource的载入,最后通过AbstractApplicationContext的registerListeners来进行注册。这就是IoC容器的初始化过程。所以下面我们来介绍一下Resource的载入工程。
4.2BeanDefinition的载入
在完成对Resource定位分析之后,就可以通过获取的Resource对象进行BeanDefinition的载入了。对IOC容器来说,这个载入过程,相当于把定义的bean在IOC容器中转化成一个Spring内部表示的数据结构的过程,也就是将其转化为BeanDefinition,IOC容器对Bean的管理和依赖注入功能的实现,是通过对其持有的BeanDefinition进行各种相关操作来完成的,这些BeanDefinition在IOC容器中通过一个HashMap来保持和维护。
我们继续跟踪AbstractBeanDefinitionReader中的loadBeanDefinitions方法,之前跟踪到的是如下图的loadBeanDefinitions方法。
①、继续跟到loadBeanDefinitions(resource)方法。
public int loadBeanDefinitions(Resource... resources) throws BeanDefinitionStoreException {
     Assert.notNull(resources, "Resource array must not be null");
     int count = 0;
     // 将所有定位到的Resource资源全部加载,交给XmlBeanDefinitionReader实现的方法来处理这些resource
     for (Resource resource : resources) {
         count += loadBeanDefinitions(resource);
     }
     return count;
 }
这里循环加载定位到Resource资源,这个方法跟前面循环加载资源路径类似,但加载的内容不一样。
②、然后点击进入loadBeanDefinitions(resource),进入之后我们可以发现,在BeanDefinitionReader接口定义了两个加载Resource资源的方法:
int loadBeanDefinitions(Resource resource) throws BeanDefinitionStoreException;

int loadBeanDefinitions(Resource... resources) throws BeanDefinitionStoreException;
这两个方法具体由BeanDefinitionReader接口的子类XmlBeanDefinitionReader 实现,其继承关系如下图所示。
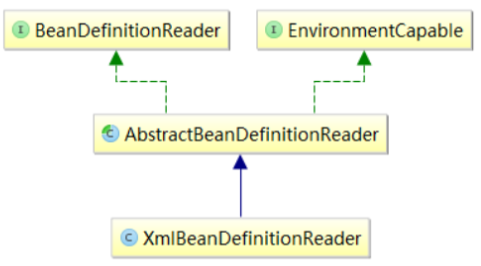
XmlBeanDefinitionReader主要用来将Bean的XML配置文件转换为多个BeanDefinition对象的工具类,所以它会将定位到的Resource资源进行处理。我们先来看上面两个实现的方法,大致过程是,先将resource包装为EncodeResource类型,然后继续进行处理,为生成BeanDefinition对象为后面做准备,我们在XmlBeanDefinitionReader类中找到实现的方法,其主要的两个方法的源码如下。
public int loadBeanDefinitions(Resource resource) throws BeanDefinitionStoreException {
    //包装resource为EncodeResource类型
    return loadBeanDefinitions(new EncodedResource(resource));
}

public int loadBeanDefinitions(EncodedResource encodedResource) throws BeanDefinitionStoreException {
    Assert.notNull(encodedResource, "EncodedResource must not be null");
    if (logger.isTraceEnabled()) {
        logger.trace("Loading XML bean definitions from " + encodedResource);
    }
    // 这里使用threadLocal来保证并发的同步
    Set<EncodedResource> currentResources = this.resourcesCurrentlyBeingLoaded.get();
    //先添加threadLocal,加载完之后finally中再移除threadLocal
    if (!currentResources.add(encodedResource)) {
        throw new BeanDefinitionStoreException(
                "Detected cyclic loading of " + encodedResource + " - check your import definitions!");
    }
    // 通过resource对象得到XML文件内容输入流,并为I/O的InputSource做准备
    try (InputStream inputStream = encodedResource.getResource().getInputStream()) {
        InputSource inputSource = new InputSource(inputStream);
        if (encodedResource.getEncoding() != null) {
            inputSource.setEncoding(encodedResource.getEncoding());
        }
        //这里就是具体读取Xml文件的方法
        return doLoadBeanDefinitions(inputSource, encodedResource.getResource());
    }
    catch (IOException ex) {
        throw new BeanDefinitionStoreException(
                "IOException parsing XML document from " + encodedResource.getResource(), ex);
    }
    finally {
        currentResources.remove(encodedResource);
        if (currentResources.isEmpty()) {
            this.resourcesCurrentlyBeingLoaded.remove();
        }
    }
}
③、接着进入doLoadBeanDefinitions方法,这里就是具体读取Xml文件的方法,也是从指定xml文件中实际载入BeanDefinition的地方。当然了这肯定是在XmlBeanDefinitionReader中的方法了。
protected int doLoadBeanDefinitions(InputSource inputSource, Resource resource)
        throws BeanDefinitionStoreException {

    try {
        //这里取得的是XML文件的Document对象,具体的解析过程是由DocumentLoader完成的,
        //这里使用的DocumentLoader是DefaultDocumentLoader,在定义documentLoader对象时候创建的
        Document doc = doLoadDocument(inputSource, resource);
        //这里启动的是对BeanDefinition解析的详细过程,也就是将document文件的bean封装成BeanDefinition,并注册到容器
        //启动对BeanDefinition解析的详细过程,这个解析会用到Spring的Bean配置规则,是我们下面详细讲解的内容
        int count = registerBeanDefinitions(doc, resource);
        if (logger.isDebugEnabled()) {
            logger.debug("Loaded " + count + " bean definitions from " + resource);
        }
        return count;
    }
    catch () {
        省略......
    }
}
④、下面我们主要关心的是Spring的BeanDefinition是怎么样按照Spring的Bean语义要求进行解析 并转化为容器内部数据结构的,这个过程是在registerBeanDefinitions(doc, resource)中完成的,具体的过程是BeanDefinitionDocumentReader来完成的,这个registerBeanDefinitions还对载入的Bean数量进行了统计,这个方法也是在 XmlBeanDefinitionReader 中自己实现的,
public int registerBeanDefinitions(Document doc, Resource resource) throws BeanDefinitionStoreException {
     //这里得到的BeanDefinitionDocumentReader对象来对XML的BeanDefinition信息进行解析
     BeanDefinitionDocumentReader documentReader = createBeanDefinitionDocumentReader();
     //获取容器中bean的数量
     int countBefore = getRegistry().getBeanDefinitionCount();
     //具体的解析过程在这个方法中实现
     documentReader.registerBeanDefinitions(doc, createReaderContext(resource));
     return getRegistry().getBeanDefinitionCount() - countBefore;
 }
注意:BeanDefinition的载入分成两部分,首先通过调用XML的解析器(XmlBeanDefinitionReader)得到document对象,但这些document对象并没有 按照Spring的Bean规则去进行解析,在完成通用XML解析之后才是按照Spring得 Bean规则进行解析的地方,这个按照Spring的Bean规则进行解析的过程是在documentReade中实现的,这里使用的documentReader是默认设置好的DefaultBeanDefinitionDocumentReader,创建的过程也是在XmlBeanDefinitionReader 中完成的,根据指定的默认方式如下:
private Class<? extends BeanDefinitionDocumentReader> documentReaderClass =
      DefaultBeanDefinitionDocumentReader.class;
protected BeanDefinitionDocumentReader createBeanDefinitionDocumentReader() {
   return BeanUtils.instantiateClass(this.documentReaderClass);
}
上面通过通过 XmlBeanDefinitionReader 类中的私有属性 documentReaderClass 获得一个 DefaultBeanDefinitionDocumentReader 实例对象,并且具体的解析过程在DefaultBeanDefinitionDocumentReader来实现,所以下面我们继续跟踪。
⑤、DefaultBeanDefinitionDocumentReader实现了BeanDefinitionDocumentReader接口,它的registerBeanDefinitions方法定义如下:
public void registerBeanDefinitions(Document doc, XmlReaderContext readerContext) {
   this.readerContext = readerContext;
   doRegisterBeanDefinitions(doc.getDocumentElement());
}
这里只是将 XML中的元素取了出来,但是具体的活还是 doRegisterBeanDefinitions(root)来实现的,do开头的方法才是真正干活的方法。
⑥、所以继续跟踪doRegisterBeanDefinitions(root)方法
protected void doRegisterBeanDefinitions(Element root) {
     // 创建了BeanDefinitionParserDelegate对象
     BeanDefinitionParserDelegate parent = this.delegate;
     this.delegate = createDelegate(getReaderContext(), root, parent);

    // 如果是Spring原生命名空间,首先解析 profile标签,这里不重要
     if (this.delegate.isDefaultNamespace(root)) {
         String profileSpec = root.getAttribute(PROFILE_ATTRIBUTE);
         if (StringUtils.hasText(profileSpec)) {
             String[] specifiedProfiles = StringUtils.tokenizeToStringArray(
                     profileSpec, BeanDefinitionParserDelegate.MULTI_VALUE_ATTRIBUTE_DELIMITERS);
             if (!getReaderContext().getEnvironment().acceptsProfiles(specifiedProfiles)) {
                 if (logger.isDebugEnabled()) {
                     logger.debug("Skipped XML bean definition file due to specified profiles [" + profileSpec +
                             "] not matching: " + getReaderContext().getResource());
                 }
                 return;
             }
         }
     }
     //解析BeanDefinition之前做的一些事情的接口触发
     preProcessXml(root);
     //主要看这个方法,标签具体解析过程
     parseBeanDefinitions(root, this.delegate);
     // 解析BeanDefinition之后可以做的一些事情的触发
     postProcessXml(root);

    this.delegate = parent;
 }
在这个方法中,我们重点看“一类三法”,也就是BeanDefinitionParserDelegate类和preProcessXml、parseBeanDefinitions、postProcessXml三个方法。其中BeanDefinitionParserDelegate类非常非常重要(需要了解代理技术,如JDK动态代理、cglib动态代理等)。Spirng BeanDefinition的解析就是在这个代理类下完成的,此类包含了各种对符合Spring Bean语义规则的处理,比如、、等的检测。对于preProcessXml、parseBeanDefinitions、postProcessXml这三个方法,其中preProcessXml和postProcessXml都是空方法,意思是在解析标签前后我们自己可以扩展需要执行的操作,也是一个模板方法模式,体现了Spring的高扩展性。parseBeanDefinitions方法才是标签的具体解析过程。所以下面进入parseBeanDefinitions方法看具体是怎么解析标签的。
⑦、前面提到Document对象不能通过XmlBeanDefinitionReader,真正去解析Document文档树的是 BeanDefinitionParserDelegate完成的,这个解析过程是与Spring对BeanDefinition的配置规则紧密相关的,parseBeanDefinitions(root, delegate)方法如下:
protected void parseBeanDefinitions(Element root, BeanDefinitionParserDelegate delegate) {
    if (delegate.isDefaultNamespace(root)) {
        NodeList nl = root.getChildNodes();
        // 遍历所有节点,做对应解析工作
        // 如遍历到<import>标签节点就调用importBeanDefinitionResource(ele)方法对应处理
        // 遍历到<bean>标签就调用processBeanDefinition(ele,delegate)方法对应处理
        for (int i = 0; i < nl.getLength(); i++) {
            Node node = nl.item(i);
            if (node instanceof Element) {
                Element ele = (Element) node;
                if (delegate.isDefaultNamespace(ele)) {
                    //默认标签解析
                    parseDefaultElement(ele, delegate);
                }
                else {
                    //自定义标签解析
                    delegate.parseCustomElement(ele);
                }
            }
        }
    }
    else {
        delegate.parseCustomElement(root);
    }
}
这里有两种标签的解析:Spring原生标签和自定义标签,那来怎么区分这两种标签呢?如下:
- 默认标签:<bean:/>
- 自定义标签:<context:component-scan/>
如果带有bean的就是Spring默认标签,否则就是自定义标签。但无论哪种标签在使用前都需要在Spring的xml配置文件里声明Namespace URI,这样在解析标签时才能通过Namespace URI找到对应的NamespaceHandler。引入:xmlns:context=http://www.springframework.org/schema/contex http://www.springframework.org/schema/beans
⑧、上面的代码中先是isDefaultNamespace判断是不是默认标签,然后进入parseDefaultElement方法:
rivate void parseDefaultElement(Element ele, BeanDefinitionParserDelegate delegate) {
    // 解析<import>标签
    if (delegate.nodeNameEquals(ele, IMPORT_ELEMENT)) {
        importBeanDefinitionResource(ele);
    }
    // 解析<alias>标签
    else if (delegate.nodeNameEquals(ele, ALIAS_ELEMENT)) {
        processAliasRegistration(ele);
    }
    // 解析<bean>标签,最常用,过程最复杂
    else if (delegate.nodeNameEquals(ele, BEAN_ELEMENT)) {
        processBeanDefinition(ele, delegate);
    }
    // 解析<beans>标签
    else if (delegate.nodeNameEquals(ele, NESTED_BEANS_ELEMENT)) {
        // recurse
        doRegisterBeanDefinitions(ele);
     }
 }
这里面主要是对import、alias、bean标签的解析以及beans的字标签的递归解析。
⑨、这里针对常用的标签中的方法做简单介绍,其他标签的加载方式类似,进入processBeanDefinition方法。
protected void processBeanDefinition(Element ele, BeanDefinitionParserDelegate delegate) {
    //BeandefinitionHolder是BeanDefinition的封装,封装了BeanDefinition,bean的名字和别名,用它来完成向IOC容器注册,
    //得到BeanDefinitionHodler就意味着BeanDefinition是通过BeanDefinitionParseDelegate对xml元素按照bean的规则解析得到的
    BeanDefinitionHolder bdHolder = delegate.parseBeanDefinitionElement(ele);
    if (bdHolder != null) {
        bdHolder = delegate.decorateBeanDefinitionIfRequired(ele, bdHolder);
        try {
            // 这里是向IOC容器解析注册得到BeanDefinition的地方
            BeanDefinitionReaderUtils.registerBeanDefinition(bdHolder, getReaderContext().getRegistry());
        }
        catch (BeanDefinitionStoreException ex) {
            getReaderContext().error("Failed to register bean definition with name '" +
                    bdHolder.getBeanName() + "'", ele, ex);
        }
        // 在BeanDefinition向Ioc容器注册完成后发送消息
        getReaderContext().fireComponentRegistered(new BeanComponentDefinition(bdHolder));
    }
}
⑩、进入parseBeanDefinitionElement(Element ele)方法方法。
注意:parseBeanDefinitionElement(Element ele)方法会调用parseBeanDefinitionElement(ele, null)方法,需要强调一下的是parseBeanDefinitionElement(ele, null)方法中产生了一个抽象类型的BeanDefinition实例,这也是我们首次看到直接定义BeanDefinition的地方,这个方法里面会将<bean>标签中的内容解析到BeanDefinition中,如果在解析<bean>标签的过程中出现错误则返回null,之后再对BeanDefinition进行包装,将它与beanName,Alias等封装到BeanDefinitionHolder 对象中,然后返回BeanDefinitionHolder类对象,该部分源码如下:
public BeanDefinitionHolder parseBeanDefinitionElement(Element ele) {
    return parseBeanDefinitionElement(ele, null);
}

public BeanDefinitionHolder parseBeanDefinitionElement(Element ele, @Nullable BeanDefinition containingBean) {
    // 获取id和name属性
    String id = ele.getAttribute(ID_ATTRIBUTE);
    String nameAttr = ele.getAttribute(NAME_ATTRIBUTE);
    // 获取别名属性,多个别名可用,;隔开
    List<String> aliases = new ArrayList<>();
    if (StringUtils.hasLength(nameAttr)) {
        String[] nameArr = StringUtils.tokenizeToStringArray(nameAttr, MULTI_VALUE_ATTRIBUTE_DELIMITERS);
        aliases.addAll(Arrays.asList(nameArr));
    }

    String beanName = id;
    if (!StringUtils.hasText(beanName) && !aliases.isEmpty()) {
        beanName = aliases.remove(0);
        if (logger.isTraceEnabled()) {
            logger.trace("No XML 'id' specified - using '" + beanName +
                    "' as bean name and " + aliases + " as aliases");
        }
    }
    // 检查beanName是否重复
    if (containingBean == null) {
        checkNameUniqueness(beanName, aliases, ele);
    }
    // 具体的解析封装过程还在这个方法里
    AbstractBeanDefinition beanDefinition = parseBeanDefinitionElement(ele, beanName, containingBean);
    if (beanDefinition != null) {
        if (!StringUtils.hasText(beanName)) {
            try {
                if (containingBean != null) {
                    beanName = BeanDefinitionReaderUtils.generateBeanName(
                            beanDefinition, this.readerContext.getRegistry(), true);
                }
                else {
                    beanName = this.readerContext.generateBeanName(beanDefinition);
                    // Register an alias for the plain bean class name, if still possible,
                    // if the generator returned the class name plus a suffix.
                    // This is expected for Spring 1.2/2.0 backwards compatibility.
                    String beanClassName = beanDefinition.getBeanClassName();
                    if (beanClassName != null &&
                            beanName.startsWith(beanClassName) && beanName.length() > beanClassName.length() &&
                            !this.readerContext.getRegistry().isBeanNameInUse(beanClassName)) {
                        aliases.add(beanClassName);
                    }
                }
                if (logger.isTraceEnabled()) {
                    logger.trace("Neither XML 'id' nor 'name' specified - " +
                            "using generated bean name [" + beanName + "]");
                }
            }
            catch (Exception ex) {
                error(ex.getMessage(), ele);
                return null;
            }
        }
        String[] aliasesArray = StringUtils.toStringArray(aliases);
        return new BeanDefinitionHolder(beanDefinition, beanName, aliasesArray);
    }

    return null;
}
上面的解析过程可以看做根据xml文件对的定义生成BeanDefinition对象的过程,这个BeanDefinition对象中封装的数据大多都是与相关的,例如:init-method,destory-method,factory-method,beanClass,descriptor。有了这个BeanDefinition中分装的信息,容器才能对Bean配置进行处理以及实现容器的特性。至此,我们的BeanDefine就已经载入完成了。
⑪、下面再来多加一个点,看一下bean的具体解析。
public AbstractBeanDefinition parseBeanDefinitionElement(
        Element ele, String beanName, @Nullable BeanDefinition containingBean) {

    this.parseState.push(new BeanEntry(beanName));
    // 获取class名称和父类名称
    String className = null;
    if (ele.hasAttribute(CLASS_ATTRIBUTE)) {
        className = ele.getAttribute(CLASS_ATTRIBUTE).trim();
    }
    // 解析 parent 属性
    String parent = null;
    if (ele.hasAttribute(PARENT_ATTRIBUTE)) {
        parent = ele.getAttribute(PARENT_ATTRIBUTE);
    }

    try {
        // 创建GenericBeanDefinition对象
        AbstractBeanDefinition bd = createBeanDefinition(className, parent);
        // 解析bean标签的属性,并把解析出来的属性设置到BeanDefinition对象中
        parseBeanDefinitionAttributes(ele, beanName, containingBean, bd);
        bd.setDescription(DomUtils.getChildElementValueByTagName(ele, DESCRIPTION_ELEMENT));
        //解析bean中的meta标签
        parseMetaElements(ele, bd);
        //解析bean中的lookup-method标签
        parseLookupOverrideSubElements(ele, bd.getMethodOverrides());
        //解析bean中的replaced-method标签
        parseReplacedMethodSubElements(ele, bd.getMethodOverrides());
        //解析bean中的constructor-arg标签
        parseConstructorArgElements(ele, bd);
        //解析bean中的property标签
        parsePropertyElements(ele, bd);
        // 解析子元素 qualifier 子元素
        parseQualifierElements(ele, bd);

        bd.setResource(this.readerContext.getResource());
        bd.setSource(extractSource(ele));

        return bd;
    }
    catch (ClassNotFoundException ex) {
        error("Bean class [" + className + "] not found", ele, ex);
    }
    catch (NoClassDefFoundError err) {
        error("Class that bean class [" + className + "] depends on not found", ele, err);
    }
    catch (Throwable ex) {
        error("Unexpected failure during bean definition parsing", ele, ex);
    }
    finally {
        this.parseState.pop();
    }

    return null;
}
上面的代码是具体生成BeanDefinition的地方,bean标签的解析步骤仔细理解并不复杂,就是将一个个标签属性的值装入到了BeanDefinition对象中,这里需要注意parseConstructorArgElements和parsePropertyElements方法,分别是对constructor-arg和property标签的解析,解析完成后分别装入了BeanDefinition对象的constructorArgumentValues和propertyValues中,而这两个属性在c和p标签的解析中还会用到,而且还涉及一个很重要的设计思想——装饰器模式。Bean标签解析完成后将生成的BeanDefinition对象、bean的名称以及别名一起封装到了BeanDefinitionHolder对象并返回,然后调用了decorateBeanDefinitionIfRequired进行装饰。
4.3BeanDefinition的注册
在完成了BeanDefinition的载入和解析后,就要对它进行注册。我们知道最终Bean配置会被解析成BeanDefinition并与beanName,Alias一同封装到BeanDefinitionHolder类中,然后返回这个对象,所以我们顺着BeanDefinitionHolder类创建的地方,也就是DefaultBeanDefinitionDocumentReader的processBeanDefinition()方法继续往下看。
protected void processBeanDefinition(Element ele, BeanDefinitionParserDelegate delegate) {
    //BeandefinitionHolder是BeanDefinition的封装,封装了BeanDefinition,bean的名字和别名,用它来完成向IOC容器注册,
    //得到BeanDefinitionHodler就意味着BeanDefinition是通过BeanDefinitionParseDelegate对xml元素按照bean的规则解析得到的
    BeanDefinitionHolder bdHolder = delegate.parseBeanDefinitionElement(ele);
    if (bdHolder != null) {
        bdHolder = delegate.decorateBeanDefinitionIfRequired(ele, bdHolder);
        try {
            // 这里是向IOC容器解析注册得到BeanDefinition的地方
            BeanDefinitionReaderUtils.registerBeanDefinition(bdHolder, getReaderContext().getRegistry());
        }
        catch (BeanDefinitionStoreException ex) {
            getReaderContext().error("Failed to register bean definition with name '" +
                    bdHolder.getBeanName() + "'", ele, ex);
        }
        // 在BeanDefinition向Ioc容器注册完成后发送消息
        getReaderContext().fireComponentRegistered(new BeanComponentDefinition(bdHolder));
    }
}
然后跟踪到BeanDefinitionReaderUtils的registerBeanDefinition()方法,这里会传入上一步的BeanDefinitionHolder对象,并且将BeanDefinition注册到IoC容器中。进入BeanDefinitionReaderUtils类的registerBeanDefinition方法如下。
public static void registerBeanDefinition(
        BeanDefinitionHolder definitionHolder, BeanDefinitionRegistry registry)
        throws BeanDefinitionStoreException {

    // 注册beanDefinition!!
    String beanName = definitionHolder.getBeanName();
    registry.registerBeanDefinition(beanName, definitionHolder.getBeanDefinition());

    // 如果有别名的话也注册进去
    String[] aliases = definitionHolder.getAliases();
    if (aliases != null) {
        for (String alias : aliases) {
            registry.registerAlias(beanName, alias);
        }
    }
}
之后会调用BeanDefinitionRegistry接口的registerBeanDefinition( beanName, bdHolder.getBeanDefinition())方法,而对于IoC容器中最重要的一个类DefaultListableBeanFactory实现了该接口的方法。这个方法的主要目的就是将BeanDefinition存放至DefaultListableBeanFactory对象的beanDefinitionMap中,当初始化容器进行bean初始化时,在bean的生命周期分析里必然会在这个beanDefinitionMap中获取beanDefition实例。我们可以在DefaultListableBeanFactory中看到此Map的定义。
/** Map of bean definition objects, keyed by bean name. */
private final Map<String, BeanDefinition> beanDefinitionMap = new ConcurrentHashMap<>(256);
下面我们在来看一下这个方法是如将BeanDefinition存放至beanDefinitionMap中的,DefaultListableBeanFactory中实现的registerBeanDefinition( beanName, bdHolder.getBeanDefinition() )方法具体如下:
public void registerBeanDefinition(String beanName, BeanDefinition beanDefinition)
            throws BeanDefinitionStoreException {

        Assert.hasText(beanName, "Bean name must not be empty");
        Assert.notNull(beanDefinition, "BeanDefinition must not be null");

        if (beanDefinition instanceof AbstractBeanDefinition) {
            try {
                ((AbstractBeanDefinition) beanDefinition).validate();
            }
            catch (BeanDefinitionValidationException ex) {
                throw new BeanDefinitionStoreException(beanDefinition.getResourceDescription(), beanName,
                        "Validation of bean definition failed", ex);
            }
        }

        //此处检查是不是有相同名字的Bean存在
        //如果名字相同又不允许覆盖,就会抛出异常BeanDefinitionOverrideException
        BeanDefinition existingDefinition = this.beanDefinitionMap.get(beanName);
        if (existingDefinition != null) {
            if (!isAllowBeanDefinitionOverriding()) {
                throw new BeanDefinitionOverrideException(beanName, beanDefinition, existingDefinition);
            }
            else if (existingDefinition.getRole() < beanDefinition.getRole()) {
                // e.g. was ROLE_APPLICATION, now overriding with ROLE_SUPPORT or ROLE_INFRASTRUCTURE
                if (logger.isInfoEnabled()) {
                    logger.info("Overriding user-defined bean definition for bean '" + beanName +
                            "' with a framework-generated bean definition: replacing [" +
                            existingDefinition + "] with [" + beanDefinition + "]");
                }
            }
            else if (!beanDefinition.equals(existingDefinition)) {
                if (logger.isDebugEnabled()) {
                    logger.debug("Overriding bean definition for bean '" + beanName +
                            "' with a different definition: replacing [" + existingDefinition +
                            "] with [" + beanDefinition + "]");
                }
            }
            else {
                if (logger.isTraceEnabled()) {
                    logger.trace("Overriding bean definition for bean '" + beanName +
                            "' with an equivalent definition: replacing [" + existingDefinition +
                            "] with [" + beanDefinition + "]");
                }
            }
            //存储Bean(Bean名字作为key,BeanDefinition作为value)
            this.beanDefinitionMap.put(beanName, beanDefinition);
        }
        else {
            if (hasBeanCreationStarted()) {
                //注册的过程需要保证数据的一致性
                synchronized (this.beanDefinitionMap) {
                    //将获取到的BeanDefinition放入Map中,容器操作使用bean时通过这个HashMap找到具体的BeanDefinition
                    //存储Bean(Bean名字作为key,BeanDefinition作为value)
                    this.beanDefinitionMap.put(beanName, beanDefinition);
                    List<String> updatedDefinitions = new ArrayList<>(this.beanDefinitionNames.size() + 1);
                    updatedDefinitions.addAll(this.beanDefinitionNames);
                    updatedDefinitions.add(beanName);
                    this.beanDefinitionNames = updatedDefinitions;
                    removeManualSingletonName(beanName);
                }
            }
            else {
                // Still in startup registration phase
                this.beanDefinitionMap.put(beanName, beanDefinition);
                this.beanDefinitionNames.add(beanName);
                removeManualSingletonName(beanName);
            }
            this.frozenBeanDefinitionNames = null;
        }

        if (existingDefinition != null || containsSingleton(beanName)) {
            resetBeanDefinition(beanName);
        }
        else if (isConfigurationFrozen()) {
            clearByTypeCache();
        }
    }
把所有的BeanDefinition(懒加载除外)都存入IOC容器中的HashMap后,注册就结束了。但是注意,以上仅仅是BeanDefinition的载入、载入和注册,Bean之间的依赖关系并不会在初始化的时候完成!后面还需要调用一系列方法才会完成初始化。


 512
512


 被折叠的 条评论
为什么被折叠?
被折叠的 条评论
为什么被折叠?
 到【灌水乐园】发言


