


AQS(AbstractQueuedSynchronizer, 队列同步器)它是Java并发用来构建锁和其他同步组件的基础框架。像Reentrantlock,Countdownlantch,Semaphore,ReadWriteLock都是由AQS来实现的,本篇文章将通过分析ReentrantLock源码来解释AQS
先看一段代码:
package com.example.AQS;

import java.util.concurrent.locks.Lock;
import java.util.concurrent.locks.ReentrantLock;

public class ReentrantlockTest {
    /**
     * 资源类
     */
    private static class Resource{
        Lock lock = new ReentrantLock();
        public void getResource(){
            //加锁
            lock.lock();
            //睡眠两秒钟代表业务逻辑
            try {
                Thread.sleep(2000);
            } catch (InterruptedException e) {
                e.printStackTrace();
            }
            System.out.println("got resource");
            //解锁
            lock.unlock();
        }
    }
    public static void main(String[] args) {
        Resource resource = new Resource();
        //五个线程竞争资源
        for (int i = 0; i < 5; i++) {
            new Thread(()->{
                resource.getResource();
            }).start();
        }
    }
}
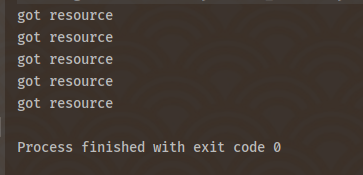
程序执行结果是每隔两秒打印获取到资源,说明存在锁竞争
我们从头来分析一下代码,首先看new ReentrantLock(),
public ReentrantLock() {
		//默认是非公平锁
        sync = new NonfairSync();

 }
我们可以在新建锁资源时选择公平锁还是非公平锁,至于两种锁的区别我们后续讲解
public ReentrantLock(boolean fair) {
		//传入true为公平,false为非公平
        sync = fair ? new FairSync() : new NonfairSync();
    }
看完构造方法来看下加锁方法,lock.lock()
public void lock() {
        sync.lock();
    }
ReentrantLock里面主要使用了其内部类Sync。Sync则是AbstractQueuedSynchronizer的实现类,也就是AQS的实现类。
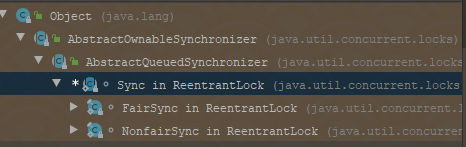
通过继承关系我们看到公平锁和非公平锁都是Sync的子类。lock方法是一个抽象方法,我们先分析FairSync公平锁的实现。
final void lock() {
      acquire(1);
 }
public final void acquire(int arg) {  //arg=1
        if (!tryAcquire(arg) &&
            acquireQueued(addWaiter(Node.EXCLUSIVE), arg))
            selfInterrupt();
    }
这个判断语句逻辑很复杂,当进入到acquire方法后,会尝试获取锁,当获取失败,返回false,会进入acquireQueued方法,不妨剧透一下,这个方法就是对获取锁失败的线程进行排队。我们先来看tryacquire方法的实现。
protected final boolean tryAcquire(int acquires) {  //acquires=1
            final Thread current = Thread.currentThread();
            //c就是状态标识,如果c为0,说明能够尝试获取锁
            int c = getState();
            if (c == 0) {
            	//hasQueuedPredecessors返回false才能进行占有锁的动作,hasQueuedPredecessors主要作用是判断队列中有没有等待的线程。有返回true,没有返回false
            	//compareAndSetState是进行锁的占有动作,将c改为acquire的值
                if (!hasQueuedPredecessors() &&
                    compareAndSetState(0, acquires)) {
                    //setExclusiveOwnerThread设置当前锁占有的线程为当前线程
                    setExclusiveOwnerThread(current);
                    //都设置成功代表占有锁成功,返回true
                    return true;
                }
            }
            //当前线程为锁正在被占有的线程,即锁的冲入过程
            else if (current == getExclusiveOwnerThread()) {
               //对c进行+1
                int nextc = c + acquires;
                if (nextc < 0)   //超过最大值抛异常
                    throw new Error("Maximum lock count exceeded");
                setState(nextc);  //设置state的值
                return true;
            }
            //获取锁失败,返回false
            return false;
        }
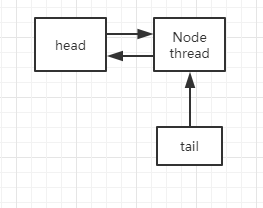
分析下if判断中的hasQueuedPredecessors方法:
//方法的主要作用就是判断有没有等待中的线程
public final boolean hasQueuedPredecessors() {
        Node t = tail; 		//队列的尾
        Node h = head;  //队列的头
        Node s;
        //如果头尾都为空,返回false,如果不为空,但是头的next不为空,说明有等待的线程,至于头和尾我们后续再说明
        return h != t &&
            ((s = h.next) == null || s.thread != Thread.currentThread());
    }
这样我们的tryacquire(1)方法就分析完了,我们再来分析acquireQueued(addWaiter(Node.EXCLUSIVE), arg))方法,只有获取锁失败了,才会进入此方法
先来看addWaiter方法
private Node addWaiter(Node mode) {
		//封装当前线程为Node对象,方便对链表数据结构的操作
        Node node = new Node(Thread.currentThread(), mode);
        //得到队尾
        Node pred = tail;
        if (pred != null) {  //当队尾不为空,说明前面有等待线程或者说明队列已经被初始化完成了
            node.prev = pred;  //将node的prev设置为队尾
            if (compareAndSetTail(pred, node)) {  //再将node通过cas设置成队尾
                pred.next = node;  //双向链表,设置原tail的next为node
                return node;
            }
        }
        //到这里说明队列还没进行初始化,这个方法就是初始化方法
        enq(node);
        return node;
    }
来分析enq方法:
private Node enq(final Node node) {
		//无限循环
        for (;;) {
            Node t = tail;
            if (t == null) {  //如果队尾为空
                if (compareAndSetHead(new Node()))  //通过cas将tail替换为new Node(),node里面的thread为空,这里设置线程为空的节点非常重要。
                    tail = head;  //将head也指向这个节点
            } else {
                node.prev = t;  //队尾不为空
                if (compareAndSetTail(t, node)) {  将node插到队尾
                    t.next = node;  //设置head的next
                    return t;
                }
            }
        }
    }
第一个线程获取锁失败后:
到这里addWriter方法就解析完了。接着看acquireQueued方法
  final boolean acquireQueued(final Node node, int arg) {
        boolean failed = true;
        try {
            boolean interrupted = false;
       		//死循环
            for (;;) {
            	//找到当前node的前置节点
                final Node p = node.predecessor();
                //当前置节点为head节点并且获取锁成功后,说明已经占有锁
                if (p == head && tryAcquire(arg)) {
                    setHead(node);  //设置head为当前节点,这里面主要讲node的thread设置为空,恢复成原来的head的样子
                    p.next = null; // 将原来的头节点指向空
                    failed = false; //失败标识
                    return interrupted;
                }
                //走到这里说明没有获取成功,应该讲该线程park掉,shouldParkAfterFailedAcquire这个方法是判断前面的节点ws标识是不是0,如果是0就将它改成-1,返回true。parkAndCheckInterrupt就是当前线程park掉
                if (shouldParkAfterFailedAcquire(p, node) &&
                    parkAndCheckInterrupt())
                    interrupted = true;
            }
        } finally {
            if (failed)
                cancelAcquire(node);
        }
    }
 private final boolean parkAndCheckInterrupt() {
 		//park当前线程
        LockSupport.park(this);
        return Thread.interrupted();
    }
到这里lock方法基本解析完成,接下来看unlock方法
public void unlock() {
        sync.release(1);
    }
看Sync类的release方法
public final boolean release(int arg) {
		//tryRelease方法尝试释放资源,释放成功的话进入下面逻辑
        if (tryRelease(arg)) {
        	//head节点
            Node h = head;
            //h不为空,并且h的waitStatus 不为0,说明当前有线程在排对获取资源
            if (h != null && h.waitStatus != 0)
            	//取到该线程并且将其unpark
                unparkSuccessor(h);
            return true;
        }
        return false;
    }
我们主要阅读tryRelease和unparkSuccessor方法
protected final boolean tryRelease(int releases) {
			//将原来状态-1
            int c = getState() - releases;
            if (Thread.currentThread() != getExclusiveOwnerThread())
                throw new IllegalMonitorStateException();
            boolean free = false;
            //已经没有线程占有锁,可以返回true,这里主要是考虑重入锁的情况,因此只能-1,不能直接赋值0
            if (c == 0) {
                free = true;
                setExclusiveOwnerThread(null);  //将资源拥有者改为空
            }
            //设置状态
            setState(c);
            return free;
        }
再来看unparkSuccessor方法
private void unparkSuccessor(Node node) {
		//得到当前node的状态
        int ws = node.waitStatus;
        if (ws < 0)   //如果小于1说明后面有线程等待,将其改为0
            compareAndSetWaitStatus(node, ws, 0);
          //当前传过来的node为head,得到head的next才是真正要进行释放的节点
        Node s = node.next;
        if (s == null || s.waitStatus > 0) {   //s为空的情况,这里基本不会发生,除非人为更改node
            s = null;
            for (Node t = tail; t != null && t != node; t = t.prev)  //找到最近的能释放的线程节点
                if (t.waitStatus <= 0)
                    s = t;
        }
        if (s != null)
            LockSupport.unpark(s.thread);   //unpark此线程
    }
到这里锁的释放完成,代码回到上锁的park处。然后再次回到循环,获取锁。
至于interrupted主要是为lockInterruptibly方法准备的,在这里基本没用,因为无论返回什么都要进行下一次循环,这也是使用lock.lock(),不能在其他线程对其进行interrupt,但不能打断的原因。
再来看下非公平锁的实现
final void lock() {
            if (compareAndSetState(0, 1))
                setExclusiveOwnerThread(Thread.currentThread());
            else
                acquire(1);
        }
发现只是在最开始尝试获取一下锁,如果没有获取到就按公平锁进行排队了。两者也只是这点区别。


 被折叠的 条评论
为什么被折叠?
被折叠的 条评论
为什么被折叠?
 到【灌水乐园】发言


