


 本文详细介绍Vue Router的配置与使用,包括定义子组件、配置嵌套路由、编程式导航及路由参数传递等核心功能,通过实战案例展示如何在Vue项目中高效运用路由管理。
接上篇:Vue Router简单使用
1.定义子组件
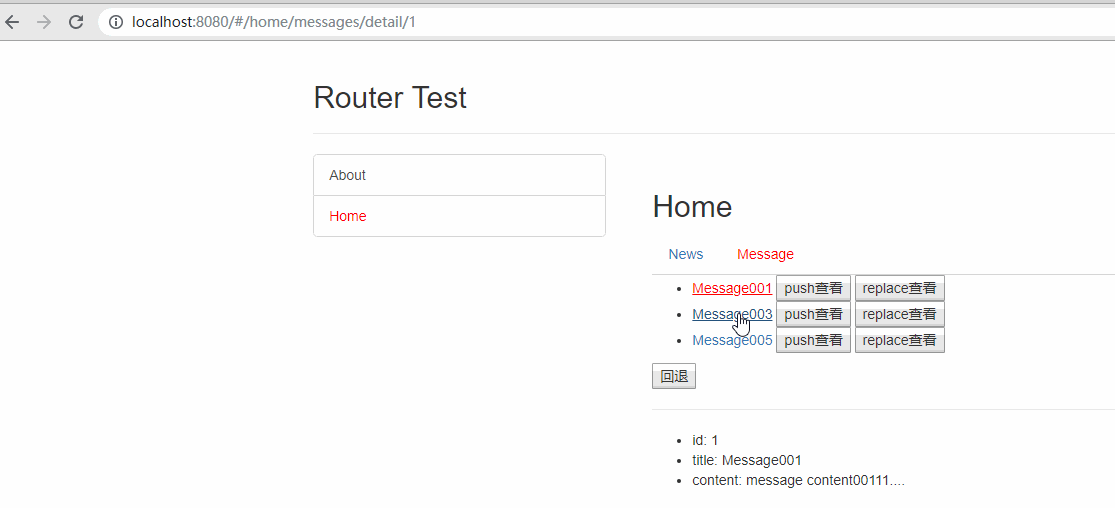
Messages.Vue
<template>
  <div>
    <ul>
      <li v-for="m in messages" :key="m.id">
       <!-- {{m.title}}-->
       <router-link :to="`/home/messages/detail/${m.id}`">{{m.title}}</router-link>
         <button @click="pushShow(m.id)">push查看</button>
        <button @click="replaceShow(m.id)">replace查看</button>
      </li>
    </ul>
    <button @click="$router.back()">回退</button>
    <hr>
    <router-view></router-view>
  </div>
</template>

<script>


  export default {
    data () {
      return {
        messages: [
           {id: 1, title: 'Message001'},
           {id: 3, title: 'Message003'},
           {id: 5, title: 'Message005'}
        ]
      }
    },

    mounted () {
      setTimeout(() => {
        const messages = [
          {id: 1, title: 'Message001'},
          {id: 3, title: 'Message003'},
          {id: 5, title: 'Message005'}
        ]
        this.messages = messages
      }, 2000)
    },

    methods: {
      pushShow (id) {
        this.$router.push(`/home/messages/detail/${id}`)
      },

      replaceShow(id) {
        this.$router.replace(`/home/messages/detail/${id}`)
      }
    }
  }
</script>

<style>

</style>
News.Vue
<template>
  <ul>
    <li v-for="(news, index) in newsArr" :key="index">{{news}}</li>
  </ul>
</template>

<script>
  export default {
    data () {
      return {
        newsArr: ['News001', 'News002', 'News003']
      }
    }
  }
</script>

<style>

</style>
MessageDetail.vue
<template>
  <ul>
    <li>id: {{$route.params.id}}</li>
    <li>title: {{detail.title}}</li>
    <li>content: {{detail.content}}</li>
  </ul>
</template>

<script>
  const messageDetails = [
    {id: 1, title: 'Message001', content: 'message content00111....'},
    {id: 3, title: 'Message003', content: 'message content00222....'},
    {id: 5, title: 'Message005', content: 'message content00333....'}
  ]
  export default {
    name: "MessageDetail",
    data(){
      return{
        detail:''
      }
    },
    mounted() {
     const id = this.$route.params.id*1
      this.detail = messageDetails.find(message =>id === message.id )
    },
    watch:{
      $route: function () { // 改变当前路由组件参数数据时自动调用
        console.log('$route()')
        const id = this.$route.params.id
        this.detail = messageDetails.find(detail => detail.id===id*1)
      }
    }
  }
</script>

<style scoped>

</style>
2.配置嵌套路由: index.js
import Vue from 'vue'
import VueRouter from 'vue-router'
import About from  '../views/About'
import Home from '../views/Home'
import News from '../views/News'
import Messages from '../views/Messages'
import MessageDetail from '../views/MessageDetail'

Vue.use(VueRouter)

export default new VueRouter({
  routes: [
    {
      path:'/about',   //path后面的/代表根路径
      component:About
    },{
      path:'/home',
      component:Home,
      children:[
        {
          path:'/home/messages',
          component:Messages,
          children: [
            {
              path:'detail/:id',
              component: MessageDetail
            }
          ]
        },{
           path:'news',  //简写
          component:News
        },{
          path:'',
          redirect:'/home/news'
        }
      ]
    },{
      path:'/',
      redirect:'about'
    }
  ]
})
3.路由链接(同上一篇)
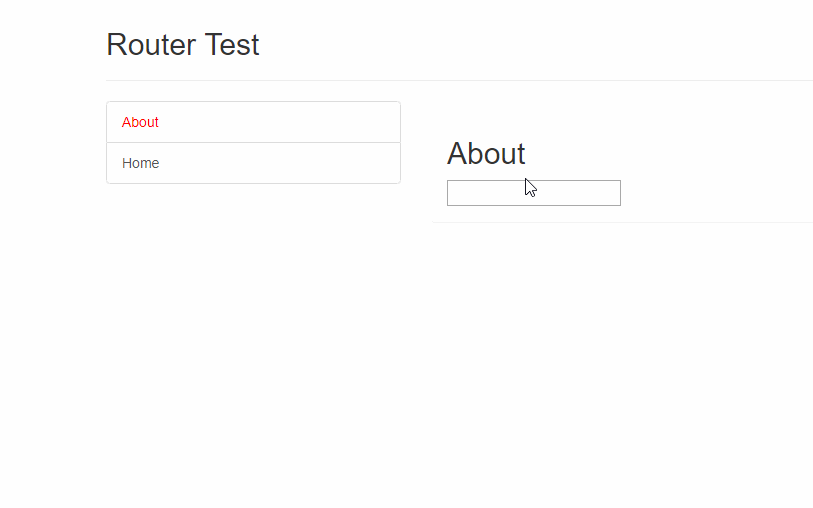
Home.Vue
<template>
  <div>
  <h2>Home</h2>
  <div>
    <ul class="nav nav-tabs">
      <li><router-link to="/home/news">News</router-link></li>
      <li><router-link to="/home/messages">Message</router-link></li>
    </ul>
    <router-view></router-view>
  </div>
</div>
</template>

<script>
  export default {
    name: "Home"
  }
</script>

<style scoped>

</style>
其他组件
About.Vue
<template>
  <div>
    <h2>About</h2>
    <input type="text">
  </div>
</template>

<script>
  export default {
    name: "About"
  }
</script>

<style scoped>

</style>
App.Vue
<template>
  <div>

    <div class="row">
      <div class="col-xs-offset-2 col-xs-8">
        <div class="page-header"><h2>Router Test</h2></div>
      </div>
    </div>

    <div class="row">
      <div class="col-xs-2 col-xs-offset-2">
        <div class="list-group">
          <!--生成路由链接-->
          <router-link to="/about" class="list-group-item">About</router-link>
          <router-link to="/home" class="list-group-item">Home</router-link>
        </div>
      </div>
      <div class="col-xs-6">
        <div class="panel">
          <div class="panel-body">
            <!--显示当前组件-->
            <keep-alive>   <!--缓存路由组件对象-->
              <router-view msg="abc"></router-view>
            </keep-alive>
           <!-- <router-view></router-view>-->
          </div>
        </div>
      </div>
    </div>
  </div>
</template>

<script>


  export default {

  }
</script>

<style scoped>

</style>
效果
总结
向路由组件传递数据
一、.路由路径携带参数(param/query)
1.配置路由
children: [
            {
              path:'detail/:id',
              component: MessageDetail
            }
]
2.路由路径
<router-link :to="`/home/messages/detail/${m.id}`">{{m.title}}</router-link>3.路由组件中读取请求参数
this.$route.params.id二、<router-view>属性携带数据
<router-view :msg="msg"></router-view>缓存路由组件对象
理解
- 默认情况下, 被切换的路由组件对象会死亡释放, 再次回来时是重新创建的(即来回跳转时数据不能保存上一次的数据)
- 如果可以缓存路由组件对象, 可以提高用户体验
编码实现
<keep-alive>
<router-view></router-view>
</keep-alive>
编程式路由导航
实例
类似于浏览器点击后退(←)前进(→)的效果
相关 API
- this.$router.push(path): 相当于点击路由链接(可以返回到当前路由界面)
- this.$router.replace(path): 用新路由替换当前路由(不可以返回到当前路由界面)
- this.$router.back(): 请求(返回)上一个记录路由
- this.$router.go(-1): 请求(返回)上一个记录路由
- this.$router.go(1): 请求下一个记录路由


 被折叠的 条评论
为什么被折叠?
被折叠的 条评论
为什么被折叠?
 到【灌水乐园】发言


