


创建SpringBoot-Mybatis项目
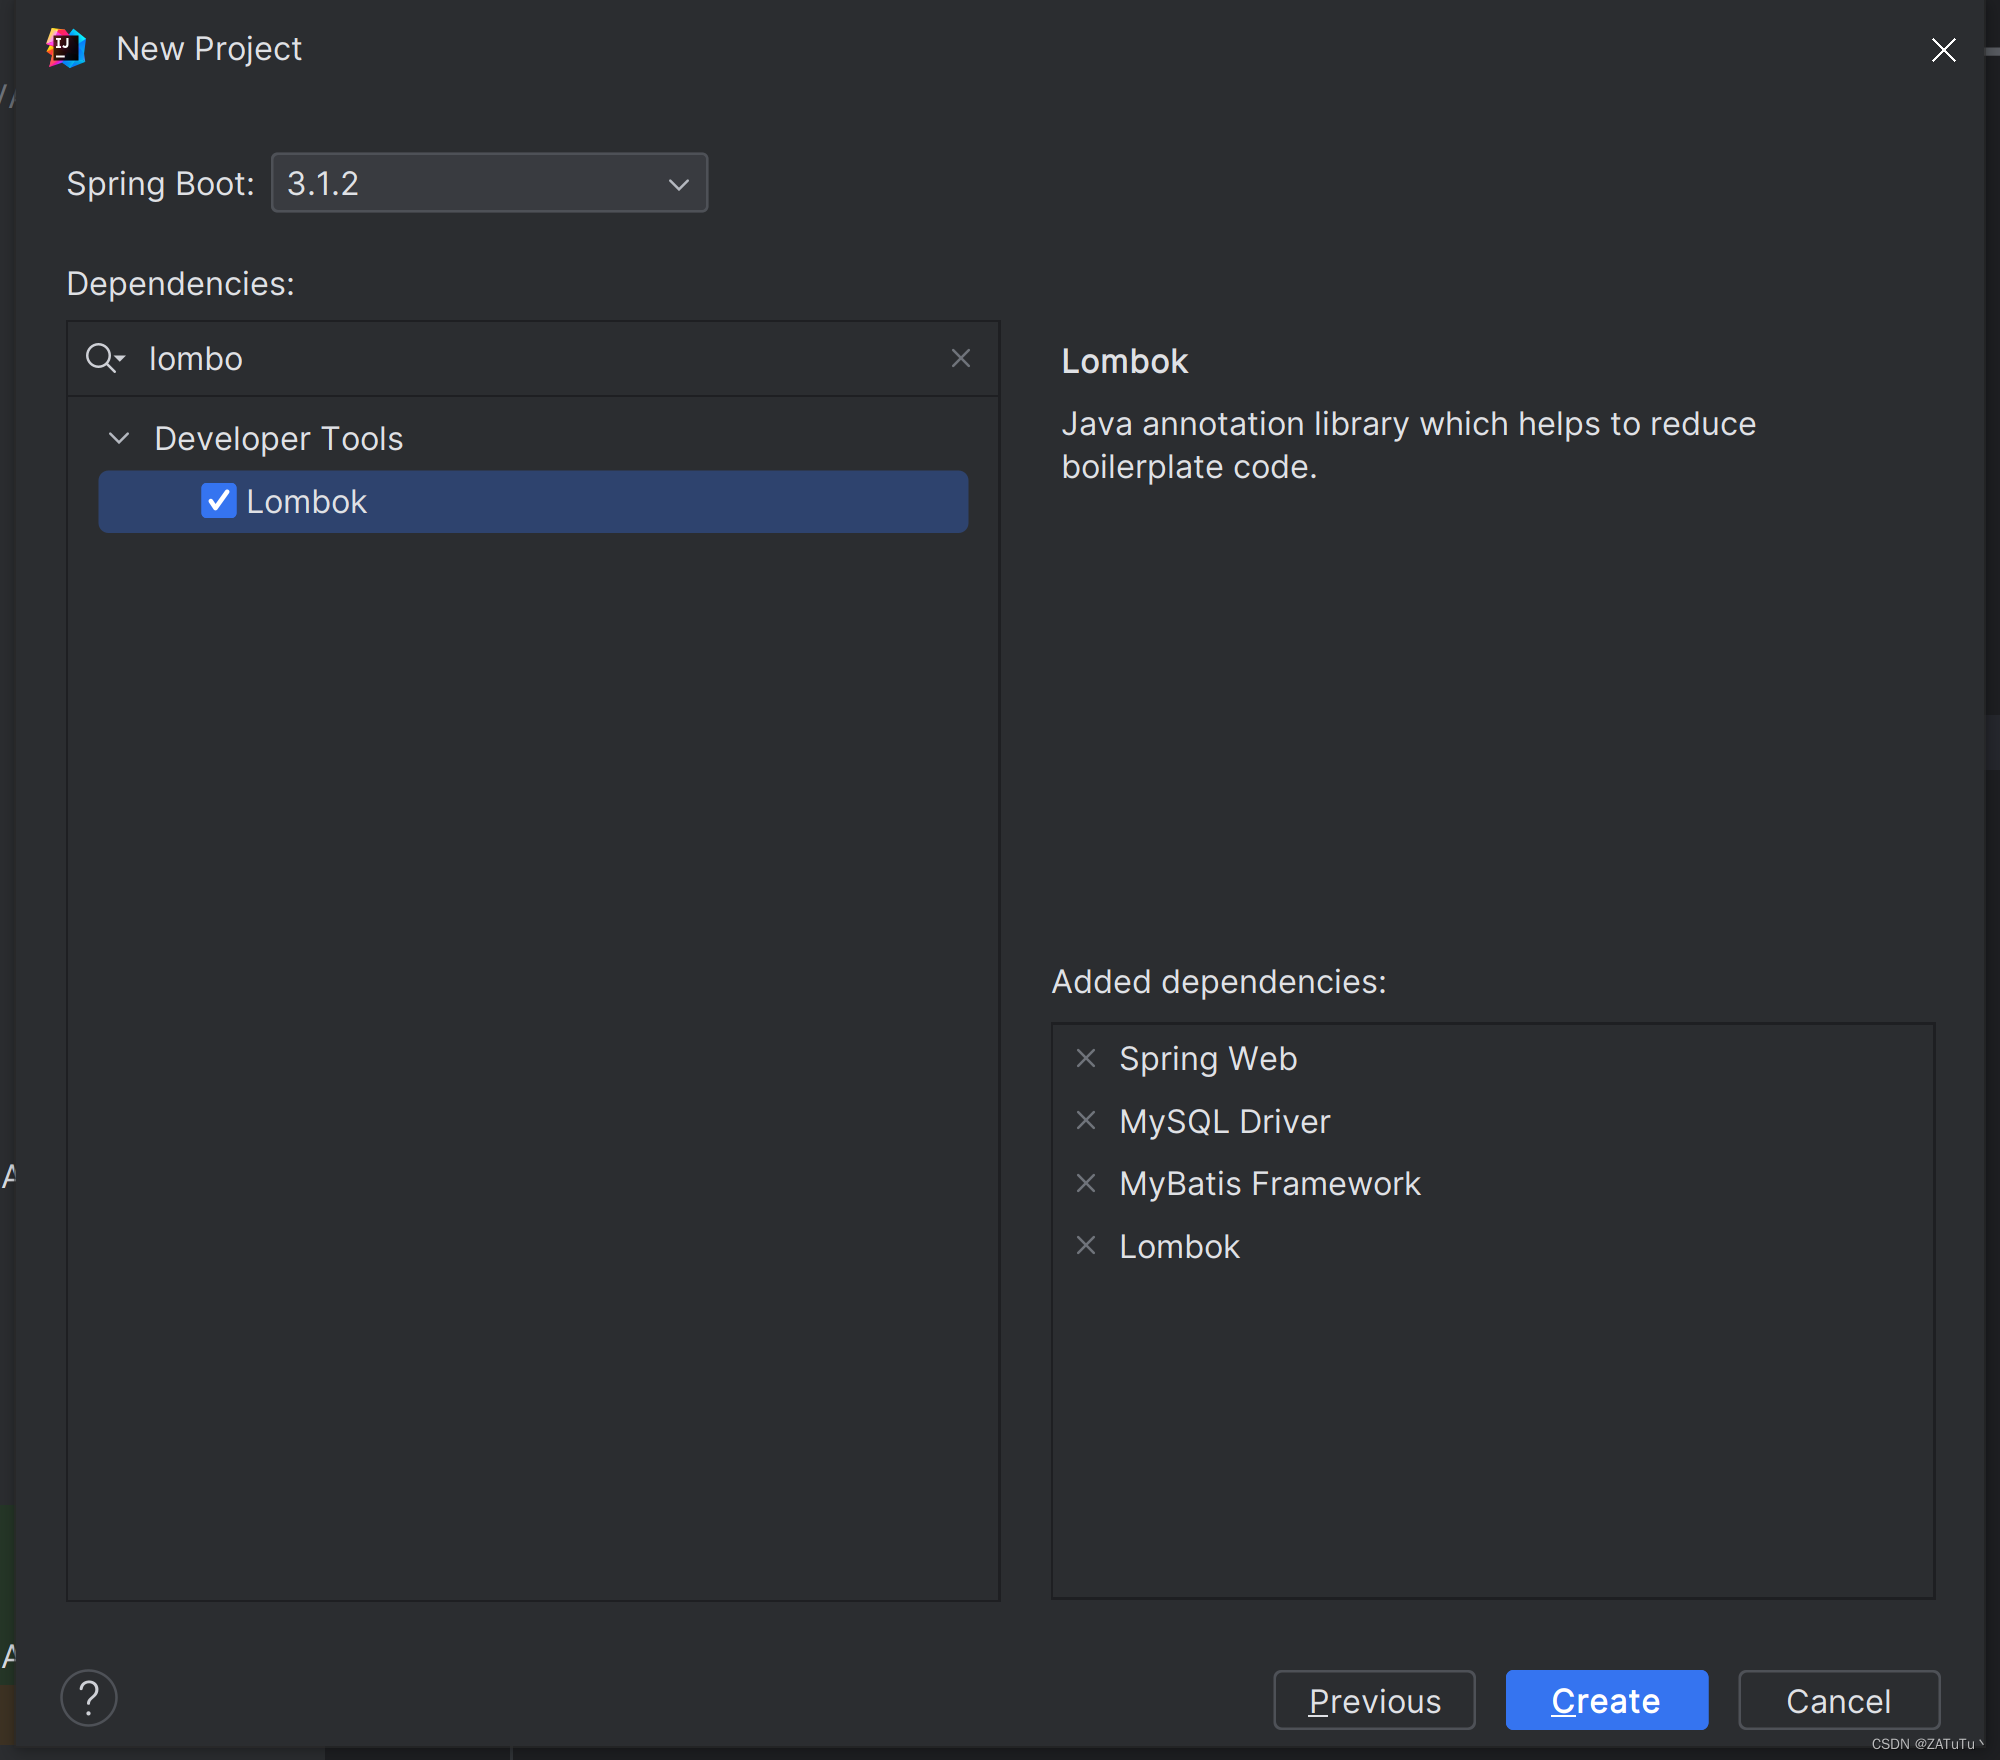
创建新项目,注意Type要选择Maven

Spring Boot的版本没啥硬性要求,一般开开发环境
依赖必选MySQL Driver、MyBatis Framework;
选Spring Web是为了辅助未来的web开发;
Lombok是个人开发习惯。
配置
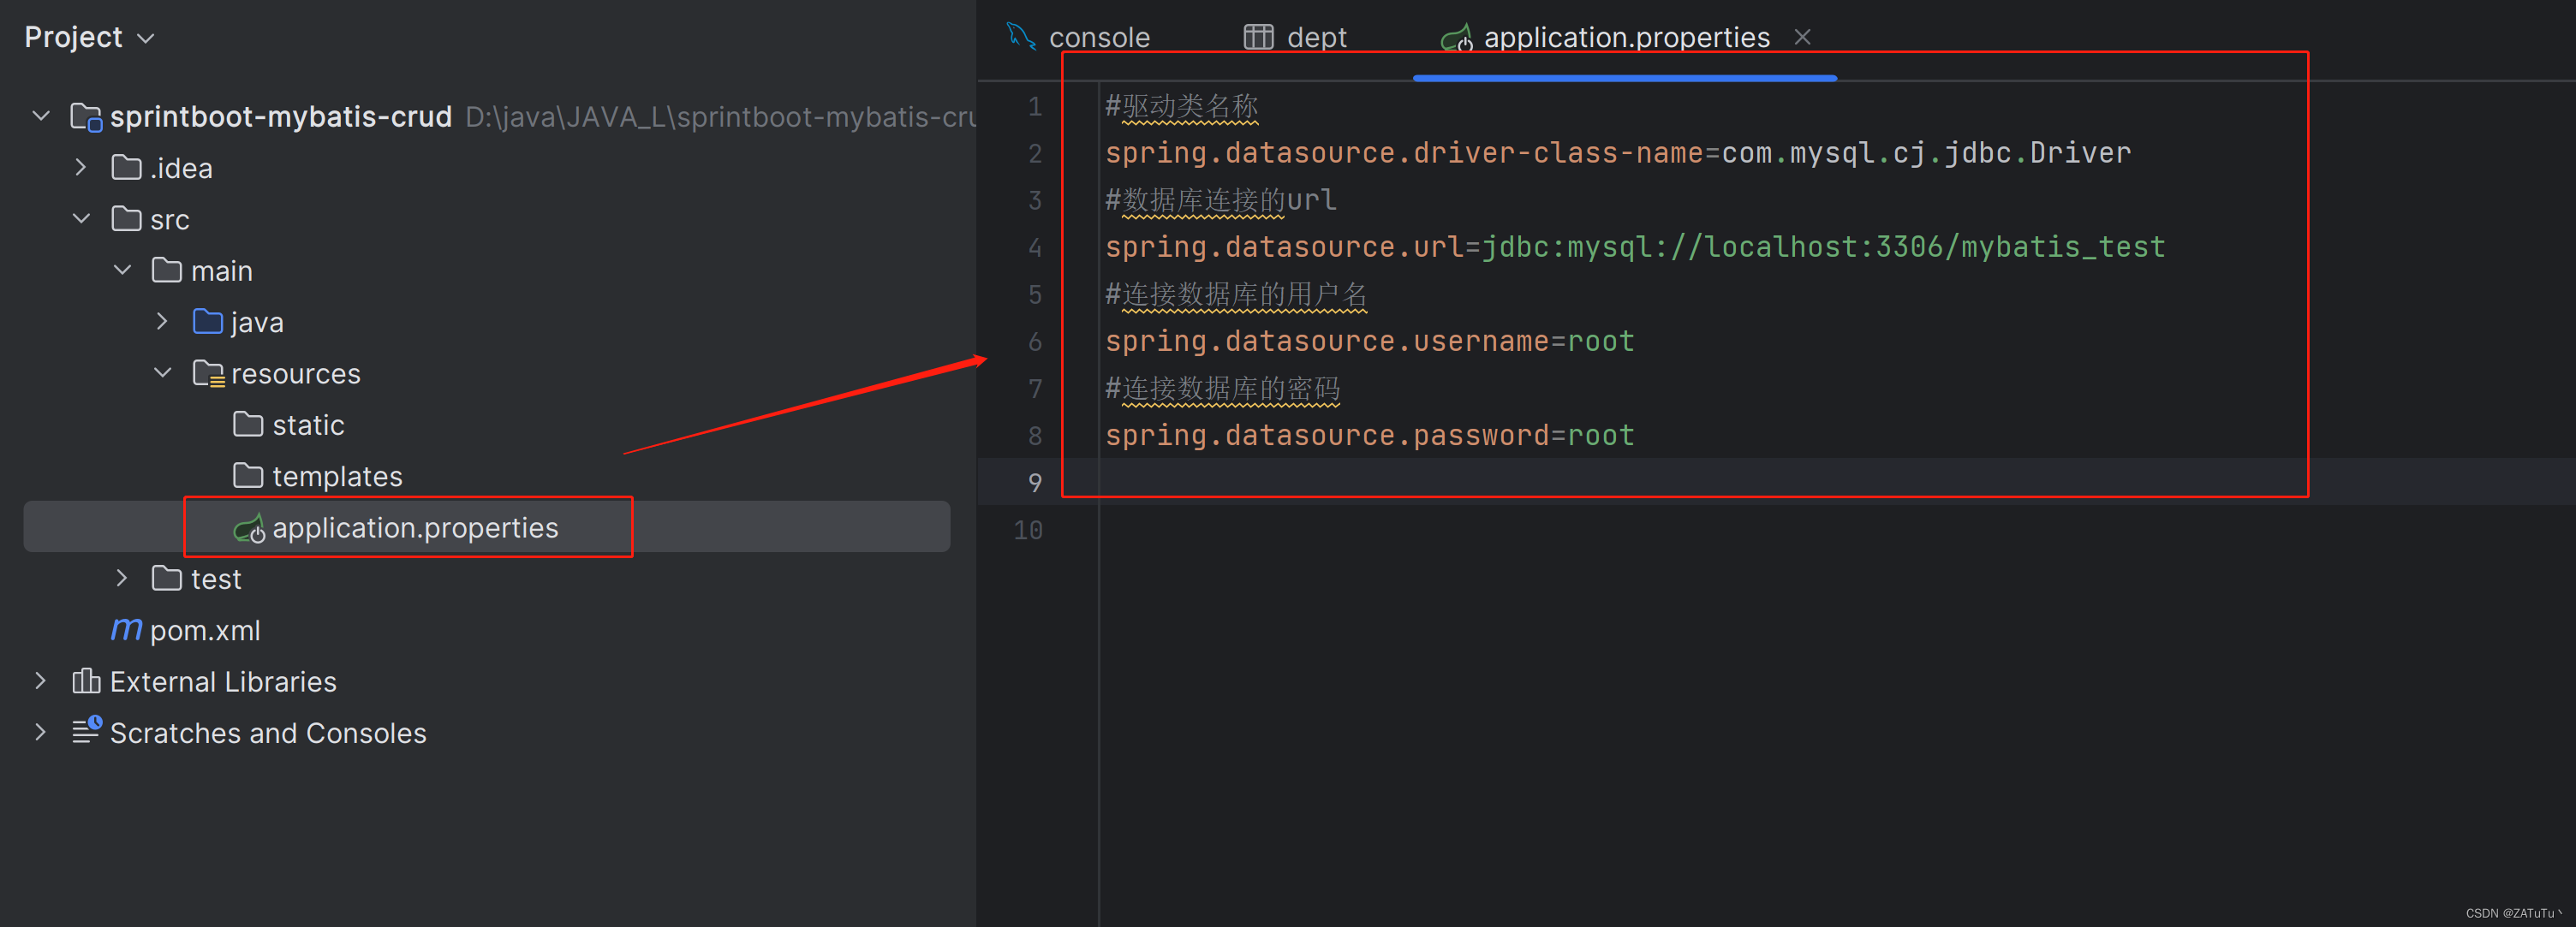
找到resources下的application.properties,在该文件下配置数据库的四要素(驱动、数据库连接、用户和密码)
#驱动类名称
spring.datasource.driver-class-name=com.mysql.cj.jdbc.Driver
#数据库连接的url   //使用的时候记得自己改一下mybatis_test指的是要操控数据库的名称
spring.datasource.url=jdbc:mysql://localhost:3306/mybatis_test
#连接数据库的用户名
spring.datasource.username=root
#连接数据库的密码
spring.datasource.password=root
在这里插入代码片
实现
在com.ztt.pojo包下构建实体类Emp,
因为我们有Lombok所以可以通过@Data(生成Getter和Setter方法)@NoArgsConstructor(无参构造)@AllArgsConstructor(全参构造)。
package com.ztt.pojo;

import lombok.AllArgsConstructor;
import lombok.Data;
import lombok.NoArgsConstructor;

import java.time.LocalDate;
import java.time.LocalDateTime;

@Data
@NoArgsConstructor
@AllArgsConstructor
public class Emp {
    private Integer id; //用户ID
    private String username; // 用户名
    private String password; //密码
    private String name; //姓名
    private Short gender; // 性别
    private String image; // 图像的URL
    private Short job; //职位
    private LocalDate entrydate; //入职时间
    private Integer deptId; // 部门ID
    private LocalDateTime createTime; //创建时间
    private LocalDateTime updateTime; //更新时间
}
com.ztt.mapper下实现接口方法(interface )。
删除数据
直接在EmpMapper下实现Mybatis的删除数据方法,通过@Mapper自动创建接口的代理对象,并将对象装入IOC容器中,在@Delete中写需要SQL语句,利用#{}作为占位符。
@Mapper //自动创建接口的代理对象,并将对象装入IOC容器中
public interface EmpMapper {
    // 删除数据
    @Delete("delete from emp where id = #{id}")
    public int delete(Integer id);

   }
删除方法
这里所有方法都包裹在public interface EmpMapper {},为了方便这里就不写了
@Options用于主键返回,keyProperty = "id"指的是主键返回到那个参数上,未来可以直接通过 emp.id 在java中查看到主键,同理这里也用#{}占位符。
    // 新增员工
    @Options(useGeneratedKeys = true,keyProperty = "id")  //用于主键返回,返回的主键通过keyProperty控制,并将其返回到emp的ID上
    @Insert("insert into  emp(username,name,gender,image,job,entrydate,dept_id,create_time,update_time)"+
    "values (#{username},#{name},#{gender},#{image},#{job},#{entrydate},#{deptId},#{createTime},#{updateTime});")
    public void insert(Emp emp);
更新数据
// 更新数据
    @Update("update emp set username=#{username},name=#{name},gender=#{gender},image=#{image},job=#{job},entrydate=#{entrydate},dept_id=#{deptId},update_time=#{updateTime} where id = #{id};")
    public void update(Emp emp);
查询数据
@Select("select * from emp where id = #{id}")
    public Emp getEmpById(Integer id);
这里需要注意,由于数据库中字段名为update_time、dept_id;但是我们上面实现的实体类中名称为updateTime、deptId,上下有不一致的问题。
我们检索到的结果为:emp(id=1, username=jinyong, password=123456, name=金庸, gender=1, image=1.jpg, job=4, entrydate=2000-01-01, deptId=null, createTime=null, updateTime=null),可以看到不匹配的位置都是空的。
为了解决上述问题一共有三种解决办法
1.在SQL语言中起别名,来跟我们的实体类对应,完成映射
@Select("select id,username,password,name,gender,image,job,entrydate,dept_id deptId,create_time createTime,update_time updateTime from emp where id = #{id}")
public Emp getEmpById(Integer id);
2.采用封装映射的办法,利用Mybatis中的Results和Result进行映射定义
@Results({
           @Result(column = "dept_id",property = "deptId"),
           @Result(column = "update_time",property = "updateTime"),
           @Result(column = "create_time",property = "createTime")
  })
 public Emp getEmpById(Integer id);
- 解决方法3 --开启mybatis的驼峰命名自动映射开关,在application.properties中自动配置
我们转到application.properties添加驼峰映射开关:mybatis.configuration.map-underscore-to-camel-case=true
添加完成后SQL语句查找出来的dept_id就会自动映射成deptId,然后我们再使用上面的方法就可以了。
@Select("select * from emp where id = #{id}")
    public Emp getEmpById(Integer id);
列表条件查询
    @Select("select * from emp where name like concat('%',#{name},'%') and gender = #{gender} " +
        "and entrydate between #{begin} and #{end}" +
        " order by update_time desc ;")
    public List<Emp> selectList(String name, Short gender, LocalDate begin, LocalDate end);
Mapper文件全部代码
package com.ztt.mapper;

import com.ztt.pojo.Emp;
import org.apache.ibatis.annotations.*;

import java.time.LocalDate;
import java.util.List;

@Mapper //自动创建接口的代理对象,并将对象装入IOC容器中
public interface EmpMapper {
    // 删除数据
    @Delete("delete from emp where id = #{id}")
    public int delete(Integer id);

    // 新增员工
    @Options(useGeneratedKeys = true,keyProperty = "id")  //用于主键返回,返回的主键通过keyProperty控制,并将其返回到emp的ID上
    @Insert("insert into  emp(username,name,gender,image,job,entrydate,dept_id,create_time,update_time)"+
    "values (#{username},#{name},#{gender},#{image},#{job},#{entrydate},#{deptId},#{createTime},#{updateTime});")
    public void insert(Emp emp);

    // 更新数据
    @Update("update emp set username=#{username},name=#{name},gender=#{gender},image=#{image},job=#{job},entrydate=#{entrydate},dept_id=#{deptId},update_time=#{updateTime} where id = #{id};")
    public void update(Emp emp);

    // 查询数据
    // @Select("select * from emp where id = #{id}")
    // emp(id=1, username=jinyong, password=123456, name=金庸, gender=1, image=1.jpg, job=4, entrydate=2000-01-01, deptId=null, createTime=null, updateTime=null)

    // 解决方法1--起别名
    //@Select("select id,username,password,name,gender,image,job,entrydate,dept_id deptId,create_time createTime,update_time updateTime from emp where id = #{id}")
    // 解决方法2--封装映射
//    @Results({
//            @Result(column = "dept_id",property = "deptId"),
//            @Result(column = "update_time",property = "updateTime"),
//            @Result(column = "create_time",property = "createTime")
//    })
    // 比较繁琐一般不用

    //解决方法3 --开启mybatis的驼峰命名自动映射开关
    // 在application.properties中自动配置
    @Select("select * from emp where id = #{id}")
    public Emp getEmpById(Integer id);

    // 列表条件查询

//    @Select("select * from emp where name like '%${name}%' and gender = #{gender} " +
//            "and entrydate between #{begin} and #{end}" +
//            " order by update_time desc ;")
    // 在使用过程中仍然要尽量避免使用${name}占位符,可以直接使用SQL的拼接方法
    @Select("select * from emp where name like concat('%',#{name},'%') and gender = #{gender} " +
        "and entrydate between #{begin} and #{end}" +
        " order by update_time desc ;")
    public List<Emp> selectList(String name, Short gender, LocalDate begin, LocalDate end);
    }
SQL中占位符
一般来说占位符有两种分别是#{...}和${...}。
执行SQL时候,Spring会将#{...}替换为?,从而生成预编译的SQL,会自动设置参数值,一般参数传递建议使用#{...}。
而${...},通常是拼接SQL,直接将参数拼接到SQL语句中,这样做的问题是可能存在注入攻击的风险。
所以我们一般不推荐使用${...}。
注意:列表条件查询,如果涉及到:
@Select("select * from emp where name like '%${name}%' and gender = #{gender} and entrydate between #{begin} and #{end} order by update_time desc ;")这种语句。'%#{name}%'可能会面临#{…}失效的问题。
为应对SQL中字符串的拼接问题,我们一般采用SQL中的concat()拼接来解决问题
例如:上面的拼接我们就可以转换成
@Select("select * from emp where name like concat('%',#{name},'%') and gender = #{gender} and entrydate between #{begin} and #{end} order by update_time desc ;")
测试
测试直接放在测试文件下进行测试即可
package com.ztt;

import com.ztt.mapper.EmpMapper;
import com.ztt.pojo.Emp;
import org.junit.jupiter.api.Test;
import org.springframework.beans.factory.annotation.Autowired;
import org.springframework.boot.test.context.SpringBootTest;

import java.time.LocalDate;
import java.time.LocalDateTime;
import java.util.List;

@SpringBootTest
class SprintbootMybatisCrudApplicationTests {

    @Autowired
    private EmpMapper empMapper;

    @Test
    public void testDelete()
    {
        int delete = empMapper.delete(17);
        System.out.println(delete);
    }
    @Test
    public void testInsert()
    {
        // 构造员工对象
        Emp emp = new Emp();
        emp.setUsername("Tom1");
        emp.setName("汤姆1");
        emp.setImage("1.jpg");
        emp.setGender((short)1);
        emp.setJob((short)1);
        emp.setEntrydate(LocalDate.of(2000,1,1));
        emp.setCreateTime(LocalDateTime.now());
        emp.setUpdateTime(LocalDateTime.now());
        emp.setDeptId(1);

        empMapper.insert(emp);
        System.out.println(emp.getId());  //主键返回接受
    }

    @Test
    public void testUpdate()
    {
        // 构造员工对象
        Emp emp = new Emp();

        emp.setId(19);

        emp.setUsername("Tom13");
        emp.setName("汤姆13");
        emp.setImage("2.jpg");
        emp.setGender((short)2);
        emp.setJob((short)2);
        emp.setEntrydate(LocalDate.of(2000,2,2));
        emp.setUpdateTime(LocalDateTime.now());
        emp.setDeptId(2);

        empMapper.update(emp);
    }

    @Test
    public void testSelectEmp()
    {
        Emp emp =new Emp();
        emp = empMapper.getEmpById(1);

        System.out.println(emp);
        // emp(id=1, username=jinyong, password=123456, name=金庸, gender=1, image=1.jpg, job=4, entrydate=2000-01-01, deptId=null, createTime=null, updateTime=null)
    }

    @Test
    public void testList()
    {   List<Emp> emplist = empMapper.selectList("张",(short) 1,LocalDate.of(2010,1,1),LocalDate.of(2020,1,1));
        System.out.println(emplist);
    }


}
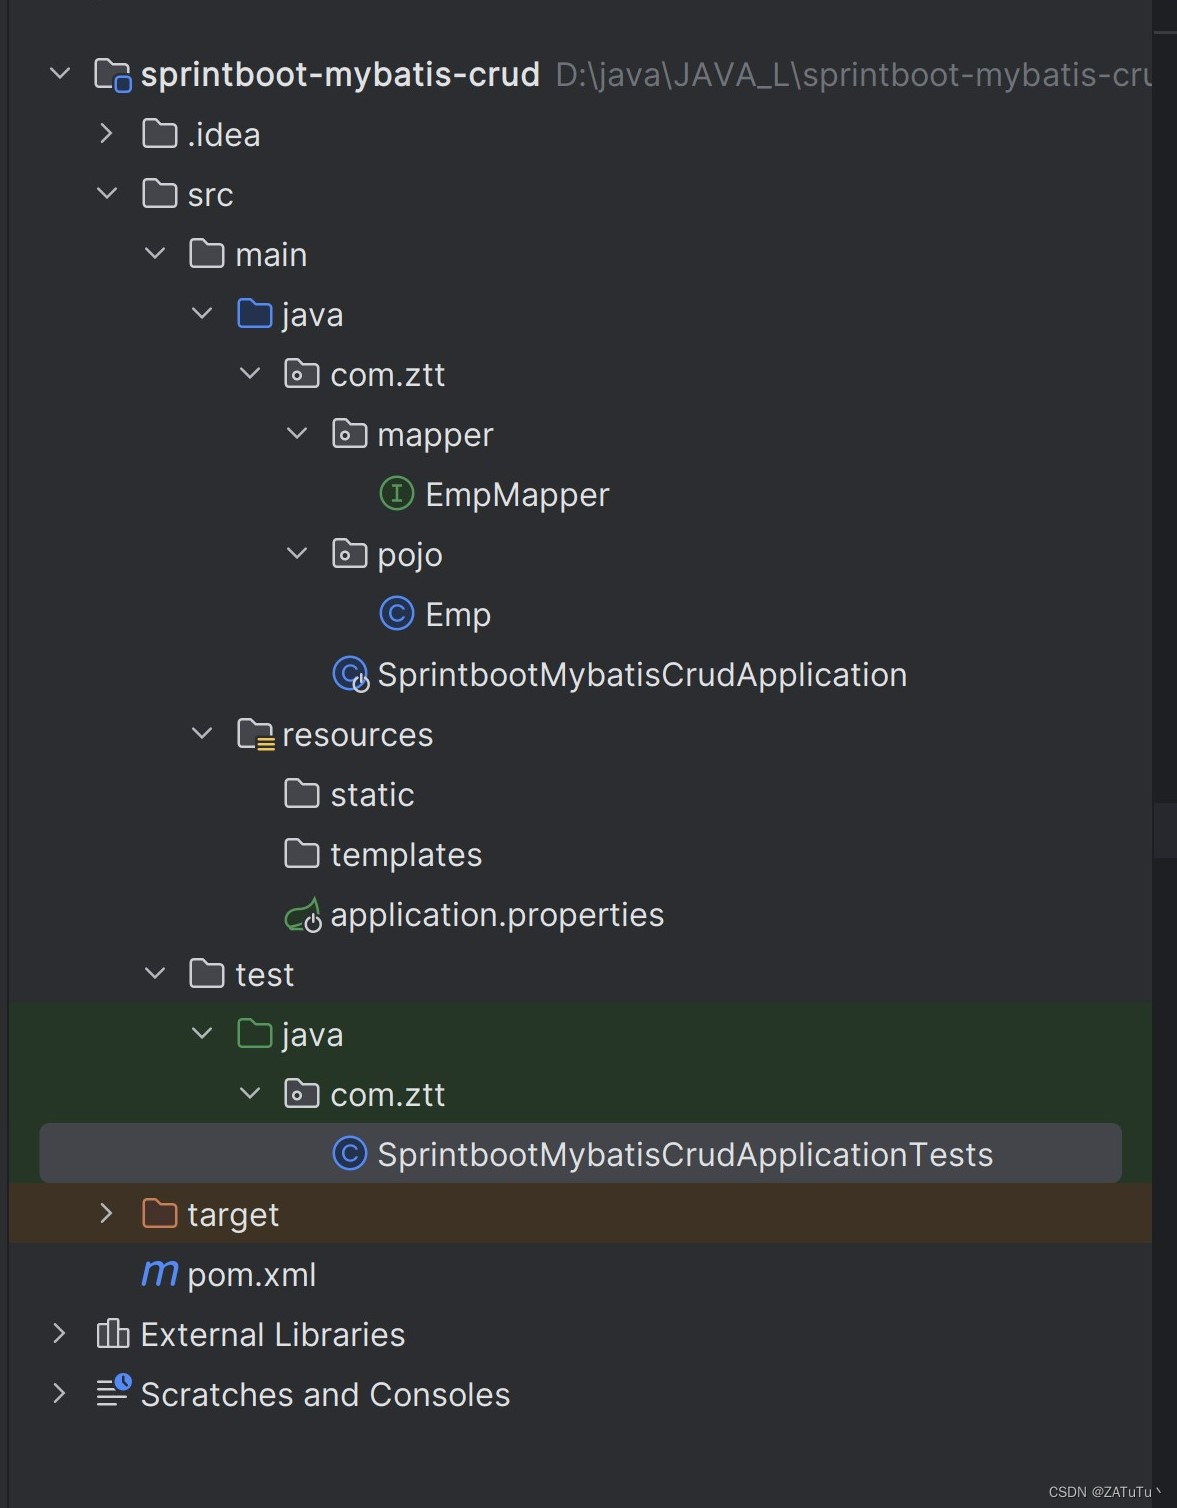
各个文件目录与级别
Mybatis的XML配置文件
Mybatis的开发有两种:注解和XML。
XML配置规范
使用Mybatis的注解方式,主要是来完成一些简单的增删改查功能。如果需要实现复杂的SQL功能,建议使用XML来配置映射语句,也就是将SQL语句写在XML配置文件中。
在Mybatis中使用XML映射文件方式开发,需要符合一定的规范:
-
XML映射文件的名称与Mapper接口名称一致,并且将XML映射文件和Mapper接口放置在相同包下(同包同名)
-
XML映射文件的namespace属性为Mapper接口全限定名一致
-
XML映射文件中sql语句的id与Mapper接口中的方法名一致,并保持返回类型一致。
XML创建
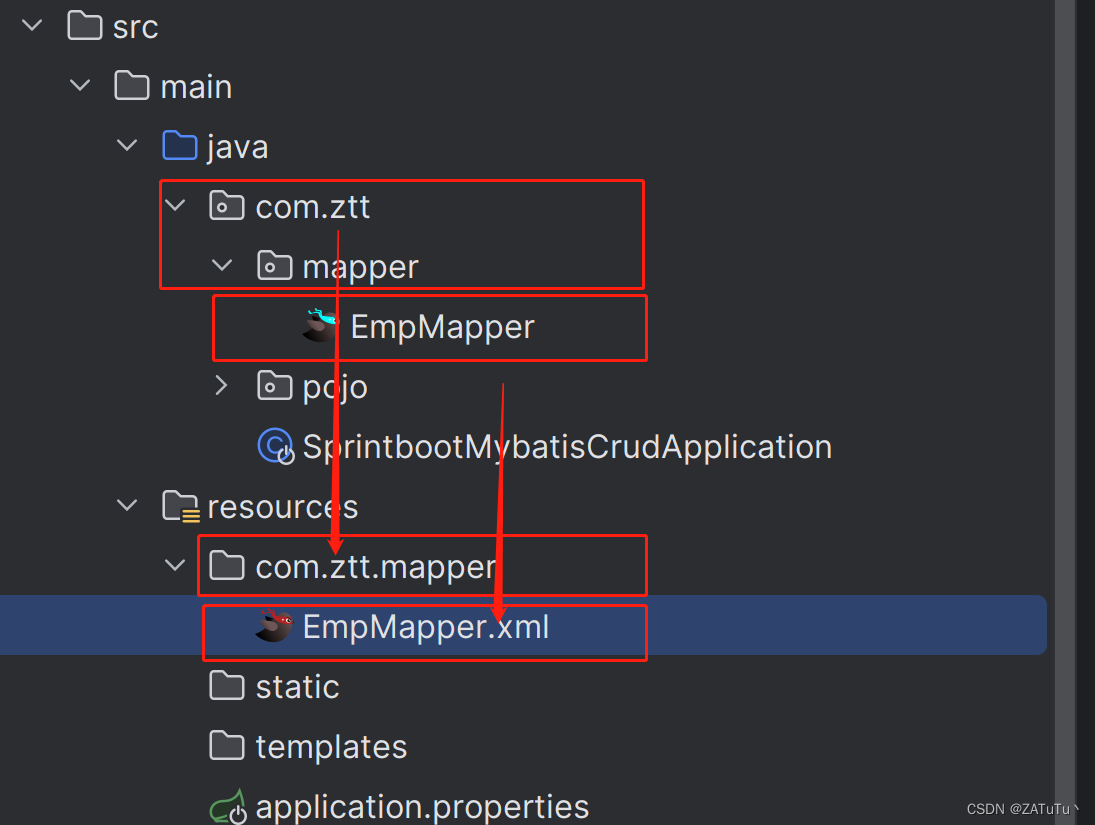
在resources下新建com/ztt/mapper包(这个要与上面的接口包名对应),在这个包下新建EmpMapper.xml文件,这个文件名要与EmpMapper对应。
这一段不用记住,直接去官网下载就行或复制就行。
<?xml version="1.0" encoding="UTF-8" ?>
<!DOCTYPE mapper
  PUBLIC "-//mybatis.org//DTD Mapper 3.0//EN"
  "https://mybatis.org/dtd/mybatis-3-mapper.dtd">
<mapper namespace="">

</mapper>
具体的Mybatis配置放在下面,被<mapper>包裹,单独的SQL语句被<select>或<delete>这样的符号包裹。
XML映射文件的namespace属性为Mapper接口全限定名。
XML映射文件中sql语句的id与Mapper接口中的方法名一致,并保持返回类型一致。
resultType为返回类型,
<?xml version="1.0" encoding="UTF-8"?>

<!DOCTYPE mapper PUBLIC "-//mybatis.org//DTD Mapper 3.0//EN"
        "http://mybatis.org/dtd/mybatis-3-mapper.dtd">

<mapper namespace="com.ztt.mapper.EmpMapper">
    <select id="selectListByXML" resultType="com.ztt.pojo.Emp">
        select *
        from emp
        <where>
            <if test="name != null">
                name like concat('%', #{name}, '%')
            </if>
            <if test="gender !=null">
                and gender = #{gender}
            </if>
            <if test="begin!=null and end!=null">
                and entrydate between #{begin} and #{end}
            </if>
        </where>
        order by update_time desc;
    </select>

    <delete id="deleteByXML">
        delete from emp where id = #{id}
    </delete>

    <insert id="insertByXML">
        insert into  emp(username,name,gender,image,job,entrydate,dept_id,create_time,update_time)
    values (#{username},#{name},#{gender},#{image},#{job},#{entrydate},#{deptId},#{createTime},#{updateTime});
    </insert>

    <update id="updateByXML">
        update emp set username=#{username},name=#{name},gender=#{gender},image=#{image},job=#{job},entrydate=#{entrydate},dept_id=#{deptId},update_time=#{updateTime} where id = #{id};
    </update>

    <select id="getEmpByIdByXML" resultType="com.ztt.pojo.Emp">
        select * from emp where id = #{id}
    </select>


</mapper>


 3258
3258


 被折叠的 条评论
为什么被折叠?
被折叠的 条评论
为什么被折叠?
 到【灌水乐园】发言


