


导语
作者现在是一名 Java 后台开发工程师,在公司负责后台业务代码的实现。公司是前后端开发的模式,这就要求后台人员写接口,前端人员调用。
所以这就需要一款接口文档能够实时的将后端写的接口展示给前端开发人员看。
目前我所了解的有两种:
- Swagger
- Knife4j:knife4j是为Java MVC框架集成Swagger生成Api文档的增强解决方案,前身是swagger-bootstrap-ui,取名knife4j是希望她能像一把匕首一样小巧,轻量,并且功能强悍!
二者都能实现相同的功能。
1 Swagger
1.1 添加依赖
使用之前首先在pom.xml文件中新增Swagger所需要的依赖
<dependency>
    <groupId>io.springfox</groupId>
    <artifactId>springfox-swagger2</artifactId>
    <version>2.4.0</version>
</dependency>
<dependency>
    <groupId>io.springfox</groupId>
    <artifactId>springfox-swagger-ui</artifactId>
    <version>2.4.0</version>
</dependency>
<dependency>
    <groupId>com.github.xiaoymin</groupId>
    <artifactId>swagger-bootstrap-ui</artifactId>
    <version>1.9.6</version>
</dependency>
默认创建的SpringBoot项目默认有spring-boot-starter,除此之外还需要引入web模块的依赖spring-boot-starter-web。
1.2 添加配置
- 首先在application.yml中添加下面代码
swagger2:
  enable: true
- 编写Swagger 配置类
package com.ifknow.config;

import com.ifknow.annotation.Api_Base;
import com.ifknow.annotation.Api_Business;
import org.springframework.beans.factory.annotation.Value;
import org.springframework.context.annotation.Bean;
import org.springframework.context.annotation.Configuration;
import springfox.documentation.builders.ApiInfoBuilder;
import springfox.documentation.builders.PathSelectors;
import springfox.documentation.builders.RequestHandlerSelectors;
import springfox.documentation.service.ApiInfo;
import springfox.documentation.service.Contact;
import springfox.documentation.spi.DocumentationType;
import springfox.documentation.spring.web.plugins.Docket;
import springfox.documentation.swagger2.annotations.EnableSwagger2;

/**
 * @Author: ifknow <br>
 * @Date: 2020/8/20  11:19 <br>
 * @Description: Swagger2 配置类
 */
@Configuration
@EnableSwagger2
public class Swagger2Config {

    @Value("${swagger2.enable}")
    private boolean enable;

    /**
     * 配置swagger2核心配置docket </br>
     * swagger访问路径:http://localhost:8081/swagger-ui.html </br>
     * swagger业务接口api
     *
     * @return
     */
    @Bean
    public Docket restApiBusiness() {
        return new Docket(DocumentationType.SWAGGER_2)
                .groupName("业务分组接口")
                .apiInfo(apiInfo())
                .select()
                .apis(RequestHandlerSelectors.withClassAnnotation(Api_Business.class))
                .paths(PathSelectors.any())
                .build()
                .enable(enable);
    }

    @Bean
    public Docket restApiBase() {
        return new Docket(DocumentationType.SWAGGER_2)
                .groupName("基础接口")
                .apiInfo(apiInfoBase())
                .select()
                .apis(RequestHandlerSelectors.withClassAnnotation(Api_Base.class))
                .paths(PathSelectors.any())
                .build()
                .enable(enable);
    }

    private ApiInfo apiInfo() {
        return new ApiInfoBuilder()
                .title("业务分组接口")
                .contact(new Contact("ifknow", "http://www.gongshiyong.online", "shiyongjava@163.com"))
                .description("ifknow测试Swagger")
                .version("1.0.0")
                .termsOfServiceUrl("http://www,gongshiyong.online")
                .build();
    }

    private ApiInfo apiInfoBase() {
        return new ApiInfoBuilder()
                .title("基础接口")
                .contact(new Contact("ifknow", "http://www.gongshiyong.online", "shiyongjava@163.com"))
                .description("ifknow测试Swagger")
                .version("1.0.0")
                .termsOfServiceUrl("http://www,gongshiyong.online")
                .build();
    }
}
package com.ifknow.annotation;

import java.lang.annotation.ElementType;
import java.lang.annotation.Retention;
import java.lang.annotation.RetentionPolicy;
import java.lang.annotation.Target;

/**
 * @Author: ifknow <br>
 * @Date: 2020/8/20  11:34 <br>
 * @Description: NO Description
 */
@Target(ElementType.TYPE)
@Retention(RetentionPolicy.RUNTIME)
public @interface Api_Business {
}
package com.ifknow.annotation;

import java.lang.annotation.ElementType;
import java.lang.annotation.Retention;
import java.lang.annotation.RetentionPolicy;
import java.lang.annotation.Target;

/**
 * @Author: ifknow <br>
 * @Date: 2020/8/20  11:50 <br>
 * @Description: NO Description
 */
@Target(ElementType.TYPE)
@Retention(RetentionPolicy.RUNTIME)
public @interface Api_Base {
}
1.3 编写代码测试
package com.ifknow.controller;
import com.ifknow.annotation.Api_Business;
import io.swagger.annotations.Api;
import io.swagger.annotations.ApiOperation;
import org.springframework.web.bind.annotation.*;
/**
* @Author: ifknow <br>
* @Date: 2020/8/20 11:37 <br>
* @Description: 用户信息Controller
*/
@Api(value = "用户管理 - 用户信息管理api", tags = "用户管理 - 用户信息管理api")
@RestController
@RequestMapping("/user")
@Api_Business
public class UserController {
@ApiOperation(value = "新增用户信息", notes = "新增用户信息")
@PostMapping("/insert")
public String insert() {
return "success";
}
@ApiOperation(value = "删除用户信息", notes = "删除用户信息")
@DeleteMapping("/delete")
public String delete(@RequestParam String id) {
return "success";
}
@ApiOperation(value = "修改用户信息", notes = "修改用户信息")
@PutMapping("/update")
public String update() {
return "success";
}
@ApiOperation(value = "查询用户信息", notes = "查询用户信息")
@GetMapping("/pageInfo")
public String pageInfo() {
return "success";
}
}
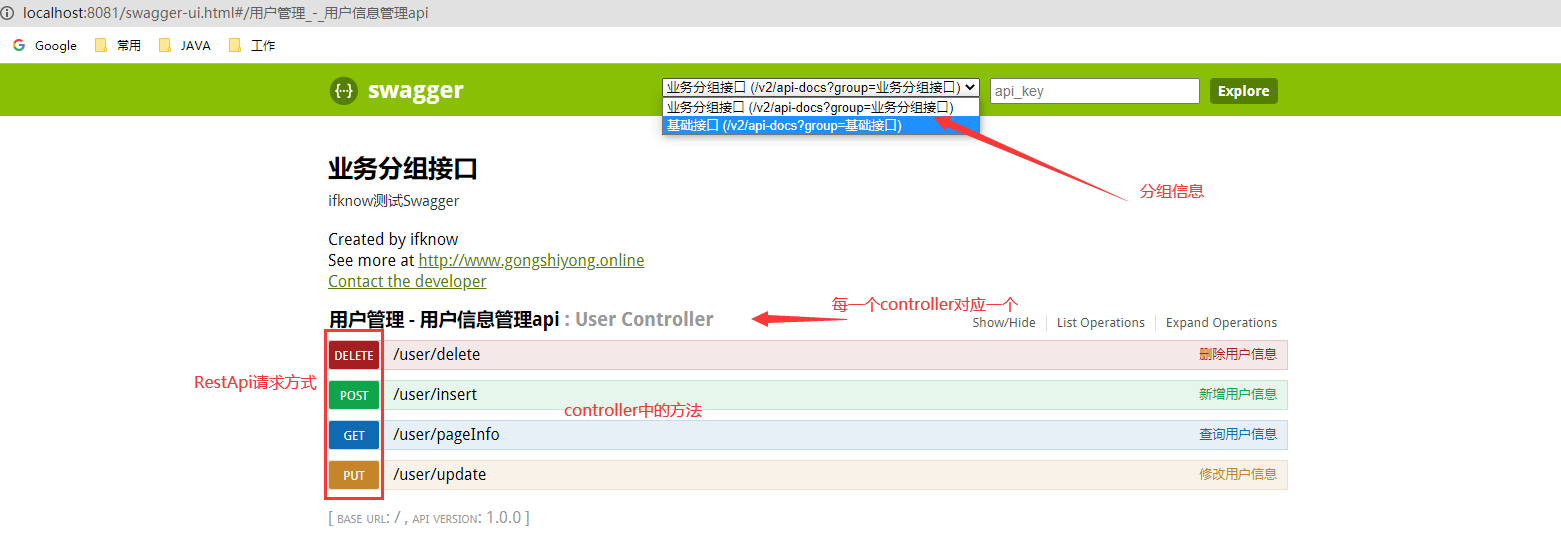
- 打开浏览器访问 http://localhost:8081/swagger-ui.html ,就可以看见 在controller中定义的方法,参数,返回值等。
2 Knife4j
2.1 添加依赖
Knife4j 的前身就是swagger。在swagger添加的依赖基础上,新增knife4j自己的依赖。
<!--整合Knife4j-->
<dependency>
    <groupId>com.github.xiaoymin</groupId>
    <!--在引用时请在maven中央仓库搜索最新版本号-->
    <artifactId>knife4j-spring-boot-starter</artifactId>
    <version>2.0.4</version>
</dependency>
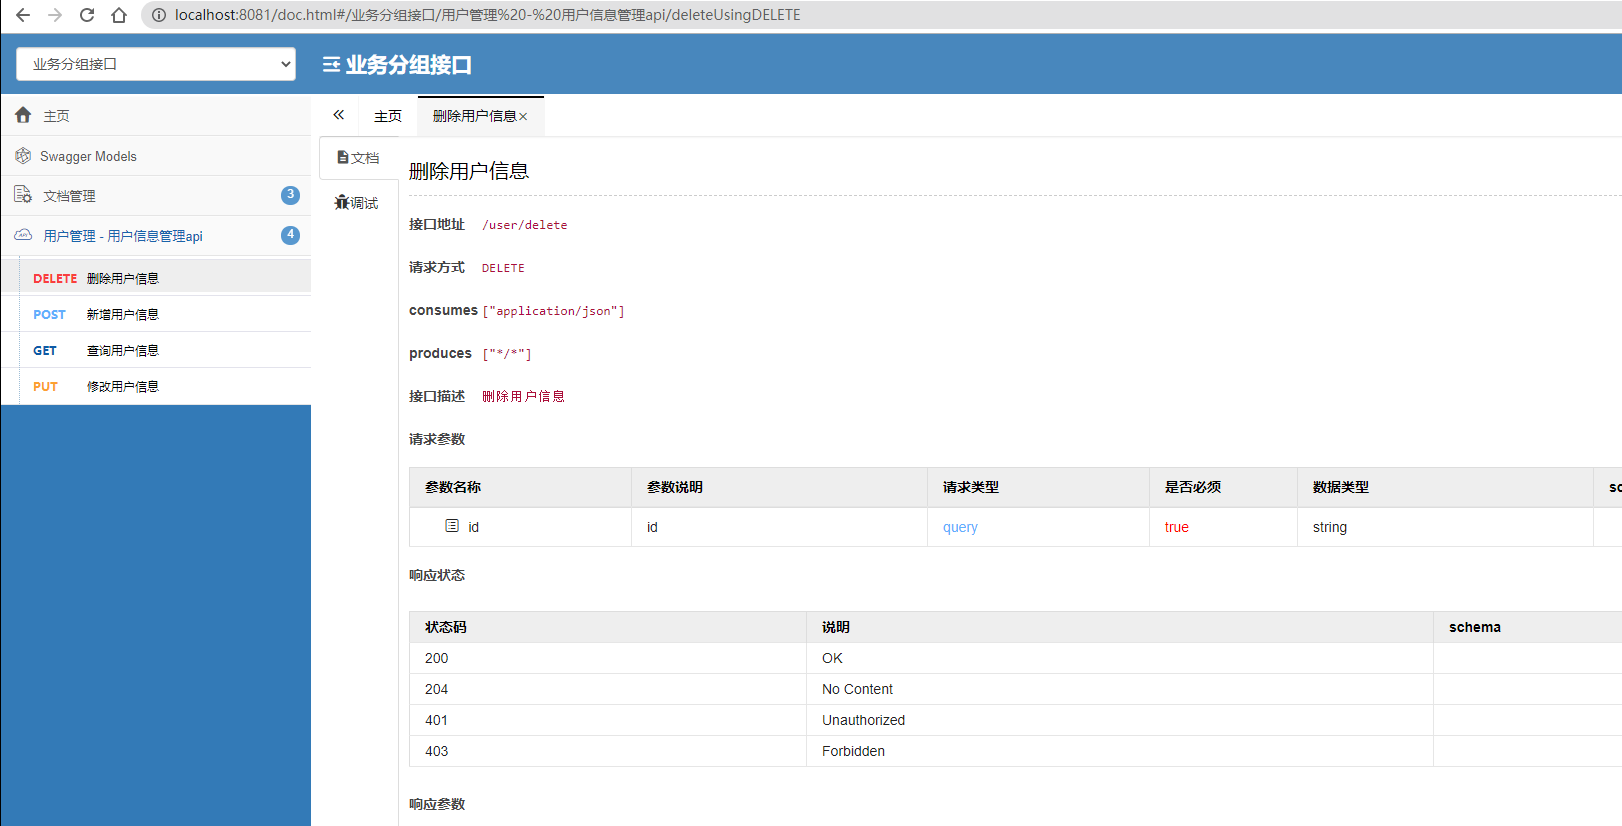
- 打开浏览器访问:http://localhost:8081/doc.html 。
3 总结
这两种接口展示我感觉来说,没有什么大的区别,用着合适就可以。
示例代码-GitHub


 1257
1257

 被折叠的 条评论
为什么被折叠?
被折叠的 条评论
为什么被折叠?
 到【灌水乐园】发言


