


什么是Http请求?
Http请求是客户端和服务器端之间,发送请求和返回应答的标准(TCP);
客户端发出一个HTTP请求之后,就与服务器建立起了TCP链接,服务端接收到请求并进行处理后返回给客户端相应数据。
什么是HttpURLConnection?
HttpURLConnection是一种多用途,轻量极的Http客户端,使用它来进行Http操作可以适用于大多数的应用程序
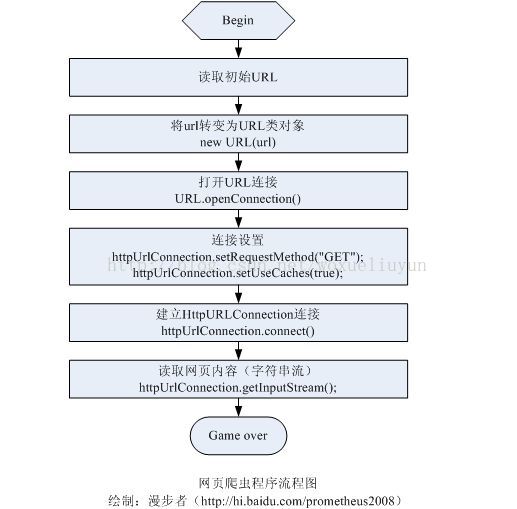
如何使用HttpURLConnection?
使用HttpURLConnection发送get请求的步骤:
1.创建URL对象;
2.通过URL对象调用openConnection()方法获得HttpURLConnection对象;
3.HttpURLConnection对象设置其他链接属性;
4.HttpURLConnection对象调用getInputStream()方法想服务器发送http请求,并获取到服务器返回的输入流;
5.读取输入流,转换成string字符串。
注意:
1.在Android中访问网络必须添加网络权限;
2.在Android中访问网络必须放在子线程中执行。
使用HttpURLConnection获取Http请求(以访问CSDN网站为例,附代码)
第一步添加网络权限,在manifest中与Application同级位置添加一段代码就可以了:
<uses-permission android:name="android.permission.INTERNET" />这里使用AsyncTask方法,java代码如下:
public class AActivity extends AppCompatActivity {

    private Button webBtn;
    private TextView webTV;
    private String webText;

    @Override
    protected void onCreate(Bundle savedInstanceState) {
        super.onCreate(savedInstanceState);
        setContentView(R.layout.activity_a);

        bindID();

        webBtn.setOnClickListener(new View.OnClickListener() {
            @Override
            public void onClick(View view) {
                new MyAsyncTask().execute();
            }
        });

    }

    private void bindID() {
        webBtn = findViewById(R.id.web_btn);
        webTV = findViewById(R.id.web_tv);
    }

    class MyAsyncTask extends AsyncTask<Integer,Integer,String>{

        @Override
        protected String doInBackground(Integer... integers) {
            try {
                //1.找水源--创建URL
                URL url = new URL("https://www.csdn.net/");
                //2.开水闸--openConnection
                HttpURLConnection httpURLConnection = (HttpURLConnection) url.openConnection();
                //3.建管道--InputStream
                InputStream inputStream = httpURLConnection.getInputStream();
                //4.建蓄水池蓄水--InputStreamReader
                InputStreamReader reader = new InputStreamReader(inputStream,"UTF-8");
                //5.水桶盛水--
                BufferedReader bufferedReader = new BufferedReader(reader);

                StringBuffer stringBuffer = new StringBuffer();
                String temp = null;

                while ((temp=bufferedReader.readLine())!=null){
                    stringBuffer.append(temp);
                }

                bufferedReader.close();
                reader.close();
                inputStream.close();

                webText = stringBuffer.toString();

            } catch (java.io.IOException e) {
                e.printStackTrace();
            }
            return webText;
        }

        @Override
        protected void onPostExecute(String s) {
            super.onPostExecute(s);
            webTV.setText(s);
        }
    }

}
如何使用HttpURLConnection加载网络图片(附代码)
xml布局文件:
<LinearLayout xmlns:android="http://schemas.android.com/apk/res/android"
    xmlns:tools="http://schemas.android.com/tools"
    android:layout_width="match_parent"
    android:layout_height="match_parent"
    android:orientation="vertical"
    tools:context="com.lenovo.demo.WebpicActivity">

    <Button
        android:id="@+id/web_pic_btn"
        android:layout_width="match_parent"
        android:layout_height="50dp"
        android:text="加载网络图片"/>

    <ImageView
        android:id="@+id/web_pic_image"
        android:layout_width="match_parent"
        android:layout_height="match_parent"
        android:scaleType="fitCenter"/>
</LinearLayout>布局效果预览图:
WebpicActivity代码:
public class WebpicActivity extends AppCompatActivity {

    private Button webpicBtn;
    private ImageView webpicImage;
    private Bitmap bitmap;

    @Override
    protected void onCreate(Bundle savedInstanceState) {
        super.onCreate(savedInstanceState);
        setContentView(R.layout.activity_webpic);

        bindID();

        webpicBtn.setOnClickListener(new View.OnClickListener() {
            @Override
            public void onClick(View view) {
                PicLoadtASK picLoadtASK = new PicLoadtASK(bitmap,webpicImage);
                picLoadtASK.execute("http://n1.itc.cn/img8/wb/smccloud/2015/04/02/142795296140124773.JPEG");
            }
        });

    }

    private void bindID() {
        webpicBtn = findViewById(R.id.web_pic_btn);
        webpicImage = findViewById(R.id.web_pic_image);
    }


}
这部分代码较为简单,只讲解一处
                PicLoadtASK picLoadtASK = new PicLoadtASK(bitmap,webpicImage);
                picLoadtASK.execute("http://n1.itc.cn/img8/wb/smccloud/2015/04/02/142795296140124773.JPEG");
此处需定义一个外部类来继承AsyncTask方法,进行耗时操作,调用execute()方法进行传值。
下面是定义的外部类的代码:
public class PicLoadtASK extends AsyncTask<String,Integer,Bitmap> {

    private Bitmap bitmap;
    private ImageView webpicImage;

    public PicLoadtASK(Bitmap bit, ImageView Image) {
        bitmap = bit;
        webpicImage = Image;
    }

    @Override
    protected Bitmap doInBackground(String... strings) {
        try {
            URL url = new URL(strings[0]);
            HttpURLConnection connection = (HttpURLConnection) url.openConnection();
            InputStream inputStream = connection.getInputStream();
            bitmap = BitmapFactory.decodeStream(inputStream);
        } catch (MalformedURLException e) {
            e.printStackTrace();
        } catch (IOException e) {
            e.printStackTrace();
        }
        return bitmap;
    }

    @Override
    protected void onPostExecute(Bitmap bitmap) {
        super.onPostExecute(bitmap);
        webpicImage.setImageBitmap(bitmap);
    }
}
由于WebpicActivity代码中定义了一个构造方法用于外部类的方法调用,所以这个外部类里必须重写这个构造方法,进行传值
public PicLoadtASK(Bitmap bit, ImageView Image) {
        bitmap = bit;
        webpicImage = Image;
    }
在doInBackbackground()方法中使用HttpURLConnection下载图片
@Override
    protected Bitmap doInBackground(String... strings) {
        try {
            URL url = new URL(strings[0]);
            HttpURLConnection connection = (HttpURLConnection) url.openConnection();
            InputStream inputStream = connection.getInputStream();
            bitmap = BitmapFactory.decodeStream(inputStream);
        } catch (MalformedURLException e) {
            e.printStackTrace();
        } catch (IOException e) {
            e.printStackTrace();
        }
        return bitmap;
    }
这里重点在于bitmap对象的获取与下载:
bitmap = BitmapFactory.decodeStream(inputStream);返回的是一个bitmap类型的值:
return bitmap;然后在onPostExecute()方法中讲图片显示出来
@Override
    protected void onPostExecute(Bitmap bitmap) {
        super.onPostExecute(bitmap);
        webpicImage.setImageBitmap(bitmap);
}先把DownLoadTask.java的代码贴上
public class DownLoadTask extends AppCompatActivity {

    private Button downBtn;
    private ImageView downImage;

    @Override
    protected void onCreate(Bundle savedInstanceState) {
        super.onCreate(savedInstanceState);
        setContentView(R.layout.activity_download_task);

        bindID();

        downBtn.setOnClickListener(new View.OnClickListener() {
            @Override
            public void onClick(View view) {
                DownLoadPicTask task = new DownLoadPicTask(DownLoadTask.this,downImage);
                task.execute("http://img31.mtime.cn/mg/2012/10/30/201631.37192876.jpg","fra1.jpg");
            }
        });

    }

    private void bindID() {
        downBtn = findViewById(R.id.down_btn);
        downImage = findViewById(R.id.pic_image);
    }
} DownLoadPicTask task = new DownLoadPicTask(DownLoadTask.this,downImage);
task.execute("http://img31.mtime.cn/mg/2012/10/30/201631.37192876.jpg","fra1.jpg");这里还可以写成
new DownLoadTask(DownLoadTask.this,downImage).execute("http://img31.mtime.cn/mg/2012/10/30/201631.37192876.jpg","fra1.jpg");然后创建外部类DownLoadPicTask.java继承AsyncTask()方法,实现doInBackground()与onPostExecute()方法;
先附上完整外部类代码
public class DownLoadPicTask extends AsyncTask<String,Integer,Integer>{

    private Context context;
    private ImageView downImage;
    private String dirPath;
    private String filePath;


    public DownLoadPicTask(Context context,ImageView image) {
        this.context = context;
        this.downImage = image;
    }


    @Override
    protected Integer doInBackground(String... strings) {
        dirPath = Environment.getExternalStorageDirectory()+"/download_pics/";

        File dir = new File(dirPath);//目录
        if (!dir.exists()){
            dir.mkdir();
        }

        filePath = dirPath+strings[1];
        File file = new File(filePath);
        if (file.exists()){
            return -1;
        }else {
            try {
                file.createNewFile();
            } catch (IOException e) {
                e.printStackTrace();
            }
        }

        InputStream inputStream= null;
        OutputStream outputStream = null;

        try {
            URL url = new URL(strings[0]);
            HttpURLConnection connection = (HttpURLConnection) url.openConnection();
            if (connection.getResponseCode()==200){
                inputStream = connection.getInputStream();
            }else {
                return -2;
            }
            outputStream = new FileOutputStream(file);

            int length = 0;
            byte[] buffer = new byte[4*1024];
            while ((length=inputStream.read(buffer))!=-1){
                outputStream.write(buffer,0,length);
            }

            inputStream.close();
            outputStream.close();

        } catch (MalformedURLException e) {
            e.printStackTrace();
        } catch (IOException e) {
            e.printStackTrace();
        }

        return 1;
    }

    @Override
    protected void onPostExecute(Integer integer) {
        super.onPostExecute(integer);
        switch (integer){
            case 1:
                Toast.makeText(context,"下载完成",Toast.LENGTH_SHORT).show();
                Bitmap bm = BitmapFactory.decodeFile(filePath);
                downImage.setImageBitmap(bm);
                break;
            case -1:
                Toast.makeText(context,"文件已存在",Toast.LENGTH_SHORT).show();
                break;
            case -2:
                Toast.makeText(context,"网络异常",Toast.LENGTH_SHORT).show();
                break;
        }
    }
}
首先需要判定文件夹是否存在,所以定义两个目录和文件对象
    private String dirPath;
    private String filePath;
dirPath = Environment.getExternalStorageDirectory()+"/download_pics/";
File dir = new File(dirPath);//目录
        if (!dir.exists()){
            dir.mkdir();
        }
再判断文件是否存在,若不存在,则创建文件
        filePath = dirPath+strings[1];//文件位置就是目录位置+传值过来的文件名
        File file = new File(filePath);
        if (file.exists()){
            return -1;
        }else {
            try {
                file.createNewFile();
            } catch (IOException e) {
                e.printStackTrace();
            }
        }
return的-1传值给onPostExecute()方法进行switch判定
if (file.exists()){
            return -1;
        }
下面对输入流与输出流进行设置
        InputStream inputStream= null;
        OutputStream outputStream = null;
照例进行URL的初步设置
        URL url = new URL(strings[0]);
        HttpURLConnection connection = (HttpURLConnection) url.openConnection();
然后需要对返回码进行一个判定,判断是否连接成功
    if (connection.getResponseCode()==200){
                inputStream = connection.getInputStream();
            }else {
                return -2;
            }
outputStream = new FileOutputStream(file); else {
return -2;
}if (connection.getResponseCode()==200){
inputStream = connection.getInputStream();
}接着对输出流进行设置
outputStream = new FileOutputStream(file);对输出流进行读取
int length = 0;
            byte[] buffer = new byte[4*1024];
            while ((length=inputStream.read(buffer))!=-1){
                outputStream.write(buffer,0,length);
            }
结束之后要对于输入流和输出流进行关闭
    inputStream.close();
    outputStream.close();
最后在onPostExecute()方法中,对传过来的值进行情况判定与输出
@Override
    protected void onPostExecute(Integer integer) {
        super.onPostExecute(integer);
        switch (integer){
            case 1:
                Toast.makeText(context,"下载完成",Toast.LENGTH_SHORT).show();
                Bitmap bm = BitmapFactory.decodeFile(filePath);
                downImage.setImageBitmap(bm);
                break;
            case -1:
                Toast.makeText(context,"文件已存在",Toast.LENGTH_SHORT).show();
                break;
            case -2:
                Toast.makeText(context,"网络异常",Toast.LENGTH_SHORT).show();
                break;
        }
    }
这里用到了context与downImage对象,需要从构造方法中传值
Toast.makeText(context,"下载完成",Toast.LENGTH_SHORT).show();downImage.setImageBitmap(bm);这是写在外部类里面的构造方法
 public DownLoadPicTask(Context context,ImageView image) {
        this.context = context;
        this.downImage = image;
    }
这一句调用了BitmapFactory.decodeFile()方法来解码图片
Bitmap bm = BitmapFactory.decodeFile(filePath);


 1111
1111

 被折叠的 条评论
为什么被折叠?
被折叠的 条评论
为什么被折叠?
 到【灌水乐园】发言


