


React生命周期
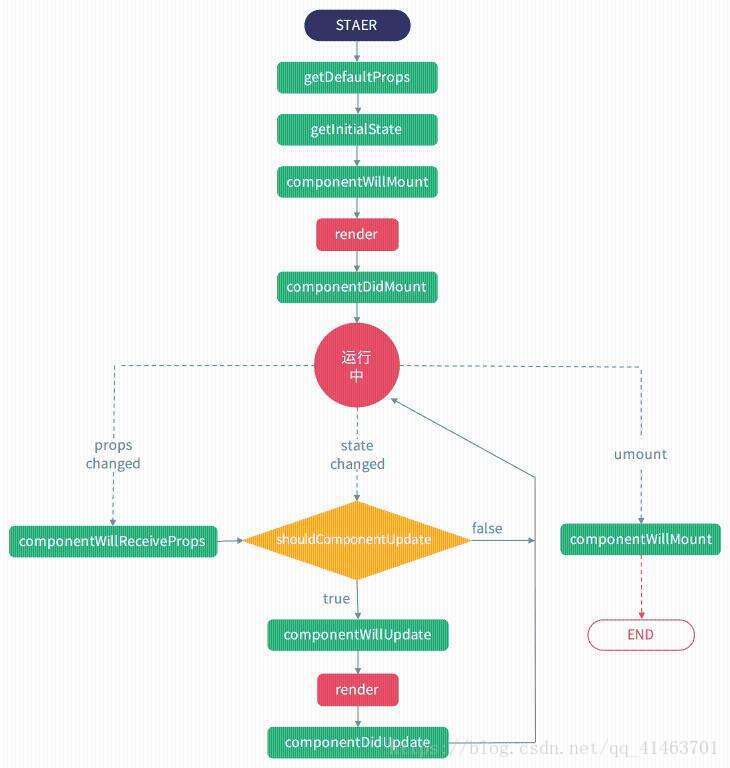
React的生命周期分别分为3个阶段
- 初始化阶段
- 运行阶段
- 销毁阶段
class MyComponent extends Component {
    constructor(props){
      super(props);
      this.state ={
          name : "Hello World"
      }

    componentWillMount() {
        console.log("渲染之前");
    }
    render() {
        console.log("渲染")
    }
    componentDidMount() {
        console.log("渲染完成")
    }
    componentWillReceiveProps(nextProps){
      console.log("接收到来自父组件的数据",nextProps)
    }
    shouldComponentUpdate(nextProps,nextState) {
        console.log("判断数据是否更新true,false来判断",nextProps,nextState)
        return true
    }
    componentWillUpdate(nextProps,nextState) {
      console.log("组件数据将要更新",nextProps,nextState)
    }
    componentDidUpdate(prevProps){
      console.log("组件数据更新完毕",prevProps)
    }
    componentWillUnmount(){
        console.log("已经销毁")
    }
}
1.组件初始化阶段
1. componentWillMount()
在初始化阶段调用一次,之后开始渲染
componentWillMount() {
        console.log("渲染之前");
    }
2. render()
render(){
    return(<div>Hello World</div>)
}
render方法是在类组件中唯一必须的方法
render方法不会和浏览器直接进行交互
3. componentDidMount()
在整个页面选软完成后调用方法,类似于Vue的mounted
可以调用setState立即在componentDidMount(),这样会让render调用两次,谨慎使用可能会导致性能的问题。
componentDidMount() {
        console.log("渲染完成")
}
2.组件运行阶段
1. componentWillReceiveProps(nextProps)
16.5.2官方文档即将要废弃
在父组件传入的值变更的时候,才会调用此方法
参数1.nextProps为接收到的父组件的数据
componentWillReceiveProps(nextProps){
      console.log("接收到来自父组件的数据",nextProps)
}
2. shouldComponentUpdate(nextProps,nextState)
return false和ture用来判断是否需要更新数据||参数2.nextState为子组件变更的数据
这个方法常用于性能的优化不要依赖它来“防止”渲染,因为这可能导致错误。考虑使用内置PureComponent而不是shouldComponentUpdate()手写
shouldComponentUpdate(nextProps,nextState) {
        console.log("shouldComponentUpdate:判断数据是否更新,true,false来判断",nextProps,nextState)
        return true//更新数据
        return false //不更新数据
        //然后UNSAFE_componentWillUpdate(),render()和componentDidUpdate()将不会被调用
    }
++在将来,React可以shouldComponentUpdate()视为提示而不是严格的指令,并且返回false仍然可能导致组件的重新呈现。++ ——————————官方文档16.5.2版本
3. componentWillUpdate(nextProps,nextState)
组件将要更新的时候调用,可以修改state的值
render(){
    return(<div>Hello World</div>)
}
4. componentDidUpdate(prevProps,prevState,snapshot)
组件更新完成后调用
componentDidUpdate(prevProps){
      //必须要if来包裹 不然会死循环
      // if(this.state.name == null){
      // }
      console.log("componentDidUpdate:数据已经改变",prevProps)
    }
3.组件销毁阶段
1. componentWidllUnmount()
componentWillUnmount(){
        console.log("componentWillUnmount:已经销毁")
}
componentWidllUnmount()在销毁组件之前调用
常用于清理无效的计时器,网络请求等等…………
下面附上测试声明周期的测试代码
有些强迫症为了美观下面render中的注释了一下
import React, { Component } from 'react';

class MyComponent extends Component {
    constructor(props){
      super(props);
      this.state ={
          name : "Hello World"
      }
      this.fn1 = this.fn1.bind(this);
    }
    fn1(){
      this.setState({
          name : "I Love You"
      })
    }
    //初始化阶段
    //渲染之前
    componentWillMount() {
        console.log("componentWillMount:render之前触发");
    }
    render(){
        console.log("render渲染完成")
        return (
            //<div className="App">
                //<h1 ref="color">{this.state.name}</h1>
                //<input type="button" defaultValue="按钮" onClick={this.fn1}/>
            //</div>
        );
    }
    //渲染之后
    componentDidMount() {
        console.log("componentWillMount:render之后触发",this.refs.color.style.color="red")
    }
    //运行阶段
    //接收父组件带来的数据
    componentWillReceiveProps(nextProps){
      console.log("componentWillReceiveProps:接收到来自父组件的数据",nextProps)
    }
    //判断数据是否更新
    shouldComponentUpdate(nextProps,nextState) {
        console.log("shouldComponentUpdate:判断数据是否更新,true,false来判断",nextProps,nextState)
        return true
    }
    //数据更新 一定要有数据的改变
    //改变后重新渲染
    componentWillUpdate(nextProps,nextState) {
      console.log("componentWillUpdate:数据将要发生改变",nextProps,nextState)
    }
    //所有组件加载完毕
    componentDidUpdate(prevProps){
      //必须要if来包裹 不然会死循环
      // if(this.state.name == null){
      //
      // }
      console.log("componentDidUpdate:数据已经改变",prevProps)
    }
    //组件销毁前
    componentWillUnmount(){
        console.log("componentWillUnmount:已经销毁")
    }
}
class App extends Component {
  constructor(){
    super();
    this.state = {
        name : "cxy",
        onOff : true
    }
    this.changeProps = this.changeProps.bind(this);
    this.removeChild = this.removeChild.bind(this);
  }
  removeChild(){
    //用一个开关来控制是否消失
      this.setState({
          onOff :false
      })
  }
  changeProps(){
      this.setState({
          name : "yxc"
      })
  }
  render(){
    return (
        <div>
            {this.state.name}
            {
              this.state.onOff?<MyComponent name={this.state.name}/>:null
            }
            <input type="button" defaultValue="更新父组件数据" onClick={this.changeProps}/>
            <input type="button" defaultValue="销毁子组件" onClick={this.removeChild}/>
        </div>
    )
  }
}
export default App;
```# React生命周期

React的生命周期分别分为3个阶段
1. 初始化阶段
2. 运行阶段
3. 销毁阶段


```javaScript

class MyComponent extends Component {
    constructor(props){
      super(props);
      this.state ={
          name : "Hello World"
      }

    componentWillMount() {
        console.log("渲染之前");
    }
    render() {
        console.log("渲染")
    }
    componentDidMount() {
        console.log("渲染完成")
    }
    componentWillReceiveProps(nextProps){
      console.log("接收到来自父组件的数据",nextProps)
    }
    shouldComponentUpdate(nextProps,nextState) {
        console.log("判断数据是否更新true,false来判断",nextProps,nextState)
        return true
    }
    componentWillUpdate(nextProps,nextState) {
      console.log("组件数据将要更新",nextProps,nextState)
    }
    componentDidUpdate(prevProps){
      console.log("组件数据更新完毕",prevProps)
    }
    componentWillUnmount(){
        console.log("已经销毁")
    }
}
结束语
本篇最后修改时间为2018.10.17
欢迎大家一起讨论,上述表述如有出错欢迎指正。


 2万+
2万+


 被折叠的 条评论
为什么被折叠?
被折叠的 条评论
为什么被折叠?
 到【灌水乐园】发言


