


swap分区的作用是,当内存不够用时,操作系统会将一部分不用的数据放到交换分区中,这个交换分区占用的是磁盘的空间。所以swap分区缺点也很明显,就是频繁地读写磁盘,会显著降低操作系统的运行速率。
1. 新建swap分区前提
首先虚拟机需要有未分配的磁盘空间,使用lsblk命令查看:
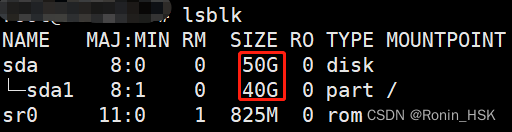
sda中a代表第一块磁盘,1代表第一块磁盘的第一个分区。
可以看到我的sda磁盘下面还有10G的未分配空间。
假如没有,可以在安装虚拟机的软件中扩展磁盘。方法很简单:关闭虚拟机->编辑虚拟机设置->点击磁盘点击扩展->选择磁盘大小->完成。
2. 创建swap分区
使用fdisk /dev/sda命令在磁盘sda中创建分区,这里根据自己的实际情况选择磁盘
fdisk /dev/sda

Welcome to fdisk (util-linux 2.27.1).
Changes will remain in memory only, until you decide to write them.
Be careful before using the write command.


Command (m for help): p  # 查看分区
Disk /dev/sda: 50 GiB, 53687091200 bytes, 104857600 sectors
Units: sectors of 1 * 512 = 512 bytes
Sector size (logical/physical): 512 bytes / 512 bytes
I/O size (minimum/optimal): 512 bytes / 512 bytes
Disklabel type: dos
Disk identifier: 0x5c334cb0

 # 这里我的只有一个分区sda1
Device     Boot Start      End  Sectors Size Id Type
/dev/sda1  *     2048 83886079 83884032  40G 83 Linux

Command (m for help): n  # 创建分区
Partition type
   p   primary (1 primary, 0 extended, 3 free)
   e   extended (container for logical partitions)
Select (default p): p   # 选择主分区类型
Partition number (2-4, default 2):  # 选择分区号,直接回车,默认就行
First sector (83886080-104857599, default 83886080):   # 选择分区开始块,直接回车,默认就行
Last sector, +sectors or +size{K,M,G,T,P} (83886080-104857599, default 104857599): +4g    # swap分区的大小

Created a new partition 2 of type 'Linux' and of size 4 GiB.

Command (m for help): t   # 分区格式转换
Partition number (1,2, default 2): 2   # 选择要转换的分区号,刚才创建的几号就选几号
Partition type (type L to list all types): L   # 输入L可以查看所有类型

 0  Empty           24  NEC DOS         81  Minix / old Lin bf  Solaris
 1  FAT12           27  Hidden NTFS Win 82  Linux swap / So c1  DRDOS/sec (FAT-
 2  XENIX root      39  Plan 9          83  Linux           c4  DRDOS/sec (FAT-
 3  XENIX usr       3c  PartitionMagic  84  OS/2 hidden or  c6  DRDOS/sec (FAT-
 4  FAT16 <32M      40  Venix 80286     85  Linux extended  c7  Syrinx
 5  Extended        41  PPC PReP Boot   86  NTFS volume set da  Non-FS data
 6  FAT16           42  SFS             87  NTFS volume set db  CP/M / CTOS / .
 7  HPFS/NTFS/exFAT 4d  QNX4.x          88  Linux plaintext de  Dell Utility
 8  AIX             4e  QNX4.x 2nd part 8e  Linux LVM       df  BootIt
 9  AIX bootable    4f  QNX4.x 3rd part 93  Amoeba          e1  DOS access
 a  OS/2 Boot Manag 50  OnTrack DM      94  Amoeba BBT      e3  DOS R/O
 b  W95 FAT32       51  OnTrack DM6 Aux 9f  BSD/OS          e4  SpeedStor
 c  W95 FAT32 (LBA) 52  CP/M            a0  IBM Thinkpad hi ea  Rufus alignment
 e  W95 FAT16 (LBA) 53  OnTrack DM6 Aux a5  FreeBSD         eb  BeOS fs
 f  W95 Ext'd (LBA) 54  OnTrackDM6      a6  OpenBSD         ee  GPT
10  OPUS            55  EZ-Drive        a7  NeXTSTEP        ef  EFI (FAT-12/16/
11  Hidden FAT12    56  Golden Bow      a8  Darwin UFS      f0  Linux/PA-RISC b
12  Compaq diagnost 5c  Priam Edisk     a9  NetBSD          f1  SpeedStor
14  Hidden FAT16 <3 61  SpeedStor       ab  Darwin boot     f4  SpeedStor
16  Hidden FAT16    63  GNU HURD or Sys af  HFS / HFS+      f2  DOS secondary
17  Hidden HPFS/NTF 64  Novell Netware  b7  BSDI fs         fb  VMware VMFS
18  AST SmartSleep  65  Novell Netware  b8  BSDI swap       fc  VMware VMKCORE
1b  Hidden W95 FAT3 70  DiskSecure Mult bb  Boot Wizard hid fd  Linux raid auto
1c  Hidden W95 FAT3 75  PC/IX           bc  Acronis FAT32 L fe  LANstep
1e  Hidden W95 FAT1 80  Old Minix       be  Solaris boot    ff  BBT

Partition type (type L to list all types): 82  # 选择82,即Linux swap/So,转换为swap分区

Changed type of partition 'Linux' to 'Linux swap / Solaris'.

Command (m for help): p  # 查看分区,发现已经创建完成
Disk /dev/sda: 50 GiB, 53687091200 bytes, 104857600 sectors
Units: sectors of 1 * 512 = 512 bytes
Sector size (logical/physical): 512 bytes / 512 bytes
I/O size (minimum/optimal): 512 bytes / 512 bytes
Disklabel type: dos
Disk identifier: 0x5c334cb0

Device     Boot    Start      End  Sectors Size Id Type
/dev/sda1  *        2048 83886079 83884032  40G 83 Linux
/dev/sda2       83886080 92274687  8388608   4G 82 Linux swap / Solaris

Command (m for help): w   # 保存,非常重要
The partition table has been altered.
Calling ioctl() to re-read partition table.
Re-reading the partition table failed.: Device or resource busy   # 报错了,我没管

The kernel still uses the old table. The new table will be used at the next reboot or after you run partprobe(8) or kpartx(8).

fdisk /dev/sda  # 再次进入磁盘sda

Welcome to fdisk (util-linux 2.27.1).
Changes will remain in memory only, until you decide to write them.
Be careful before using the write command.


Command (m for help): p   # 查看分区,发现创建成功,没问题
Disk /dev/sda: 50 GiB, 53687091200 bytes, 104857600 sectors
Units: sectors of 1 * 512 = 512 bytes
Sector size (logical/physical): 512 bytes / 512 bytes
I/O size (minimum/optimal): 512 bytes / 512 bytes
Disklabel type: dos
Disk identifier: 0x5c334cb0

Device     Boot    Start      End  Sectors Size Id Type
/dev/sda1  *        2048 83886079 83884032  40G 83 Linux
/dev/sda2       83886080 92274687  8388608   4G 82 Linux swap / Solaris

Command (m for help): q   # 退出
3. 格式化
partprobe /dev/sda  # 更新磁盘信息
lsblk  # fdisk –l也可以查看分区情况,看到了刚创建的sda2,但是TYPE还是part,而我们需要swap

NAME   MAJ:MIN RM  SIZE RO TYPE MOUNTPOINT
sda      8:0    0   50G  0 disk
├─sda1   8:1    0   40G  0 part /
└─sda2   8:2    0    4G  0 part
sr0     11:0    1  825M  0 rom

mkswap /dev/sda2   # 格式化为swap,注意分区名字

Setting up swapspace version 1, size = 4 GiB (4294963200 bytes)
no label, UUID=9f902014-dae1-481b-b9f8-4ab2397efbc2
4. 挂载
blkid  # 查看swap对应的分区,这里是/dev/sda2,复制它的UUID

/dev/sda1: UUID="13f8f93d-33c6-40ee-adaa-dff3df7e4513" TYPE="ext4" PARTUUID="5c334cb0-01"
/dev/sr0: UUID="2017-08-01-11-30-13-00" LABEL="Ubuntu-Server 16.04.3 LTS amd64" TYPE="iso9660" PTUUID="40b1aa35" PTTYPE="dos"
/dev/sda2: UUID="9f902014-dae1-481b-b9f8-4ab2397efbc2" TYPE="swap" PARTUUID="5c334cb0-02"

vim /etc/fstab   # 打开这个文件,添加内容
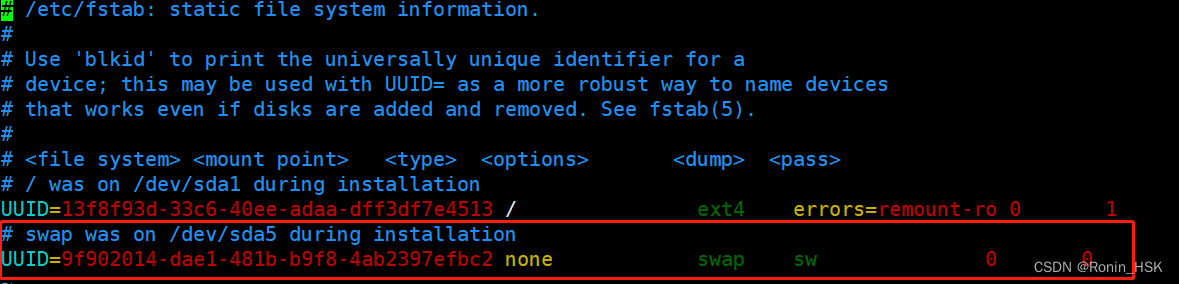
打开文件发现,里面有swap的信息。/dev/sda5就是我之前误删的swap分区,而开机启动报错a start job is running for dev-disk-by,应该就是因为系统找不到UUID对应的swap分区。
如果有swap信息,就修改UUID的值,否则,添加红框中的信息。
挂载最后一步,执行命令mount –a,将/etc/fstab的所有内容重新加载
5. 激活swap分区
挂载完成后,还需要激活swap分区
swapon /dev/sda2   # 激活swap分区 /dev/sda2

free -h   # 查看内存,发现swap已存在
              total        used        free      shared  buff/cache   available
Mem:           3.8G        106M        3.5G        5.9M        256M        3.5G
Swap:          4.0G          0B        4.0G
至此,swap分区新建完成


 7787
7787

 被折叠的 条评论
为什么被折叠?
被折叠的 条评论
为什么被折叠?
 到【灌水乐园】发言


