一、$介绍
1、$就是jQuery的简写。
<body>
    <input type="submit" value="按钮">

    <script src="../script/jquery.js"></script>
    <script>
        jQuery("input").click(function () {
            console.log("hello world");
        })
    </script>
</body>
效果如下:

分析:
将$替换为jQuery,效果是一样的。
2、$获取到的结果是一个jQuery对象。
(1)
<body>
    <input type="submit" value="按钮">

    <script src="../script/jquery.js"></script>
    <script>
        jQuery("input").click(function () {
            // console.log("hello world");
            console.log($("input"));
        })
    </script>
</body>
效果如下:

分析:
通过$("input")获取到的对象,不是DOM对象,而是jQuery对象。
其实,是将DOM对象包装成了jQuery对象,从而可以使用jQuery的方法,简化了代码。
(2)如果输出this呢?
    <script>
        jQuery("input").click(function () {
            // console.log("hello world");
            console.log($("input"));
            console.log(this);
        })
    </script>
输出如下:

可见,this指的是DOM对象。
(3)也可以通过【$】,将DOM对象转换为jQuery对象。
    <script>
        jQuery("input").click(function () {
            // console.log("hello world");
            console.log($("input"));
            console.log(this);

            console.log(this.value);
            console.log($(this).val())
        })
    </script>
输出如下:

因为,在以前,有些浏览器,无法通过this.value获取到数据。
需要将其转换为jQuery对象,让它帮我们获取,而我们不需要去做兼容。
3、 什么时候用jQuery?什么时候用JavaScript?
jQuery本质上,其实就是JavaScript。
只是,jQuery封装了许多方法,方便我们调用而已。
从性能或者代码统一上来做选择。
二、jQuery常用方法
1、.index():索引
<body>
    <button>按钮一</button>
    <button>按钮二</button>
    <button>按钮三</button>

    <script src="../script/jquery.js"></script>
    <script>
        $("button").click(function () {
            console.log($(this).index())
        })
    </script>
</body>
效果如下:

分析:
当我们点击按钮时,输出按钮(jQuery对象)对应的索引。
2、.text():文本
    <script>
        $("button").click(function () {
            // console.log($(this).index());
            console.log($(this).text());
            $(this).text("新按钮");
        })
    </script>
效果如下:

分析:
当我们点击按钮时,控制台输出文本,并且更改文本。
3、.css():样式
    <script>
        $("button").click(function () {
            // console.log($(this).index());
            // console.log($(this).text());
            // $(this).text("新按钮");
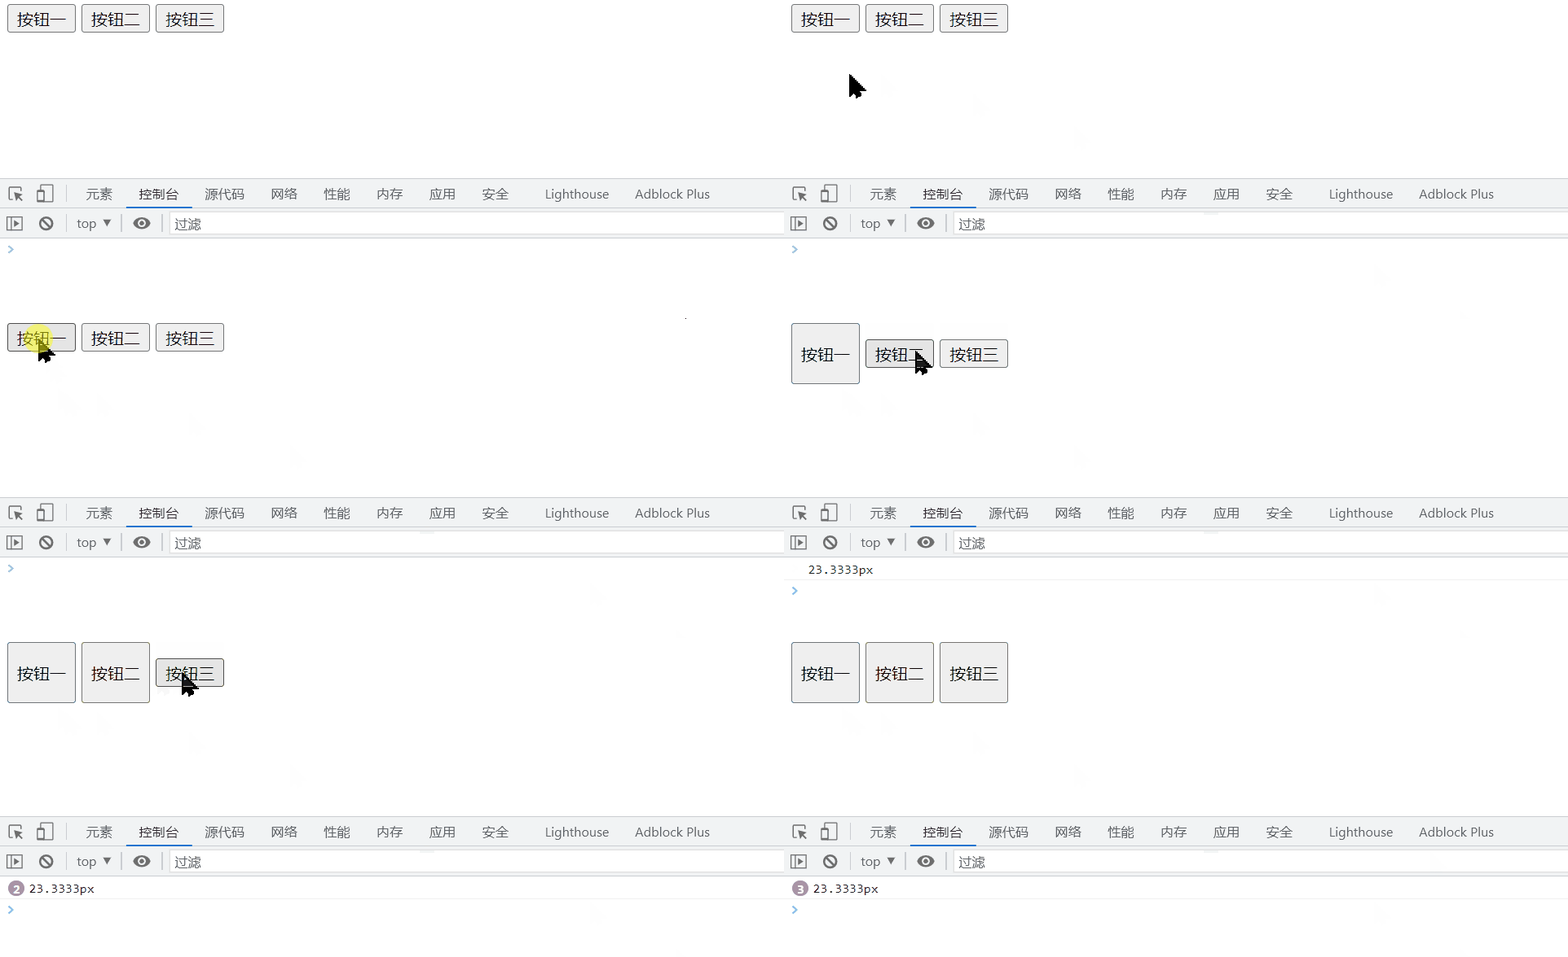
            console.log($(this).css("height"));
            $(this).css("height", "50px");
        })
    </script>
输出如下:

设置多组样式的写法:
$(this).css({
                height: "100px",
                height: "100px"
            })
分析:
通过.css(),可以【获取/更改】对象的css属性。
4、.val():value值
    <input type="button" value="按钮">

    <script>
        console.log($("input").val());
        $("input").click(function () {
            $(this).val("新按钮");
        })
    </script>
输出如下:

分析:
不做介绍。
5、.attr():属性值
<!DOCTYPE html>
<html lang="en">

<head>
    <meta charset="UTF-8">
    <meta http-equiv="X-UA-Compatible" content="IE=edge">
    <meta name="viewport" content="width=device-width, initial-scale=1.0">
    <title>Demo04</title>
    <style>
        img {
            width: 400px;
            height: 200px;
        }
    </style>
</head>

<body>
    <img src="../picture/java.jpg" alt="">
    <button>改变</button>

    <script src="../script/jquery.js"></script>
    <script>
        $("button").click(function () {
            $("img").attr("src", "../picture/前端.jpg");
        })
    </script>
</body>

</html>
效果如下:

分析:
通过.attr(),实现了:点击按钮,修改了img标签的src属性,切换为了另一张图片。
6、案例一——点击切换图片
<!DOCTYPE html>
<html lang="en">

<head>
    <meta charset="UTF-8">
    <meta http-equiv="X-UA-Compatible" content="IE=edge">
    <meta name="viewport" content="width=device-width, initial-scale=1.0">
    <title>Demo05</title>
    <style>
        img {
            width: 400px;
            height: 200px;
        }
    </style>
</head>

<body>
    <img src="../picture/java.jpg" alt="">
    <div class="btn-list">
        <button>1</button>
        <button>2</button>
        <button>3</button>
    </div>

    <script src="../script/jquery.js"></script>
    <script>
        let imgSrc = [
            "../picture/java.jpg",
            "../picture/前端.jpg",
            "../picture/php.jpg"
        ]
        $("button").click(function () {
            let index = $(this).index();
            $("img").attr("src", imgSrc[index]);
        })
    </script>
</body>

</html>
效果如下:

分析:
当点击不同的按钮时,切换到不同的图片。
1、使用.click()为按钮添加点击事件
2、 使用.index()获取索引
3、通过索引,通过.attr()修改图片的src属性(即图片路径)
7、.addClass()和.removeClass():添加/删除class
我们在上述代码上稍作修改,将按钮一添加一个黄底的背景色。
并在按钮点击事件中,新增功能。
代码如下:
<!DOCTYPE html>
<html lang="en">

<head>
    <meta charset="UTF-8">
    <meta http-equiv="X-UA-Compatible" content="IE=edge">
    <meta name="viewport" content="width=device-width, initial-scale=1.0">
    <title>Demo05</title>
    <style>
        img {
            width: 400px;
            height: 200px;
        }

        .active {
            background-color: yellow;
        }
    </style>
</head>

<body>
    <img src="../picture/java.jpg" alt="">
    <div class="btn-list">
        <button class="active">1</button>
        <button>2</button>
        <button>3</button>
    </div>

    <script src="../script/jquery.js"></script>
    <script>
        let imgSrc = [
            "../picture/java.jpg",
            "../picture/前端.jpg",
            "../picture/php.jpg"
        ]
        $("button").click(function () {
            let index = $(this).index();
            $("img").attr("src", imgSrc[index]);
            if (index === 0) {
                $(this).removeClass("active");
            } else if (index === 1) {
                $(this).addClass("active")
            } else {
                $(this).toggleClass("active");
            }
        })
    </script>
</body>

</html>
效果如下:

分析:
当我们点击按钮1时,移出已有的active样式。【.removeClass()】
当我们点击按钮2时,新增active样式。【.addClass()】
当我们点击按钮3时,可以新增/移除active样式。【.toggleClass()】
8、.siblings():获取同级其它元素
我们对前面的代码稍作修改。
<!DOCTYPE html>
<html lang="en">

<head>
    <meta charset="UTF-8">
    <meta http-equiv="X-UA-Compatible" content="IE=edge">
    <meta name="viewport" content="width=device-width, initial-scale=1.0">
    <title>Demo05</title>
    <style>
        img {
            width: 400px;
            height: 200px;
        }

        .active {
            background-color: yellow;
        }
    </style>
</head>

<body>
    <img src="../picture/java.jpg" alt="">
    <div class="btn-list">
        <button class="active">1</button>
        <button>2</button>
        <button>3</button>
    </div>

    <script src="../script/jquery.js"></script>
    <script>
        let imgSrc = [
            "../picture/java.jpg",
            "../picture/前端.jpg",
            "../picture/php.jpg"
        ]
        $("button").click(function () {
            let index = $(this).index();
            $("img").attr("src", imgSrc[index]);
            // if (index === 0) {
            //     $(this).removeClass("active");
            // } else if (index === 1) {
            //     $(this).addClass("active")
            // } else {
            //     $(this).toggleClass("active");
            // }

            $(this).addClass("active");
            $(this).siblings().removeClass("active");
        })
    </script>
</body>

</html>
效果如下:

分析:
当我们点击其中一个按钮,这个按钮添加active样式,另外两个按钮就自动移除active样式。
9、find()和parent()
<!DOCTYPE html>
<html lang="en">

<head>
    <meta charset="UTF-8">
    <meta http-equiv="X-UA-Compatible" content="IE=edge">
    <meta name="viewport" content="width=device-width, initial-scale=1.0">
    <title>Demo06</title>
    <style>
        .active1 {
            background-color: red;
        }

        .active2 {
            background-color: yellow;
        }

        .box {
            width: 100px;
            height: 100px;
            border: 1px solid red;
        }
    </style>
</head>

<body>
    <div class="box">
        <button>按钮</button>
    </div>
    <div class="box">
        <button>按钮</button>
    </div>
    <div class="box">
        <button>按钮</button>
    </div>

    <script src="../script/jquery.js"></script>
    <script>
        $(".box").click(function () {
            $(this).find("button").toggleClass("active1");
        })

        // $("button").click(function () {
        //     $(this).parent().toggleClass("active2");
        // })
    </script>
</body>

</html>
两种情况,分别注释来看。
1、点击外面的box,里面的button【子级】变色。【find.("button)】
2、 点击里面的button,外面的box【父级】变色。【.parent()】
效果如下:


三、DOM操作
1、.append()和.remove():添加/删除元素节点
<!DOCTYPE html>
<html lang="en">

<head>
    <meta charset="UTF-8">
    <meta http-equiv="X-UA-Compatible" content="IE=edge">
    <meta name="viewport" content="width=device-width, initial-scale=1.0">
    <title>Demo07</title>
</head>

<body>
    <input type="text">
    <button>添加</button>
    <ul class="fruit-list">
        <li>香蕉</li>
        <li>苹果</li>
        <li>鸭梨</li>
    </ul>

    <script src="../script/jquery.js"></script>
    <script>
        // 删除水果(利用事件委托)
        $(".fruit-list").on("click", "li", function () {
            $(this).remove();
        })

        // 添加水果
        $("button").click(function () {
            // 获取input的输入值
            let value = $("input").val();
            // 将li标签转换为jQuery对象
            let li = $(`<li>${value}</li>`);
            $(".fruit-list").append(li);
        })
    </script>
</body>

</html>
效果如下:

分析:
on():实现事件委托。
第一个参数:事件类型【click】。
第二个参数:选择器【li】。
第三个参数:函数。(函数中的this指向的是li)
四、jQuery事件
1、click():点击事件
2、on():事件委托
前面两点都讲过,就不再赘述了。
3、.mouseenter()、.mouseleave()、.mousemove():鼠标移入、移出、移动事件
(1)
<!DOCTYPE html>
<html lang="en">

<head>
    <meta charset="UTF-8">
    <meta http-equiv="X-UA-Compatible" content="IE=edge">
    <meta name="viewport" content="width=device-width, initial-scale=1.0">
    <title>Demo08</title>
    <style>
        .box {
            width: 100px;
            height: 100px;
            background-color: red;
        }
    </style>
</head>

<body>
    <div class="box">

    </div>

    <script src="../script/jquery.js"></script>
    <script>
        $(".box").mouseenter(function () {
            console.log("鼠标移入!");
        })

        $(".box").mouseleave(function () {
            console.log("鼠标移出!");
        })

        $(".box").mousemove(function () {
            console.log("hello world");
        })
    </script>
</body>

</html>
效果如下,不做解释:

(2)我们还可以这样写:(链式操作)
    <script>
        $(".box").mouseenter(function () {
            console.log("鼠标移入!");
        }).mouseleave(function () {
            console.log("鼠标移出!");
        }).mousemove(function () {
            console.log("hello world");
        })
</script>效果是一样的!这样的写法叫作:链式操作。
因为,$(".box").mouseenter(......)的返回值就是box的jQuery对象。
(3)获取坐标【e.pageX和e.pageY】
    <script>
        $(".box").mouseenter(function () {
            console.log("鼠标移入!");
        }).mouseleave(function () {
            console.log("鼠标移出!");
        }).mousemove(function (e) {
            console.log("X坐标:" + e.pageX + ",Y的坐标:" + e.pageY);
        })
    </script>
效果如下:

4、案例三——大图显示
前面做过,这次使用jQuery改写。
<!DOCTYPE html>
<html lang="en">

<head>
    <meta charset="UTF-8">
    <meta http-equiv="X-UA-Compatible" content="IE=edge">
    <meta name="viewport" content="width=device-width, initial-scale=1.0">
    <title>Demo09</title>
    <style>
        img {
            width: 400px;
            height: 200px;
        }

        .big-img {
            position: absolute;
        }
    </style>
</head>

<body>
    <div class="imgList">
        <img src="../picture/java.jpg" alt="">
        <img src="../picture/前端.jpg" alt="">
        <img src="../picture/php.jpg" alt="">
    </div>
    <div class="big-img">

    </div>

    <script src="../script/jquery.js"></script>
    <script>
        let bigImg = ["../picture/java.jpg", "../picture/前端.jpg", "../picture/php.jpg"];
        // 鼠标移动事件
        $(".imgList img").mousemove(function (e) {
            // 获取索引
            let index = $(this).index();
            // 根据索引,设置大图的src
            let img = `<img src="${bigImg[index]}">`;
            // 添加大图的img标签
            $(".big-img").html(img);
            // 设置大图随鼠标的移动而移动
            $(".big-img").css({
                left: (e.pageX + 10) + "px",
                top: (e.pageY + 10) + "px"
            })
        })

        // 鼠标离开之后,关闭显示
        $(".imgList img").mouseleave(function () {
            $(".big-img").html("");
        })
    </script>
</body>

</html>
效果如下:

五、jQuery动画方法(已淘汰,不做详细介绍)
1、.show()和.hide()
<!DOCTYPE html>
<html lang="en">

<head>
    <meta charset="UTF-8">
    <meta http-equiv="X-UA-Compatible" content="IE=edge">
    <meta name="viewport" content="width=device-width, initial-scale=1.0">
    <title>Demo10</title>
    <style>
        .box {
            width: 100px;
            height: 100px;
            background-color: red;
        }
    </style>
</head>

<body>
    <button class="show">显示</button>
    <button class="hide">隐藏</button>
    <div class="box">

    </div>
    <script src="../script/jquery.js"></script>
    <script>
        $(".show").click(function () {
            $(".box").show(500);
        });

        $(".hide").click(function () {
            $(".box").hide(500);
        })
    </script>
</body>

</html>
显示效果如下:

分析:
点击隐藏按钮,0.5秒后,隐藏了div。
点击显示按钮,0.5秒后,显示了div。
2、.fadeIn()和.fadeOut()
跟前面那个差不多,我们直接看代码和演示就行。
    <script>
        $(".show").click(function () {
            $(".box").fadeIn(500);
        });

        $(".hide").click(function () {
            $(".box").fadeOut(500);
        })
    </script>
效果如下:

六、jQuery插件
jQuery插件也是别人写好的,我们直接用的。
基于jQuery开发,插件包含:css文件+js文件。
大量的jQuery插件没有良好的文档,而且存在大量bug,所以,能不用就不用。


 8485
8485


 被折叠的 条评论
为什么被折叠?


