


根域名已被个人主站占用,想把做过的项目部署到二级域名,特此记录。
一、环境说明
系统: CentOS7.6
应用服务器:Nginx 1.16.1、Tomcat 9.0
安全组已开放端口: 22、80、443、3389
二、解析二级域名并申请 SSL 证书(腾讯云)
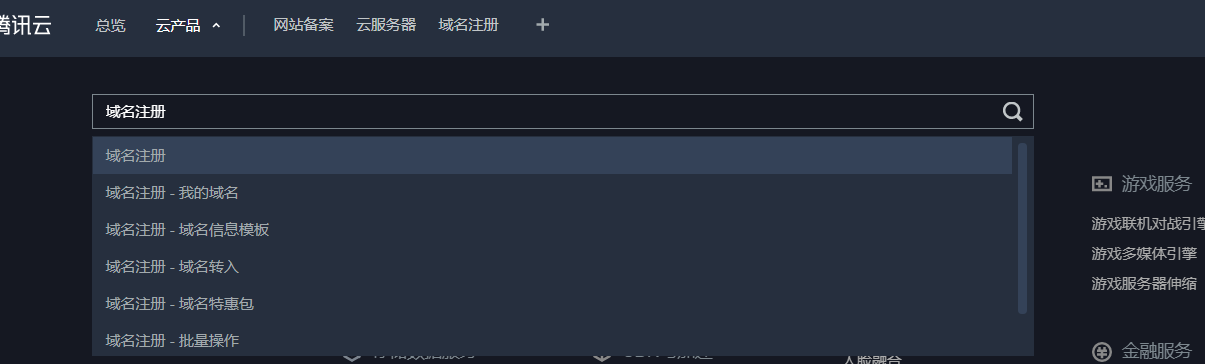
1、登录腾讯云,点击控制台下方的个人中心头像。

2、点击云产品,搜索域名注册,点击进入。
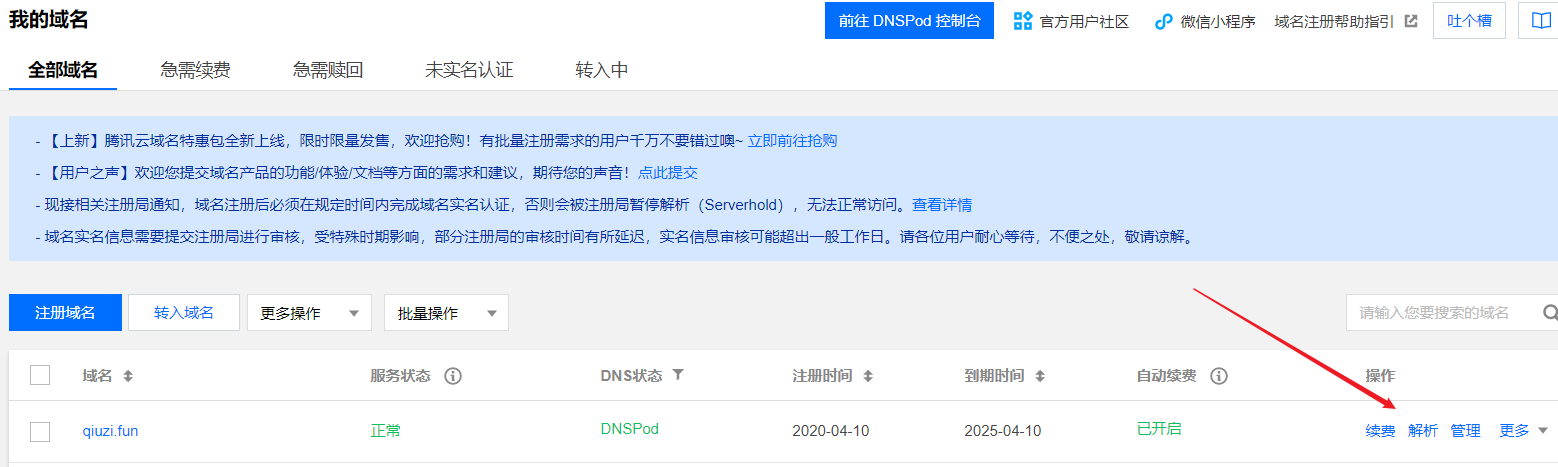
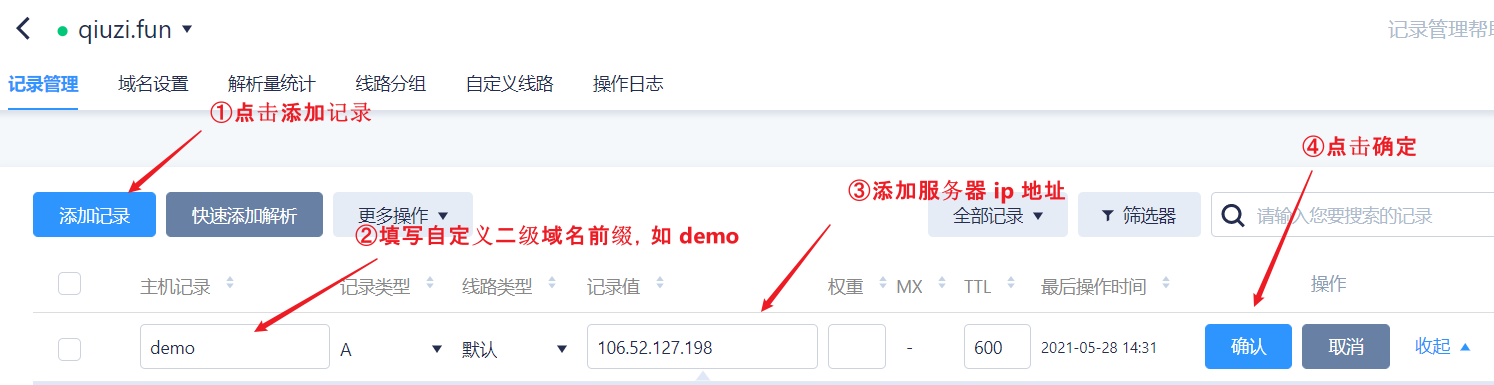
3、解析域名
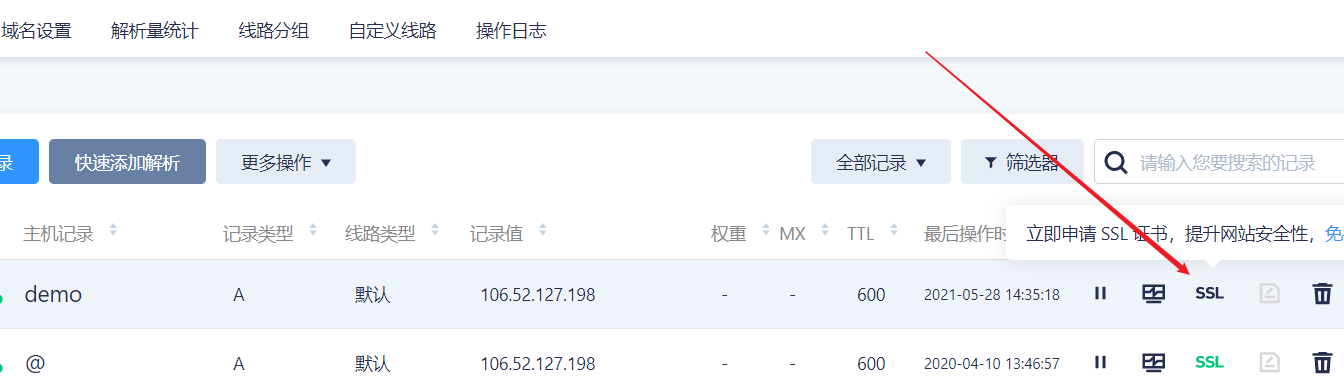
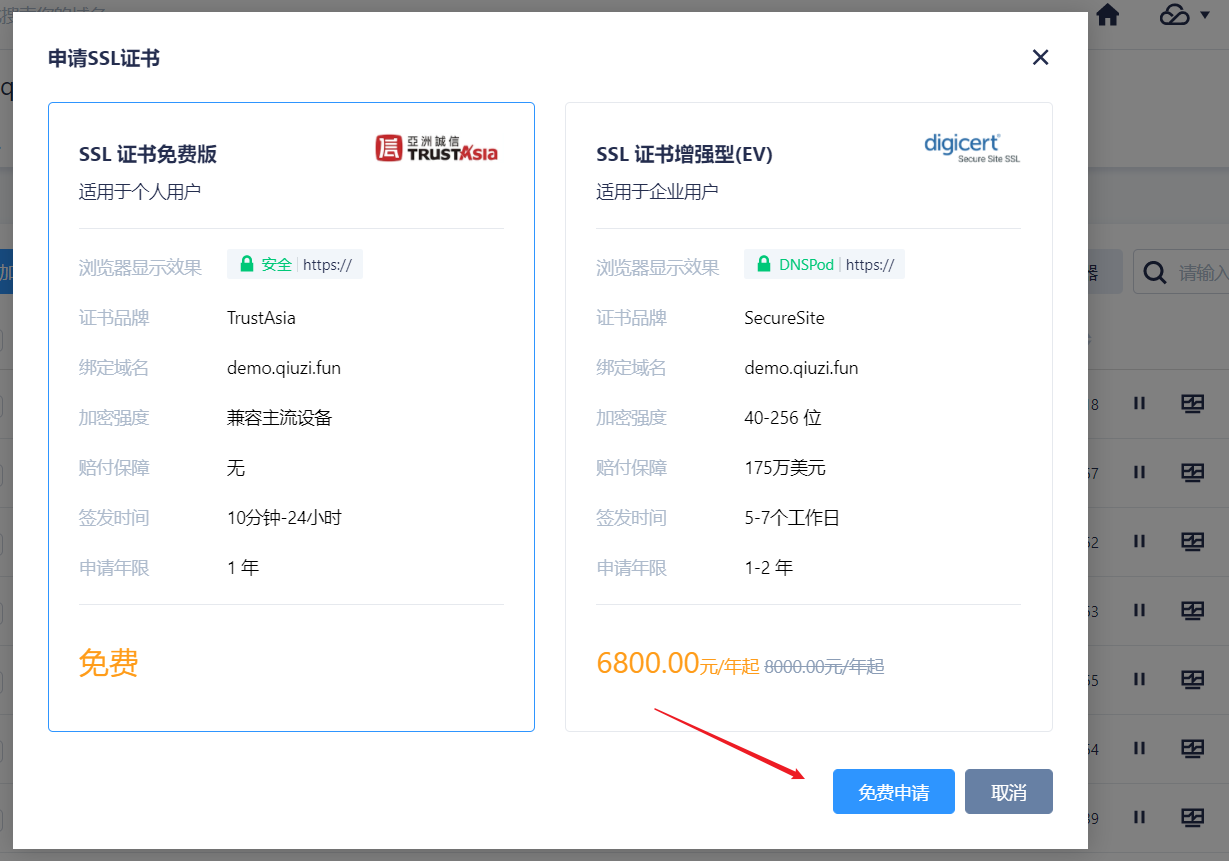
4、申请二级域名 SSL 证书
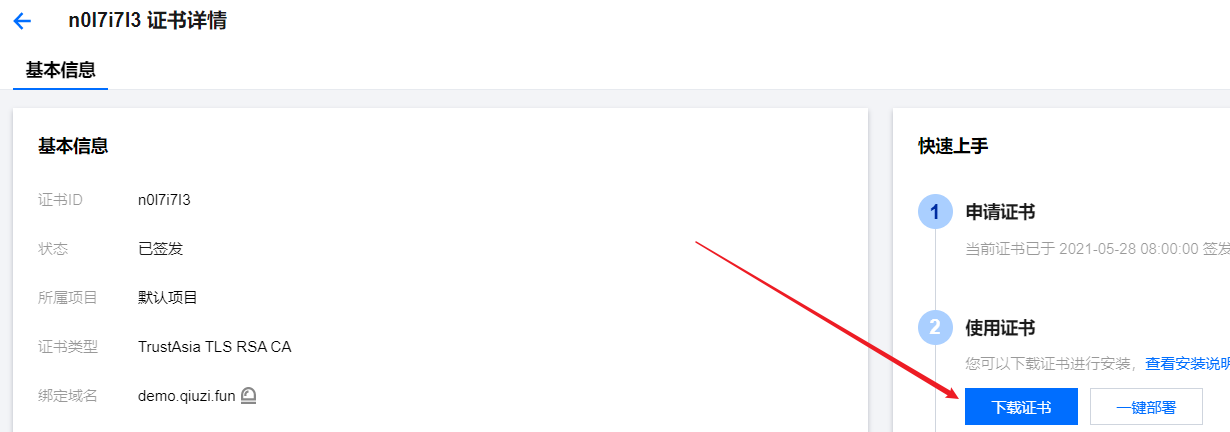
5、待证书审核通过并颁发后,下载 SSL 证书并解压


三、Nginx 配置二级域名项目映射
1、编辑 nginx.conf 配置文件,新增 server 项
 server {
    listen 80;  # 监听 80 端口
    server_name demo.qiuzi.fun; # 二级域名地址
    root /data/subdomain/demo; # 映射项目地址
    index index.html index.htm index.jsp; # 映射项目地址入口
}
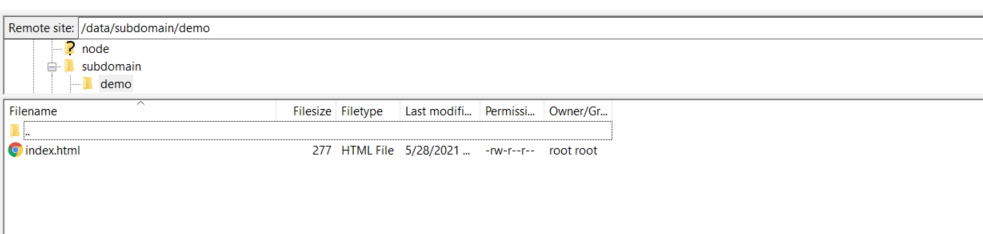
2、上传要部署的项目到对应文件地址,如 index.html 文件进行测试,本人使用软件为 FileZilla。
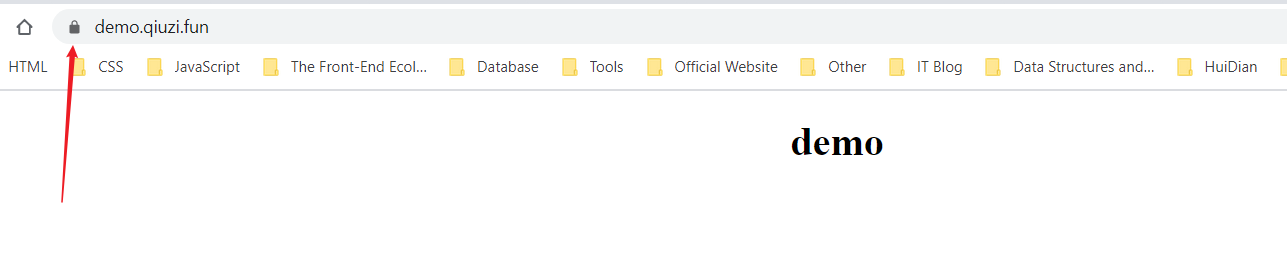
3、重启 Nginx 成功后,浏览器输入对应网址进行验证。
service nginx restart
或
/usr/local/nginx/sbin/nginx -c /usr/local/nginx/conf/nginx.conf
若 80 端口被占用,通过 kill [id] 结束进程。
# 查看端口使用
netstat -lntp;

Active Internet connections (only servers)
Proto Recv-Q Send-Q Local Address           Foreign Address         State       PID/Program name
tcp        0      0 0.0.0.0:3306            0.0.0.0:*               LISTEN      4351/mysqld
tcp        0      0 127.0.0.1:11211         0.0.0.0:*               LISTEN      3078/memcached
tcp        0      0 127.0.0.1:6379          0.0.0.0:*               LISTEN      2957/redis-server 1
tcp        0      0 0.0.0.0:80              0.0.0.0:*               LISTEN      9096/nginx: master
tcp        0      0 0.0.0.0:21              0.0.0.0:*               LISTEN      2942/pure-ftpd
tcp        0      0 0.0.0.0:22              0.0.0.0:*               LISTEN      3027/sshd
tcp        0      0 0.0.0.0:443             0.0.0.0:*               LISTEN      9096/nginx: master
tcp        0      0 127.0.0.1:7773          0.0.0.0:*               LISTEN      28167/node
tcp6       0      0 127.0.0.1:8006          :::*                    LISTEN      3865/java
tcp6       0      0 :::8080                 :::*                    LISTEN      3865/java
tcp6       0      0 :::21                   :::*                    LISTEN      2942/pure-ftpd
tcp6       0      0 :::7001                 :::*                    LISTEN      28160/node

# 结束 80 端口进程
kill 9096;
再次重启 Nginx。
浏览器验证

四、Nginx 配置二级域名 SSL 证书
1、在 Nginx 目录下新建文件夹存放 SSL 证书(注:文件路径和文件名由个人决定)
cd /usr/local/nginx
mkdir cert
cd cert
mkdir demo.qiuzi.fun
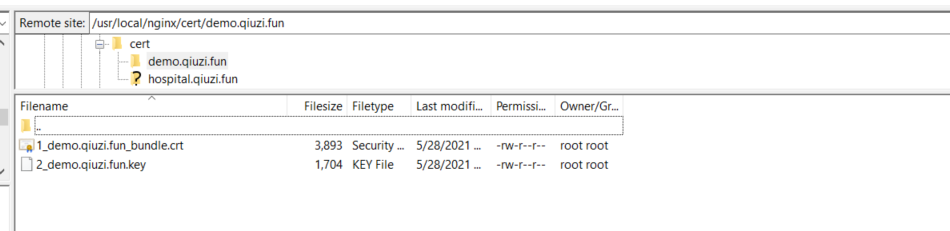
2、将 SSL 证书中 Nginx 两个文件通过 FileZilla 上传到服务器对应目录下
3、编辑 nginx.conf 配置文件,更改刚添加 sever 项和新增一个 sever 项
server {
    listen 80;  # 监听 80 端口
    server_name demo.qiuzi.fun; # 二级域名地址
    root /data/subdomain/demo; # 映射项目地址
    index index.html index.htm index.jsp; # 映射项目地址入口
    return 301 https://$server_name$request_uri; # 重定向至 https 协议的域名地址(新增的)
}

# 新增 443 server 项
server {
    listen       443 ssl;        # 监听 443 端口
    server_name  demo.qiuzi.fun; # 二级域名地址

    ssl_certificate      /usr/local/nginx/cert/demo.qiuzi.fun/1_demo.qiuzi.fun_bundle.crt;      # ssl_certificate 对应路径
    ssl_certificate_key  /usr/local/nginx/cert/demo.qiuzi.fun/2_demo.qiuzi.fun.key;             # ssl_certificate_key 对应路径

    ssl_session_cache    shared:SSL:1m;
    ssl_session_timeout  5m;

    ssl_ciphers ECDHE-RSA-AES128-GCM-SHA256:ECDHE:ECDH:AES:HIGH:!NULL:!aNULL:!MD5:!ADH:!RC4;    # 加密算法
    ssl_protocols TLSv1 TLSv1.1 TLSv1.2;                                                        # 安全链接可选的加密协议
    ssl_prefer_server_ciphers on;                                                               # 使用服务器端的首选算法

    location / {
      root /data/subdomain/demo;            # 映射项目地址
      index index.html index.htm index.jsp; # 映射项目地址入口
    }
}
4、重启 Nginx 成功后,浏览器输入对应网址进行验证。
service nginx restart
或
/usr/local/nginx/sbin/nginx -c /usr/local/nginx/conf/nginx.conf
若 80 端口被占用,通过 kill [id] 结束进程。
# 查看端口使用
netstat -lntp;

Active Internet connections (only servers)
Proto Recv-Q Send-Q Local Address           Foreign Address         State       PID/Program name
tcp        0      0 0.0.0.0:3306            0.0.0.0:*               LISTEN      4351/mysqld
tcp        0      0 127.0.0.1:11211         0.0.0.0:*               LISTEN      3078/memcached
tcp        0      0 127.0.0.1:6379          0.0.0.0:*               LISTEN      2957/redis-server 1
tcp        0      0 0.0.0.0:80              0.0.0.0:*               LISTEN      9096/nginx: master
tcp        0      0 0.0.0.0:21              0.0.0.0:*               LISTEN      2942/pure-ftpd
tcp        0      0 0.0.0.0:22              0.0.0.0:*               LISTEN      3027/sshd
tcp        0      0 0.0.0.0:443             0.0.0.0:*               LISTEN      9096/nginx: master
tcp        0      0 127.0.0.1:7773          0.0.0.0:*               LISTEN      28167/node
tcp6       0      0 127.0.0.1:8006          :::*                    LISTEN      3865/java
tcp6       0      0 :::8080                 :::*                    LISTEN      3865/java
tcp6       0      0 :::21                   :::*                    LISTEN      2942/pure-ftpd
tcp6       0      0 :::7001                 :::*                    LISTEN      28160/node

# 结束 80 端口进程
kill 9096;
再次重启 Nginx。
浏览器验证


 330
330


 被折叠的 条评论
为什么被折叠?
被折叠的 条评论
为什么被折叠?
 到【灌水乐园】发言


