


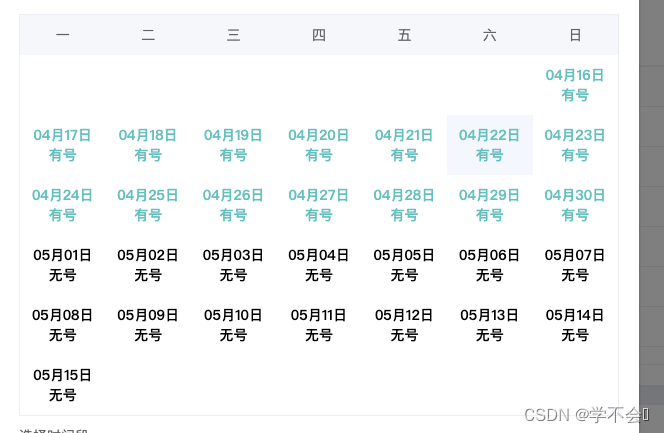
接了一个需求,实现日历功能,但是并不完全是正常看到的日历,需要用接口返回的数据进行展示,并且需要和星期对上,用element UI上的日历并不能实现 想要的效果,所以自己写了一个组件,供大家参考。
首先下载 moment 包 npm i moment
// html

     <div class="date-list">
            <div class="date-items" v-for="(item) in week" :key="item">{{item}}</div>
            <div class="date-item" v-for="(item,index) in timeData" :key="index" :class="[item.allocationDate && item.allocationDate === time ? 'on' : '']">
              <el-link @click="selectDay(item)" :underline="false" :disabled='array.includes(item.allocationDate)'>
                <div :class="colorList[item.status]" v-if="item.allocationDate">
                  <div>{{item.allocationDate.slice(5).replace('-', '月')}}日</div>
                  <div v-if="item.status === 1">有号</div>
                  <div v-if="item.status === 0">无号</div>
                  <div v-if="item.status === 2">约满</div>
                </div>
              </el-link>
            </div>
          </div>


// 引入 moment
import moment from 'moment'

data () {
    return {
      time: '', // 用来高亮日期
      colorList: { 0: 'black', 1: 'blue', 2: 'red' }, // 不同状态展示不同颜色
      timeData: [], // 日历
      week: ['一', '二', '三', '四', '五', '六', '日'],
      array: [], // 补日历的数据
    }
  }


methods:{

    btn () {
         // 这里写请求接口
        const res = await getDailyAllocation(params)
        if (res.code === 200) {

        this.timeData = res.data

        // 数据处理展示成日历
        let startDate = moment(res.data[0].allocationDate)
        let endDate = null

        let week = moment(startDate).weekday()

        // week 为0 说明是周日
        if (week === 0) {
          week = 7
        }
        if (week > 1) {
          week = week - 1
          startDate = moment(startDate).subtract(week, 'days')
          endDate = moment(res.data[0].allocationDate)
          // 存储大于接口返回的数据日期
          const arr = []
           // 如果想展示大于接口返回的数据初始日期,那就放开这段代码,我这里只需要展示接口的数
           据,所以注释了
          // arr.push({ allocationDate: startDate.format('YYYY-MM-DD') })
          arr.push({ allocationDate: '' })
          while (startDate.add(1, 'days').isBefore(endDate)) {
            // 注意这里add方法处理后SDate对象已经改变。
           // arr.push({ allocationDate: endDate.format('YYYY-MM-DD') })
            arr.push({ allocationDate: '' })
          }
          this.timeData = [...arr, ...this.timeData]
          // 拿到补的数据
          this.array = arr.map(item => item.allocationDate)
        }
      }
    },

    // 点击日期高亮
     selectDay (item) {
      this.time = item.allocationDate
    },

}

<style lang="less" scoped>
.date-list {
  width: 100%;
  display: flex;
  align-items: center;
  flex-wrap: wrap;
  .date-item,
  .date-items {
    width: calc(100% / 7);
    text-align: center;
  }
  .date-items {
    line-height: 40px;
    height: 40px;
    background: #f5f7fa;
  }
  .date-item {
    height: 60px;
    cursor: pointer;
    padding-top: 10px;
  }
}

.black {
  color: black;
}
.blue {
  color: #00c0bf;
}
.red {
  color: #bb3d52;
}
.on {
  background: #f2f8fe;
}
</style>
//以下是接口返回的数据
res.data = [
    {orgId: 107, screenType: null, allocationSum: 10, bookedSum: 2, allocationDate: "2023-04-16",…}
1
:
{orgId: 107, screenType: null, allocationSum: 10, bookedSum: 0, allocationDate: "2023-04-17",…}
2
:
{orgId: 107, screenType: null, allocationSum: 10, bookedSum: 2, allocationDate: "2023-04-18",…}
3
:
{orgId: 107, screenType: null, allocationSum: 10, bookedSum: 2, allocationDate: "2023-04-19",…}
4
:
{orgId: 107, screenType: null, allocationSum: 10, bookedSum: 2, allocationDate: "2023-04-20",…}
]


 7402
7402


 被折叠的 条评论
为什么被折叠?
被折叠的 条评论
为什么被折叠?
 到【灌水乐园】发言


