


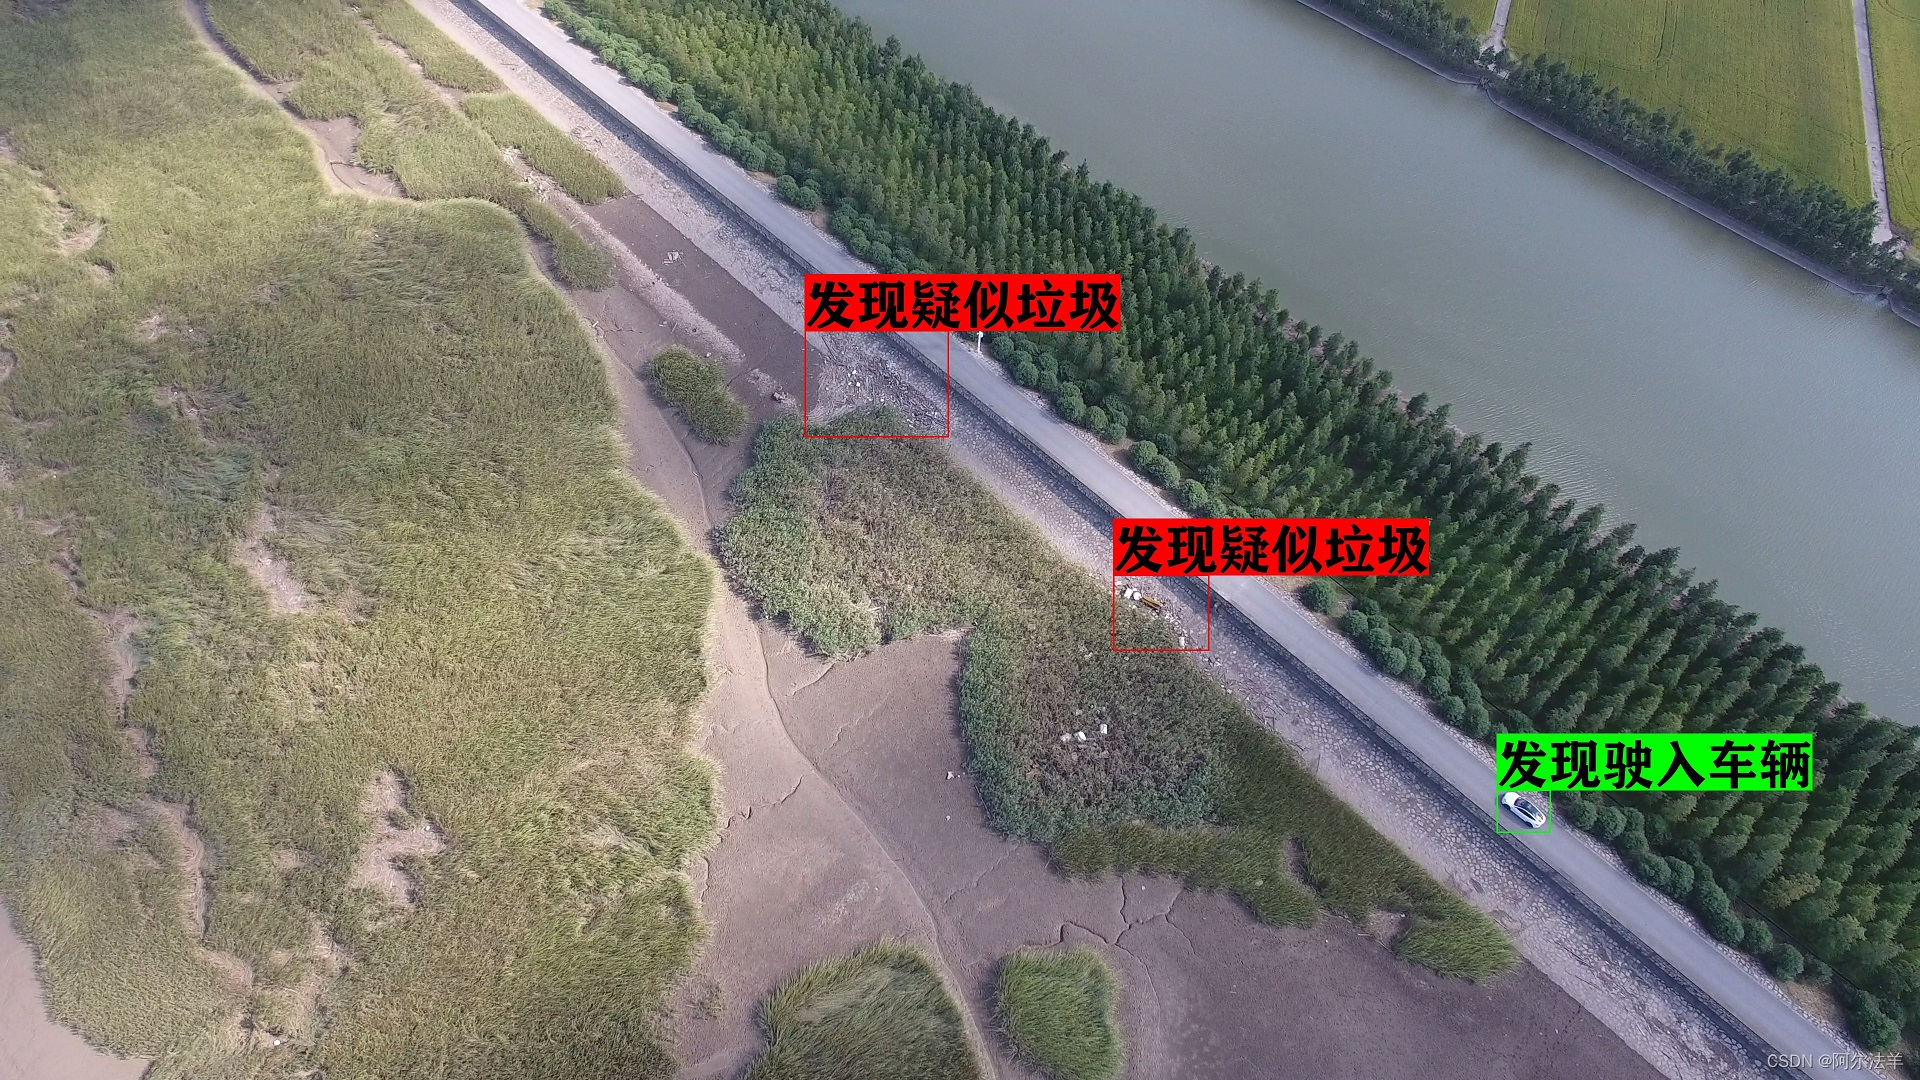
公司一个项目需要在无人机巡检的画面中识别垃圾和汽车,正好听闻yolov9最新出炉,于是试了一下采用yolov9来搭建该项目
1.下载和部署
下载yolov9:
GitHub地址:GitHub代码下载地址
配置环境可以参考之前关于yolov5的文章
Yolov5自学笔记之一--从入门到入狱,功能强大不要乱用(实现yolov5的基本功能使用流程及训练自己的数据集)_yolov5文件夹datasets-CSDN博客
因为我发现yolov5和yolov9的运行环境是一样的,我原来跑yolov5的环境直接可以用来跑yolov9
在官网的README.md文件中可以看到yolov9预训练模型的数据:

直接点击可以下载模型,目前官网只开放了C和E
2.测试运行
研究了一下yolov9的代码,结构和yolov5几乎一样,只是训练这里多了个train_dual,这个我们后面再讲,把data目录下默认的coco.yaml文件复制一份,重命名为coco128.yaml(叫啥都行,下面detect.py文件里对应上就行)。
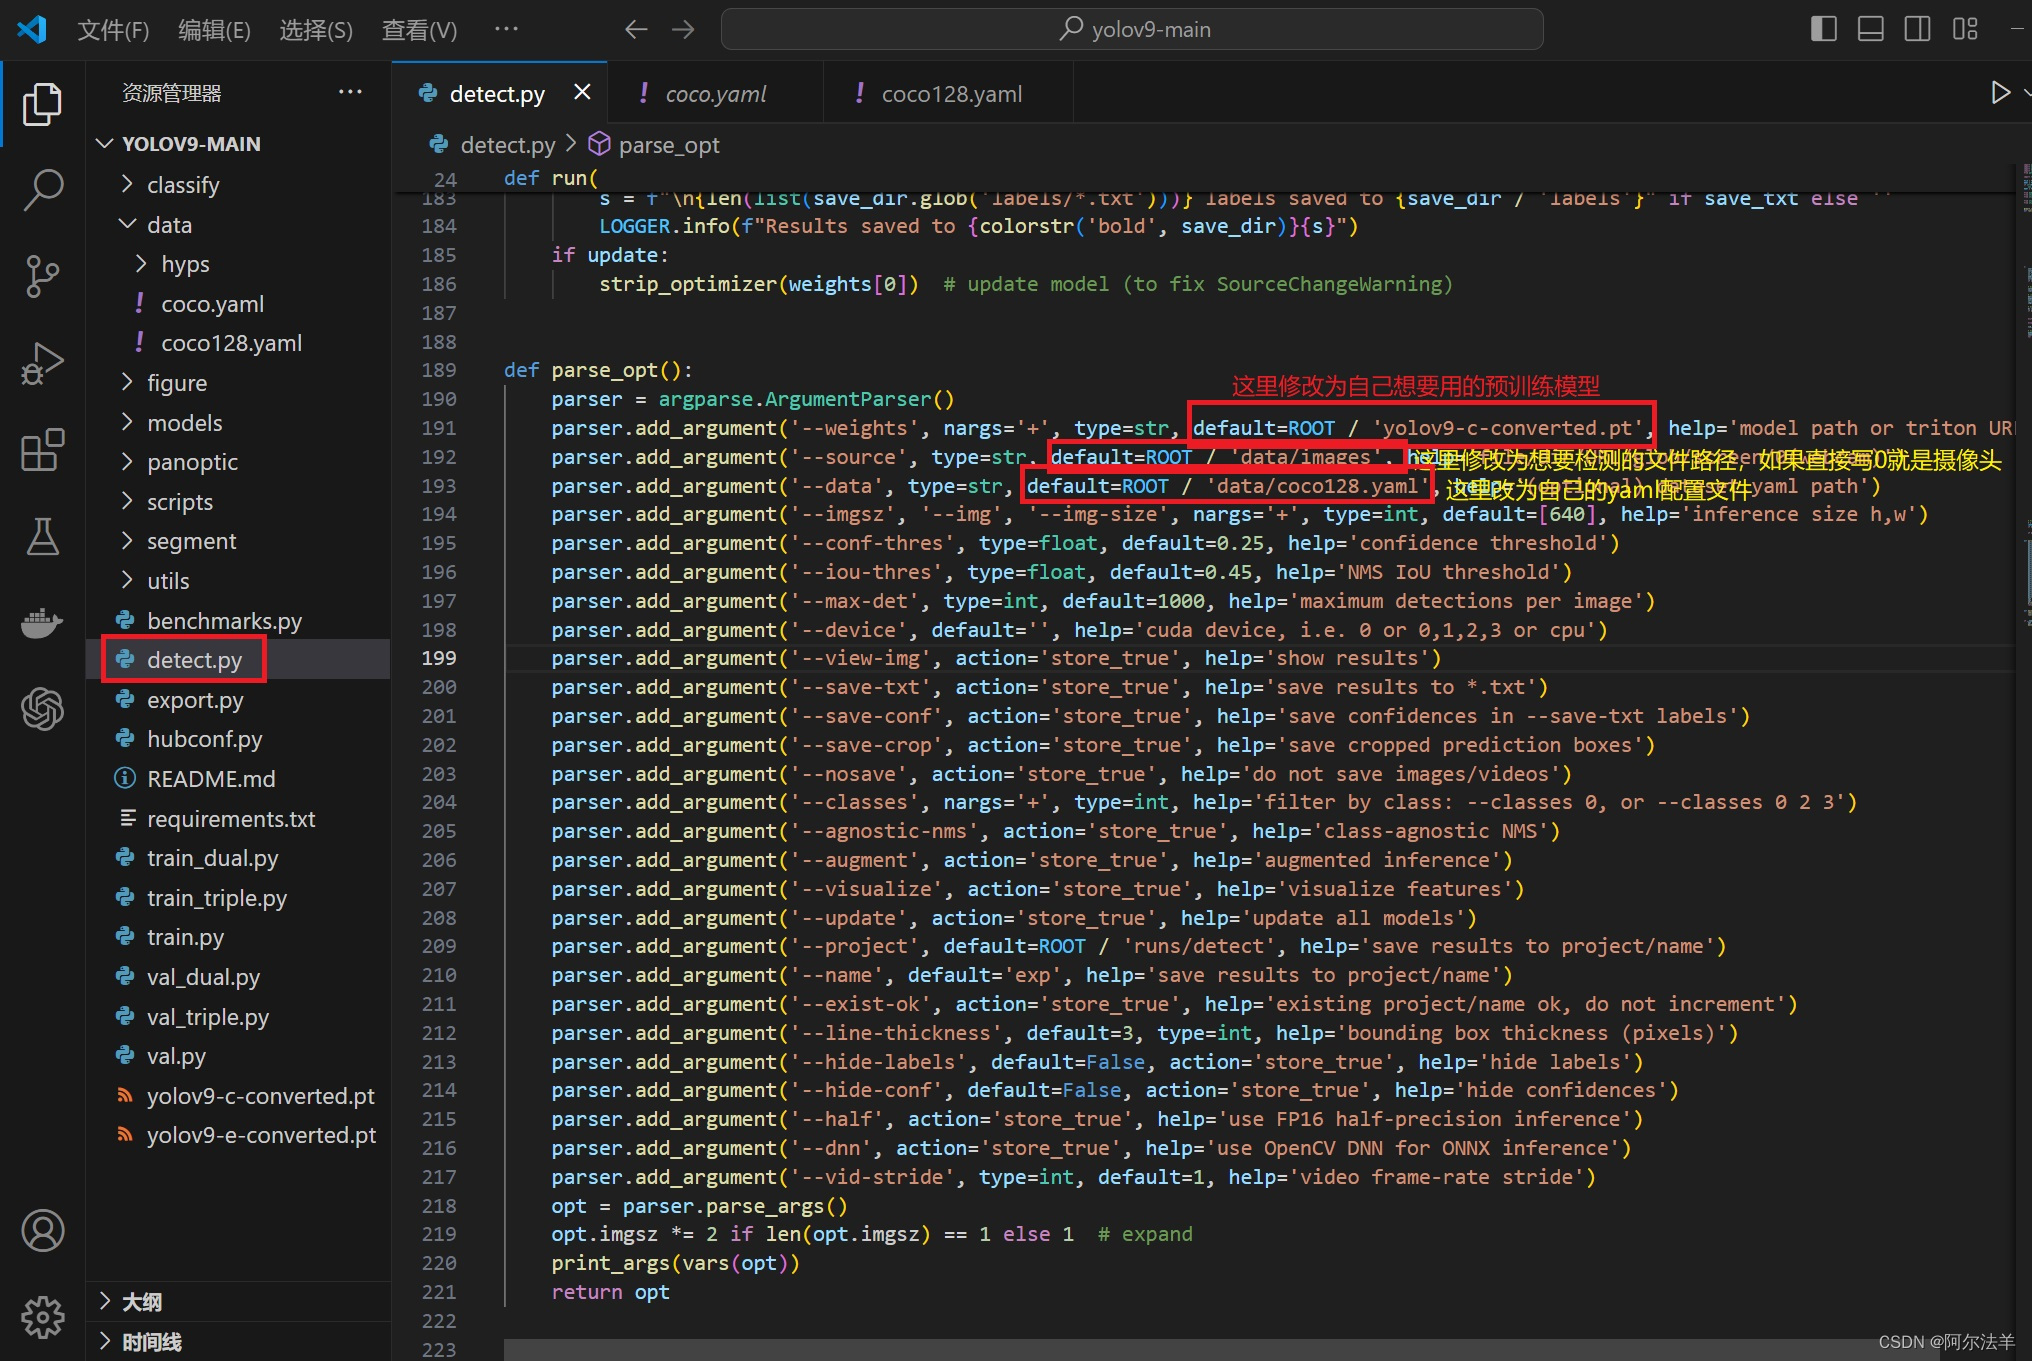
把下载的预训练权重文件放到 yolov9-main/yolov9-main 目录下,打开detect.py文件,做一些修改

这里我选择用yolov9-c.pt 这个模型
修改coco128.yaml,把download这一行注释掉
# download: |
#   from utils.general import download, Path
然后运行 detect.py,效果如下

3训练模型
3.1 数据集打标签
yolov9用的训练数据集结构和yolov5是一样的,我还是用Make Sense这个工具,不同的是垃圾呈现出来的是不规则图形,用Rect方式就不合适了,要用polygan这种方式

标签打完之后,点击左上角菜单 Actions-Export Annotations

弹出菜单中选择Single file in coco JSON format.

这样输出以后得到一个json格式的文件:
3.2 准备好数据集
这个文件yolov9是没法直接用的,还需要再处理一下,我们写一个json转txt标签.py
import os
import json
from tqdm import tqdm
import argparse

parser = argparse.ArgumentParser()
#这里根据自己的json文件位置,换成自己的就行
parser.add_argument('--json_path', default='C:\\Users\\admin\\Desktop\\海洋局垃圾识别\\json\\labelsforyolov9.json',type=str, help="input: coco format(json)")
#这里设置.txt文件保存位置
parser.add_argument('--save_path', default='C:\\Users\\admin\\Desktop\\海洋局垃圾识别\\out2\\', type=str, help="specify where to save the output dir of labels")
arg = parser.parse_args()

def convert(size, box):
    dw = 1. / (size[0])
    dh = 1. / (size[1])
    x = box[0] + box[2] / 2.0
    y = box[1] + box[3] / 2.0
    w = box[2]
    h = box[3]
#round函数确定(xmin, ymin, xmax, ymax)的小数位数
    x = round(x * dw, 6)
    w = round(w * dw, 6)
    y = round(y * dh, 6)
    h = round(h * dh, 6)
    return (x, y, w, h)

if __name__ == '__main__':
    json_file =   arg.json_path # COCO Object Instance 类型的标注
    ana_txt_save_path = arg.save_path  # 保存的路径

    data = json.load(open(json_file, 'r'))
    if not os.path.exists(ana_txt_save_path):
        os.makedirs(ana_txt_save_path)

    id_map = {} # coco数据集的id不连续!重新映射一下再输出!
    with open(os.path.join(ana_txt_save_path, 'classes.txt'), 'w') as f:
        # 写入classes.txt
        for i, category in enumerate(data['categories']):
            f.write(f"{category['name']}\n")
            id_map[category['id']] = i
    # print(id_map)
    #这里需要根据自己的需要,更改写入图像相对路径的文件位置。
    list_file = open(os.path.join(ana_txt_save_path, 'C:\\Users\\admin\\Desktop\\海洋局垃圾识别\\out2\\train2024.txt'), 'w')
    for img in tqdm(data['images']):
        img_file_name = img['file_name'] # 图片名称
        filename = img_file_name.split("/")[-1]
        img_width = img["width"]
        img_height = img["height"]
        img_id = img["id"]
        head, tail = os.path.splitext(filename)
        ana_txt_name = head + ".txt"  # 对应的txt名字,与jpg一致
        f_txt = open(os.path.join(ana_txt_save_path, ana_txt_name), 'w')
        for ann in data['annotations']:
            # print(ann)
            if ann['image_id'] == img_id:
                # box = convert((img_width, img_height), ann["bbox"])
                segmentation = ann["segmentation"][0]  # 获取ann["segmentation"][0]

                for i in range(len(segmentation)):
                    if i % 2 == 0:  # 偶数项
                        segmentation[i] /= img_width
                    else:  # 奇数项
                        segmentation[i] /= img_height

                f_txt.write("%s %s\n" % (id_map[ann["category_id"]], ' '.join(map(str, segmentation))))
        f_txt.close()
        #将图片的相对路径写入train2017或val2017的路径
        # list_file.write('./images/train2017/%s.jpg\n' %(head))
# list_file.close()这样运行后我们得到了一个文件夹里全是.txt文件,这就是我们输入Make Sense 打标签的那些图片对应的标签文件,到此为止就和之前Rect打标签一样了。
现在我们手动分配,在yolov9-main目录下(其实在哪都行,只要后面自己配置的时候能找到就行)新建一个datasets文件夹,下面新建images、labels、test、train、val等5个文件夹。
images 和 labels 用来放 打标签的图片和.txt文件,其实这只是为了文件管理方便,这两个文件夹不要也行。
把其中90%的图片和对应的txt文件(注意图片和txt的文件名一定要对应起来)放入train文件夹,
5%放在test文件夹,5%放入val文件夹,这样我们就把训练用的数据集准备好了。
3.3 修改配置
首先修改coco128.yaml配置,因为我们只需要识别两种物体 laji 和 car 所以就把nc改为2,names里面放两个标签 'laji' 和 ‘car’。 还要注意path路径,是相对于coco128.yaml这个文件的位置,看目录树,因为我们的datasets在coco128.yaml的上两层目录所以用 ../ 来获取到datasets文件夹。其余train val test 三个目录是相对于path的位置,所以直接写。
# YOLOv9 🚀 by Ultralytics, GPL-3.0 license
# COCO128 dataset https://www.kaggle.com/ultralytics/coco128 (first 128 images from COCO train2017)
# Example usage: python train.py --data coco128.yaml
# parent
# ├── yolov9-main
#     └── data
#         └── coco128  ← downloads here
# └── datasets
#     └── images
#     └── labels
#     └── test
#     └── train
#     └── val

# Train/val/test sets as 1) dir: path/to/imgs, 2) file: path/to/imgs.txt, or 3) list: [path/to/imgs1, path/to/imgs2, ..]
path: ../datasets  # dataset root dir
train: train  # train images (relative to 'path') 128 images
val: val  # val images (relative to 'path') 128 images
test: test  # test images (optional)

# Classes
nc: 2  # number of classes
names: ['laji','car']  # class names


# Download script/URL (optional)
# download: https://github.com/ultralytics/yolov5/releases/download/v1.0/coco128.zip
然后修改自己准备使用的模型对应的yaml文件,我这里修改 models/yolov9-c.yaml文件
其实主要就是把 nc 改为需要训练的种类数量,我这里改为2.
然后下面注意,在yolov9-c.yaml文件的最后 detection head部分
   # detection head

   # detect
   [[31, 34, 37, 16, 19, 22], 1, DualDDetect, [nc]],  # DualDDetect(A3, A4, A5, P3, P4, P5)
如果用train.py 来训练,会报错 AttributeError: ‘list‘ object has no attribute ‘view‘
这时候就需要把这里的 DualDDetect 改为 Detect
   # detection head

   # detect
   [[31, 34, 37, 16, 19, 22], 1, Detect, [nc]],  # DualDDetect(A3, A4, A5, P3, P4, P5)
  ]
如果用 train_dual.py来训练,这里不用改
然后我们对train.py做一些修改

运行,如果报错 RuntimeError: CUDA out of memory. Tried to allocate 14.00 MiB (GPU 0; 2.00 GiB total capacity; 1.06 GiB already allocated; 8.88 MiB free; 1.08 GiB reserved in total by PyTorch)
说明GPU分配的显存不够,可以用如下方法清理一下:
打开cmd新开一个终端,输入nvidia-smi,可以看到当前的GPU占用情况
Mon Apr 08 18:25:55 2024
+-----------------------------------------------------------------------------+
| NVIDIA-SMI 445.87       Driver Version: 445.87       CUDA Version: 11.0     |
|-------------------------------+----------------------+----------------------+
| GPU  Name            TCC/WDDM | Bus-Id        Disp.A | Volatile Uncorr. ECC |
| Fan  Temp  Perf  Pwr:Usage/Cap|         Memory-Usage | GPU-Util  Compute M. |
|===============================+======================+======================|
|   0  GeForce MX250      WDDM  | 00000000:01:00.0 Off |                  N/A |
| N/A   41C    P8    N/A /  N/A |     64MiB /  2048MiB |      0%      Default |
+-------------------------------+----------------------+----------------------+

+-----------------------------------------------------------------------------+
| Processes:                                                                  |
|  GPU                  PID   Type   Process name                  GPU Memory |
|                                                                  Usage      |
|=============================================================================|
|    0                11832    C+G   ...cw5n1h2txyewy\LockApp.exe    N/A      |
|    0                19496    C+G   ...2txyewy\TextInputHost.exe    N/A      |
|    0                19532    C+G   ...nager\MessageCenterUI.exe    N/A      |
|    0                19572    C+G   ...5n1h2txyewy\SearchApp.exe    N/A      |
|    0                22248    C+G   ...icrosoft VS Code\Code.exe    N/A      |
+-----------------------------------------------------------------------------+
用 taskkill -PID +进程号 杀死这些进程
C:\Users\admin>taskkill -PID 11832
成功: 给进程发送了终止信号,进程的 PID 为 11832。

C:\Users\admin>taskkill -PID 19496
成功: 给进程发送了终止信号,进程的 PID 为 19496。

C:\Users\admin>taskkill -PID 19532
成功: 给进程发送了终止信号,进程的 PID 为 19532。

C:\Users\admin>taskkill -PID 19572
成功: 给进程发送了终止信号,进程的 PID 为 19572。

C:\Users\admin>taskkill -PID 22248
成功: 给进程发送了终止信号,进程的 PID 为 22248。
然后再运行就可以了,如果还不行,那就升级硬件吧,要换显卡了
顺利训练完成的话,在 yolov9-main/yolov9-main/runs/train/exp/weights 目录下,可以找到best.pt 和 last.pt 两个训练好的模型,一般来说 best.pt用来推理,last.pt 保存了断点信息,用来继续训练
3.4 推理
推理没啥说的,在detect.py 中修改配置,和之前的一样,只要把模型改为 best.pt就行了
3.5 定制输出
默认的输出是一个方形线框,显示类别名和置信度,如果想定制显示效果,可以通过修改utils/plots.py文件定制自己想要的效果。
中文显示:首先找到 C:\Windows\Fonts 目录下,可以看到本机安装的字体,复制自己想要的字体文件,然后找到 C:\Users\admin\AppData\Roaming\Ultralytics 目录,粘贴到此目录下。
然后打开 utils/plots.py 中的class Annotator:
class Annotator:
    if RANK in (-1, 0):
        check_font()  # download TTF if necessary

    # YOLOv5 Annotator for train/val mosaics and jpgs and detect/hub inference annotations
    def __init__(self, im, line_width=None, font_size=None, font='方正粗黑宋简体.ttf', pil=True, example='abc'):
        assert im.data.contiguous, 'Image not contiguous. Apply np.ascontiguousarray(im) to Annotator() input images.'
        self.pil = pil or not is_ascii(example) or is_chinese(example)
        if self.pil:  # use PIL
            self.im = im if isinstance(im, Image.Image) else Image.fromarray(im)
            self.draw = ImageDraw.Draw(self.im)
            self.font = check_font(font='Arial.Unicode.ttf' if is_chinese(example) else font,
                                   size=font_size or max(round(sum(self.im.size) / 2 * 0.035), 12))
        else:  # use cv2
            self.im = im
        self.lw = line_width or max(round(sum(im.shape) / 2 * 0.003), 2)  # line width

    def box_label(self, box, label='', color=(128, 128, 128), txt_color=(0, 0, 0)):
        #做一个字典,用来映射中文
        label_dic={"laji":["发现疑似垃圾",(0,0,255)],"car":["发现驶入车辆",(0,255,0)]}

        # Add one xyxy box to image with label
        if self.pil or not is_ascii(label):

            if label:
                label_key = label.split(" ")[0]
                label_conf = float(label.split(" ")[1])
                label_show = label_dic[label_key][0]
                label_color = label_dic[label_key][1]

                print("置信度:",label_show,label_conf)

                if label_key=="laji":
                    if label_conf > 0.7:
                        self.draw.rectangle(box, width=self.lw, outline=label_color)  # box
                        w, h = self.font.getsize(label_show)  # text width, height
                        outside = box[1] - h >= 0  # label fits outside box
                        self.draw.rectangle([box[0],
                                            box[1] - h if outside else box[1],
                                            box[0] + w + 1,
                                            box[1] + 1 if outside else box[1] + h + 1], fill=label_color)
                        # self.draw.text((box[0], box[1]), label, fill=txt_color, font=self.font, anchor='ls')  # for PIL>8.0
                        self.draw.text((box[0], box[1] - h if outside else box[1]), label_show, fill=txt_color, font=self.font)

                elif label_key == "car":
                    if label_conf > 0.3:
                        self.draw.rectangle(box, width=self.lw, outline=label_color)
                        w, h = self.font.getsize(label_show)  # text width, height
                        outside = box[1] - h >= 0  # label fits outside box
                        self.draw.rectangle([box[0],
                                            box[1] - h if outside else box[1],
                                            box[0] + w + 1,
                                            box[1] + 1 if outside else box[1] + h + 1], fill=label_color)
                        # self.draw.text((box[0], box[1]), label, fill=txt_color, font=self.font, anchor='ls')  # for PIL>8.0
                        self.draw.text((box[0], box[1] - h if outside else box[1]), label_show, fill=txt_color, font=self.font)

        else:  # cv2
            p1, p2 = (int(box[0]), int(box[1])), (int(box[2]), int(box[3]))
            cv2.rectangle(self.im, p1, p2, color, thickness=self.lw, lineType=cv2.LINE_AA)
            if label:
                tf = max(self.lw - 1, 1)  # font thickness
                w, h = cv2.getTextSize(label, 0, fontScale=self.lw / 3, thickness=tf)[0]  # text width, height
                outside = p1[1] - h - 3 >= 0  # label fits outside box
                p2 = p1[0] + w, p1[1] - h - 3 if outside else p1[1] + h + 3
                cv2.rectangle(self.im, p1, p2, color, -1, cv2.LINE_AA)  # filled
                cv2.putText(self.im, label, (p1[0], p1[1] - 2 if outside else p1[1] + h + 2), 0, self.lw / 3, txt_color,
                            thickness=tf, lineType=cv2.LINE_AA)

    def rectangle(self, xy, fill=None, outline=None, width=1):
        # Add rectangle to image (PIL-only)
        self.draw.rectangle(xy, fill, outline, width)

    def text(self, xy, text, txt_color=(255, 255, 255)):
        # Add text to image (PIL-only)
        w, h = self.font.getsize(text)  # text width, height
        self.draw.text((xy[0], xy[1] - h + 1), text, fill=txt_color, font=self.font)

    def result(self):
        # Return annotated image as array
        return np.asarray(self.im)
其中的box_label函数就是用来画出显示的标签框的,对它进行修改:
 经过定制后,显示的效果为:
防抖处理:
现在能够识别了,但是有个问题,在进行视频推理的时候,标签框会不停抖动,这是因为识别不稳定,置信度忽高忽低,即模型一会觉得它是垃圾,一会又觉得不是,造成画框时隐时现,肉眼看上去就是抖动、闪烁的效果。
解决思路:如果开始识别到某个类别,那么将增加下一帧认定它是这个类别的概率,以实现线框连续效果。
最终成品视频效果:


 被折叠的 条评论
为什么被折叠?
被折叠的 条评论
为什么被折叠?
 到【灌水乐园】发言


