前言:
openlayers中渲染图片是有多种方法的, Icon ,Image 等等都可以实现将图片放到地图上面,但是操作图片的话,方法比较少了,这里是配合 ol-ext 来实现的。
相关资料:
1、ol-ext官方地址:入口
2、ol-ext 对应的资料地址:入口
3、ol-ext 源码gitee地址:入口
4、openlayers 最新官网:入口
5、openlayers 官网api:入口
6、实际坐标转换视图坐标(getPixelFromCoordinate):入口

7、视图坐标转换为实际坐标(getCoordinateFromPixel):入口

实现效果:
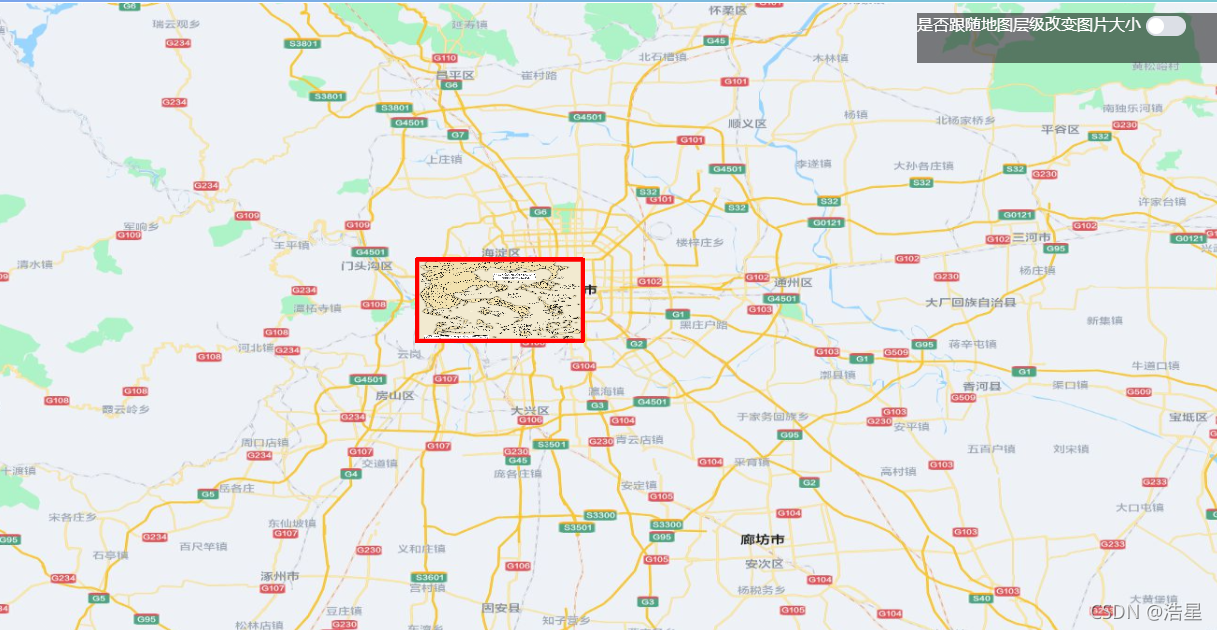
图1、默认实现效果
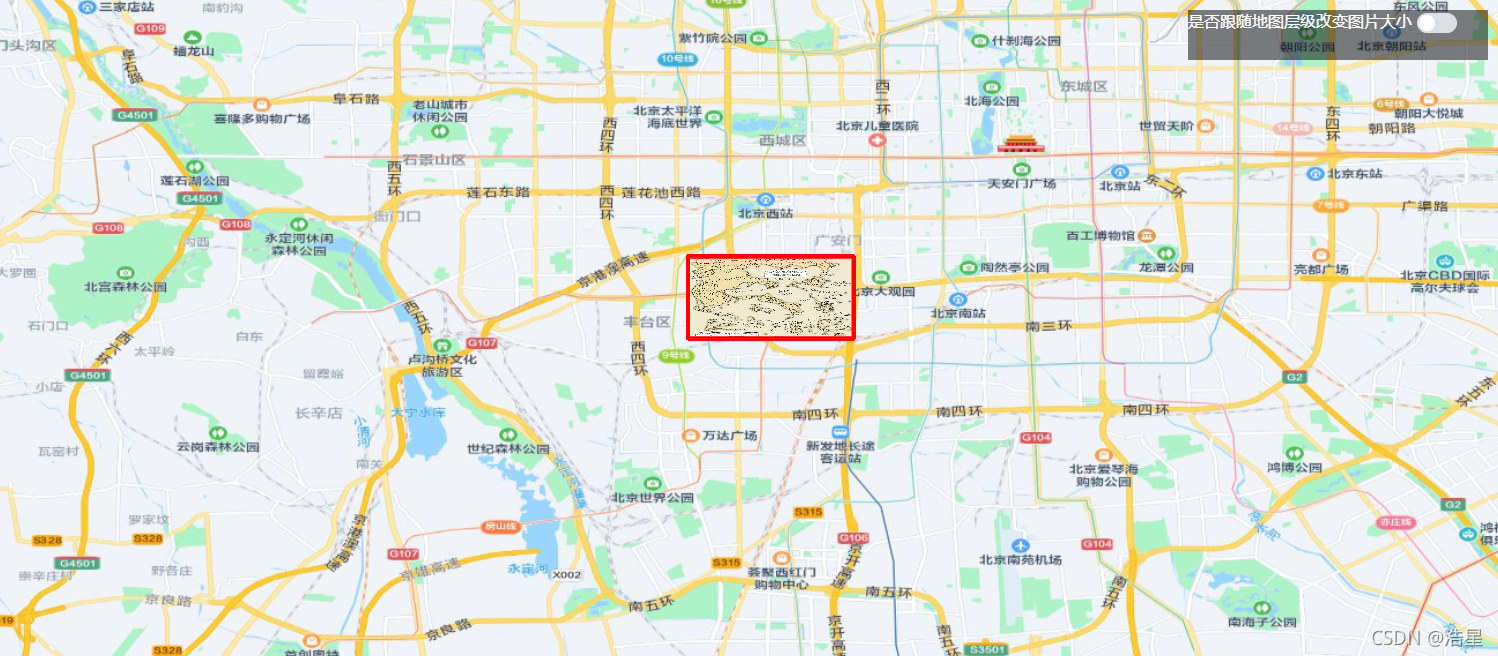
图2、鼠标滚动,层级变化,图片大小不变
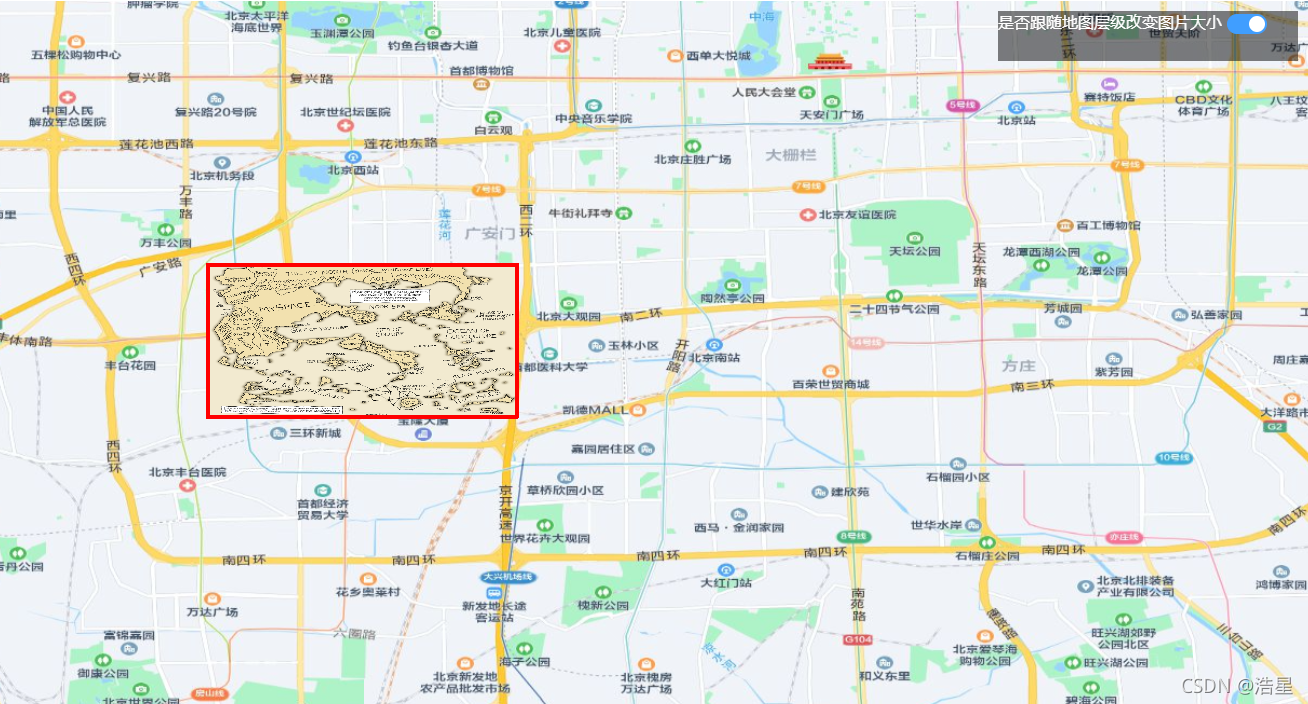
图3、鼠标滚动,层级变化,图片跟着变化,始终在一个坐标范围上
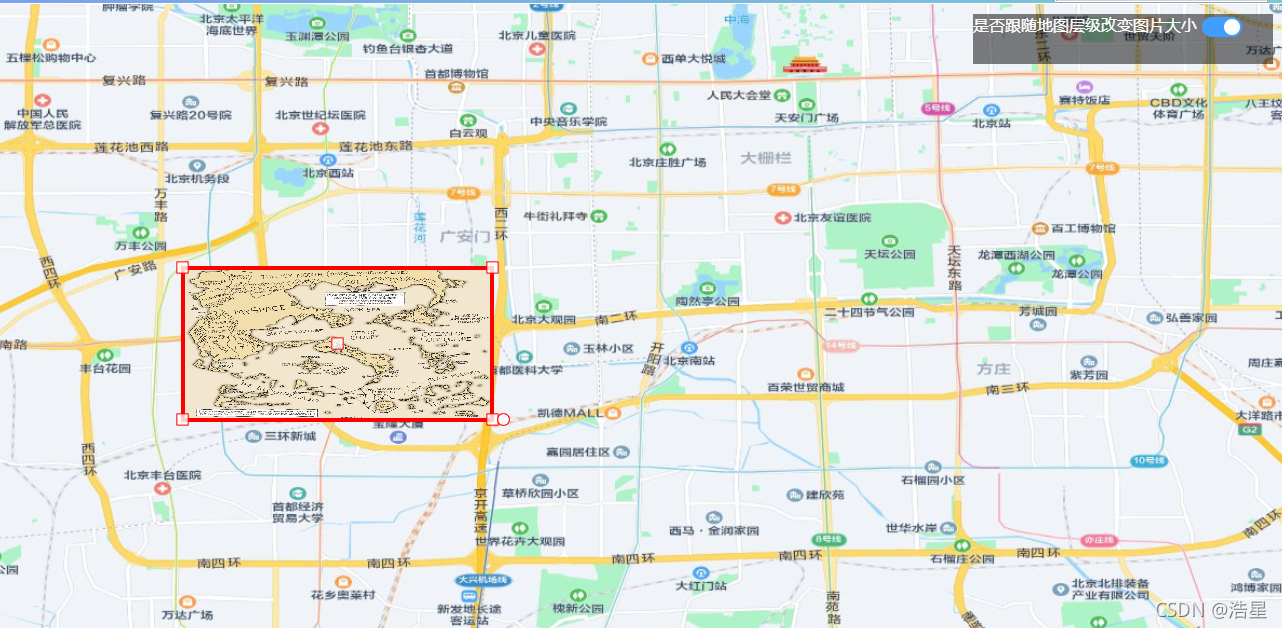
图4、拖拽放大前
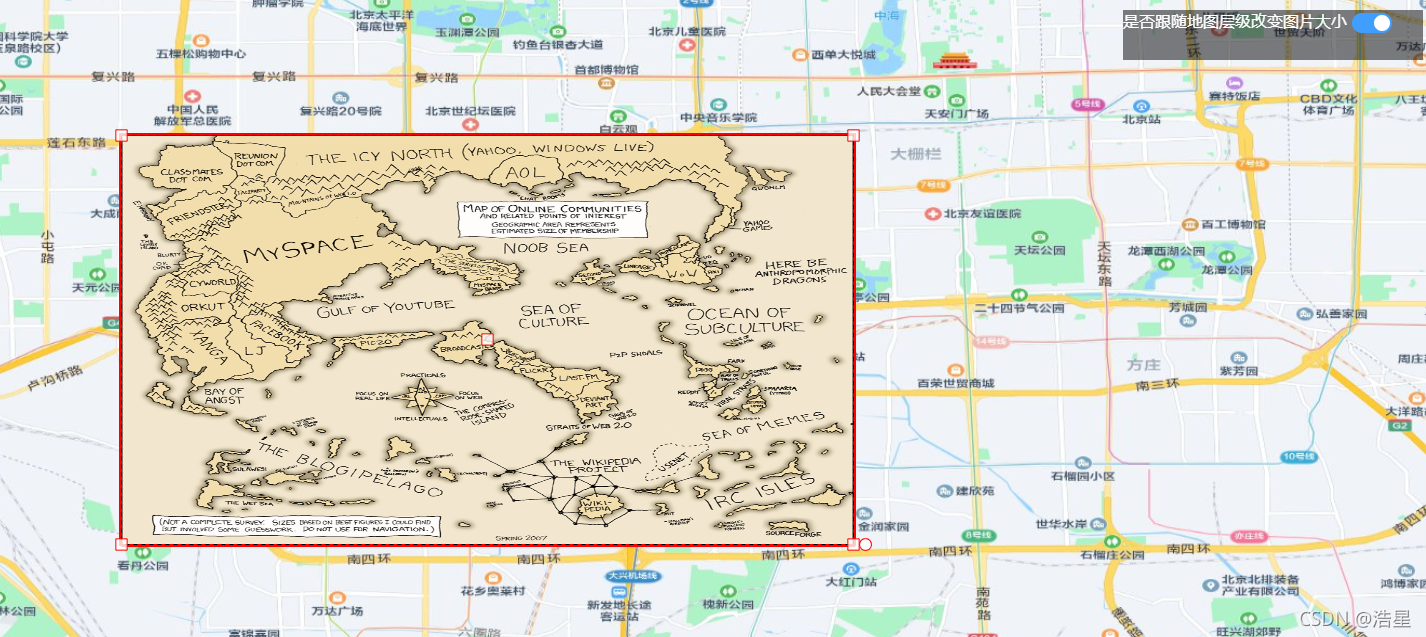
图5、拖拽放大后
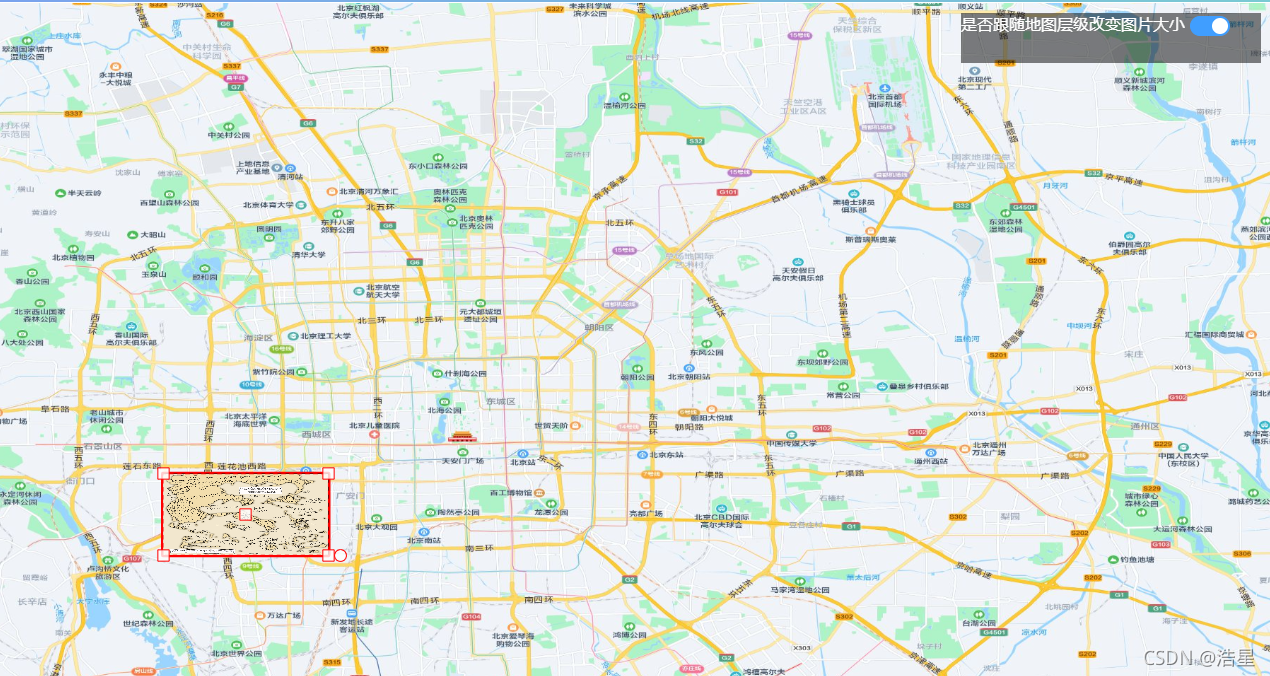
图6、移动前
 图7、移动后
相关思路:
1、openlayers是可以实现图片的展示,svg,canvas,png等等
2、openlayers的扩展 ol-ext 是可以实现图形的拖拽,放大缩小,旋转等功能
3、将他们结合,下面放多边形,来控制可以使用ol-ext的功能,上面放图片,来同步效果
实现步骤:
1、把最下面的源码放进去,修改,这个是我本地的服务,下载的地图瓦片
http://localhost:8888/haoxing-map/sosomaps/roadmap/{z}/{x}/{y}.jpg
2、清理当前图形方法
this.polygon_vectorSource.clear();
3、创建一个多边形
let polygon = new Feature({
    geometry: new Polygon([
        this.Coordinate_arr
    ]),
})
4、设置样式
polygon.setStyle(new Style({
          fill: new Fill({
            color: 'rgba(255, 255, 255, 0.2)'
          }),
          stroke: new Stroke({
            width: 4,
            color: [255, 0, 0, 1],
          }),
        }))
5、将多边形加到图层内
this.polygon_vectorSource.addFeature(polygon);
6、将图层加入地图上
this.map.addLayer(new VectorLayer({
          source: this.polygon_vectorSource,
        }))
源码分享:
<template>
  <div id="map" class="map" ref="imageDom">
    <div class="setting">
      是否跟随地图层级改变图片大小
      <el-switch
        v-model="switchVal"
        @change="changeSwitch"
      >
      </el-switch>
    </div>
  </div>
</template>

<script>
  import "ol/ol.css";
  import View from "ol/View";
  import Map from "ol/Map";
  import TileLayer from "ol/layer/Tile";
  import Overlay from "ol/Overlay";
  import XYZ from "ol/source/XYZ";
  import { Vector as SourceVec ,Cluster,Vector as VectorSource } from "ol/source";
  import { Feature } from "ol";
  import { Vector as LayerVec , Vector as VectorLayer } from "ol/layer";
  import { Point, LineString, Polygon } from "ol/geom";
  import ExtTransform from 'ol-ext/interaction/Transform'

  import ImageLayer from 'ol/layer/Image';
  import Static from 'ol/source/ImageStatic';
  import Projection from 'ol/proj/Projection';

  import {
    Style,
    Icon,
    Fill,
    Stroke,
    Text,
    Circle as CircleStyle,
  } from "ol/style";
  import { OSM, TileArcGISRest } from "ol/source";


  import {fromLonLat} from 'ol/proj';

  export default {
    name: "siteMapping",
    data() {
      return {
        map: null,
        switchVal:false,
        center: [116.39702518856394, 39.918590567855425], //北京故宫的经纬度
        centerSize: 11.5,
        projection: "EPSG:4326",
        vectorSource:new SourceVec({}),
        polygon_vectorSource:new SourceVec({}),
        rotation:0,//角度
        pointCenter:[116.2925480012459, 39.87353495433062],//中心点
        Coordinate_arr:[
          [116.33272829555995,39.893308222194946], //右上
          [116.33272829555995,39.85376168646629],  //右下
          [116.25236770693185,39.85376168646629], //左下
          [116.25236770693185,39.893308222194946], //左上

        ],
        Pixel_arr:[],
        imgStatic:null

      };
    },
    mounted() {
      this.initMap()

      this.createPolygon()
      let left_lon = 116.25236770693185
      let bottom_lat = 39.85376168646629
      let right_lon = 116.33272829555995
      let top_lat = 39.893308222194946
      this.createImg(left_lon,bottom_lat,right_lon,top_lat)

      this.onEdit()
    },
    methods: {
      //初始化地图
      initMap() {
        //渲染地图
        var layers = [
          //深蓝色背景
          // new TileLayer({
          //   source: new XYZ({
          //     url:
          //       "https://map.geoq.cn/ArcGIS/rest/services/ChinaOnlineStreetPurplishBlue/MapServer/tile/{z}/{y}/{x}",
          //   }),
          // }),
          //初始化背景
          // new TileLayer({
          //   source: new OSM(),
          // })
          new TileLayer({
            title: "街道图",
            source: new XYZ({
              url: "http://localhost:8888/haoxing-map/sosomaps/roadmap/{z}/{x}/{y}.jpg",//zwh本地使用
            }),
          }),
        ];

        this.map = new Map({
          layers: layers,
          target: "map",
          view: new View({
            center: this.center,
            projection: this.projection,
            zoom: this.centerSize,
            maxZoom: 17,
            minZoom: 8,
          }),
        });

        let that = this
        this.map.on("moveend", function(evt){
          var zoom = that.map.getView().getZoom();
          console.log("zoom = " + zoom);
          // console.log(that.switchVal);

          if(that.Pixel_arr.length>0 && !that.switchVal){
            let arr = that.changeGetCoordinateFromPixel(that.Pixel_arr)
            let left_lon = arr[2][0]
            let bottom_lat = arr[2][1]
            let right_lon = arr[0][0]
            let top_lat = arr[0][1]
            that.createImg(left_lon,bottom_lat,right_lon,top_lat)

            that.createPolygon()
          }


        });


        //图片值
        setTimeout(()=>{
          this.changeGetPixelFromCoordinate(this.Coordinate_arr)
        },800)

      },

      //是否跟随改变
      changeSwitch(val){

      },

      //创建多边形
      createPolygon() {
        //清除现在的
        this.polygon_vectorSource.clear();
        let polygon = new Feature({
          geometry: new Polygon([
            this.Coordinate_arr
          ]),
        })
        polygon.setStyle(new Style({
          fill: new Fill({
            color: 'rgba(255, 255, 255, 0.2)'
          }),
          stroke: new Stroke({
            width: 4,
            color: [255, 0, 0, 1],
          }),
        }))
        this.polygon_vectorSource.addFeature(polygon);
        this.map.addLayer(new VectorLayer({
          source: this.polygon_vectorSource,
        }))


      },

      //切换坐标,实际坐标-》界面坐标
      changeGetPixelFromCoordinate(Coordinate_arr){
        let Pixel_arr = []
        Pixel_arr.push(this.map.getPixelFromCoordinate(Coordinate_arr[0])  )
        Pixel_arr.push(this.map.getPixelFromCoordinate(Coordinate_arr[1])  )
        Pixel_arr.push(this.map.getPixelFromCoordinate(Coordinate_arr[2])  )
        Pixel_arr.push(this.map.getPixelFromCoordinate(Coordinate_arr[3])  )
        this.Pixel_arr = Pixel_arr
        return Pixel_arr
      },
      //切换坐标,界面坐标-》实际坐标
      changeGetCoordinateFromPixel(Pixel_arr){
        let Coordinate_arr = []
        Coordinate_arr.push(this.map.getCoordinateFromPixel(Pixel_arr[0])  )
        Coordinate_arr.push(this.map.getCoordinateFromPixel(Pixel_arr[1])  )
        Coordinate_arr.push(this.map.getCoordinateFromPixel(Pixel_arr[2])  )
        Coordinate_arr.push(this.map.getCoordinateFromPixel(Pixel_arr[3])  )
        this.Coordinate_arr = Coordinate_arr
        return Coordinate_arr
      },

      //图片
      createImg(left_lon,bottom_lat,right_lon,top_lat,arr){
        // var extent = [116.25236770693185, 39.85376168646629, 116.33272829555995,39.893308222194946]; //左经度 下纬度 右经度 上纬度
        if(!left_lon || !bottom_lat ||  !right_lon || !top_lat){
          return
        }
        if(arr){
          let Coordinate_arr = []
          Coordinate_arr[0] = [arr[0],arr[1]]
          Coordinate_arr[1] = [arr[2],arr[3]]
          Coordinate_arr[2] = [arr[4],arr[5]]
          Coordinate_arr[3] = [arr[6],arr[7]]
          let newArr = this.changeGetPixelFromCoordinate(Coordinate_arr)
          console.log(newArr);
          console.log(66666666666666666666666666666);
        }


        var extent = [left_lon, bottom_lat, right_lon,top_lat]; //左经度 下纬度 右经度 上纬度
        console.log(extent);
        var projection = new Projection({
          code: 'xkcd-image',
          units: 'pixels',
          extent: extent,
        });

        if(this.imgStatic){
          this.map.removeLayer(this.imgStatic)
          this.imgStatic = null
        }

        this.imgStatic = new ImageLayer({
          source: new Static({
            url: 'https://imgs.xkcd.com/comics/online_communities.png',
            projection: projection,
            imageExtent: extent,
          }),
        })
        this.map.addLayer(
          this.imgStatic
        )


        // // //清除点位
        // this.vectorSource.clear();
        // //标注点图标样式
        // let markerStyle = new Style({
        //   image: new Icon({
        //     opacity: 0.75,
        //     src: 'https://imgs.xkcd.com/comics/online_communities.png',
        //     imgSize:[160,80],
        //     rotation: this.rotation,
        //     // extent: extent,
        //   }),
        //   text: new Text({
        //     text: '哈哈哈哈',
        //     rotation: this.rotation,
        //     textAlign: 'center',
        //     textBaseline: 'top',
        //   }),
        // });
        //
        //
        //
        //
        // // 创建图标特性
        // let feature = new Feature({
        //   geometry: new Point(this.pointCenter, "XY"),
        //   name: '测试',
        //   properties: {name:'123'},
        // });
        // feature.setStyle(markerStyle);
        //
        //
        // // 将图标特性添加进矢量中
        // this.vectorSource.addFeature(feature);
        //
        // //添加进map层-聚合点-VectorLayer
        // var layer = new LayerVec({
        //   source: this.vectorSource,
        //   style: function (feature, resolution) {
        //     return feature.get('features')[0].style_
        //
        //   }
        // })
        // //地图添加画板
        // this.map.addLayer(
        //   layer
        // );


      },


      //操作事件
      onEdit() {
        const transform = new ExtTransform({
          enableRotatedTransform: false,
          hitTolerance: 2,
          translate: true, // 拖拽
          stretch: false, // 拉伸
          scale: true, // 缩放
          rotate: true, // 旋转
          translateFeature: false,
          noFlip: true,
          // layers: [],
        })
        this.map.addInteraction(transform)

        let that = this
        //开始事件
        transform.on(['rotatestart','translatestart'], function(e){
          // Rotation
          let startangle = e.feature.get('angle')||0;
          // Translation
          console.log(1111);
          console.log(e);

          // that.pointCenter = e.target.center_
          // that.createImg()

        });
        //旋转
        transform.on('rotating', function (e){
          // $('#info').text("rotate: "+((e.angle*180/Math.PI -180)%360+180).toFixed(2));
          // Set angle attribute to be used on style !
          // e.feature.set('angle', startangle - e.angle);
          console.log(2222);
          console.log("rotate: "+((e.angle*180/Math.PI -180)%360+180).toFixed(2));
          console.log(e);


          // let value = ((e.angle*180/Math.PI -180)%360+180).toFixed(2)
          // that.rotation = -e.angle
          // that.createImg()


          let arr = e.target._featureListeners[0].target.values_.geometry.flatCoordinates
          let left_lon = arr[4]
          let bottom_lat = arr[5]
          let right_lon = arr[0]
          let top_lat = arr[1]
          that.createImg(left_lon,bottom_lat,right_lon,top_lat,arr)

        });
        //移动
        transform.on('translating', function (e){
          // d[0]+=e.delta[0];
          // d[1]+=e.delta[1];
          // $('#info').text("translate: "+d[0].toFixed(2)+","+d[1].toFixed(2));
          // if (firstPoint) {
          //   interaction.setCenter(e.features.getArray()[0].getGeometry().getFirstCoordinate());
          // }
          console.log(3333);
          // console.log(e.delta);
          console.log(e);


          let arr = e.target._featureListeners[0].target.values_.geometry.flatCoordinates
          let left_lon = arr[4]
          let bottom_lat = arr[5]
          let right_lon = arr[0]
          let top_lat = arr[1]
          that.createImg(left_lon,bottom_lat,right_lon,top_lat,arr)

        });
        //拖拽事件
        transform.on('scaling', function (e){
          // $('#info').text("scale: "+e.scale[0].toFixed(2)+","+e.scale[1].toFixed(2));
          // if (firstPoint) {
          //   interaction.setCenter(e.features.getArray()[0].getGeometry().getFirstCoordinate());
          // }
          console.log(4444);
          // console.log(e.scale);
          // console.log(e);


          let arr = e.target._featureListeners[0].target.values_.geometry.flatCoordinates
          let left_lon = arr[4]
          let bottom_lat = arr[5]
          let right_lon = arr[0]
          let top_lat = arr[1]
          that.createImg(left_lon,bottom_lat,right_lon,top_lat,arr)
        });
        //事件结束
        transform.on(['rotateend', 'translateend', 'scaleend'], function (e) {
          // $('#info').text("");
          console.log(5555);
          console.log(e);

          that.pointCenter = e.target.center_
          that.createImg()

        });


      },


    },
    beforeDestroy() {

    },
  };
</script>

<style type="scss" scoped>
  .map {
    width: 100%;
    height: 100%;
    position: relative;
  }
  .popup-content {
    /*background: rgba(255,255,255,.7);*/
    /*color: #333;*/
    background: rgba(0, 0, 0, 0.7);
    color: #fff;
    border-radius:  0.5208333333333334vw;
    padding:  0.5208333333333334vw;
    box-shadow: 0 0 0.3125vw #fff;
    position: relative;
  }
  .arrow {
    position: absolute;
    left: 46%;
    bottom: -20px;
    width: 8%;
    font-size: 25px;
    color: rgba(0, 0, 0, 0.7);
  }

  .site-mapping-tem .query-tem {
    position: relative;
    top: 25px;
    left: 1.5625vw;
    z-index: 100;
  }
  .setting{
    position: absolute;
    top:10px;
    right:10px;
    width: 300px;
    height: 50px;
    background: rgba(0,0,0,.5);
    z-index: 1000;
    color: #fff;
  }
</style>


 477
477

 被折叠的 条评论
为什么被折叠?
被折叠的 条评论
为什么被折叠?
 到【灌水乐园】发言


