


seata client 与 seata 是怎么通讯的
下面这张图,就是一切的基础。

- seata server 向注册中心注册
- seata client 想注册中心注册
- seata client 通过注册中心返回的seata server的地址与端口,找到seata server
由此可见,注册中行在这一场景下的作用就是让client 找到server
下面我们来看注册中心,注册中心分为两类,file与非file,我们先来看看file 类型
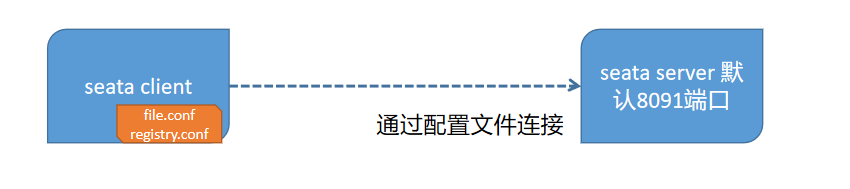
file 类型的 注册中心(file 类型的配置方式)
file 类型是个什么类型呢,file类型是用于做概念验证的注册中心,它的目标是通过配置文件,让client 直接找到 seata server,从而免去第三方注册中心的依赖,用来做快速验证。
其核心的配置点如下
... 省略部分代码
# service configuration, only used in client side 只在客户端使用
service {
  #transaction service group mapping
  #配置事务组,如果注册中心为nacos,需要在nacos中配置相应的配置项,这里就直接使用了文件配置。
  vgroupMapping.my_test_tx_group = "default"
  #only support when registry.type=file, please don't set multiple addresses
  #只在registry.conf 中 registry.type=file 时才使用此项配置,此项配置的作用就是制定seata server 在哪里。
  default.grouplist = "127.0.0.1:8091"
  #degrade, current not support
  enableDegrade = false
  #disable seata
  disableGlobalTransaction = false
... 省略部分代码
}
复制代码
此时 seata client 与 seata server的关系就变为如下图所示
seata server 端的file.conf 内容如下,只定义了数据存储方式。
## transaction log store, only used in seata-server
store {
  ## store mode: file、db
  mode = "file"

  ## file store property
  file {
    ## store location dir
    dir = "sessionStore"
    # branch session size , if exceeded first try compress lockkey, still exceeded throws exceptions
    maxBranchSessionSize = 16384
    # globe session size , if exceeded throws exceptions
    maxGlobalSessionSize = 512
    # file buffer size , if exceeded allocate new buffer
    fileWriteBufferCacheSize = 16384
    # when recover batch read size
    sessionReloadReadSize = 100
    # async, sync
    flushDiskMode = async
  }

  ## database store property
  db {
    ## the implement of javax.sql.DataSource, such as DruidDataSource(druid)/BasicDataSource(dbcp) etc.
    datasource = "dbcp"
    ## mysql/oracle/h2/oceanbase etc.
    dbType = "mysql"
    driverClassName = "com.mysql.jdbc.Driver"
    url = "jdbc:mysql://127.0.0.1:3306/seata"
    user = "mysql"
    password = "mysql"
    minConn = 1
    maxConn = 10
    globalTable = "global_table"
    branchTable = "branch_table"
    lockTable = "lock_table"
    queryLimit = 100
  }
}
复制代码
nacos 方式的注册中心
seata-server 的registry.conf 文件
registry {
  # file 、nacos 、eureka、redis、zk、consul、etcd3、sofa
  type = "nacos"

  nacos {
    application = "seata-server"
    serverAddr = "localhost"
    namespace = ""
    cluster = "default"
    username = "nacos"
    password = "nacos"
  }
}
nacos配置中心的部分
config {
  # file、nacos 、apollo、zk、consul、etcd3
  type = "nacos"

  nacos {
    serverAddr = "localhost"
    namespace = ""
    group = "SEATA_GROUP" # 这个配置比较重要。服务端对应的配置项必须所属这个配置项指定的组
    username = "nacos"
    password = "nacos"
  }
}
}
复制代码
客户端对配置中心的指定,有不同的方式,原始方式是使用registry.conf,如果使用spring-cloud-alibaba,则可以通过spring 的application.yml(或者application.properties)文件指定 client 端的 registry.conf 文件内容如下
registry {
  # file 、nacos 、eureka、redis、zk、consul、etcd3、sofa
  type = "nacos"

  nacos {
    serverAddr = "localhost"
    namespace = ""
    cluster = "default"
    username = "nacos"
    password = "nacos"
  }
}

config {
  # file、nacos 、apollo、zk、consul、etcd3
  type = "nacos"

  nacos {
    serverAddr = "localhost"
    namespace = ""
    group="SEATA_GROUP" 与 server 端的对应
    username = "nacos"
    password = "nacos"
  }

}
复制代码
spring-cloud-alibaba client 端的配置方式
# ----------配置中心,如果无需使用配置中心,可以删除此部分配置----------
# 设置配置中心服务端地址
#spring.cloud.nacos.config.server-addr=127.0.0.1:8848
# nacos认证信息
spring.cloud.nacos.config.username=nacos
spring.cloud.nacos.config.password=nacos
spring.cloud.nacos.config.contextPath=/nacos

# 设置注册中心服务端地址
spring.cloud.nacos.discovery.server-addr= 127.0.0.1:8848
# nacos认证信息
spring.cloud.nacos.discovery.username=nacos
spring.cloud.nacos.discovery.password=nacos
复制代码
seata client 端的内部
client 内部的回滚机制
按照官方文档介绍,seata会分析修改数据的sql,同时生成对应的反向回滚SQL,这个回滚记录在undo_log 表中。所以要求每一个client 都有一个对应的undo_log表,定义如下
CREATE TABLE `undo_log`
(
  `id`            BIGINT(20)   NOT NULL AUTO_INCREMENT,
  `branch_id`     BIGINT(20)   NOT NULL,
  `xid`           VARCHAR(100) NOT NULL,
  `context`       VARCHAR(128) NOT NULL,
  `rollback_info` LONGBLOB     NOT NULL,
  `log_status`    INT(11)      NOT NULL,
  `log_created`   DATETIME     NOT NULL,
  `log_modified`  DATETIME     NOT NULL,
  `ext`           VARCHAR(100) DEFAULT NULL,
  PRIMARY KEY (`id`),
  UNIQUE KEY `ux_undo_log` (`xid`, `branch_id`)
) ENGINE = InnoDB
  AUTO_INCREMENT = 1
  DEFAULT CHARSET = utf8;
复制代码
那么发生分析的生成回滚SQL 的地方在哪里呢?答案是在DataSource。下面我们看看seata client 是如何办到的。
一切的核心都在
io.seata.rm.datasource.DataSourceProxy
这里尽可能的简单,不做源码分析,用DataSourceProxy(java.sql.Datasource)这种包含关系,同时DataSourceProxy的父类AbstractDataSourceProxy实现了Datasource 接口,所以DataSourceProxy 也是Datasource 的一个实现,这使得DataSourceProxy有机会分析要执行的SQL 与生成对应的回滚SQL。
那么我们只要把DataSourceProxy 注册成默认的java.sql.Datasource实现,并提供给其他使用框架(mybatis, jdbctemplate)装配,就达到我们的目的了。所以client端一切的配置都围绕着把DataSourceProxy 注册成默认的java.sql.Datasource,或者把数据库访问框架的Datasource配置DataSourceProxy 为来进行的。
明白了上面的思路,我们开发时所做的工作就是完成 DataSourceProxy 的配置了。
从seata0.9 开始,提供了DataSource自动代理功能,并且默认是开启的。这个骚操作是什么意思呢。就是告诉你,你不用在去管DataSource放到DataSourceProxy中这个步骤了,seata会自动帮你完成这一步的操作。然后你只需要将DataSource放到其他使用DataSource的地方就好啦。
client 端 DataSourceProxy的自动装配
seata 是如何自动装配的?
一切的核心都在
io.seata.spring.boot.autoconfigure.SeataAutoConfiguration和io.seata.spring.annotation.datasource.SeataDataSourceBeanPostProcessor
在SeataAutoConfiguration中,通过seata.enableAutoDataSourceProxy 的值来判断是否注册 SeataDataSourceBeanPostProcessor bean。
这里有个巨大的坑 seata.enableAutoDataSourceProxy 这个配置写在,yaml 文件里的时候,智能提示的配置项是enable-auto-data-source-proxy,无法生效。必须写为enableAutoDataSourceProxy 的形式。
#智能提示给出的设置,无法生效。
seata:
  enable-auto-data-source-proxy: false
#正常生效的例子
seata:
  enableAutoDataSourceProxy: false
复制代码这个SeataDataSourceBeanPostProcessor 实现了org.springframework.beans.factory.config.BeanPostProcessor 接口 ,BeanPostProcessor 接口有两个钩子方法 postProcessBeforeInitialization 和 postProcessAfterInitialization, 然后seata就在 postProcessAfterInitialization 中一顿操作猛如虎,完成了自动代理功能。有兴趣的自己看下源码。
BeanPostProcessor 钩子流程如下

注意事项
- 接口中的两个方法都要将传入的bean返回,而不能返回null,如果返回的是null那么我们通过getBean方法将得不到目标。
- BeanFactory和ApplicationContext对待bean后置处理器稍有不同。ApplicationContext会自动检测在配置文件中实现了BeanPostProcessor接口的所有bean,并把它们注册为后置处理器,然后在容器创建bean的适当时候调用它,因此部署一个后置处理器同部署其他的bean并没有什么区别。而使用BeanFactory实现的时候,bean 后置处理器必须通过代码显式地去注册,在IoC容器继承体系中的ConfigurableBeanFactory接口中定义了注册方法
- 不要将BeanPostProcessor标记为延迟初始化。因为如果这样做,Spring容器将不会注册它们,自定义逻辑也就无法得到应用。假如你在元素的定义中使用了'default-lazy-init'属性,请确信你的各个BeanPostProcessor标记为'lazy-init="false"'。
关于生命周期送上一张福利

自动装配的相关设置——均已1.1.0版本为例
开启与关闭
- 对于使用seata-spring-boot-starter的方式,默认已开启数据源自动代理,如需关闭,请配置seata.enableAutoDataSourceProxy=false,该项配置默认为true。 如需切换代理实现方式,请通过seata.useJdkProxy=false进行配置,默认为false,采用CGLIB作为数据源自动代理的实现方式。
- 对于使用seata-all的方式,请使用@EnableAutoDataSourceProxy来显式开启数据源自动代理功能。如有需要,可通过该注解的useJdkProxy属性进行代理实现方式 的切换。默认为false,采用CGLIB作为数据源自动代理的实现方式。
其他版本设置 1.0.0: client.support.spring.datasource.autoproxy=true 0.9.0: support.spring.datasource.autoproxy=true
自动配置开启时的配置示例-均已mybatis-plus 为例
@Configuration
public class DataSourceConfig {

    @Bean
    @ConfigurationProperties(prefix = "spring.datasource.druid")
    public DataSource druidDataSource() {
        DruidDataSource druidDataSource = new DruidDataSource();
        return druidDataSource;
    }

    @Bean
    public SqlSessionFactory sqlSessionFactory(DataSource dataSource) throws Exception {
        SqlSessionFactoryBean factoryBean = new SqlSessionFactoryBean();
        factoryBean.setDataSource(dataSource);
        factoryBean.setMapperLocations(new PathMatchingResourcePatternResolver()
            .getResources("classpath*:/mapper/*.xml"));
        return factoryBean.getObject();
    }
}
复制代码
application.yaml
spring:
  application:
    name: alicloudapp
  datasource:
    name: storageDataSource
    type: com.alibaba.druid.pool.DruidDataSource
    druid:
      initial-size: 2
      max-active: 20
      min-idle: 2
      url: 'jdbc:mysql://localhost:3306/seata_storage?characterEncoding=utf8&useSSL=false&serverTimezone=UTC&allowPublicKeyRetrieval=true'
      username: root
      password: openstack
      driver-class-name: 'com.mysql.cj.jdbc.Driver'
      name: storageDataSource
复制代码
自动配置关闭时的配置示例-均已mybatis-plus 为例
application.yaml
#seata 使用有几个点
#1 自定义配置数据源参见SeataConfiguration,同时排除DataSourceAutoConfiguration
#2 配置微服务的seata 注册名称,通过spring.cloud.alibaba.seata.tx-service-group=<service-group-name> 来配置,此配置需要和nacos 中的配置对应。
#3 在nacos中,需要配置对应的配置性,已本工程为例,需要配置Data_ID=serivce.vgroup_mapp.<service-group-name>, GROUP=SEATA_GROUP 配置格式为text,配置内容为default的配置项,参见nacos-seata-configuration.png
#4 配置registry.conf 中的type 使用nacos 作为服务发现与配置中心
#5 seata server 需要修改 conf 目录下的registry.conf 配置使用nacos 作为服务发现与配置中心,注意config段的配置项中,需要把nacos的group项添加上,并指定为SEATA_GROUP
#6 在使用spring-cloud-starter-alibaba-seata 的情况下,client端与server端需要保持版本一致。
#7 在 seata 在 0.9 开始会自动代理(auto datasource proxy)datasource,需要选择自定义装配ProxyDataSource或者自动代理装配
spring:
  autoconfigure:
#    自定义配置DataSource 和 ProxyDataSource时,需要排除spring 原生的自动化装配类
    exclude: [org.springframework.boot.autoconfigure.jdbc.DataSourceAutoConfiguration,com.alibaba.druid.spring.boot.autoconfigure.DruidDataSourceAutoConfigure]
  profiles: seata
  cloud:
    alibaba:
      seata:
        tx-service-group: storage-service-group
# 取消datasource自动代理  enable-auto-data-source-proxy 这种连字符的写法是无法生效的,详情看SeataAutoConfiguration源码
seata:
  enableAutoDataSourceProxy: false
复制代码
MybatisPlusConfiguration.java
@Configuration
@MapperScan(basePackages = {"com.mycompany.alicloudapp.mapper"})
@Slf4j
@ConditionalOnClass(DruidDataSource.class)
@AutoConfigureBefore(DataSourceAutoConfiguration.class)
public class MybatisPlusConfiguration {

    @Profile("dev")
    @Bean
    public PerformanceMonitorInterceptor performanceMonitorInterceptor() {
        return new PerformanceMonitorInterceptor();
    }

    /**
     * MP 自带分页插件
     *
     * @return
     */
    @Bean
    public PaginationInterceptor paginationInterceptor() {
        PaginationInterceptor page = new PaginationInterceptor();
        page.setCountSqlParser(new JsqlParserCountOptimize(true));

        return page;
    }

    /**
     * @param sqlSessionFactory SqlSessionFactory
     * @return SqlSessionTemplate
     */
    @Autowired(required = true)
    private DataSourceProperties dataSourceProperties;

    @Bean
    public SqlSessionTemplate sqlSessionTemplate(SqlSessionFactory sqlSessionFactory) {
        return new SqlSessionTemplate(sqlSessionFactory);
    }

    /**
     * 从配置文件获取属性构造datasource,注意前缀,这里用的是druid,根据自己情况配置,
     * 原生datasource前缀取"spring.datasource"
     *
     * @return
     */
    @Bean(name = "datasource")
    @Primary
    public DataSourceProxy druidDataSource() {

        DruidDataSource druidDataSource = new DruidDataSource();
        log.info("dataSourceProperties.getUrl():{}", dataSourceProperties);
        druidDataSource.setUrl(dataSourceProperties.getUrl());
        druidDataSource.setUsername(dataSourceProperties.getUsername());
        druidDataSource.setPassword(dataSourceProperties.getPassword());
        druidDataSource.setDriverClassName(dataSourceProperties.getDriverClassName());
        druidDataSource.setInitialSize(1);
        druidDataSource.setMaxActive(120);
        druidDataSource.setMaxWait(60000);
        druidDataSource.setMinIdle(1);
        druidDataSource.setValidationQuery("Select 1 from DUAL");
        druidDataSource.setTestOnBorrow(false);
        druidDataSource.setTestOnReturn(false);
        druidDataSource.setTestWhileIdle(true);
        druidDataSource.setTimeBetweenEvictionRunsMillis(60000);
        druidDataSource.setMinEvictableIdleTimeMillis(25200000);
        druidDataSource.setRemoveAbandoned(true);
        druidDataSource.setRemoveAbandonedTimeout(1800);
        druidDataSource.setLogAbandoned(true);
        log.info("装载dataSource........");
        return new DataSourceProxy(druidDataSource);
    }


    @Bean(name = "sqlSessionFactory")
    public SqlSessionFactory sqlSessionFactoryBean(DataSourceProxy dataSourceProxy) throws Exception {
//         DataSource dataSourceProxy = new DataSourceProxy(druidDataSource);

        MybatisSqlSessionFactoryBean bean = new MybatisSqlSessionFactoryBean();
        bean.setDataSource(dataSourceProxy);
        ResourcePatternResolver resolver = new PathMatchingResourcePatternResolver();
        // bean.setConfigLocation(resolver.getResource("classpath:mybatis-config.xml"));
        bean.setMapperLocations(resolver.getResources("classpath*:/com.mycompany.alicloudapp.mapper/**/*.xml"));
        SqlSessionFactory factory = null;
        try {
            factory = bean.getObject();
        } catch (Exception e) {
            throw new RuntimeException(e);
        }
        return factory;
    }
}
复制代码
更简洁的写法是
@Configuration
@ConditionalOnClass(DruidDataSource.class)
@AutoConfigureBefore(DataSourceAutoConfiguration.class)
public class MyDataSourceConfig {

    @Bean
    @ConfigurationProperties(prefix = "spring.datasource.druid")
    public DataSource druidDataSource() {
        DruidDataSource druidDataSource = new DruidDataSource();
        return druidDataSource;
    }

    @Primary
    @Bean("dataSource")
    public DataSourceProxy dataSourceProxy(DataSource druidDataSource) {
        return new DataSourceProxy(druidDataSource);
    }
}
复制代码
到此为止DataSourceProxy 相关的部分就配置完了


 3549
3549


 被折叠的 条评论
为什么被折叠?
被折叠的 条评论
为什么被折叠?
 到【灌水乐园】发言


