


SpringBoot 自动配置源码分析 、自定义一个Starter
SpringBoot 自动配置原理是面试官最喜欢询问的一个问题、考察你是否真的了解其底层实现。本篇文章和您一起探索自动配置的原理、以及如何自定义一个Starter
SpringBoot自动配置的原理
本人总结:SpringBoot 自动配置原理就是根据某种条件加载默认支持的第三方配置类进ioc容器里。为了验证这么原理我们从以下2点进行源码的跟踪
1、 SpringBoot 自动配置默认支持的配置类在哪?有哪些默认支持的配置类?
2、是如何将这些默认支持的配置类加载进容器里的?如果让配置类生效?
SpringBoot 自动配置默认支持的配置类在哪?有哪些默认支持的配置类?
SpringBoot 应用程序想必大家都再熟悉不过了,其程序入口main 方法 上的@SpringBootApplication注解就是我们研究SpringBoot 自动配置的原理,如下程序:
@SpringBootApplication()
public class XxxxxApplication {
    public static void main(String[] args) {
        SpringApplication.run(XxxxxApplication.class,args);
    }
}
按住ctrl 鼠标右击点击 (idea)@SpringBootApplication 注解进入,可用看到如下代码:
@Target(ElementType.TYPE)
@Retention(RetentionPolicy.RUNTIME)
@Documented
@Inherited
@SpringBootConfiguration
@EnableAutoConfiguration
@ComponentScan(excludeFilters = { @Filter(type = FilterType.CUSTOM, classes = TypeExcludeFilter.class),
      @Filter(type = FilterType.CUSTOM, classes = AutoConfigurationExcludeFilter.class) })
public @interface SpringBootApplication {
	// 这里有很多代码
	....
}
再以上代码中,可用看到@SpringBootApplication 注解是一个组合注解、其中@EnableAutoConfiguration 这个注解是我们需要研究的,不难揣测出其中文名称为:“自动配置”
按住ctrl 鼠标右击点击 (idea)@EnableAutoConfiguration 注解进入,可用看到如下代码:
@Target(ElementType.TYPE)
@Retention(RetentionPolicy.RUNTIME)
@Documented
@Inherited
@AutoConfigurationPackage
@Import(AutoConfigurationImportSelector.class)
public @interface EnableAutoConfiguration {
    // 这里很多代码
    ......
}
在以上 @EnableAutoConfiguration 注解中,@Import 注解 的值,AutoConfigurationImportSelector.class 译为:自动配置导入选择器,在AutoConfigurationImportSelector 类中有一个方法为:
/**
 * Return the {@link AutoConfigurationEntry} based on the {@link AnnotationMetadata}
 * of the importing {@link Configuration @Configuration} class.
 * @param annotationMetadata the annotation metadata of the configuration class
 * @return the auto-configurations that should be imported
 */
// 大致意思为:返回被@Configuration 注解标记的类
// annotationMetadata 可用理解为 @Configuration 注解对象、包含值等
protected AutoConfigurationEntry getAutoConfigurationEntry(AnnotationMetadata annotationMetadata) {
   if (!isEnabled(annotationMetadata)) {
      return EMPTY_ENTRY;
   }
   AnnotationAttributes attributes = getAttributes(annotationMetadata);
   List<String> configurations = getCandidateConfigurations(annotationMetadata, attributes);
   configurations = removeDuplicates(configurations);
   Set<String> exclusions = getExclusions(annotationMetadata, attributes);
   checkExcludedClasses(configurations, exclusions);
   configurations.removeAll(exclusions);
   configurations = getConfigurationClassFilter().filter(configurations);
   fireAutoConfigurationImportEvents(configurations, exclusions);
   return new AutoConfigurationEntry(configurations, exclusions);
}
以上代码我们重点看:getCandidateConfigurations(xx,xx)
/**
 * Return the auto-configuration class names that should be considered. By default
 * this method will load candidates using {@link SpringFactoriesLoader} with
 * {@link #getSpringFactoriesLoaderFactoryClass()}.
 * @param metadata the source metadata
 * @param attributes the {@link #getAttributes(AnnotationMetadata) annotation
 * attributes}
 * @return a list of candidate configurations
 */
// 大致意思是:默认使用SpringFactoriesLoader,加载返回自动配置的类的类名
protected List<String> getCandidateConfigurations(AnnotationMetadata metadata, AnnotationAttributes attributes) {
   List<String> configurations = SpringFactoriesLoader.loadFactoryNames(getSpringFactoriesLoaderFactoryClass(),
         getBeanClassLoader());
   Assert.notEmpty(configurations, "No auto configuration classes found in META-INF/spring.factories. If you "
         + "are using a custom packaging, make sure that file is correct.");
   return configurations;
}
再跟踪进:SpringFactoriesLoader.loadFactoryNames(xxx,xxx);
	/**
	 * Load the fully qualified class names of factory implementations of the
	 * given type from {@value #FACTORIES_RESOURCE_LOCATION}, using the given
	 * class loader.
	 * <p>As of Spring Framework 5.3, if a particular implementation class name
	 * is discovered more than once for the given factory type, duplicates will
	 * be ignored.
	 * @param factoryType the interface or abstract class representing the factory
	 * @param classLoader the ClassLoader to use for loading resources; can be
	 * {@code null} to use the default
	 * @throws IllegalArgumentException if an error occurs while loading factory names
	 * @see #loadFactories
	 */
//大致意思:通过给定的类加载器,从 FACTORIES_RESOURCE_LOCATION 加载出全限定类名
public static List<String> loadFactoryNames(Class<?> factoryType, @Nullable ClassLoader classLoader) {
   ClassLoader classLoaderToUse = classLoader;
   if (classLoaderToUse == null) {
      classLoaderToUse = SpringFactoriesLoader.class.getClassLoader();
   }
   String factoryTypeName = factoryType.getName();
   return loadSpringFactories(classLoaderToUse).getOrDefault(factoryTypeName, Collections.emptyList());
}
这个方法中再跟进 loadSpringFactories(xxx,xxx),整个方法实现如下:
private static Map<String, List<String>> loadSpringFactories(ClassLoader classLoader) {
   Map<String, List<String>> result = cache.get(classLoader);
   if (result != null) {
      return result;
   }
   result = new HashMap<>();
   try {
      Enumeration<URL> urls = classLoader.getResources(FACTORIES_RESOURCE_LOCATION);
      while (urls.hasMoreElements()) {
         URL url = urls.nextElement();
         UrlResource resource = new UrlResource(url);
         Properties properties = PropertiesLoaderUtils.loadProperties(resource);
         for (Map.Entry<?, ?> entry : properties.entrySet()) {
            String factoryTypeName = ((String) entry.getKey()).trim();
            String[] factoryImplementationNames =
                  StringUtils.commaDelimitedListToStringArray((String) entry.getValue());
            for (String factoryImplementationName : factoryImplementationNames) {
               result.computeIfAbsent(factoryTypeName, key -> new ArrayList<>())
                     .add(factoryImplementationName.trim());
            }
         }
      }
      // Replace all lists with unmodifiable lists containing unique elements
      result.replaceAll((factoryType, implementations) -> implementations.stream().distinct()
            .collect(Collectors.collectingAndThen(Collectors.toList(), Collections::unmodifiableList)));
      cache.put(classLoader, result);
   }
   catch (IOException ex) {
      throw new IllegalArgumentException("Unable to load factories from location [" +
            FACTORIES_RESOURCE_LOCATION + "]", ex);
   }
   return result;
}
以上代码注意点:
Enumeration urls = classLoader.getResources(FACTORIES_RESOURCE_LOCATION);
静态变量 FACTORIES_RESOURCE_LOCATION的值是:
public final class SpringFactoriesLoader {
   /**
    * The location to look for factories.
    * <p>Can be present in multiple JAR files.
    */
    // factorires 的查询路径
   public static final String FACTORIES_RESOURCE_LOCATION = "META-INF/spring.factories";
   	....
   }
我们把断点标记在如下位置后启动项目:会看到下图的结果 引入了redisson-spring-boot-stater 这个包,程序启动时回去加载 redisson-spring-boot-stater包 “META-INF/spring.factories” 中定义的自动配置类
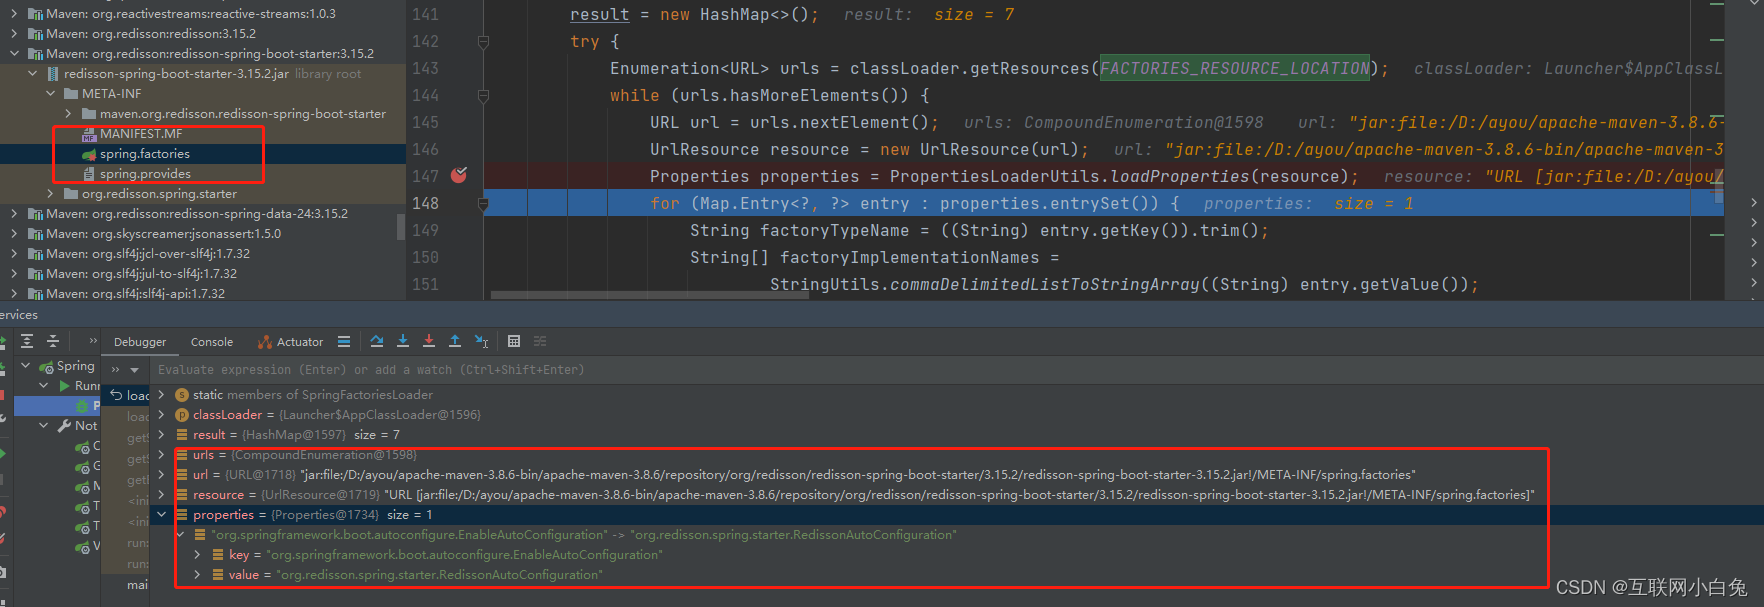
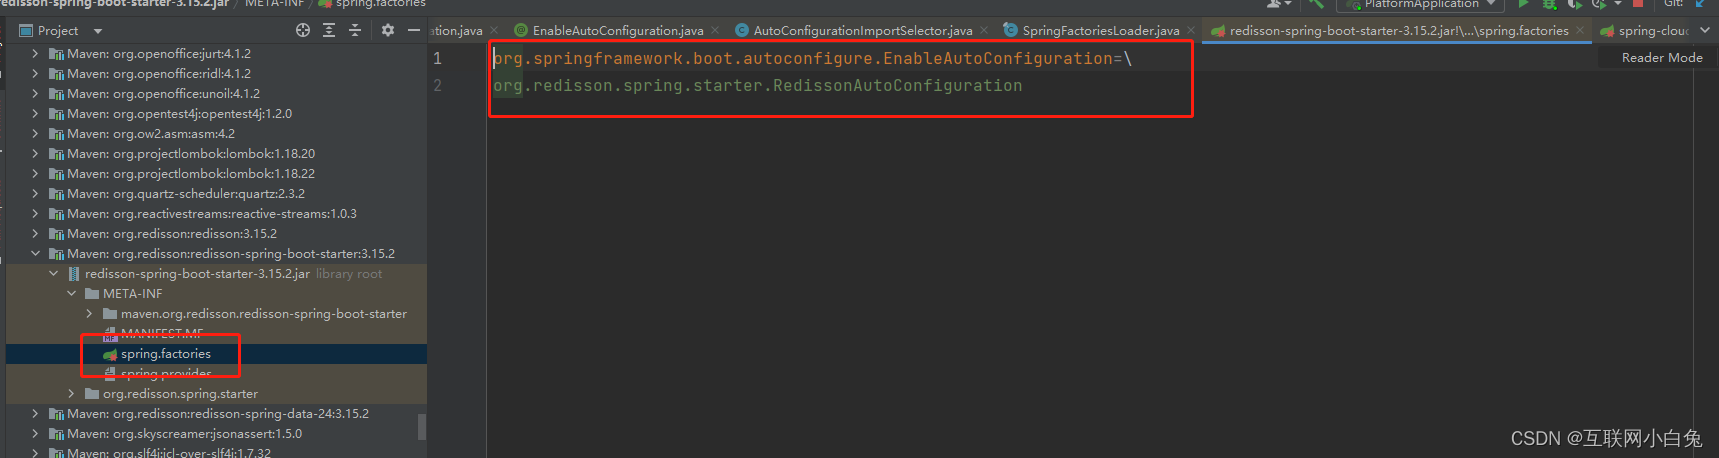
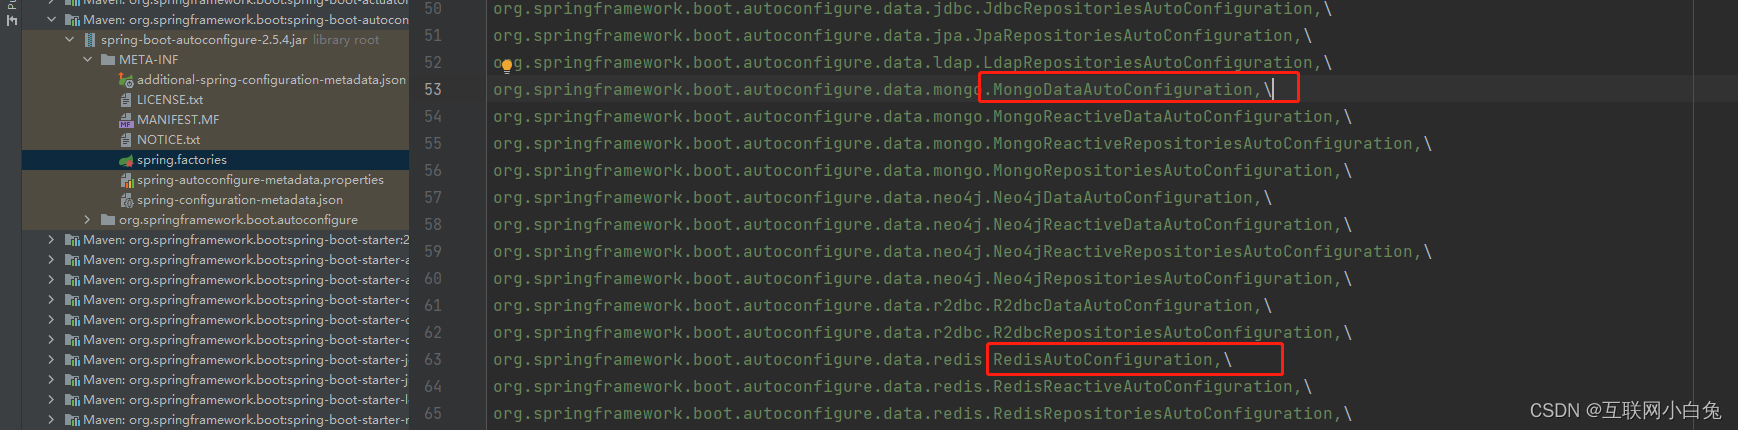
redisson-spring-boot-stater包 ,META-INF/spring.factories” 文件内容如下图:
加载所有的自动配置类之后返回的全限定类名如下:(项目不同扫描出来的都不会相同)
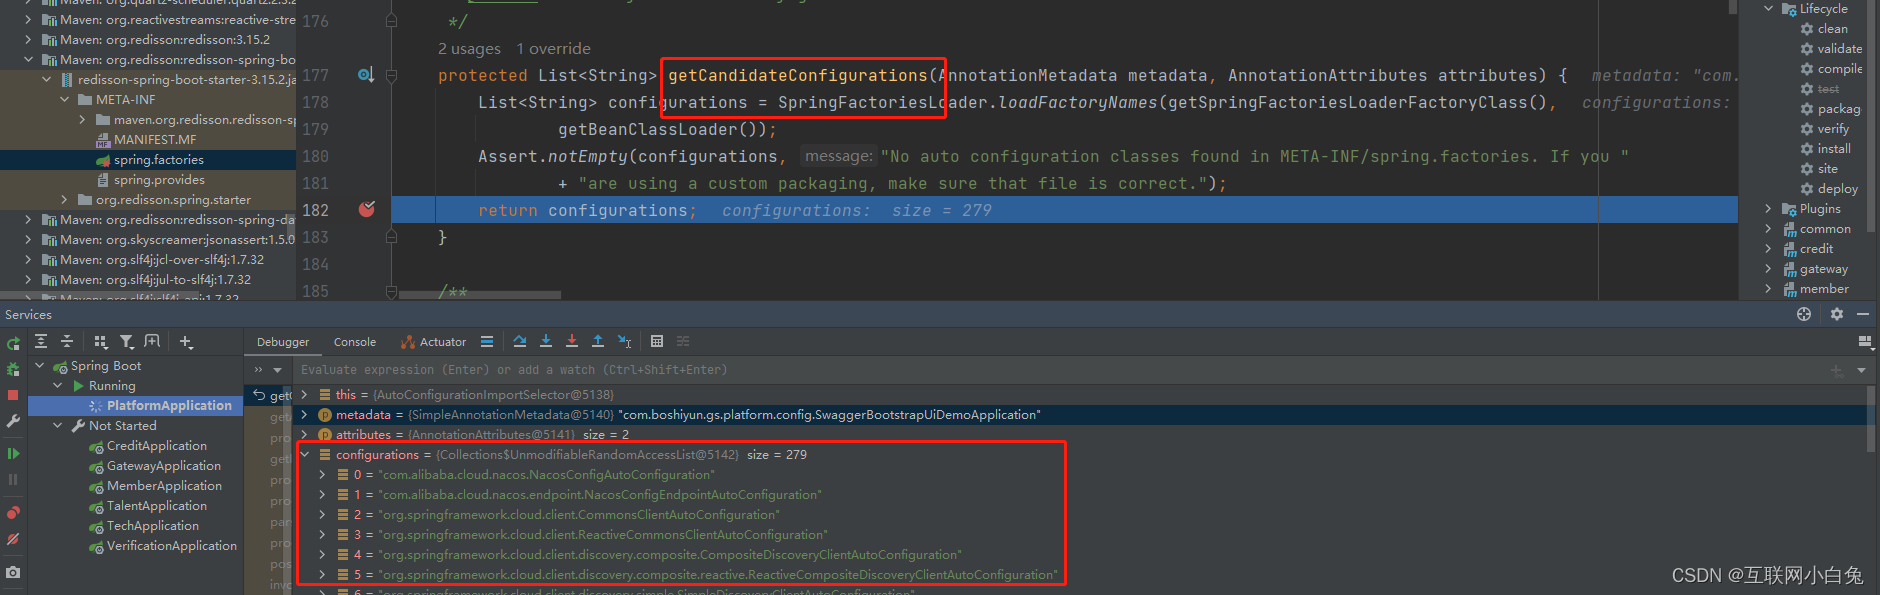
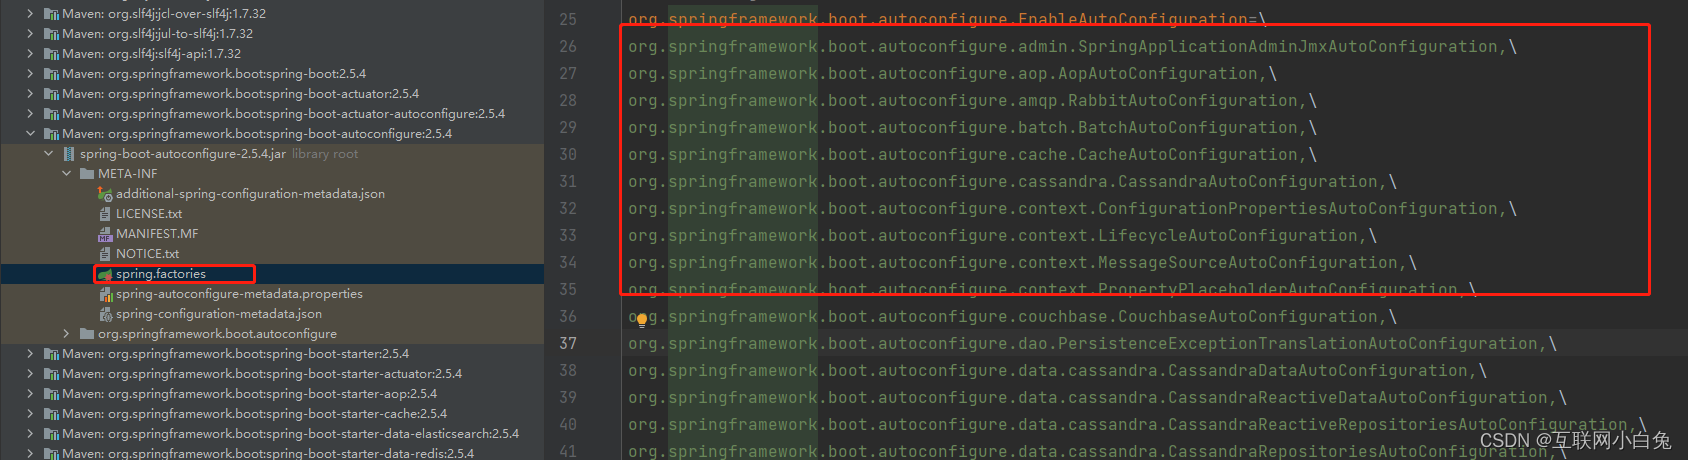
以上的截图是再pom.xml文件中添加的 redission依赖,而springBoot 也默认了很多自动配置类,该文件在 spring-boot-autoconfigure.jar 中 如图:
从以上源码跟踪,可用得出 结论1:
SpringBoot 程序在启动时候会扫描所有jar包 META-INF/spring.factories 文件里定义的自动配置类
自此我们已经知道了springboot 去哪里找到这些配置类的了,接下来是第二个问题 怎么样才能让这些配置类生效?
如何将这些默认支持的配置类加载进容器里的?如果让配置类生效?
这个项目里面已经引入了redis 的starter , 但是沒有引入 Mongo的 starter
我们分别看看 这两个 配置如下:
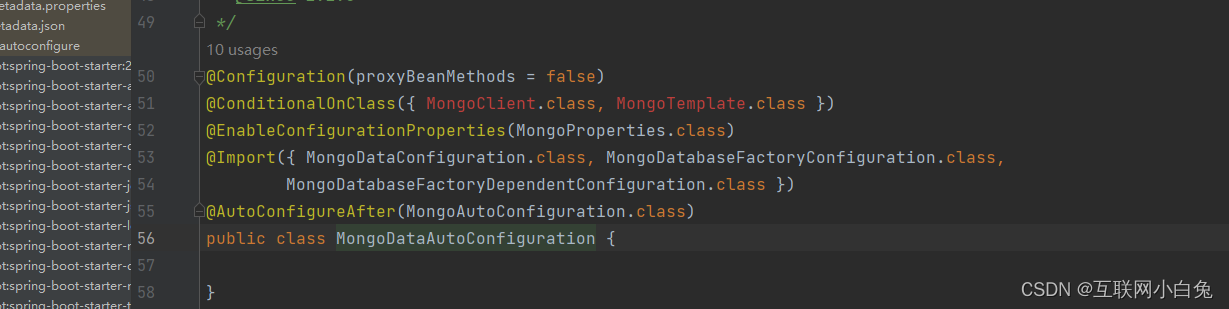
MongoDataAutoConfiguration 如下图:可以看到这个MongoClient 和 MongoTemplate 这两个类是不存在的(因为没有引入jar包依赖),所以显示红色
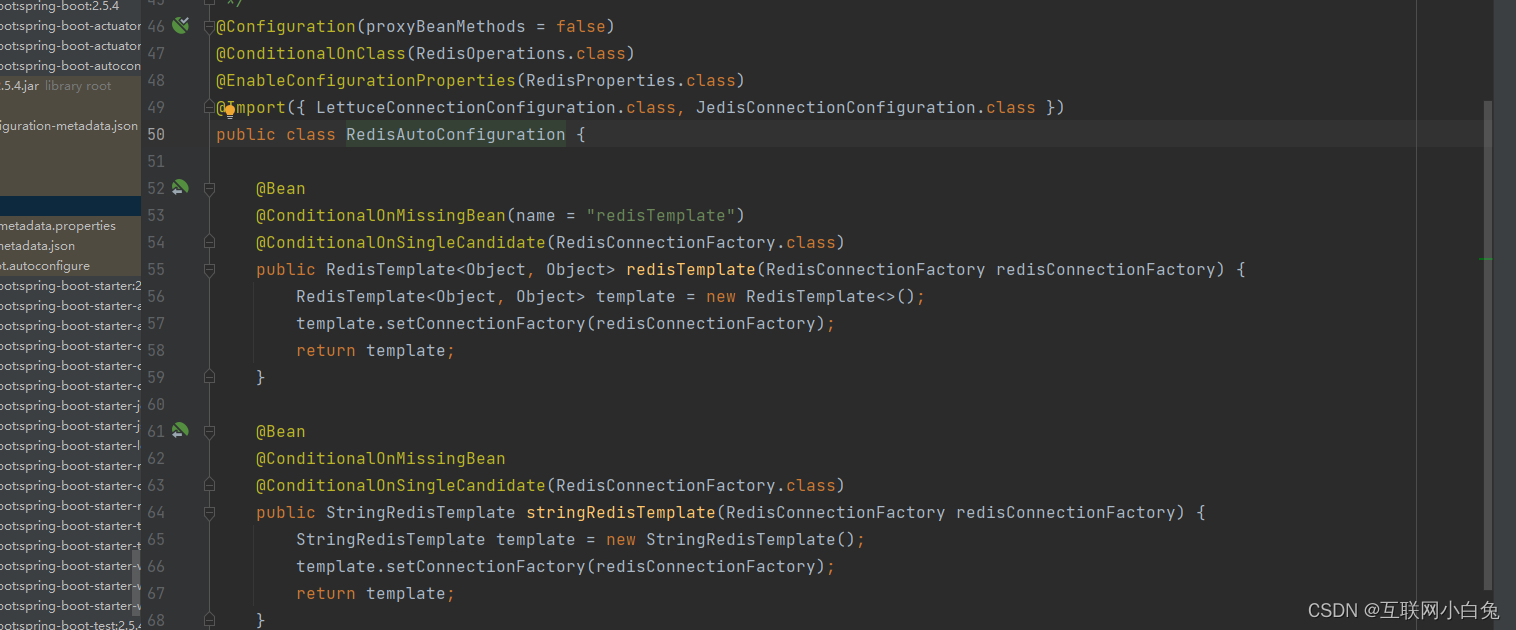
RedisAutoConfiguratiion: 如下图:可以看到RedisAutoConfiguratiion 这个类是正确可用的一个类,当程序启动时候扫描到@Configuration 这注解,将配置类加载,就完成了redis 的自动配置
思考:上图为什么Mongo的配置类,方法都找不到了,程序还能启动起来?(常规我们自己写的代码方法找不到项目启动不起来) 仅仅是因为添加了 坐标依赖 就可以完成自动配置了吗?
条件注解:springBoot 中定义了很多条件注解,条件注解作用就是当满足条件注解的要求这个类才会被实例化,如以下这段代码的意思可以理解为 当存在MongoClient.class 和 MongoTemplate.class 这两个class 文件时,@Configuration 才会生效。
@ConditionalOnClass({ MongoClient.class, MongoTemplate.class })
| ConditionalOnBean | ApplicationContext存在某些bean时条件才成立 | OnBeanCondition |
|---|---|---|
| ConditionalOnClass | classPath中存在某些Class时条件才成立 | OnClassCondition |
| ConditionalOnCloudPlatform | 在某些云平台(Kubemetes、Heroku、Cloud Foundry)下条件才成立 | OnCloudPlatformCondition |
| ConditionalOnExpression | SPEL表达式成立时条件才成立 | OnExpressionCondition |
| ConditionalOnJava | JDK某些版本条件才成立 | OnJavaCondition |
| ConditionalOnJndi | JNDI路径下存在时条件才成立 | OnJndiCondition |
| ConditionalOnMissingBean | ApplicationContext不存在某些bean时条件才成立 | OnBeanCondition |
| ConditionalOnMissingClass | classpath中不存在某些class是条件才成立 | OnClassCondition |
| ConditionalOnNotWebApplication | 在非Web环境下条件才成立 | OnWebApplicationCondition |
| ConditionalOnProperty | Environment中存在某些配置项时条件才成立 | OnPropertyCondition |
| ConditionalOnResource | 存在某些资源时条件才成立 | OnResourceCondition |
| ConditionalOnSingleCandidate | ApplicationContext中存在且只有一个bean时条件成立 | OnBeanCondition |
| ConditionalOnWebApplication | 在Web环境下条件才成立 | OnWebApplicationCondition |
我们常用的有@ConditionalOnClass、@ConditionalOnBean 、@ConditionalOnMissingBean、@ConditionalOnMissingClass、@ConditionalOnProperty
然而上图中mongoDB 中都找不到类了程序运行起来不会报错?
我们知道读取该注解的值JVM肯定是先要内存中加载该值的Class对象的。其实原理就是Spring Boot并不是通过反射去获取该值,而是直接去读取标注该注解的类的二进制文件,去获取其中的值。
/**
 * {@link Conditional @Conditional} that only matches when the specified classes are on
 * the classpath.
 * <p>
 * A {@link #value()} can be safely specified on {@code @Configuration} classes as the
 * annotation metadata is parsed by using ASM before the class is loaded. Extra care is
 * required when placed on {@code @Bean} methods, consider isolating the condition in a
 * separate {@code Configuration} class, in particular if the return type of the method
 * matches the {@link #value target of the condition}.
 *
 * @author Phillip Webb
 * @since 1.0.0
 */
//大概意思是:这里意思是说,使用value属性(类型为Class<?>)进行赋值,那么当@ConditionalOnClass()注解作用在@Configuration类上是安全的,因为这时Spring Boot会通过ASM(一个操作字节码的框架)去获取对应的Class值。而当@ConditionalOnClass()和@Bean搭配使用时,则不能使用value属性赋值了,应该使用name属性(类型为String),大概是因为这个时候Spring Boot不会使用ASM去获取值了。当然除了使用name属性,也可以按注释中给出的代码,继续使用value属性,但是需要多创建一个@Configuration类去隔绝@Conditional条件。

@Target({ ElementType.TYPE, ElementType.METHOD })
@Retention(RetentionPolicy.RUNTIME)
@Documented
@Conditional(OnClassCondition.class)
public @interface ConditionalOnClass {
...
}
总结:首先这些@Configuration类没有被程序中的类引用到、其次即使引用到这个类,不一定引用到类中的具体某个方法。 虽然这些地方import失败了, 但是不影响.class类加载,也就是说编译这些@Configuration类时依赖的jar是必须存在的,但是运行时这些jar可以不提供
到此上文的两个问题我们都大致初略的明白了 以下两个问题:
1、 SpringBoot 自动配置默认支持的配置类在哪?有哪些默认支持的配置类?
2、是如何将这些默认支持的配置类加载进容器里的?如果让配置类生效?
自定义一个starter
案例背景:我们在开发中每个项目都会使用到文件上传模块、这个案例中就把文件上传的功能封装成一个starter
快速创建一个SpringBoot项目 pom.xml如下:
以下三个依赖必须的:
	<dependencies>
		<dependency>
			<groupId>org.springframework.boot</groupId>
			<artifactId>spring-boot-starter</artifactId>
		</dependency>
		<dependency>
			<groupId>org.springframework.boot</groupId>
			<artifactId>spring-boot-starter-web</artifactId>
		</dependency>
		<dependency>
			<groupId>org.springframework.boot</groupId>
			<artifactId>spring-boot-configuration-processor</artifactId>
			<optional>true</optional>
		</dependency>
	</dependencies>
提供一个上传文件接口IUploadService
public interface IUploadService {
    /**
     * 上传文件接口
     * @param file
     * @return
     */
    Result upload(MultipartFile file);
    ...
}
properties 对应类:
/**
 * 对应的是application文件的配置
 */
@Component
@ConfigurationProperties(prefix = "spring.upload")
public class UploadProperties {
    // 文件的上传地址
    private String dir;
    // 文件前缀
    private String prefix;

    //getter and setter
}
默认实现方法:
public class DefaultUploadService implements IUploadService {
    @Autowired
    private UploadProperties uploadProperties;
    public DefaultUploadService (UploadProperties uploadProperties){
        this.uploadProperties=uploadProperties;
    }
    /**
     * 文件上传方法
     */
    @Override
    public Result upload(MultipartFile file){
        if(uploadProperties.getDir()==null || uploadProperties.getPrefix()==null){
            return Result.error("请配置文件上传路径");
        }
        try {
        if(file.isEmpty()){
            return Result.error("文件为空");
        }
        String originalFilename=file.getOriginalFilename();
        boolean blob = originalFilename.equals("blob");
        String fileExt = blob?".jpg": originalFilename.substring(originalFilename.lastIndexOf(".") ).toLowerCase();
        if(StringUtils.isBlank(fileExt)||fileExt.equals(".blob")){
            fileExt=".jpg";
        }
        String month= DateUtil.formatDate(new Date(),"yyyyMMdd");
        String uploadPathPrefix=uploadProperties.getPrefix()+month+"/";
        SimpleDateFormat df = new SimpleDateFormat("yyyyMMddHHmmss");
        String newFileName = UUID.randomUUID() + fileExt;
        String absuDir=uploadProperties.getDir()+uploadPathPrefix;
            //是否有目录,没有就创建
            File absuDirFile=new File(absuDir);
            if(!absuDirFile.exists()){
                absuDirFile.mkdirs();
            }
            //目录下写入文件
            File uploadFile=new File(absuDir,newFileName);
            Files.copy(file.getInputStream(), uploadFile.toPath());
            NameUrlBean bean=new NameUrlBean();
            bean.setName(originalFilename);
            bean.setUrl(uploadPathPrefix+newFileName);
            return Result.success(bean);
     } catch (IOException e) {
            e.printStackTrace();
            return Result.error("上传文件失败"+e.getMessage());
        }
    }
    ...
}
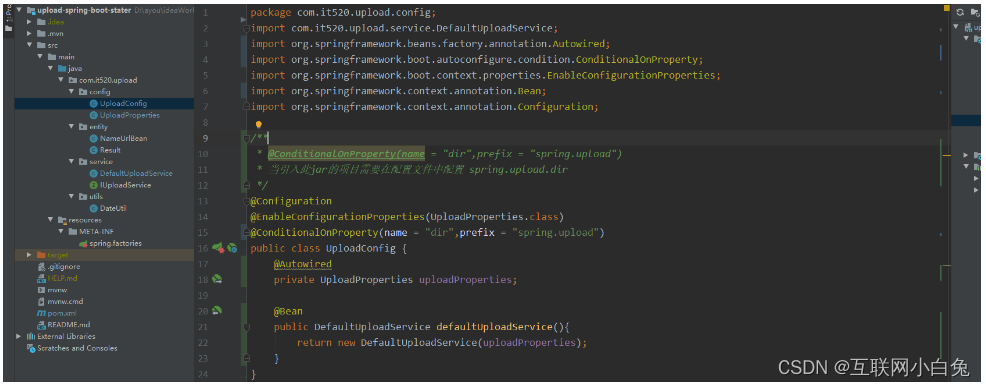
UploadConfig 关键配置类:
/**
 * @ConditionalOnProperty(name = "dir",prefix = "spring.upload")
 * 当引入此jar的项目需要在配置文件中配置 spring.upload.dir
 */
@Configuration
@EnableConfigurationProperties(UploadProperties.class)
@ConditionalOnProperty(name = "dir",prefix = "spring.upload")
public class UploadConfig {
    @Autowired
    private UploadProperties uploadProperties;

    @Bean
    public DefaultUploadService defaultUploadService(){
        return new DefaultUploadService(uploadProperties);
    }
}
以上代码中注意 @ConditionalOnProperty(name = “dir”,prefix = “spring.upload”),这里的意思是:当引入此上传文件jar 的项目,在application.yml中 配置 了上传文件地址 spring.upload.dir 时才把这个类注册到容器中。
在resource 目录下新建 /META-INF/spring.factories 文件添加配置如下:
#-------starter自动装配---------
org.springframework.boot.autoconfigure.EnableAutoConfiguration=com.it520.upload.config.UploadConfig
项目pom.xml 添加如下:
	<build>
		<plugins>
			<plugin>
				<groupId>org.springframework.boot</groupId>
				<artifactId>spring-boot-maven-plugin</artifactId>
				<configuration>
					<skip>true</skip>
				</configuration>
			</plugin>
		</plugins>
	</build>
默认的springBoot 项目是没有 这个节点的配置的,这里需要新增该配置不然 打包之后生成的jar 文件路径找不到。
完整的stater项目如下:
在这个springBoot 项目我们不需要启动类 和 原来的 application 文件、test 目录 的,在此删掉也无妨。
idea 点击 install,把项目打包并存到本地maven仓库中
使用测试:
随便找一个springBoot 项目引入我们自定义的stater 如下:
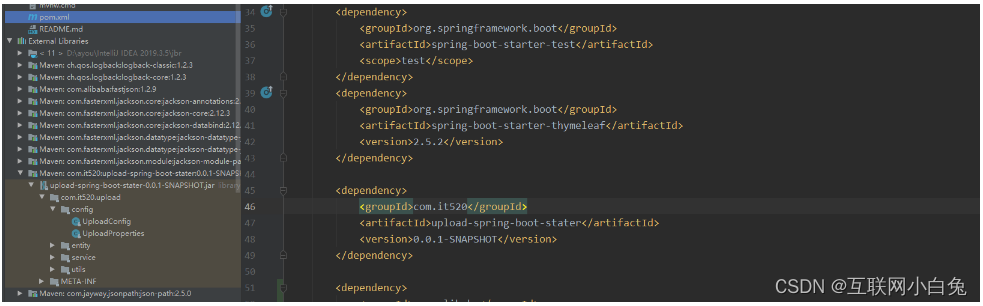
新增一个接口使用默认的DefalutUploadService,进行文件上传:如下
@RestController
public class UploadTestController {
    @Autowired
    private DefaultUploadService uploadService;


    @PostMapping("/myUpload")
    public Result upload(@RequestParam("file") MultipartFile file){
        return uploadService.upload(file);
    }
}
此时我们不在application 文件中配置上传文件的地址时启动项目:
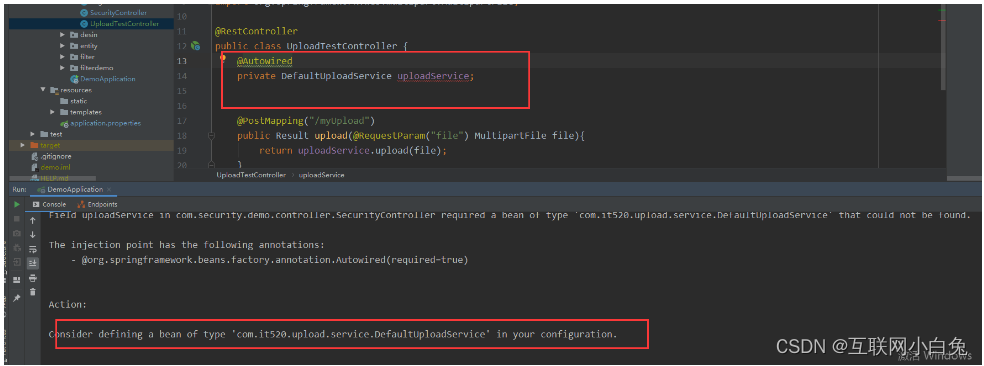
启动项目时 @Autowired 在容器中找不到 DefaultUploadService 这个bean,所以启动失败了
我们在application.yml 中配置上传文件的地址:
#other setting

spring.upload.dir=D:/upload
spring.upload.prefix=/test/

#other setting
配置后重启项目,就不会报错了,测试访问刚刚定义的 上传文件接口,结果如下图显示:
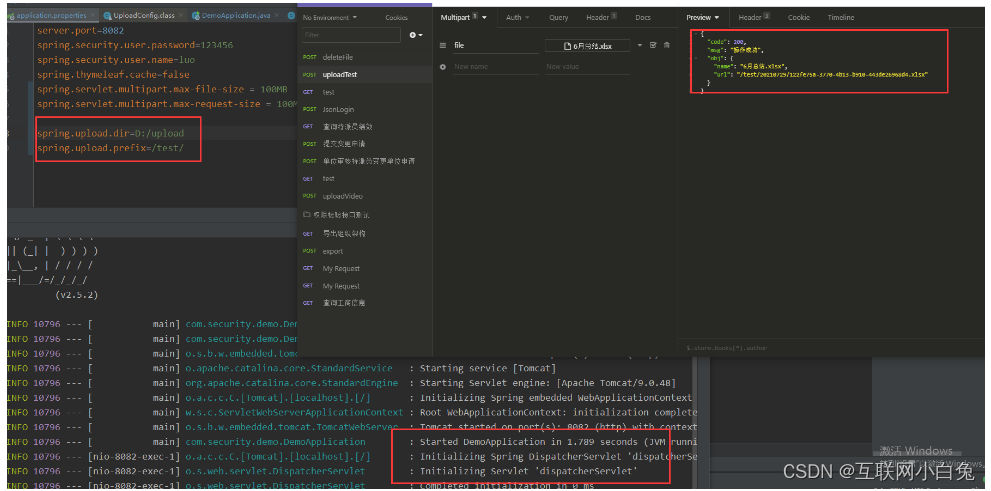
至此我们自定义一个stater 完成了,可以上传到maven私服仓库,之后的项目中需要上传文件的功能时,引入这个jar 调用默认的实现方法即可。


 746
746


 被折叠的 条评论
为什么被折叠?
被折叠的 条评论
为什么被折叠?
 到【灌水乐园】发言


