


文章目录
学习地址
1、UI布局
1.1、编写计算器
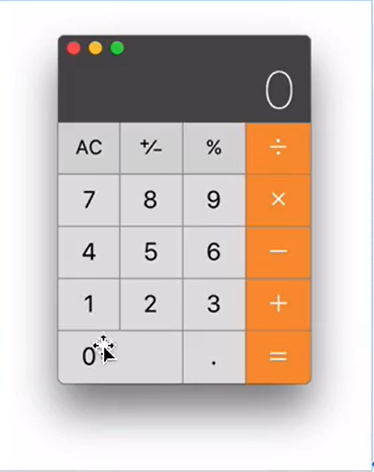
1.1.1、布局文件
calculator_layout.xml
<?xml version="1.0" encoding="utf-8"?>
<LinearLayout xmlns:android="http://schemas.android.com/apk/res/android"
    android:orientation="vertical"
    android:layout_width="match_parent"
    android:layout_height="match_parent">

    <LinearLayout
        android:layout_width="match_parent"
        android:layout_height="80dp"
        android:orientation="horizontal">
        <TextView
            android:onClick="oneClick"
            android:background="@drawable/selector_white_bg"
            android:layout_width="0dp"
            android:layout_height="match_parent"
            android:layout_weight="1"
            android:gravity="center"
            android:text="C"
            android:textSize="60sp"/>
        <TextView
            android:layout_width="0dp"
            android:onClick="oneClick"
            android:background="@drawable/selector_white_bg"
            android:layout_height="match_parent"
            android:layout_weight="1"
            android:gravity="center"
            android:text="+/-"
            android:textSize="60sp"/>
        <TextView
            android:layout_width="0dp"
            android:onClick="oneClick"
            android:background="@drawable/selector_white_bg"
            android:layout_height="match_parent"
            android:layout_weight="1"
            android:gravity="center"
            android:text="%"
            android:textSize="60sp"/>
        <TextView
            android:layout_width="0dp"
            android:layout_height="match_parent"
            android:layout_weight="1"
            android:gravity="center"
            android:text="/"
            android:onClick="oneClick"
            android:background="@drawable/selector_orange_bg"
            android:textSize="60sp"/>
    </LinearLayout>
    <LinearLayout
        android:layout_width="match_parent"
        android:layout_height="80dp"
        android:orientation="horizontal">
        <TextView
            android:layout_width="0dp"
            android:onClick="oneClick"
            android:background="@drawable/selector_white_bg"
            android:layout_height="match_parent"
            android:layout_weight="1"
            android:gravity="center"
            android:text="1"
            android:textSize="60sp"/>
        <TextView
            android:layout_width="0dp"
            android:onClick="oneClick"
            android:background="@drawable/selector_white_bg"
            android:layout_height="match_parent"
            android:layout_weight="1"
            android:gravity="center"
            android:text="2"
            android:textSize="60sp"/>
        <TextView
            android:layout_width="0dp"
            android:onClick="oneClick"
            android:background="@drawable/selector_white_bg"
            android:layout_height="match_parent"
            android:layout_weight="1"
            android:gravity="center"
            android:text="3"
            android:textSize="60sp"/>
        <TextView
            android:layout_width="0dp"
            android:layout_height="match_parent"
            android:layout_weight="1"
            android:gravity="center"
            android:text="×"
            android:onClick="oneClick"
            android:background="@drawable/selector_orange_bg"
            android:textSize="60sp"/>
    </LinearLayout>
    <LinearLayout
        android:layout_width="match_parent"
        android:layout_height="80dp"
        android:orientation="horizontal">
        <TextView
            android:layout_width="0dp"
            android:onClick="oneClick"
            android:background="@drawable/selector_white_bg"
            android:layout_height="match_parent"
            android:layout_weight="1"
            android:gravity="center"
            android:text="4"
            android:textSize="60sp"/>
        <TextView
            android:layout_width="0dp"
            android:onClick="oneClick"
            android:background="@drawable/selector_white_bg"
            android:layout_height="match_parent"
            android:layout_weight="1"
            android:gravity="center"
            android:text="5"
            android:textSize="60sp"/>
        <TextView
            android:layout_width="0dp"
            android:onClick="oneClick"
            android:background="@drawable/selector_white_bg"
            android:layout_height="match_parent"
            android:layout_weight="1"
            android:gravity="center"
            android:text="6"
            android:textSize="60sp"/>
        <TextView
            android:layout_width="0dp"
            android:layout_height="match_parent"
            android:layout_weight="1"
            android:gravity="center"
            android:text="-"
            android:onClick="oneClick"
            android:background="@drawable/selector_orange_bg"
            android:textSize="60sp"/>
    </LinearLayout>
    <LinearLayout
        android:layout_width="match_parent"
        android:layout_height="80dp"
        android:orientation="horizontal">
        <TextView
            android:layout_width="0dp"
            android:onClick="oneClick"
            android:background="@drawable/selector_white_bg"
            android:layout_height="match_parent"
            android:layout_weight="1"
            android:gravity="center"
            android:text="7"
            android:textSize="60sp"/>
        <TextView
            android:layout_width="0dp"
            android:onClick="oneClick"
            android:background="@drawable/selector_white_bg"
            android:layout_height="match_parent"
            android:layout_weight="1"
            android:gravity="center"
            android:text="8"
            android:textSize="60sp"/>
        <TextView
            android:layout_width="0dp"
            android:onClick="oneClick"
            android:background="@drawable/selector_white_bg"
            android:layout_height="match_parent"
            android:layout_weight="1"
            android:gravity="center"
            android:text="9"
            android:textSize="60sp"/>
        <TextView
            android:layout_width="0dp"
            android:layout_height="match_parent"
            android:layout_weight="1"
            android:gravity="center"
            android:text="+"
            android:onClick="oneClick"
            android:background="@drawable/selector_orange_bg"
            android:textSize="60sp"/>
    </LinearLayout>
    <LinearLayout
        android:layout_width="match_parent"
        android:layout_height="80dp"
        android:orientation="horizontal">
        <TextView
            android:layout_width="0dp"
            android:onClick="oneClick"
            android:background="@drawable/selector_white_bg"
            android:layout_height="match_parent"
            android:layout_weight="2"
            android:paddingLeft="20dp"
            android:gravity="center_vertical"
            android:text="0"
            android:textSize="60sp"/>
        <TextView
            android:layout_width="0dp"
            android:onClick="oneClick"
            android:background="@drawable/selector_white_bg"
            android:layout_height="match_parent"
            android:layout_weight="1"
            android:gravity="center"
            android:text="1"
            android:textSize="60sp"/>

        <TextView
            android:layout_width="0dp"
            android:layout_height="match_parent"
            android:layout_weight="1"
            android:onClick="oneClick"
            android:background="@drawable/selector_orange_bg"
            android:gravity="center"
            android:text="="
            android:textSize="60sp" />
    </LinearLayout>

</LinearLayout>
1.1.2、颜色背景的xml
shape_rectangle_white.xml
是用来模拟数字中间的竖线的
<?xml version="1.0" encoding="utf-8"?>
<shape xmlns:android="http://schemas.android.com/apk/res/android"
    android:shape="rectangle">
    <solid android:color="#ffffff"/>
    <stroke android:color="#333333"
        android:width="1dp"/>
</shape>
shape_rectangle_orange.xml
是用来模拟符号中间的竖线的
<?xml version="1.0" encoding="utf-8"?>
<shape xmlns:android="http://schemas.android.com/apk/res/android"
    android:shape="rectangle">
    <solid android:color="#e47f26"/>
    <stroke android:color="#333333"
        android:width="1dp"/>
</shape>
shape_rectangle_white_grey.xml
<?xml version="1.0" encoding="utf-8"?>
<shape xmlns:android="http://schemas.android.com/apk/res/android"
    android:shape="rectangle">
    <solid android:color="#999999"/>
    <stroke android:color="#333333"
        android:width="1dp"/>
</shape>
shape_rectangle_orange_grey.xml
<?xml version="1.0" encoding="utf-8"?>
<shape xmlns:android="http://schemas.android.com/apk/res/android"
    android:shape="rectangle">
    <solid android:color="#b55f1c"/>
    <stroke android:color="#333333"
        android:width="1dp"/>
</shape>
selector_white_bg.xml
做按压颜色背景变化
<?xml version="1.0" encoding="utf-8"?>
<selector xmlns:android="http://schemas.android.com/apk/res/android">
    <item android:state_pressed="true" android:drawable="@drawable/shape_rectangle_white_grey"/>
    <item android:drawable="@drawable/shape_rectangle_white"/>
</selector>
selector_orange_bg.xml
做按压颜色背景变化
<?xml version="1.0" encoding="utf-8"?>
<selector xmlns:android="http://schemas.android.com/apk/res/android">
    <item android:state_pressed="true" android:drawable="@drawable/shape_rectangle_orange_grey"/>
    <item android:drawable="@drawable/shape_rectangle_orange"/>
</selector>
1.1.3、主程序
public class MainActivity extends AppCompatActivity {

    private static final String TAG = "MainActivity" ;

    @Override
    protected void onCreate(Bundle savedInstanceState) {
        super.onCreate(savedInstanceState);
        setContentView(R.layout.calculator_layout);

    }
    //点击事件
    public void oneClick(View view){
        //做日志的输出
        Log.d(TAG,"one  click");
    }
}
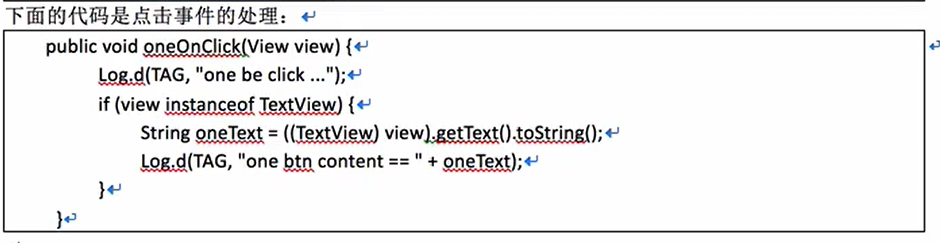
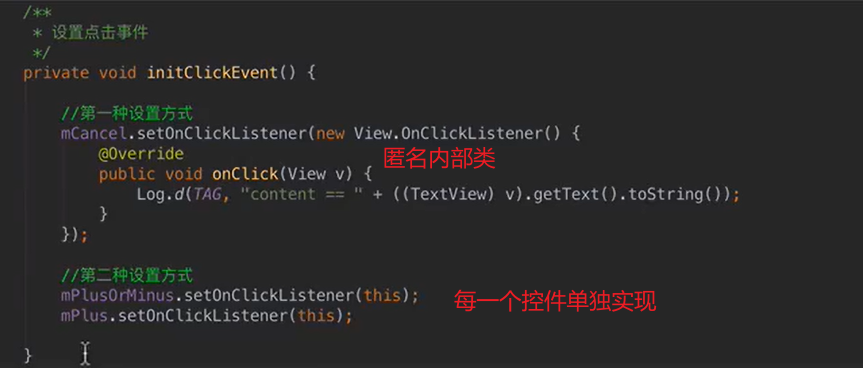
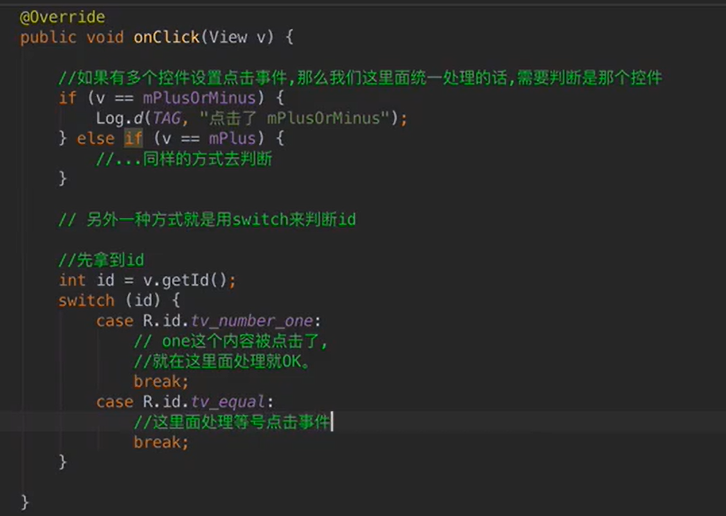
1.1.4、实现控件的点击事件
方式一:通过selectot实现,在java代码中写上点击事件的逻辑。
view就是对应的控件。
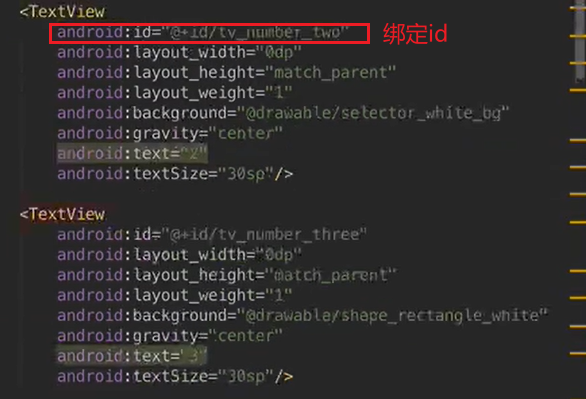
方式二:使用id进行绑定。
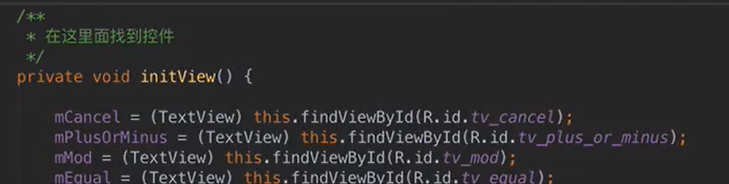
在activity中找到控件。
设置点击事件

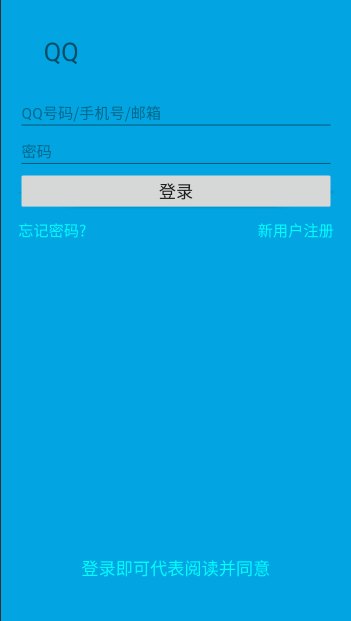
1.2、QQ登录界面

1.2.1、布局文件
<?xml version="1.0" encoding="utf-8"?>
<RelativeLayout xmlns:android="http://schemas.android.com/apk/res/android"
    android:orientation="vertical" android:layout_width="match_parent"
    android:layout_height="match_parent"
    android:background="#02a5e1">
    <TextView
        android:layout_width="wrap_content"
        android:layout_height="wrap_content"
        android:text="登录即可代表阅读并同意"
        android:textSize="20dp"
        android:layout_centerHorizontal="true"
        android:layout_alignParentBottom="true"
        android:layout_marginBottom="50dp"
        android:textColor="#00ffff"/>
    <LinearLayout
        android:layout_width="match_parent"
        android:layout_height="wrap_content"
        android:padding="20dp"
        android:orientation="vertical">
        <TextView
            android:layout_width="wrap_content"
            android:layout_height="wrap_content"
            android:layout_marginTop="20dp"
            android:layout_marginLeft="30dp"
            android:text="QQ"
            android:textSize="30sp" />
        <EditText
            android:layout_marginTop="30dp"
            android:layout_width="match_parent"
            android:hint="QQ号码/手机号/邮箱"
            android:layout_height="match_parent"/>
        <EditText
            android:layout_width="match_parent"
            android:hint="密码"
            android:layout_height="match_parent"/>
        <Button
            android:layout_width="match_parent"
            android:layout_height="wrap_content"
            android:text="登录"
            android:textSize="20sp"/>
        <RelativeLayout
            android:layout_marginTop="10dp"
            android:layout_width="match_parent"
            android:layout_height="wrap_content">
            <TextView
                android:layout_width="wrap_content"
                android:layout_height="wrap_content"
                android:text="忘记密码?"
                android:textSize="18dp"
                android:textColor="#00ffff"/>
            <TextView
                android:layout_alignParentRight="true"
                android:layout_width="wrap_content"
                android:layout_height="wrap_content"
                android:text="新用户注册"
                android:textSize="18dp"
                android:textColor="#00ffff"/>
        </RelativeLayout>

    </LinearLayout>
</RelativeLayout>
效果图:
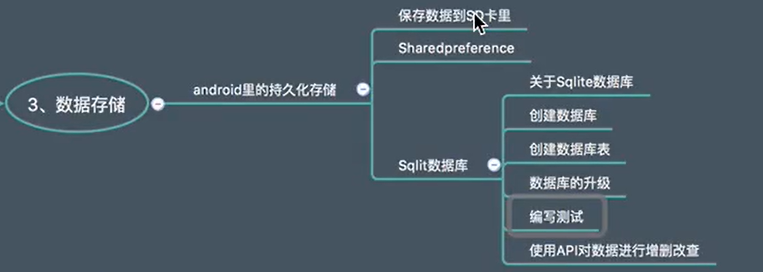
2、Android开发数据持久化存储
2.1、示例
将在QQ登录界面做讲解
2.1.1、布局文件
<?xml version="1.0" encoding="utf-8"?>
<RelativeLayout xmlns:android="http://schemas.android.com/apk/res/android"
    android:orientation="vertical" android:layout_width="match_parent"
    android:layout_height="match_parent"
    android:background="#02a5e1">
    <TextView
        android:layout_width="wrap_content"
        android:layout_height="wrap_content"
        android:text="登录即可代表阅读并同意"
        android:textSize="20dp"
        android:layout_centerHorizontal="true"
        android:layout_alignParentBottom="true"
        android:layout_marginBottom="50dp"
        android:textColor="#00ffff"/>
    <LinearLayout
        android:layout_width="match_parent"
        android:layout_height="wrap_content"
        android:padding="20dp"
        android:orientation="vertical">
        <TextView
            android:layout_width="wrap_content"
            android:layout_height="wrap_content"
            android:layout_marginTop="20dp"
            android:layout_marginLeft="30dp"
            android:text="QQ"
            android:textSize="30sp" />
        <EditText
            android:id="@+id/et_account"
            android:layout_marginTop="30dp"
            android:layout_width="match_parent"
            android:hint="QQ号码/手机号/邮箱"
            android:layout_height="match_parent"/>
        <EditText
            android:id="@+id/et_password"
            android:layout_width="match_parent"
            android:hint="密码"
            android:layout_height="match_parent"/>
        <Button
            android:id="@+id/bt_login"
            android:layout_width="match_parent"
            android:layout_height="wrap_content"
            android:text="登录"
            android:textSize="20sp"/>
        <RelativeLayout
            android:layout_marginTop="10dp"
            android:layout_width="match_parent"
            android:layout_height="wrap_content">
            <TextView
                android:layout_width="wrap_content"
                android:layout_height="wrap_content"
                android:text="忘记密码?"
                android:textSize="18dp"
                android:textColor="#00ffff"/>
            <TextView
                android:layout_alignParentRight="true"
                android:layout_width="wrap_content"
                android:layout_height="wrap_content"
                android:text="新用户注册"
                android:textSize="18dp"
                android:textColor="#00ffff"/>
        </RelativeLayout>

    </LinearLayout>
</RelativeLayout>
2.1.2、主程序
package com.example.qqlogindemo;

import androidx.appcompat.app.AppCompatActivity;

import android.os.Bundle;
import android.util.Log;
import android.view.View;
import android.widget.Button;
import android.widget.EditText;

import java.io.File;
import java.io.FileOutputStream;
import java.io.IOException;

public class MainActivity extends AppCompatActivity {
    private static final String TAG = "MainActivity";
    private EditText mAccount;
    private EditText mPassword;
    private Button mLogin;

    @Override
    protected void onCreate(Bundle savedInstanceState) {
        super.onCreate(savedInstanceState);
        setContentView(R.layout.activity_main);
        //找控件
        initView();
        //登陆按钮设置点击事件
        initListener();
    }

    /*
    设置点击监听
     */
    private void initListener() {
        mLogin.setOnClickListener(new View.OnClickListener() {
            @Override
            public void onClick(View view) {
                handlerLoginEven(view);
            }
        });
    }
    /*
    处理登录事件
     */
    private void handlerLoginEven(View view) {
        //拿到账号和密码
        String accountText = mAccount.getText().toString();
        String passwordText = mPassword.getText().toString();

        //进行保存
        saveUserInfo(accountText, passwordText);
    }

    /*
    存储数据
     */
    private void saveUserInfo(String accountText, String passwordText) {
        Log.d(TAG,"保存用户信息");
        FileOutputStream fos = null;
        try {
        	//错误写法
            //File file = new File("info.txt");
        	//正确写法
            File file = new File("/data/data/com.example.qqlogindemo/info.txt");
            if (!file.exists()) {
                Log.d(TAG,"走了这里");
                file.createNewFile();
            }
            fos = new FileOutputStream(file);
            fos.write((accountText + "*****" + passwordText).getBytes());
        }catch (Exception e){
            e.printStackTrace();
        }finally {
            try {
                if(fos != null) {
                    fos.close();
                }
            } catch (IOException e) {
                e.printStackTrace();
            }
        }
    }

    private void initView() {
        mAccount= this.findViewById(R.id.et_account);
        mPassword = this.findViewById(R.id.et_password);
        mLogin = this.findViewById(R.id.bt_login);
    }
}
2.1.3、错误分析及解决

为什么直接写一个文件名去写文件,会报一个异常是read-only?
因为在安卓系统中,每一个应用就是一个用户,每个用户的权限是特定的,不可操作其他应用内容
解决:
windows下(Linux下是一样的,只不过一个是cmd窗口,一个是终端窗口):
打开cmd,输入adb devices查看当前模拟器,然后输入adb remount进行重新挂载,再输入adb shell(因为安卓是基于Linux的)
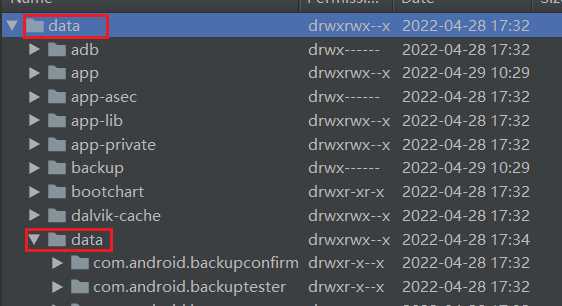
此时进行的是内部存储,因此转到/data/data/,找到AndroidManifest.xml的包名,然后此时,在文件中写入路径。完成内部数据的保存。

查看保存的数据:

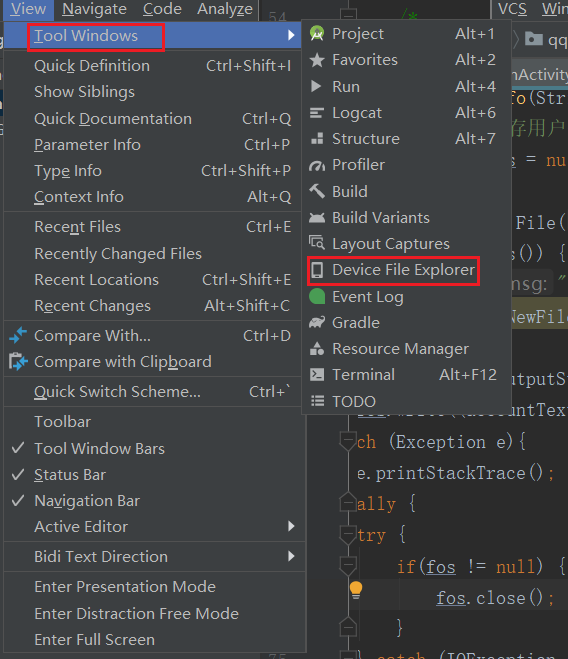

2.2、通过系统提供的方法获取到保存文件的路径
//过长,如何获取文件的保存路径
File file = new File
("/data/data/com.example.qqlogindemo/info.txt");
附:上下文是什么?(就是指当前环境)
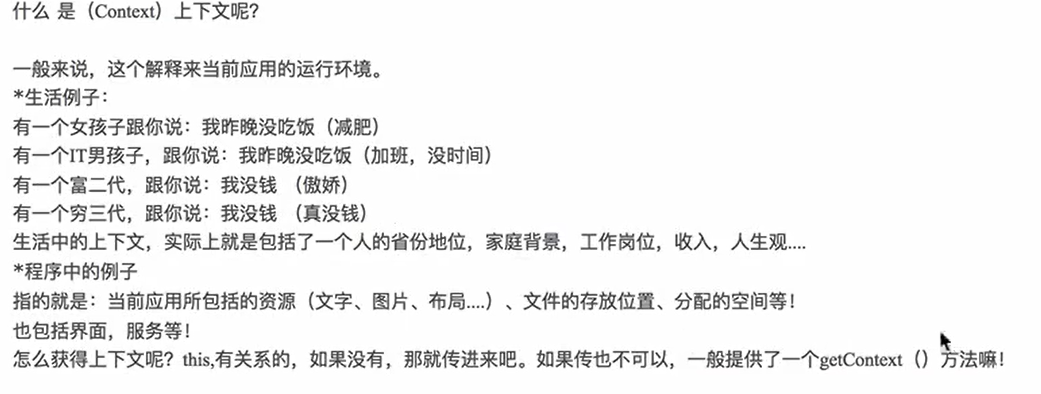
调用API获得文件路径:
File dir = this.getFilesDir();
File saveFile = new File(dir, "info.txt");
2.2.1、对账号密码进行判空
//使用工具类
        if (TextUtils.isEmpty(accountText)) {
            Toast.makeText(this,"账号不能为空",Toast.LENGTH_SHORT).show();
            return;
        }
        if (TextUtils.isEmpty(passwordText)) {
            Toast.makeText(this,"密码不能为空",Toast.LENGTH_SHORT).show();
            return;
        }
2.2.2、数据回显
@Override
    protected void onResume() {
        super.onResume();

        try {
            FileInputStream fileInputStream = this.openFileInput("info.txt");
            BufferedReader bufferedReader= new BufferedReader(new InputStreamReader(fileInputStream));
            String info = bufferedReader.readLine();
            //对数据进行切割
            //fos.write((accountText + "*****" + passwordText).getBytes());写入规则
            String[] splits = info.split("\\*\\*\\*\\*\\*");
            String account = splits[0];
            String password = splits[1];
            //回显数据
            mAccount.setText(account);
            mPassword.setText(password);
        } catch (Exception e) {
            e.printStackTrace();
        }
    }
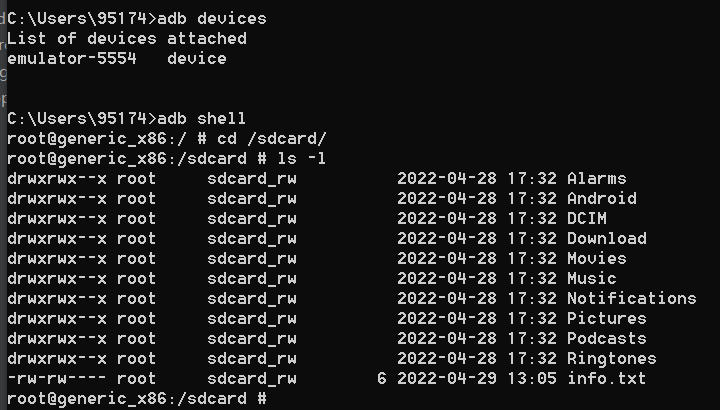
2.3、把数据存储到SD卡上
这里和视频中有些出入,这里的地址是/sdcard

代码:
public class SDCardDemoActivity extends Activity {
    Button writeDataBtn;
    @Override
    protected void onCreate(Bundle savedInstanceState) {
        super.onCreate(savedInstanceState);
        //设置布局
        setContentView(R.layout.activity_sd_card);
        writeDataBtn = this.findViewById(R.id.write_data_to_sd_card_btn);
        writeDataBtn.setOnClickListener(new View.OnClickListener() {
            @Override
            public void onClick(View view) {
                if(view == writeDataBtn){
                    //写入数据到sd卡,写入到/sdcard上,不知道Linux下的路径是这个还是/storage/sdcard?
                    File file = new File("/sdcard","info.txt");
                    FileOutputStream fos = null;
                    try {
                        fos = new FileOutputStream(file);
                        fos.write(("加油").getBytes());
                    } catch (Exception e) {
                        e.printStackTrace();
                    }finally {
                        if(fos != null){
                            try {
                                fos.close();
                            } catch (IOException e) {
                                e.printStackTrace();
                            }
                        }
                    }

                }
            }
        });
    }


}
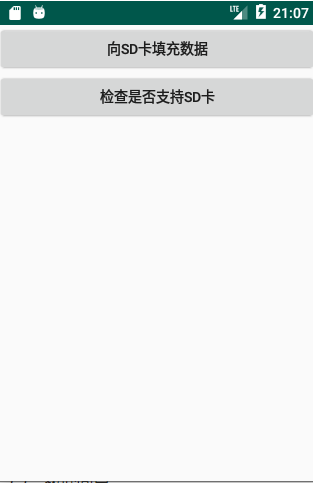
布局文件:
<?xml version="1.0" encoding="utf-8"?>
<LinearLayout
    xmlns:android="http://schemas.android.com/apk/res/android"
    android:orientation="vertical"
    android:layout_width="match_parent"
    android:layout_height="match_parent">
    <Button
        android:id="@+id/write_data_to_sd_card_btn"
        android:layout_width="match_parent"
        android:layout_height="wrap_content"
        android:text="向SD卡填充数据"/>
</LinearLayout>
AndroidMainfest.xml:
<?xml version="1.0" encoding="utf-8"?>
<manifest xmlns:android="http://schemas.android.com/apk/res/android"
    package="com.example.qqlogindemo">
    <uses-permission android:name="android.permission.WRITE_EXTERNAL_STORAGE"/>
    <uses-permission android:name="android.permission.READ_EXTERNAL_STORAGE"/>
    <application
        android:allowBackup="true"
        android:icon="@mipmap/ic_launcher"
        android:label="@string/app_name"
        android:requestLegacyExternalStorage="true"
        android:roundIcon="@mipmap/ic_launcher_round"
        android:supportsRtl="true"
        android:theme="@style/AppTheme">
        <activity android:name=".MainActivity">
<!--            <intent-filter>-->
<!--                <action android:name="android.intent.action.MAIN" />-->

<!--                <category android:name="android.intent.category.LAUNCHER" />-->
<!--            </intent-filter>-->
        </activity>
        <activity android:name=".SDCardDemoActivity">
            <intent-filter>
                <action android:name="android.intent.action.MAIN" />

                <category android:name="android.intent.category.LAUNCHER" />
            </intent-filter>
        </activity>
    </application>

</manifest>
报错:

因为在安卓中,向sd卡写入数据也需要权限,读写都需要权限,如何加权限?
解决权限问题
2.3.1、获取SD卡以及判断SD卡是否挂载
因为不同手机厂商的扩展卡名字不一样,通过这个API就可以获得扩展卡(SD卡)的路径。
File externalStorageDirectory = Environment.getExternalStorageDirectory();
                Log.d(TAG, "FilePath = " + externalStorageDirectory);

如何知道有SD卡?
checkSDCard.setOnClickListener(new View.OnClickListener() {
            @Override
            public void onClick(View view) {
                //点击的是检查是否有SD卡按钮
                String state = Environment.getExternalStorageState();
                if (state.equals(Environment.MEDIA_MOUNTED)) {
                    Log.d(TAG,"SD卡已经挂载了");
                }else if(state.equals(Environment.MEDIA_REMOVED)){
                    Log.d(TAG,"SD卡已经删除了");
                }
            }
        });

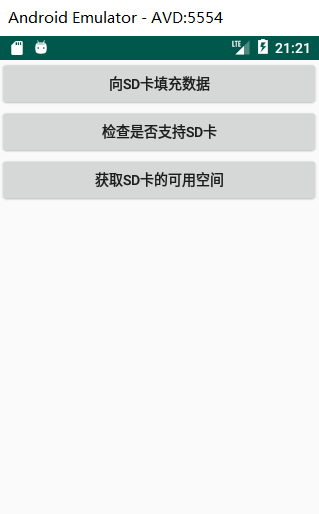
2.3.2、获取SD卡剩余空间
freeSize.setOnClickListener(this);
@Override
    public void onClick(View view) {
        long freeSpace = Environment.getExternalStorageDirectory().getFreeSpace();
        Log.d(TAG,"剩余" + freeSpace);
        String size = Formatter.formatFileSize(this, freeSpace);
        Log.d(TAG,"剩余大小为:" + size);
    }

2.4、编写偏好模仿设置界面
一般用来保存偏好设置,比如权限的开关。
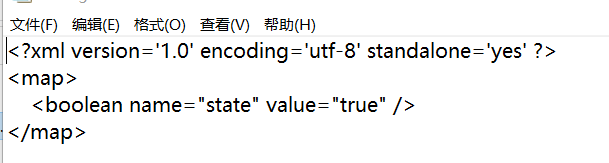
sharepreference使用步骤:
- 拿到这个SharePreference。
sharedPreferences = this.getSharedPreferences("settingInfo", MODE_PRIVATE); - 进入编辑模式,拿到编辑器。
SharedPreferences.Editor edit = sharedPreferences.edit(); - 保存数据。
edit.putBoolean("state",b); - 提交编辑器。
edit.commit();
完整代码:
public class PreferenceDemoActivity extends Activity implements CompoundButton.OnCheckedChangeListener {
    private static final String TAG = "PreferenceDemoActivity";
    private SharedPreferences sharedPreferences;

    @Override
    protected void onCreate(Bundle savedInstanceState) {
        super.onCreate(savedInstanceState);
        setContentView(R.layout.activity_preference_demo);
        //找到控件
        Switch isSwitch = this.findViewById(R.id.is_switch);
        isSwitch.setOnCheckedChangeListener(this);
        sharedPreferences = this.getSharedPreferences("settingInfo", MODE_PRIVATE);
    }

    @Override
    public void onCheckedChanged(CompoundButton compoundButton, boolean b) {
        //对数据进行保存
        Log.d(TAG,"当前状态为 = " + b);
        SharedPreferences.Editor edit = sharedPreferences.edit();
        //保存数据
        edit.putBoolean("state",b);
        edit.commit();
    }
}
查看: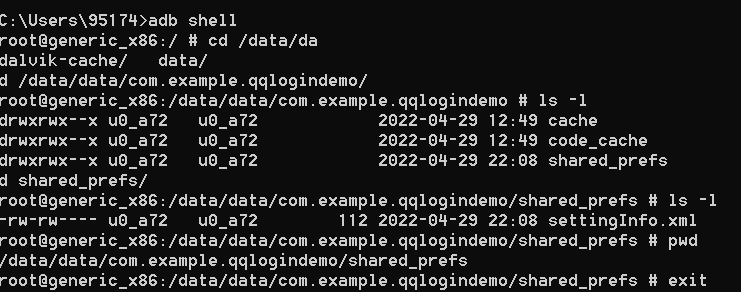
拉取:

2.4.1、回显数据
public class PreferenceDemoActivity extends Activity implements CompoundButton.OnCheckedChangeListener {
    private static final String TAG = "PreferenceDemoActivity";
    private SharedPreferences sharedPreferences;

    @Override
    protected void onCreate(Bundle savedInstanceState) {
        super.onCreate(savedInstanceState);
        setContentView(R.layout.activity_preference_demo);
        //找到控件
        Switch isSwitch = this.findViewById(R.id.is_switch);
        isSwitch.setOnCheckedChangeListener(this);
        sharedPreferences = this.getSharedPreferences("settingInfo", MODE_PRIVATE);
        //得到设置的状态,没有默认为false
        boolean state = sharedPreferences.getBoolean("state", false);
        //控件进行状态设置
        isSwitch.setChecked(state);
    }

    @Override
    public void onCheckedChanged(CompoundButton compoundButton, boolean b) {
        //对数据进行保存
        Log.d(TAG,"当前状态为 = " + b);
        SharedPreferences.Editor edit = sharedPreferences.edit();
        //保存数据
        edit.putBoolean("state",b);
        edit.commit();
    }
}


 1309
1309


 被折叠的 条评论
为什么被折叠?
被折叠的 条评论
为什么被折叠?
 到【灌水乐园】发言


