


— k8s basic —
安装版本信息查询
命令行自动补全功能设置
01. Namespaces and Pods
02. Assigning Pods to Nodes
03. Basic Deployments
04. Advanced Deployment
05. Jobs, Init Containers and Cron Jobs
06. Manage DaemonSets
07. Manage Services
08. Manage Ingress
09. Persistent Volumes
10. ConfigMaps
11. Secrets
12. Debug Problems
CKA environment based practise
—contents—
Playground
Vim Setup
Apiserver Crash
Apiserver Misconfigured
Application Misconfigured
Application Multi Container Issue
ConfigMap Access in Pods
Ingress Create
NetworkPolicy Namespace Selector
RBAC ServiceAccount Permissions
RBAC User Permissions
Scheduling Priority
k8s trouble shooting CTF: K8s trouble shooting simple pod errors
Crash Bang Wallop
Fixing Deployments
Image issues
Under Construction
Cloud Foundry:
try cloud foundry on k8s
this tutorial provides a brief introduction to deploying applications to Kubernetes via the Cloud Foundry platform.
⭕️online practise:
https://killercoda.com/
NOTE: 如下CKA考试界面在用谷歌浏览器打开的界面上不显示,在edge浏览器中才显示
https://killercoda.com/killer-shell-cka
https://killercoda.com/playgrounds
https://killercoda.com/spcloud/course/kubernetes/
😮 😮 😮
kubectl version [-h|--help]- 简单集群版本信息获取
kubectl version [--short]
NOTE:kubectl versioninformation is deprecated and will be replaced with the output fromkubectl version --short
Flag --short has been deprecated, and will be removed in the future. The --short output will become the default.
- 详细版本信息获取
kubectl version --output=yaml|json
Use --output=yaml|json to get the full version.
kubectl cluster-info [-h|--help]- 简单集群配置信息获取
kubectl cluster-info
Display addresses of the control plane and services with label kubernetes.io/cluster-service=true.
- 进一步调试诊断集群问题
kubectl cluster-info dump > cluster-info.json
To further debug and diagnose cluster
problems, use ‘kubectl cluster-info dump’.
⭕️ 命令行自动补全功能设置
kubectl提供命令行自动补全功能支持,可选择如下任意一种:
-
bash
1.test if you have bash-completion already installed:type _init_completion
2.if not,then install bash-completion:
Debian os(debian|ubuntu|kali):apt-get install bash-completion
RHLE os(redhat|centos):yum install bash-completion
3.manually source this file in your ~/.bashrc file:source /usr/share/bash-completion/bash_completion
NOTE:export, source命令说明
4.reload your shell and verify that bash-completion is correctly installed:type _init_completion
5.enable kubectl autocompletion bash:
ensure that the kubectl completion script gets sourced in all your shell sessions.
There are two ways in which you can do this:
User:echo 'source <(kubectl completion bash)' >>~/.bashrc #if you have an alias for kubectl, extend shell completion with that alias: echo 'alias k=kubectl' >>~/.bashrc echo 'complete -o default -F __start_kubectl k' >>~/.bashrc #two approaches are equivalent, enable bash autocompletion in current session exec bash NOTE:bash-completion sources all completion scripts in /etc/bas_completion.dSystem:
kubectl completion bash | sudo tee /etc/bash_completion.d/kubectl > /dev/null #if you have an alias for kubectl, extend shell completion with that alias: echo 'alias k=kubectl' >>~/.bashrc echo 'complete -o default -F __start_kubectl k' >>~/.bashrc #two approaches are equivalent, enable bash autocompletion in current session exec bash NOTE:bash-completion sources all completion scripts in /etc/bas_completion.d -
fish
autocomplete for fish requires kubectl 1.23 or later.
1.generate completion script for fish:kubectl completion fish
2.souring the completion script in your shell enable kubectl autocompletion:
to do so in all your shell sessions, add the following line to your ~/.config/fish/config.fish file:
kubectl completion fish | source -
zsh
1.generate completion script for zsh:
kubectl completion zsh
2.souring the completion script in your shell enable kubectl autocompletion:
to do so in all your shell sessions, add the following line to your ~/.zshrc file:
source <(kubectl completion zsh)
01. Namespaces and Pods
ns:资源隔离
kubectl get ns
k8s predefined namespaces:

-
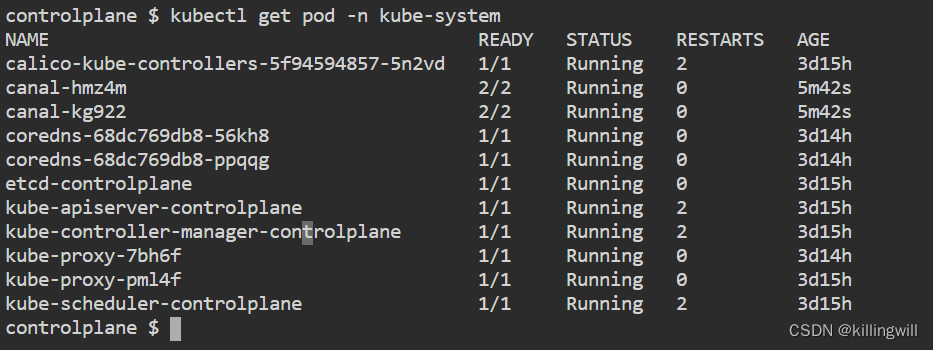
kube-system:has objects created by k8s system.
kubectl get po -n kube-system
-
kube-public:has a ConfigMap which contains the bootstrapping and certificate configuration for k8s cluster. visible throught the whloe cluster.
kubectl get po -n kube-public
nothing you will see, but we can see a cluster-info ConfigMap:
kubectl -n kube-public get configmap

kubectl get configmap cluster-info -n kube-public -o yaml
in addition, this ns can be treated as a location used to run an object which should be visible and readable throught the whole cluster.
- default:all objects created without specifying a ns will automatically be created in the default ns, and default ns can not be deleted.
kubectl get po
kubectl get po -n default
practise:
kubectl create ns cloudnative
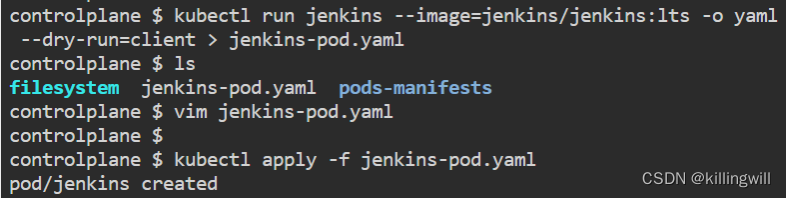
#使用kubectl run <podName> --image -oyaml --dry-run > outputfilename.yaml 快速创建一个pod的yaml文件
kubectl run jenkins --image=jenkins/jenkins:lts -o yaml --dry-run=client > jenkins-pod.yaml
ls
vim jenkins-pod.yaml
kubectl apply -f jenkins-pod.yaml
kubectl get po jenkins -n cloudnative
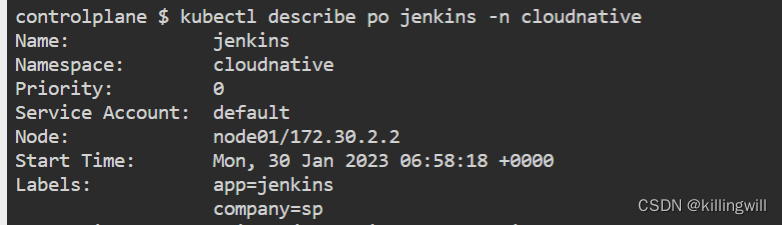
kubectl describe po jenkins -n cloudnative
#使用kubectl expose pod <podname> -n <podnamespace> --port=<serviceport> --name=<servicename>
#快速将一个pod暴露为服务
kubectl expose po jenkins -n cloudnative --port=444 --name=jenkins
kubectl get svc -n cloudnative
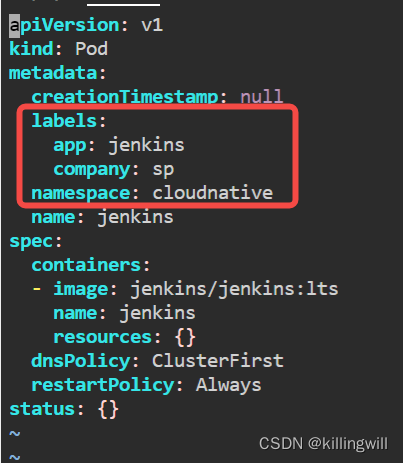
A. Create namespace: cloudnative

B. Create a pod with the following constraints:
Pod name: jenkins
- Deploy pod in a cloudnative namespace
- Add additional labels:
app: jenkins
company: sp- Use this container image: jenkins/jenkins:lts


C. [Optional] Expose the pod using a service and check if Jenkins is running successfully


02. Assigning Pods to Nodes
# 查询所有ns下的po,使用-owide选项可看到该pod位于那个node上
kubectl get po -A -owide
k8s scheduler automatically assigns pods to nodes.
if you want to decide this, there are two ways:
- 节点选择器:
nodeSeletor
将pod调度到具有特定标签的节点上。
若满足pod的nodeSelector的k-v条件在任意node均不存在,则该pod调度失败。 - 亲和性|反亲和性:
Affinity|Anti-Affinity
上述两点都是通过标签labels及标签选择器selector实现。
https://kubernetes.io/docs/concepts/scheduling-eviction/assign-pod-node/
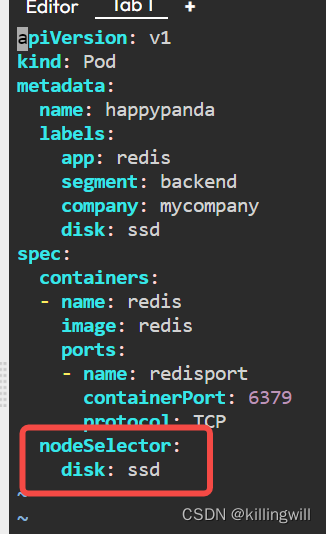
task:schedule happypanda pod to the node01 node by using nodeSelector(disk=ssd)
- discover node labels
kubectl get nodes --show-labels- add a new node label
kubectl label nodes node01 disk=ssd
kubectl get nodes node01 --show-labels | grep ssd
- assign the happypanda pod to node01, matching disk:ssd label
cat /manifests/pod-nodeselector.yaml
kubectl apply -f /manifests/pod-nodeselector.yaml
- verify pod has been successfully scheduled on the node01 node:
kubectl get po -o wide
- delete pod
kubectl delete -f /manifests/pod-nodeselector.yaml
or
kubectl delete pod happypanda- delete label
kubectl label node node01 disk-


亲和性:
- NodeAffinity:schedule pods on specific nodes.
- PodAffinity: run multiple pods on specific nodes.
Node Affinity:
spec.affinity.nodeAffinity.preferredDuringSchedulingIgnoredDuringExecution: Soft NodeAffinity and Anti-Affinity.
if the node label exists: the pod will run there.
if not: the pod will be rescheduled elsewhere within the cluster.
# node-soft-affinity.yaml
# 使用preferred(soft) + In operator(affinity)
apiVersion: v1
kind: Pod
metadata:
  name: happypanda
  labels:
    app: redis
    segment: backend
    company: mycompany
    disk: ssd
spec:
  affinity:
    nodeAffinity:
      preferredDuringSchedulingIgnoredDuringExecution:
      - weight: 1
        preference:
          matchExpressions:
          - key: fruit
            operator: In
            values:
            - apple
  containers:
  - name: redis
    image: redis
    ports:
    - name: redisport
      containerPort: 6379
      protocol: TCP
# node-soft-anti-affinity.yaml
# 使用preferred(soft) + NotIn operator(anti-affinity)
apiVersion: v1
kind: Pod
metadata:
  name: happypanda
  labels:
    app: redis
    segment: backend
    company: mycompany
    disk: ssd
spec:
  affinity:
    nodeAffinity:
      preferredDuringSchedulingIgnoredDuringExecution:
      - weight: 1
        preference:
          matchExpressions:
          - key: fruit
            perator: NotIn
            values:
            - apple
  containers:
  - name: redis
    image: redis
    ports:
    - name: redisport
      containerPort: 6379
      protocol: TCP
spec.affinity.nodeAffinity.requiredDuringSchedulingIgnoredDuringExecution: Hard NodeAffinity and Anti-Affinity.
if the node label does not exist, the pod won`t be scheduled at all.
# node-hard-affinity.yaml
# 使用required(hard) + In operator(affinity)
apiVersion: v1
kind: Pod
metadata:
  name: happypanda
  labels:
    app: redis
    segment: backend
    company: mycompany
    disk: ssd
spec:
  affinity:
    nodeAffinity:
      preferredDuringSchedulingIgnoredDuringExecution:
      - weight: 1
        preference:
          matchExpressions:
          - key: fruit
            operator: In
            values:
            - apple
  containers:
  - name: redis
    image: redis
    ports:
    - name: redisport
      containerPort: 6379
      protocol: TCP
#node-hard-anti-affinity.yaml
#使用required(hard) + NotIn operator(anti-affinity)
apiVersion: v1
kind: Pod
metadata:
  name: happypanda
  labels:
    app: redis
    segment: backend
    company: mycompany
    disk: ssd
spec:
  affinity:
    nodeAffinity:
      requiredDuringSchedulingIgnoredDuringExecution:
        nodeSelectorTerms:
        - matchExpressions:
          - key: fruit
            operator: NotIn
            values:
            - apple
  containers:
  - name: redis
    image: redis
    ports:
    - name: redisport
      containerPort: 6379
      protocol: TCP
Pod Affinity:
spec.affinity.podAffinity.preferredDuringSchedulingIgnoredDuringExecution: Soft Pod Affinity.
if the preferred option is available: the pod will run there.
if not: the pod scheduled any where.spec.affinity.podAffinity.requiredDuringSchedulingIgnoredDuringExecution: Hard Pod Affinity.
if the required option is not available: the pod cannot run.
# pod-hard-affinity.yaml
# if none of the nodes are labelled with fruit=apple, then the pod won`t be scheduled.
apiVersion: v1
kind: Pod
metadata:
  name: happypanda
  labels:
    app: redis
    segment: backend
    company: mycompany
    disk: ssd
spec:
  affinity:
    podAffinity:
      requiredDuringSchedulingIgnoredDuringExecution:
        - labelSelector:
            matchExpressions:
            - key: fruit
              operator: In
              values:
              - apple
          topologyKey: kubernetes.io/hostname
  containers:
  - name: redis
    image: redis
    ports:
    - name: redisport
      containerPort: 6379
      protocol: TCP
Pod Anti-Affinity:
spec.affinity.podAntiAffinity.perferredDuringSchedulingIgnoredDuringExecution: Soft Pod Anti-Affinity.spec.affinity.podAntiAffinity.requiredDuringSchedulingIgnoredDuringExecution: Hard Pod Anti-Affinity.
pod anti-affinity works the opposite way of pod affinity.
If one if the nodes has a pod running with label fruit=apple, the pod will be scheduled on different node.
03. Basic Deployments
Tip --dry-run with -o=yaml is an excellent way to generate configurations!
# 使用yaml的输出形式可看到输出为一个items列表
kubectl get po -o yaml
kubectl describe po $(kubectl get po --no-headers=true|awk '{print $1}')
# Job Logs:
# 1.in order to see the job`s log we need get the name of the job.
# jsonpath的路径参考-o为yaml时的输出形式
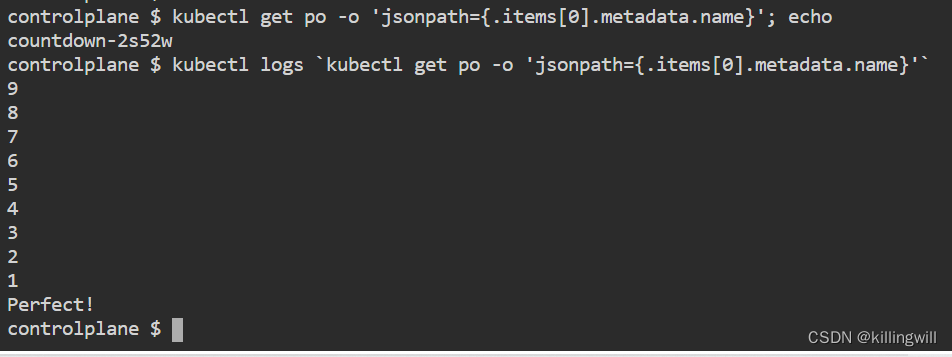
kubectl get pods -o 'jsonpath={.items[0].metadata.name}'; echo
# 2.the execute the following command to get the logs:
kubectl logs `kubectl get po -o 'jsonpath={.items[0].metadata.name'`
kubectl get cronjob --watch
kubectl get po --watch
kubectl get po -n development -l app=nginx -o 'jsonpath={.items[0].spec.nodeName}'; echo
kubectl get po -n deployment -l app=nginx -o 'jsonpath={.items[0].status.podIP}'; echo
kubectl get po -n development -l app=nginx -o 'jsonpath={.items[0].spec.nodeName}'; echo
kubectl get po -n development -l app=nginx -o 'jsonpath={.items[0].status.podIP}'; echo

curl <podIP>
curl `kubectl get po -n development -l app=nginx -o 'jsonpath={.items[0].status.podIP}'`


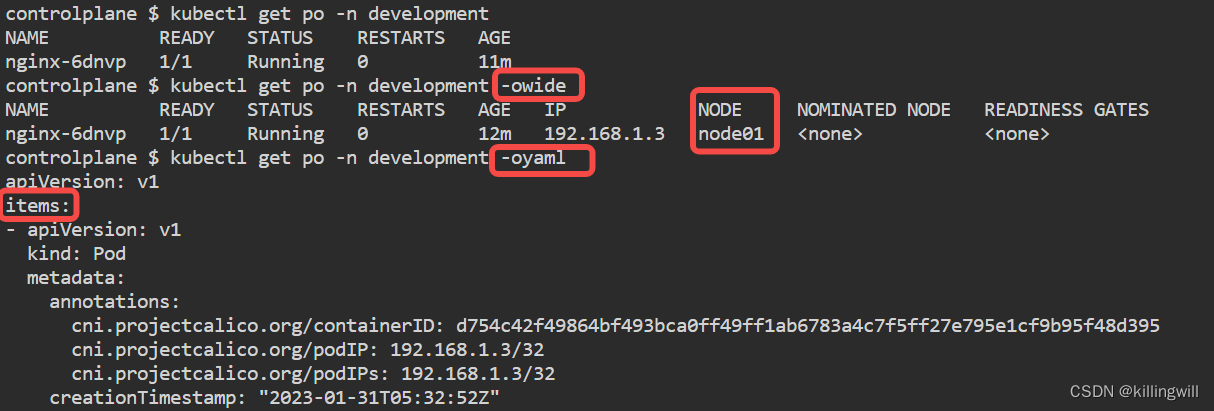
kubectl get po -n <nsname>
kubectl get po -n <nsname> -owide
kubectl get po -n <nsname> -oyaml
kubectl get po -n <nsname> --no-headers=true | awk '{print $1}'; echo
kubectl get po -n <nsname> -l <k=v>
kubectl get po --show-labels
04. Advanced Deployment
The goal of this Lab is to explain Kubernetes deployments.
This labs will explain the concept of ReplicaSets, Deployments, and have us create multiple Deployments using different strategies.
ReplicaSets
Before we work with Deployments, we’ll go over the basics of ReplicaSets. A ReplicaSet will ensure that the desired number of replicas of each Pod are up and running. Any time a Pod goes down, the ReplicaSet will deploy a new one to maintain high availability.
Now inspect the file ./resources/tutum-rs.yaml . It should look familiar to the Pod resource. We do have a few additions. These additions are what configure our ReplicaSet.
apiVersion: apps/v1
kind: ReplicaSet
metadata:
  name: tutum-rs
  labels:
    app: tutum
spec:
  replicas: 3
  selector:
    matchLabels:
      app: tutum
  template:
    metadata:
      labels:
        app: tutum
    spec:
      containers:
      - name: tutum
        image: tutum/hello-world
        ports:
        - containerPort: 80
The biggest additions are replicas: 3 and selector . The first component configures the total number of replicas of the Pod should be active at all times. The selector matches a set of constraints to identify Pods to represent. In this case, the ReplicaSet will track Pods with the label app=tutum .
We can deploy this ReplicaSet the same way we did Pods:
kubectl create -f ./resources/tutum-rs.yaml
Now watch Kubernets create 3 tutum Pods based on the specification in the tutum-rs.yaml file.
kubectl get po --watch
Wait for the pods to be created. You can press CTRL-C to stop watching.
Inspect the ReplicaSet .
NOTE: rs is shorthand for ReplicaSet
kubectl describe rs tutum-rs
Now modify the ReplicaSet to instantiate 5 pods by changing the replicas: 3 value.
kubectl edit rs tutum-rs
With edit , you can live edit the configuration of the resource in Kubernetes. However, it will not edit the underlying Manifest file representing the object.
Scaling
In the last step you scaled up the tutum-rs ReplicaSet to 5 pods by editing the spec file. Those changes were automatically applied.
Manual Scaling
To manually scale a ReplicaSet up or down, use the scale command. Scale the tutum pods down to 2 with the command:
kubectl scale rs tutum-rs --replicas=2
You can verify that 3 of the 5 tutum instances have been terminated:
kubectl get pods
or watch them until they finish
kubectl get po --watch
Of course, the ideal way to do this is to update our Manifest to reflect these changes.
AutoScaling
Kubernetes provides native autoscaling of your Pods. However, kube-scheduler might not be able to schedule additional Pods if your cluster is under high load. In addition, if you have a limited set of compute resources, autoscaling Pods can have severe consequences, unless your worker nodes can automatically scale as well (e.g. AWS autoscaling groups).
apiVersion: autoscaling/v1
kind: HorizontalPodAutoscaler
metadata:
  name: frontend-scaler
spec:
  scaleTargetRef:
    kind: ReplicaSet
    name: tutum-rs
  minReplicas: 3
  maxReplicas: 10
  targetCPUUtilizationPercentage: 50
To see all the autoscale options:
kubectl autoscale --help
It is also possible to automatically generate a config file, which we’ve seen before. The command to output a YAML config looks like this:
kubectl autoscale rs tutum-rs --max=10 --min=3 --cpu-percent=50 --dry-run=client -o=yaml
Note --dry-run=client , this means that Kubernetes will not apply the desired state changes to our cluster. However, we provided it with -o=yaml , which means output the configuration as YAML. This lets us easily generate a Manifest.
Tip --dry-run with -o=yaml is an excellent way to generate configurations!
We’ve provided this content in ./resources/hpa-tutum.yaml .
Now actually apply the configuration: kubectl create -f ./resources/hpa-tutum.yaml
At this point, we have a ReplicaSet managing the Tutum Pods, with Horizontal Pod Autoscaling configured. Let’s clean up our environment:
kubectl delete -f ./resources/hpa-tutum.yaml

kubectl delete -f ./resources/tutum-rs.yaml
Deployments on the CLI
Kubernetes Deployments can be created on the command line with kubectl run . It enables you to configure both the Pods and ReplicaSets.
kubectl run NAME --image=image
   --port=port]
  [--env="key=value"]
  [--replicas=replicas]
  [--dry-run=bool]
  [--overrides=inline-json]
  [--command]
  -- [COMMAND] [args...]
To create a simple Kubernetes deployment from the command-line:
kubectl create deployment tutum --image=tutum/hello-world --port 80
Congrats, you have just created your first Deployment. The run command created a Deplyment which automatically performed a few things for you:
- it searched for a suitable node to run the pod
- it scheduled the pod to run on that Node
- it configured the cluster to restart / reschedule the pod when needed
Basically, it created all of the objects we defined, which include Pods and ReplicaSets. It scheduled the Pods on a node capable of accepting workloads.
Let’s think back, what is the difference between this command, and how we create Pods on the CLI?
--restart=Never
To verify that the command created a Deployment:
kubectl get deployments
To see the Pods created by the Deployment:
kubectl get pods
To see the ReplicaSet created by the Deployment:
kubectl get replicasets
We can also get more information about our Deployment:
kubectl describe deployment tutum
The magic of Deployments
If a pod that was created by a Deployment should ever crash, the Deployment will automatically restart it. To see this in action, kill the Pod directly:
kubectl delete pod $(kubectl get pods --no-headers=true | awk '{print $1;}')
The pod should be deleted successfully. Now wait a moment or two and check the pod again:
kubectl get pods
Notice the the pod is running again. This is because the Deployment will restart a pod when it fails. What actually restarts those Pods?
Let’s quickly clean up and delete our Deployment: kubectl delete deployment tutum
Deployment Manifests
The most effective and repeatable way to manage our Deployments is with Manifest files. Here is one that defines our simple Tutum application (./resources/tutum-simple.yaml ):
apiVersion: apps/v1
kind: Deployment
metadata:
  name: tutum-deployment
spec:
  template:
    spec:
      containers:
      - name: tutum
        image: tutum/hello-world
        ports:
        - containerPort: 80
If we look at this Deployment, it looks very similar to our PodSpec and RS Manifests. We can add any configuration that we’ve already covered in the Pod section to this manifest. We should also configure the ReplicaSet to match our replication requirements.
Let’s create our Deployment: kubectl create -f ./resources/tutum-simple.yaml
All Kubernetes deployment YAML files must contain the following specifications:
apiVersion - apps/v1
The apiVersion specifies the version of the API to use. The API objects are defined in groups. The deployment object belongs to the apps API group. Group objects can be declared alpha , beta , or stable :
alpha- may contain bugs and no guarantee that it will work in the future. Example:(object)/v1alpha1beta- still somewhat unstable, but will most likely go into the Kubernetes main APIs. Example:(object)/v1beta1stable- Only stable versions are recommended to be used in production systems. Example:apps/v1
NOTE: You can check the latest Kubernetes API version here: https://kubernetes.io/docs/reference/
kind - Deployment
A kind value declares the type of Kubernetes object to be described in the Yaml file. Kubernetes supports the followng ‘kind’ objects:
componentstatusesconfigmapsdaemonsetsDeploymenteventsendpointshorizontalpodautoscalersingressjobslimitrangesNamespacenodespodspersistentvolumespersistentvolumeclaimsresourcequotasreplicasetsreplicationcontrollersserviceaccountsservices
metadata
The metadata declares additional data to uniquely identify a Kubernetes object. The key metadata that can be added to an object:
labels- size constrained key-value pairs used internally by k8s for selecting objects based on identifying informationname- the name of the object (in this case the name of the deployment)namespace- the name of the namespace to create the object (deployment)annotations- large unstructured key-value pairs used to provide non-identifying information for objects. k8s cannot query on annotations.spec- the desired state and characteristics of the object. spec has three important subfields:replicas: the numbers of pods to run in the deploymentselector: the pod labels that must match to manage the deploymenttemplate: defines each pod (containers, ports, etc. )
Interacting with Deployments
Now that we have created our Tutum Deployment, let’s see what we’ve got:
kubectl get deployments

kubectl get rs

kubectl get pods
Managing all of these objects by creating a Deployment is powerful because it lets us abstract away the Pods and ReplicaSets. We still need to configure them, but that gets easier with time.
Let’s see what happened when we created our Deployment:
kubectl describe deployment tutum-deployment
We can see that, in the events for the Deployment, a ReplicaSet was created. Let’s see what the ReplicaSet with kubectl describe rs . Your ReplicaSet has a unique name, so you’ll need to tab-complete.
When we look at the ReplicaSet events, we can see that it is creating Pods.
When we look at our Pods with kubectl describe pod , we’ll see that the host pulled the image, and started the container.
Deployments can be updated on the command line with set . Here’s an example:
kubectl set image deployment/tutum-deployment tutum=nginx:alpine --record
Remember, Kubernetes lets you do whatever you want, even if it doesn’t make sense. In this case, we updated the image tutum to be nginx , which is allowed, although strange.
Let’s see what happened now that we upated the image to something strange:
kubectl describe deployment tutum-deployment
We can see the history, which includes scaling up and down ReplicaSets for Pods from our command. We can also view revision history:
kubectl rollout history deployment tutum-deployment
We didn’t specify any reason for our updates, so CHANGE-CLAUSE is empty. We can also update other configuration options, such as environment variables:
kubectl set env deployment/tutum-deployment username=admin
How do we view those updated environment variables?
Let’s get the name of the Pod
We need to exec env inside the Pod
You can also update resources , selector , serviceaccount and subject .
For now, let’s simply delete our Deployment:
kubectl delete -f ./resources/tutum-simple.yaml
Configuring Tutum
Now that we’ve covered a simple Deployment, let’s walk through and create a fully featured one. We will deploy Tutum with additional configuration options.
First, let’s all start off with the same file: touch ./resources/tutum-full.yaml
Now, let’s populate this file with the base content for a Deployment:
apiVersion:
kind:
metadata:
spec:
What values should we put in for each of these?
apiVersion: apps/v1kind: Deploymentmetadata? We need to apply anameandlabels, let’s sayapp=tutumspecis a complex component, where we need to configure our RS and Pod
We should have something similar to shis:
apiVersion: apps/v1
kind: Deployment
metadata:
  name: tutum-deployment
  labels:
    app: tutum
spec:
Next, let’s add the scaffolding required to configure the RS and Pods:
apiVersion: apps/v1
kind: Deployment
metadata:
  name: tutum-deployment
  labels:
    app: tutum
spec:
  # RS config goes here
  template:
    metadata:

    spec:
      containers:
Now that we’ve got the scaffolding, let’s configure the RS
We need to set the number of replicas
We need to configure a selector to matchLabels
Let’s stick with 3 replicas. Remember, we need the RS To match labels on the Pod.
apiVersion: apps/v1
kind: Deployment
metadata:
  name: tutum-deployment
  labels:
    app: tutum
spec:
  replicas: 3
  selector:
    matchLabels:
      app: tutum
  template:
    metadata:

    spec:
      containers:
Now we need to give the Pods the appropriate labels so the RS will match with it. In addition, let’s configure the containers.
- We need to apply the label app=tutum to the Pod
- We need a single container, let’s call it tutum
- We need to specify the image, which is tutum/hello-world
- The Pod needs to expose port 80
This configuration leads us to create this file (or similar):
apiVersion: apps/v1
kind: Deployment
metadata:
  name: tutum-deployment
  labels:
    app: tutum
spec:
  replicas: 3
  selector:
    matchLabels:
      app: tutum
  template:
    metadata:
      labels:
        app: tutum
    spec:
      containers:
      - name: tutum
        image: tutum/hello-world
        ports:
        - containerPort: 80
Now that we’ve got the application configured, we can always add additional PodSpec like what we did in the previous Pod lab. For now, let’s deploy the application:
kubectl create -f ./resources/tutum-full.yaml
Who can help me validate that the Deployment was successful?
- Check Pod status
- Make a request against the webserver
At this point, you can make Deployments as simple or advanced as you want.
Configuring NGiNX
Now that we’ve covered Manifest files, its time to tackle some real applications.
Form groups of 2-3 people, and you will put together a Manifest file to help us configure an application. Here’s what you need to do:
- Create a Manifest file:
touch ./resources/nginx-self.yaml - Fill in the required configuration information to run your Deployment
- Run the Deployment and make sure it works properly
Here is what you’ll need to put in your Pod (in addition to other requirements, like apiVersion):
- Name the Deployment
- Configure labels for the Deployment
- Have the RS maintain 5 Pods
- Use the nginx-alpine image
- Listen on port 80
- Configure environment variables user=admin, password=root, host=katacoda
- Configure resource limits: 1 CPU core, 256 MB of RAM
Once you’ve created the Manifest file, save it, and create the Deployment: kubectl create -f ./resources/nginx-self.yaml
Next, to prove it is working correctly, open up a shell and view the environment variables, and CURL the welcome page from your host. After that, get the logs to make sure everything is working properly. Finally, open up a shell on the Pod, and find out what processes are running inside.
HINT: you might need to install additional software.
Bonus Task: update the image used by the Pod to alpine:latest , apply the configuration change, what happens?
Configuring Minecraft
Next, we will deploy software many of probably has heard of, the Minecraft server. The Minecraft server is free to run, and many people have made businesses out of hosting other people’s servers. We’ll do this with Kubernetes.
The configuration is relatively simple. Create your base file: touch ./resources/minecraft.yaml
Now, you need to configure the following values, in addition to everything else necessary to create a Deployment:
- replicase = 1
- image = itzg/minecraft-server
- environment variables: EULA=“true”
- container port = 25565
- volume: Pod local = /data , use an emptyDir for the actual storage
There are many more scaffolding requirements for this Deployment, such as apiVersion . Refer back to your notes, and you may need to check out what you’ve previously done in the Pod lab. You can find old files that you’ve previously worked on in the /old/ directory on this host.
Once you’ve deployed it, it should be pretty easy to verify that everything is working correctly.
Deploying applications is really easy with Kubernetes. If any of you have softare running on a server in your home, I can almost guarantee someone is currently maintaining a Deployment Manifest for it on GitHub.
Rolling Updates and Rollbacks
Now that we’ve gotten a good taste of creating our own Deployments, its time to use the rolling update and rollback features.
First, let’s all start off with a fully configured NGiNX Deployment, located at ./resources/nginx.yaml
Here are the file contents:
apiVersion: apps/v1
kind: Deployment
metadata:
  name: nginx-deployment
  labels:
    app: nginx
spec:
  replicas: 5
  selector:
    matchLabels:
      app: nginx
  template:
    metadata:
      labels:
        app: nginx
    spec:
      containers:
      - name: nginx
        image: nginx:1.7.9
        ports:
        - containerPort: 80
For our ReplicaSet, we can configure a strategy that defines how to safely perform a rolling update.
strategy:
  rollingUpdate:
    maxSurge: 1
    maxUnavailable: 1
  type: RollingUpdate
This strategy utilizes Rolling Updates. With rolling updates, Kubernetes will spin up a new Pod, and when it is ready, tear down an old Pod. The maxSurge refers to the total number of Pods that can be active at any given time. If maxSurge = 6 and replicas = 5, that means 1 new Pod (6 - 5) can be created at a time for the rolling update. maxUnavailable is the total number (or percentage) of Pods that can be unavailable at a time.
Here is what our Manifest looks like after integrating this:
apiVersion: apps/v1
kind: Deployment
metadata:
  name: nginx-deployment
  labels:
    app: nginx
spec:
  replicas: 5
  selector:
    matchLabels:
      app: nginx
  strategy:
    rollingUpdate:
      maxSurge: 1
      maxUnavailable: 1
    type: RollingUpdate
  template:
    metadata:
      labels:
        app: nginx
    spec:
      containers:
      - name: nginx
        image: nginx:1.7.9
        ports:
        - containerPort: 80
Now, let’s apply this configuration change: kubectl apply -f ./resources/nginx.yaml
Now that the application is deployed, lets update the Manifest to use a different image: nginx:alpine . Now apply the changes.
kubectl get pods --watch
We can see that the Pods are being updated one at a time. If we look at the Deployment events, we can see this as well:
kubectl describe deployment nginx-deployment

Type    Reason             Age   From                   Message
  ----    ------             ----  ----                   -------
  Normal  ScalingReplicaSet  1m    deployment-controller  Scaled up replica set nginx-deployment-555958bc44 to 1
  Normal  ScalingReplicaSet  1m    deployment-controller  Scaled down replica set nginx-deployment-67594d6bf6 to 3
  Normal  ScalingReplicaSet  1m    deployment-controller  Scaled up replica set nginx-deployment-555958bc44 to 2
  Normal  ScalingReplicaSet  1m    deployment-controller  Scaled down replica set nginx-deployment-67594d6bf6 to 2
  Normal  ScalingReplicaSet  1m    deployment-controller  Scaled up replica set nginx-deployment-555958bc44 to 3
  Normal  ScalingReplicaSet  1m    deployment-controller  Scaled down replica set nginx-deployment-67594d6bf6 to 1
  Normal  ScalingReplicaSet  1m    deployment-controller  Scaled up replica set nginx-deployment-555958bc44 to 4
  Normal  ScalingReplicaSet  1m    deployment-controller  Scaled down replica set nginx-deployment-67594d6bf6 to 0
We can see that the Deployment scaled up RS for the new Pods, and then scaled down the old RS. These actions were done one at a time, as specified by our RollingUpdate configuration.
We can now get our Deployment rollout history:
kubectl rollout history deployment/nginx-deployment
We can jump back a version:
kubectl rollout undo deployment.v1.apps/nginx-deployment
Or we can jump back to a specific version:
kubectl rollout undo deployment.v1.apps/nginx-deployment --to-revision=X , where X is the version you want to rollback to
05. Jobs, Init Containers and Cron Jobs
This scenario provides an overview of Jobs, Init Containers and CronJobs in Kubernetes.
Jobs resources create one or more pods and ensures that all of them successfully terminate.
There are two types of jobs:
- Non-parallel Job: A Job which creates only one Pod (which is re-created if the Pod terminates unsuccessfully), and which is completed when the Pod terminates successfully.
- Parallel jobs with a completion count: A Job that is completed when a certain number of Pods terminate successfully. You specify the desired number of completions using the completions field.
Cron Jobs create a job object, they are useful for creating periodic and recurring tasks, e.g running backups or sending emails.
Init Containers are regular containers within a pod that run before the app container and they also satisfy the following statements:
- They can run setup scripts not present in an app container - e.g prepopulate some data, waiting until a specific service is up and running and etc.
- A pod can have one or more init containers apart from app containers
- Init containers always run to completation
- Each one must complete successfully before the next one is started
- The application container won’t run if any of the configured init containers will not finish the execution successfully
Jobs
Job resources are used to facilitate the execution of a batch job. Through Job resources, Kubernetes also supports parallel jobs which will finish executing when a specific number of successful completions is reached.
Therefore with Job resources, we can run work items such as frames to be rendered, files to be transcoded, ranges of keys in a NoSQL database to scan, and so on.
Have a look at Jobs Api reference to see how to build a job resource in Kubernetes.
Pods created by jobs are not automatically deleted. Keeping the pods around allows you to view the logs of completed jobs in order to check for potential errors. If you want to remove them, you need to do that manually.
Create Countdown Job
Take a look at the file job.yaml .
apiVersion: batch/v1
kind: Job
metadata:
  name: countdown
spec:
  template:
    spec:
      containers:
      - name: countdown
        image: bash
        command: ["/bin/sh",  "-c"]
        args:
          - for i in 9 8 7 6 5 4 3 2 1 ; do echo $i ; done &&
            echo Perfect!
      restartPolicy: OnFailure
This example creates a job which runs a bash command to count down from 10 to 1.
Notice that the field spec.restartPolicy allow only two values: “OnFailure” or “Never”. For further information read here
Note: There are situations where you want to fail a job after a number of retries. To do so, use
spec.backoffLimitwhich, by defauly, is set 6. You can usespec.activeDeadlineSecondsto limit the execution time in case you want to manage the duration of a specific job. If the execution reaches this deadline, the Job and all of its Pods are terminated.
Create the countdown job:
kubectl apply -f /manifests/job.yaml
Job status
Check the status of the job:
kubectl get jobs
Job Logs
In order to see the job’s logs we need to get the name of the Job in question:
kubectl get pods -o 'jsonpath={.items[0].metadata.name}'; echo
And then execute the following command to get the logs:
kubectl logs `kubectl get pods -o 'jsonpath={.items[0].metadata.name}'`
You will get a result like:
9 8 7 6 5 4 3 2 1 Perfect!
Delete Job
kubectl delete -f /manifests/job.yaml
or
kubectl delete job countdown
Parallel Jobs
To create a parallel job we can use spec.parallelism to set how many pods we want to run in parallel and spec.completions to set how many job completitions we would like to achieve.
Create Countdown Parallel Job
Inspect the file jobs-parallels.yaml .
apiVersion: batch/v1
kind: Job
metadata:
  name: countdown
spec:
  completions: 8
  parallelism: 2
  template:
    spec:
      containers:
      - name: countdown
        image: bash
        command: ["/bin/sh",  "-c"]
        args:
          - for i in 9 8 7 6 5 4 3 2 1 ; do echo $i ; done &&
            echo Perfect!
      restartPolicy: OnFailure
This is the same countdown job we used in the previous scenario but we have added spec.parallelism and spec.completions parameters.
The job will run 2 pods in parallel until it reaches 8 completions successfully.
Create countdown parallel job:
kubectl apply -f /manifests/jobs-parallels.yaml
Job status
Wait for a few seconds to get the 8 completions and then check the status of the job:
kubectl get jobs
You should see a similar result to the following, but if not, wait for a few more seconds and check again:
NAME DESIRED SUCCESSFUL AGE
countdown 8 8 16s
This job was executed successfully 8 time by running 2 jobs in parallel.
Job Logs
In order to see the job’s logs, we need to get the job name:
kubectl get pods -o 'jsonpath={.items[0].metadata.name}'; echo
And then execute the following command to get the logs:
kubectl logs `kubectl get pods -o 'jsonpath={.items[0].metadata.name}'`
You will get a result like:
9 8 7 6 5 4 3 2 1 Perfect!
Delete Job
kubectl delete -f /manifests/jobs-parallels.yaml
or
kubectl delete job countdown
Cron Jobs
Written in a Cron format, a Cron Job resource runs a job periodically on a given schedule. These are useful for creating periodic and recurring tasks, e.g running backups or sending emails.
Create Hello Cron Job
Take a look at the file cronjob.yaml . This example create a job every minute which prints the current time and a hello message.
apiVersion: batch/v1
kind: CronJob
metadata:
  name: hello
spec:
  schedule: "*/1 * * * *"
  jobTemplate:
    spec:
      template:
        spec:
          containers:
          - name: hello
            image: busybox
            args:
            - /bin/sh
            - -c
            - date; echo Hello from the Kubernetes cluster
          restartPolicy: OnFailure
kubectl apply -f /manifests/cronjob.yaml
Cron Job status
Check the status of the cronjob:
kubectl get cronjob hello
Immediatly after creating a cron job, the LAST-SCHEDULE column will have no value ( ). This indicates that the CronJob hasn’t run yet.
master $ kubectl get cronjob hello
NAME SCHEDULE SUSPEND ACTIVE LAST SCHEDULE AGE
hello */1 * * * * False 0 <none> 8s
Once the LAST-SCHEDULE column gets a value, it indicates that the CronJobs is now scheduled to run:
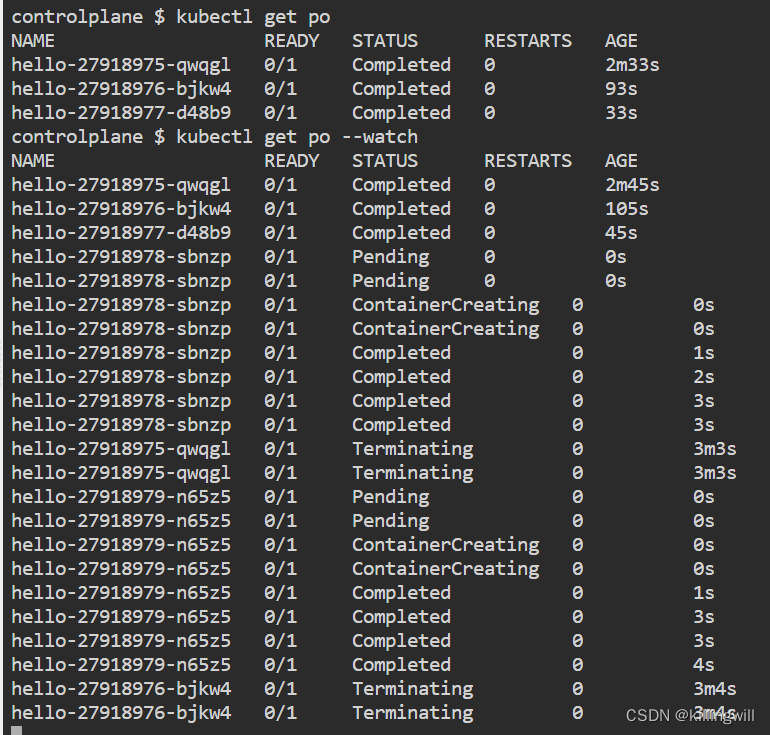
kubectl get cronjob --watch
Check the cron job again, you should see that the cronjob has been scheduled at the time specified in LAST-SCHEDULE :
kubectl get cronjob hello
Cron Job Logs
In order to see the job’s logs, we need to know the pod’s name:
kubectl get pod -o 'jsonpath={.items[0].metadata.name}'; echo
And then:
# kubectl logs <pod-name>
kubectl logs `kubectl get pod -o 'jsonpath={.items[0].metadata.name}'`

# kubectl logs cronjob/<cronjob-name>:
kubectl log cronjob/`kubectl get cronjonb -o 'jsonpath={.items[0].metadata.name}'`
Delete Cron Job
kubectl delete cronjob hello
Init Container
An Init Container is a container which is executed before the application container is started. Init-containers are usually used for deploying utilities or execute scripts which are not loaded and executed in the application container image.
Create a Pod with an init container
Take a look at the file init-container.yaml .
apiVersion: v1
kind: Pod
metadata:
  name: happypanda
spec:
  containers:
  - name: busybox
    image: busybox:latest
    command: ["/bin/sh", "-c"]
    args: ["cat /opt/workdir/helloworld && sleep 3600"]
    volumeMounts:
    - name: workdir
      mountPath: /opt/workdir
  initContainers:
  - name: init-container
    image: busybox
    command:
            - sh
            - -c
            - 'echo "The app is running" > /opt/workdir/helloworld'
    volumeMounts:
    - mountPath: /opt/workdir
      name: workdir
  volumes:
  - name: workdir
    emptyDir: {}
This example runs an init-container which creates a helloworld file in a volume. The application pod will be scheduled if the helloworld file exist at a specific path and the pod can access it.
Create the init container:
kubectl apply -f /manifests/init-container.yaml
It could take some time until the Init container finishes the execution successfully and the application container is scheduled to run.
Pod status
The Init container will take some time until it creates the file so you might have to check the status of the pod a couple of times:
kubectl get pods
If the pod is running, it means that the file was created succesfully and the pod can read it. We are going to manually check that the file is at the specified path and it has the correct content:
kubectl exec -ti happypanda -- cat /opt/workdir/helloworld
You should see a result like:
The app is running
Delete Pod
kubectl delete -f /manifests/init-container.yaml
or
kubectl delete pod happypanda
06. Manage DaemonSets
Overview
A DaemonSet ensures that all (or some) Nodes run a copy of a Pod. As nodes are added to the cluster, Pods are added to them. As nodes are removed from the cluster, those Pods are evicted. Deleting a DaemonSet will clean up the Pods it created.
Some typical uses of a DaemonSet are:
- running a cluster storage daemon, such as glusterd and ceph , on each node.
- running a logs collection daemon on every node, such as fluentd or logstash .
- running a node monitoring daemon on every node, such as Prometheus Node Exporter (node_exporter ), collectd , Datadog agent, New Relic agent, or Ganglia gmond .
In a simple case, one DaemonSet, covering all nodes, would be used for each type of daemon. A more complex setup might use multiple DaemonSets for a single type of daemon, but with different flags and/or different memory and cpu constraints for different hardware types.
Create a DaemonSet
In this scenario, we’re going to create an nginx DaemonSet. Initially, we’ll run this on our worker nodes (node01), but then we will manipulate the DaemonSet to get it to run on the master node too.
nginx DaemonSet
In your terminal, you’ll see a file named nginx-daemonset.yaml . This is the DaemonSet which we will be using to run nginx across both of our nodes.
First, let’s create all the prerequisites needed for this DaemonSet to run:
kubectl create -f nginx-ds-prereqs.yaml
---
kind: Namespace
apiVersion: v1
metadata:
  name: development
  labels:
    name: development

---
apiVersion: v1
kind: ServiceAccount
metadata:
  name: nginx-svc-acct
  namespace: development
  labels:
    name: nginx-svc-acct
Now we’ve created the namespace (and other prerequisites), let’s inspect the manifest for the nginx DaemonSet:
cat nginx-daemonset.yaml; echo
apiVersion: apps/v1
kind: DaemonSet
metadata:
  name: nginx
  namespace: development
  labels:
    app: nginx
    name: nginx
spec:
  selector:
    matchLabels:
      app: nginx
      name: nginx
  template:
    metadata:
      labels:
        app: nginx
        name: nginx
    spec:
      serviceAccountName: nginx-svc-acct
      containers:
      - image: katacoda/docker-http-server:latest
        name: nginx
        ports:
        - name: http
          containerPort: 80
As you can see, we’re running a basic DaemonSet - in the development namespace - which exposes port 80 inside the container.
Create it:
kubectl create -f nginx-daemonset.yaml
Now check the status of the DaemonSet:
kubectl get daemonsets -n development
Accessing nginx
Now that we’ve created our nginx DaemonSet, let’s see what host it’s running on:
kubectl get po -n development -l app=nginx -o 'jsonpath={.items[0].spec.nodeName}'; echo
Notice that it’s running on node01 and not master . By default, Kubernetes won’t schedule any workload to master nodes unless they’re tainted. Essentially, what this means is that workload has to be specifically set to be ran on master nodes.
It’s not best practice to run ‘normal’ workload on master nodes, as it’s where etcd and other crucial Kubernetes components reside. However, it’s acceptable to run workload such as log collection and node monitoring daemons on master nodes as you want to understand what’s happening on those nodes.
Testing the Webserver
We want to get the IP address for the pod so we can test that it’s working, now that we know which node it’s running on:
kubectl get po -n development -l app=nginx -o 'jsonpath={.items[0].status.podIP}'; echo
Curl it:
curl `kubectl get po -n development -l app=nginx -o 'jsonpath={.items[0].status.podIP}'`
You should see a result like:
This request was processed by host: nginx-8n2qj
Updating a DaemonSet (Rolling Update)
As mentioned in the previous chapter, workload isn’t scheduled to master nodes unless specificaly tainted. In this scenario, we want to run the nginx DaemonSet across both master and node01 .
We need to update the DaemonSet, so we’re going to use the nginx-daemonset-tolerations.yaml file to replace the manifest.
First, let’s see what we added to the -tolerations.yaml file:
cat nginx-daemonset-tolerations.yaml; echo
apiVersion: apps/v1
kind: DaemonSet
metadata:
  name: nginx
  namespace: development
  labels:
    app: nginx
    name: nginx
spec:
  selector:
    matchLabels:
      app: nginx
  template:
    metadata:
      labels:
        app: nginx
        name: nginx
    spec:
      serviceAccountName: nginx-svc-acct
      containers:
      - image: katacoda/docker-http-server:latest
        name: nginx
        ports:
        - name: http
          containerPort: 80
      tolerations:
      - key: node-role.kubernetes.io/master
        effect: NoSchedule
As you can see, we’ve added the following to the spec section:
tolerations:
- key: node-role.kubernetes.io/master
  effect: NoSchedule
This is what manifests need to be tainted with in order to be ran on master nodes. Proceed to update the DaemonSet:
kubectl replace -f nginx-daemonset-tolerations.yaml
Now check to see if an additional pod has been created. Remember - a DaemonSet schedules a pod to every node, so there should be two pods created:
kubectl get po -n development -l app=nginx -o wide
If there’s two pods - great. That means that the tolerations have worked and we are now running across two nodes.
Accessing the pod on the master node
Find the pod IP address for the newly created pod on the master node:
kubectl get po -n development -l app=nginx -o 'jsonpath={.items[1].status.podIP}'; echo
Notice that it’s different to the IP address that we curl’ed before.
Now curl the new pod’s IP address:
curl `kubectl get po -n development -l app=nginx -o 'jsonpath={.items[1].status.podIP}'`
You should see a similar result to the one in the previous chapter:
This request was processed by host: nginx-njq9h
Deleting a DaemonSet
Clean up our workspace:
kubectl delete daemonset nginx -n development
Alternatively, we could use the short hand, which achieves the same result:
kubectl delete ds nginx -n development
Success - you’ve deleted the DaemonSet. Check for pods:
kubectl get pods -n development
Great! You’re all done.
07. Manage Services
A Service is an abstraction in kubernetes that allows you to connect to pods, it provides two main functionalities service-discovery and load-balancing.
Some typical uses of a Service are:
- provide an endpoint to connect to an application, such as an nginx webserver
- create a load-balancer that will distribute traffic to pods
- create an external endpoint to a service outside of the cluster for example an RDS database
There are multiple types of services:
NodePortthat exposes a port on all the nodesLoadBalancerthat create a loadbalancer depending on your environmentClusterIPwhich creates a dedicated IP which can usually be only access inside of the cluster
Launch Deployment
First things first, lets create a deployment that we will use to learn the various service types.
To do so run:
kubectl create -f nginx-deployment.yml
# nginx-deployment.yml
apiVersion: apps/v1
kind: Deployment
metadata:
  name: nginx
  labels:
    app: nginx
    name: nginx
spec:
  selector:
    matchLabels:
      app: nginx
      name: nginx
  template:
    metadata:
      labels:
        app: nginx
        name: nginx
    spec:
      containers:
      - image: katacoda/docker-http-server:latest
        name: nginx
        ports:
        - name: http
          containerPort: 80
and make sure all is healthy:
kubectl get deploy
ClusterIP Service
Now that we have a working deployment, lets expose it to the cluster so that other deployments can access it too.
kubectl create -f clusterip-service.yml
# clusterip-service.yml
kind: Service
apiVersion: v1
metadata:
  name: clusterip-nginx-service
spec:
  selector:
    app: nginx
  ports:
  - protocol: TCP
    port: 80
    targetPort: 80
We can check if it was created with:
kubectl get svc -o wide
or if we want more information:
kubectl describe svc clusterip-nginx-service
NodePort Service
What if we wanted to expose our service outside of the cluster? This is where NodePort comes in. NodePort is one the most often utilized service types in kubernetes.
Lets create one:
kubectl create -f nodeport-service.yml
# nodeport-service.yml
kind: Service
apiVersion: v1
metadata:
  name: nodeport-nginx-service
spec:
  selector:
    app: nginx
  ports:
  - protocol: TCP
    port: 80
    targetPort: 80
  type: NodePort
We can check if it was created with:
kubectl get svc -o wide
or if we want more information:
kubectl describe svc nodeport-nginx-service
We can now access our service with:
curl http://<NODEPORT-IP>
LoadBalancer Service
What if we wanted a single point of entry for our service from the oustide? For that we need a LoadBalancer type of service. If you are running on any of the major cloud providers it will be freely available for you, but if you are on-prem or in this case katacoda, then you need to make this functionality available.
Lets make katacoda LoadBalancer friendly:
kubectl create -f cloudprovider.yml
# cloudprovider.yml
apiVersion: apps/v1
kind: DaemonSet
metadata:
  name: kube-keepalived-vip
  namespace: kube-system
spec:
  selector:
    matchLabels:
      name: kube-keepalived-vip
  template:
    metadata:
      labels:
        name: kube-keepalived-vip
    spec:
      hostNetwork: true
      containers:
        - image: gcr.io/google_containers/kube-keepalived-vip:0.9
          name: kube-keepalived-vip
          imagePullPolicy: Always
          securityContext:
            privileged: true
          volumeMounts:
            - mountPath: /lib/modules
              name: modules
              readOnly: true
            - mountPath: /dev
              name: dev
          # use downward API
          env:
            - name: POD_NAME
              valueFrom:
                fieldRef:
                  fieldPath: metadata.name
            - name: POD_NAMESPACE
              valueFrom:
                fieldRef:
                  fieldPath: metadata.namespace
          # to use unicast
          args:
          - --services-configmap=kube-system/vip-configmap
          # unicast uses the ip of the nodes instead of multicast
          # this is useful if running in cloud providers (like AWS)
          #- --use-unicast=true
      volumes:
        - name: modules
          hostPath:
            path: /lib/modules
        - name: dev
          hostPath:
            path: /dev
      nodeSelector:
        # type: worker # adjust this to match your worker nodes
---
## We also create an empty ConfigMap to hold our config
apiVersion: v1
kind: ConfigMap
metadata:
  name: vip-configmap
  namespace: kube-system
data:
---
apiVersion: apps/v1
kind: Deployment
metadata:
  labels:
    app: keepalived-cloud-provider
  name: keepalived-cloud-provider
  namespace: kube-system
spec:
  replicas: 1
  revisionHistoryLimit: 2
  selector:
    matchLabels:
      app: keepalived-cloud-provider
  strategy:
    type: RollingUpdate
  template:
    metadata:
      annotations:
        scheduler.alpha.kubernetes.io/critical-pod: ""
        scheduler.alpha.kubernetes.io/tolerations: '[{"key":"CriticalAddonsOnly", "op
      labels:
        app: keepalived-cloud-provider
    spec:
      containers:
      - name: keepalived-cloud-provider
        image: quay.io/munnerz/keepalived-cloud-provider:0.0.1
        imagePullPolicy: IfNotPresent
        env:
        - name: KEEPALIVED_NAMESPACE
          value: kube-system
        - name: KEEPALIVED_CONFIG_MAP
          value: vip-configmap
        - name: KEEPALIVED_SERVICE_CIDR
          value: 10.10.0.0/26 # pick a CIDR that is explicitly reserved for keepalive
        volumeMounts:
        - name: certs
          mountPath: /etc/ssl/certs
        resources:
          requests:
            cpu: 200m
        livenessProbe:
          httpGet:
            path: /healthz
            port: 10252
            host: 127.0.0.1
          initialDelaySeconds: 15
          timeoutSeconds: 15
          failureThreshold: 8
      volumes:
      - name: certs
        hostPath:
          path: /etc/ssl/certs
Once we have that we can create our service:
kubectl create -f loadbalancer-service.yml
# loadbalancer-service.yml
kind: Service
apiVersion: v1
metadata:
  name: lb-nginx-service
spec:
  selector:
    app: nginx
  ports:
  - protocol: TCP
    port: 80
    targetPort: 80
  type: LoadBalancer
We can check if it was created with:
kubectl get svc -o wide
or if we want more information:
kubectl describe svc lb-nginx-service
We can now access our service with:
curl http://<EXTERNAL-IP>
Exercise
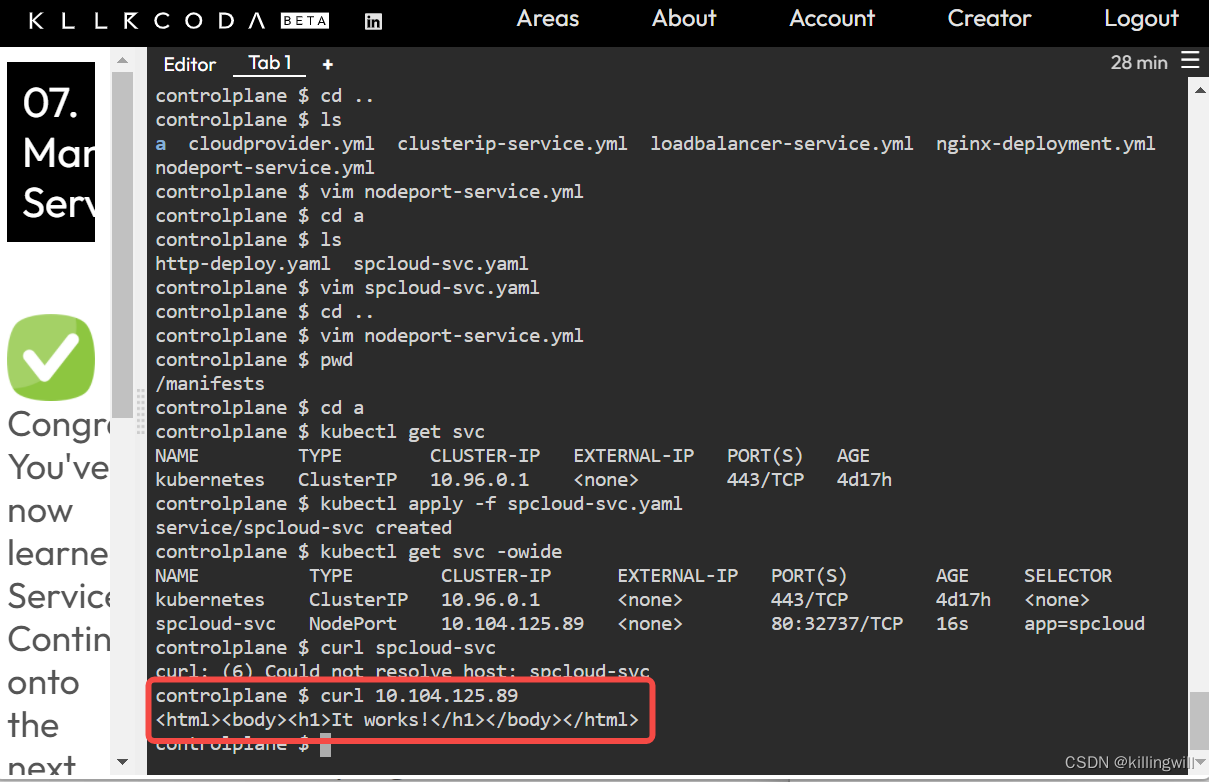
Create a deployment in the default namespace with the httpd image, name the deployment as spcloud and expose it as a NodePort service named spcloud-svc .
When you runcurl node01:<NODE_PORT>, you should receive a responseIt works!
mkdir a
cd a
使用-oyaml以及--dry-run=client快速创建deploy的yaml文件:
kubectl create deploy spcloud --image=httpd -o yaml --dry-run=client > httpd-deploy.yaml
vim httpd-deploy.yaml
修改http-deploy.yaml文件,增加如下容器开放的80端口:
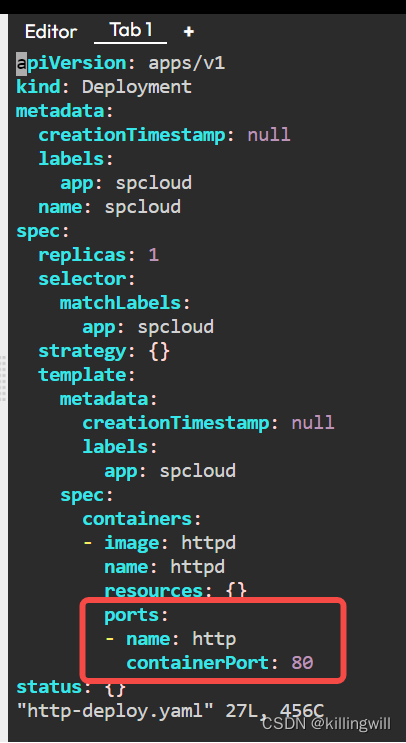
#根据已有deploy快速创建service,并将其生成为yaml文件形式:
kubectl apply -f httpd-deploy.yaml
kubectl get deploy
kubectl expose deploy <deployname> --port=80 --target-port=80 --name=<svc-name> --type=NodePort -o yaml --dry-run=client > spcloud-svc.yaml

检查service配置文件spcloud-svc.yaml符合题意要求后:
kubectl apply -f spcloud-svc.yaml
获取svc的ip
kubectl get svc -owide
curl <ip>

08. Manage Ingress
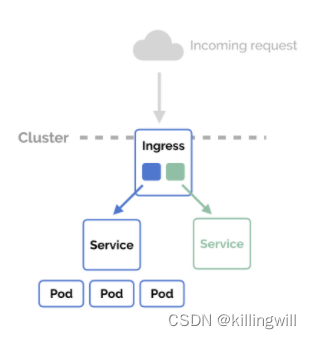
Traditionally, you would create a LoadBalancer service for each public system you want to expose. This can get rather expensive, very quickly. Ingress gives you a way to route requests to services based on the request host or path, centralizing a number of services into a single entrypoint (or in this case, load balancer).
Ingress Resources
Ingress is split up into two main pieces. The first is an Ingress resource, which defines how you want requests routed to the backing services.
For example, a definition that defines an Ingress to handle requests for www.mysite.com and forums.mysite.com and routes them to the Kubernetes services named website and forums respectively would look like:
apiVersion: extensions/v1beta1
kind: Ingress
metadata:
  name: my-ingress
spec:
  rules:
  - host: www.mysite.com
    http:
      paths:
      - backend:
          serviceName: website
          servicePort: 80
  - host: forums.mysite.com
    http:
      paths:
      - path:
        backend:
          serviceName: forums
          servicePort: 80
Ingress Controllers
Here is where things seem to get confusing, though. Ingress on its own doesn’t really do anything. You need something to listen to the Kubernetes API for Ingress resources and then handle requests that match them. This is where the second piece to the puzzle comes in — the Ingress Controller.
Ingress Controllers can technically be any system capable of reverse proxying, but the most common is Nginx. A full example Nginx Ingress Controller (and LoadBalancer service) is as follows. Please note that if you are not on a provider that supports LoadBalancer services (ie. bare-metal), you can create a NodePort Service instead and point to your nodes with an alternative solution that fills that role — a reverse proxy capable of routing requests to the exposed NodePort for the Ingress Controller on each of your nodes.
Creating the Controller
First, inspect the file:
cat ing-controller.yaml; echo
# ing-controller.yaml
kind: Service
apiVersion: v1
metadata:
  name: ingress-nginx
spec:
  type: LoadBalancer
  selector:
    app: ingress-nginx
  ports:
  - name: http
    port: 80
    targetPort: http
  - name: https
    port: 443
    targetPort: https

---

kind: Deployment
apiVersion: apps/v1
metadata:
  name: ingress-nginx
spec:
  selector:
    matchLabels:
      app: ingress-nginx
    spec:
      terminationGracePeriodSeconds: 60
      containers:
      - image: gcr.io/google_containers/nginx-ingress-controller:0.8.3
        name: ingress-nginx
        imagePullPolicy: Always
        ports:
          - name: http
            containerPort: 80
            protocol: TCP
          - name: https
            containerPort: 443
            protocol: TCP
        livenessProbe:
          httpGet:
            path: /healthz
            port: 10254
            scheme: HTTP
          initialDelaySeconds: 30
          timeoutSeconds: 5
        env:
          - name: POD_NAME
            valueFrom:
              fieldRef:
                fieldPath: metadata.name
          - name: POD_NAMESPACE
            valueFrom:
              fieldRef:
                fieldPath: metadata.namespace
        args:
        - /nginx-ingress-controller
        - --default-backend-service=$(POD_NAMESPACE)/nginx-default-backend
Now create it:
kubectl create -f ing-controller.yaml
This is essentially an Nginx image that monitors Ingress resources for requested routes to serve. One callout you may have noticed is that it specifies a --default-backend-service as a startup argument, passing in nginx-default-backend. This is wanting a service that can simply handle returning a 404 response for requests that the Ingress Controller is unable to match to an Ingress rule. Let’s create that as well with the specified name:
kubectl create -f ing-backend.yaml
# ing-backend.yaml
kind: Service
apiVersion: v1
metadata:
  name: nginx-default-backend
spec:
  ports:
  - port: 80
    targetPort: http
  selector:
    app: nginx-default-backend

---
kind: Deployment
apiVersion: apps/v1
metadata:
  name: nginx-default-backend
spec:
  selector:
    matchLabels:
      app: nginx-default-backend
  replicas: 1
  template:
    metadata:
      labels:
        app: nginx-default-backend
    spec:
  selector:
    matchLabels:
      app: nginx-default-backend
  replicas: 1
  template:
    metadata:
      labels:
        app: nginx-default-backend
    spec:
      terminationGracePeriodSeconds: 60
      containers:
      - name: default-http-backend
        image: gcr.io/google_containers/defaultbackend:1.0
        livenessProbe:
          httpGet:
            path: /healthz
            port: 8080
            scheme: HTTP
          initialDelaySeconds: 30
          timeoutSeconds: 5
        resources:
          limits:
            cpu: 10m
            memory: 20Mi
          requests:
            cpu: 10m
            memory: 20Mi
        ports:
        - name: http
          containerPort: 8080
          protocol: TCP
I said Ingress is made up of two main components and we introduced three new things. This is because the default backend isn’t really a piece of Ingress itself, but rather is something that the Nginx Ingress Controller requires. Other Ingress Controllers won’t necessarily have this component.
Wiring it Up
Assuming you’ve created the Ingress Controller above with the dependent default backend, your Ingress resources should be handled by the LoadBalancer created with the Ingress Controller service. Of course, you would need services named website and forums to route to in the above example.
As a quick test, you can deploy the following instead.
kubectl create -f demo-ing.yaml
# demo-ing.yaml
apiVersion: networking.k8s.io/v1
kind: Ingress
metadata:
  name: demo-ingress
spec:
  rules:
  - http:
      paths:
      - path: /
        pathType: Prefix
        backend:
          service:
            name: nginx
            port:
              number: 80
---

apiVersion: v1
kind: Service
metadata:
  name: nginx
spec:
  ports:
  - port: 80
    targetPort: 80
  selector:
    app: nginx

---

apiVersion: apps/v1
kind: Deployment
metadata:
  name: nginx
spec:
  selector:
    matchLabels:
      app: nginx
  replicas: 1
  template:
    metadata:
      labels:
        app: nginx
    spec:
      containers:
      - name: echoserver
        image: nginx
        ports:
        - containerPort: 80
To test things out, you need to get your Ingress Controller entrypoint.
For LoadBalancer services that will be:
kubectl get service ingress-nginx -o wide
For NodePort services, you can find the exposed port with:
kubectl describe service ingress-nginx
09. Persistent Volumes
We’ll learn the basics of how to manage persistent storage, and how to supply this storage to running Pods.
In general, our microservices are stateless, so they won’t need any persistent storage. However, microservices are almost never truly stateless, and this can be important. In addition, you might be running a Database in your Kubernetes cluster, and want to provide it Kubernetes-managed persistent storage.
For more information, see the Kubernetes documentation.
Local Volumes
To start off, let’s create a local emptyDir volume for a Pod. An emptyDir volume has the same lifecycle as the Pod. If the container(s) in the Pod restart or ccrash, the volume will live on and persist data. However, if the Pod is removed, then the volume will be removed as well.
First, let’s look at a simple Pod Manifest:
apiVersion: v1
kind: Pod
metadata:
  name: nginx
spec:
  containers:
  - name: nginx
    image: nginx
    volumeMounts:
    - name: nginx-data
      mountPath: /data/nginx
  volumes:
  - name: nginx-data
    emptyDir: {}
In this Manifest file, we create a Pod and provide a container specification to run nginx. In this scenario, we are creating a local volume for nginx. It will be mounted inside of the nginx container at /data/nginx .
On the host system, Kubernetes will provide an empty directory for storage.
Next, let’s launch this Pod, and store some data:
kubectl create -f ./resources/nginx-local.yaml
# nginx-local.ymal
apiVersion: v1
kind: Pod
metadata:
  name: nginx
spec:
  containers:
  - name: nginx
    image: nginx
    volumeMounts:
    - name: nginx-data
      mountPath: /data/nginx
  volumes:
  - name: nginx-data
    emptyDir: {}
We can see that the Pod was started:
kubectl get pods --watch
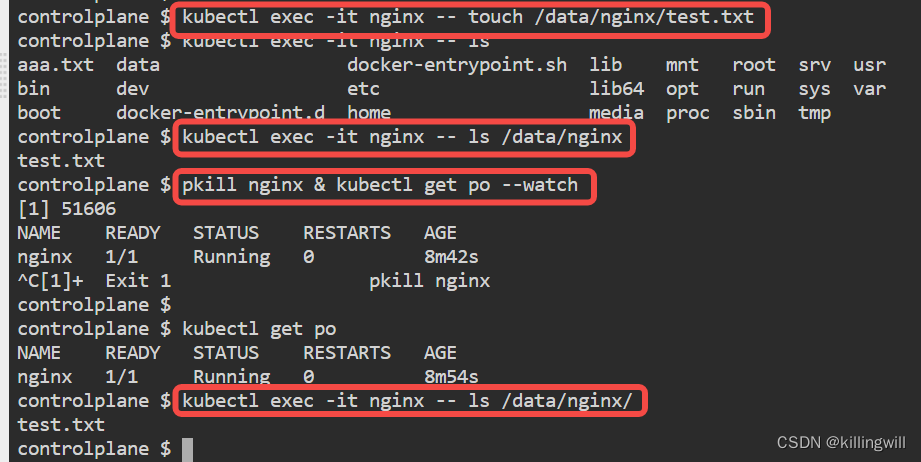
Once it has successfully started, let’s go into the nginx container and drop a file.
kubectl exec -it nginx -- touch /data/nginx/test.txt
Now, let’s force the nginx container in the Pod to restart. At this point, the Kubelet will destroy that container, and start a new one.
pkill nginx & kubectl get pods --watch
Now, we can open up another bash session into the container, and we’ll find that our file is still there:
kubectl exec nginx -- ls /data/nginx/
Creating a PersistentVolume
PersistentVolumes abstract the low-level details of a storage device, and provide a high-level API to provide such storage to Pods.
PersistentVolumes are storage inside of your cluster that has been provisioned by your administrator. Their lifecycle is external to your Pods or other objects.
There are many different types of PersistentVolumes that can be used with Kubernetes. As an example, you can use a local filesystem, NFS, and there are plugins for cloud vendor storage solutions like EBS.
We specify PersistentVolumes via a Manifest file:
apiVersion: v1
kind: PersistentVolume
metadata:
  name: local-pv
spec:
  capacity:
    storage: 3Gi
  volumeMode: Filesystem
  accessModes:
  - ReadWriteOnce
  persistentVolumeReclaimPolicy: Delete
  storageClassName: local-storage
  hostPath:
    path: "/mnt/data"
This describes a single PersistentVolume. It is mounted to /mnt/data on a node. It is of type Filesystem, with 3 GB of storage. (hostPath are only appropriate for testing in single node environments)
We can create this PersistentVolume:
kubectl create -f ./resources/pv-local.yaml
# pv-local.yaml
apiVersion: v1
kind: PersistentVolume
metadata:
  name: local-pv
spec:
  capacity:
    storage: 3Gi
  volumeMode: Filesystem
  accessModes:
  - ReadWriteOnce
  persistentVolumeReclaimPolicy: Delete
  storageClassName: local-storage
  hostPath:
    path: "/mnt/data"
We can then view it with:
kubectl get pv
We can get even more information with:
kubectl describe pv local-pv
If we want to swap out the PersistentVolume type, we can configure it for NFS or EBS storage by making a few tweaks to the file. For more information, please see the PersistentVolume documentation.
Creating a PersistentVolumeClaim
Now that we have a PersistentVolume, let’s make a PersistentVolumeClaim to provide storage to a Pod. PersistentVolumeClaims enable you to request a certain amount of storage from a PersistentVolume, and reserve it for your Pod.
The following is a PersistentVolumeClaim:
apiVersion: v1
kind: PersistentVolumeClaim
metadata:
  name: nginx-pvc
spec:
  # Notice the storage-class name matches the storage class in the PV we made in the previous step.
  storageClassName: local-storage
  accessModes:
    - ReadWriteOnce
  resources:
    requests:
      storage: 1Gi
This PersistentVolumeClaim is requesting 10 GB of storage from a local Filesystem PersistentVolume. When a Pod uses this Claim, Kubernetes will attempt to satisfy the claim by enumerating all PersistentVolumes, and matching the requirements in this Claim to what is present in the cluster.
If we were to match this Claim to PersistentVolume, it would succeed, because we have a PersistentVolume of type Filesystem with 100 GB of storage.
Let’s create the PersistentVolumeClaim:
kubectl create -f ./resources/pv-claim.yaml
# pv-claim.ymal
apiVersion: v1
kind: PersistentVolumeClaim
metadata:
  name: nginx-pvc
spec:
  # Notice the storage-class name matches the storage class in the PV we made in the
  storageClassName: local-storage
  accessModes:
    - ReadWriteOnce
  resources:
    requests:
      storage: 1Gi
and wait until the resource is available:
kubectl get pvc --watch
We can also use label selectors to aid in matching Claims with PersistentVolumes.
apiVersion: v1
kind: PersistentVolumeClaim
metadata:
  name: nginx-pvc
spec:
  accessModes:
    - ReadWriteOnce
  resources:
    requests:
      storage: 10Gi
  selector:
    matchLabels:
      env: dev
This Claim is identical to the previous one, but it will only be matched with PersistentVolumes that have the label env: dev . You can use this to have more control over which Claims bind to a particular PersistentVolume.
Adding Storage to Pods
Now that we have PersistentVolumes and a PersistentVolumeClaim, we can provide the Claim to a Pod, and Kubernetes will provision storage.
apiVersion: v1
kind: Pod
metadata:
  name: nginx
spec:
  containers:
  - name: nginx
    image: nginx
    volumeMounts:
    - name: nginx-data
      mountPath: /data/nginx
  volumes:
  - name: nginx-data
    persistentVolumeClaim:
      claimName: nginx-pvc
This is very similar to the first Pod that we initially created with local storage. Now, we have basically changed what provides the Storage with the addition of those bottom two lines. To deploy our pod, execute the following:
kubectl create -f ./resources/nginx-persistent.yaml
# nginx-persistent.yaml
apiVersion: v1
kind: Pod
metadata:
  name: nginx-persist
spec:
  containers:
  - name: nginx
    image: nginx
    volumeMounts:
    - name: nginx-data
      mountPath: /data/nginx
  volumes:
  - name: nginx-data
    persistentVolumeClaim:
      claimName: nginx-pvc
~
We can see that the Pod was created, and that the Claim was fulfilled:
kubectl get pods --watch
kubectl get pvc
Clean Up
Delete all Kubernetes resources
kubectl delete -f ./resources
practise
# pv-local.yaml
apiVersion: v1
kind: PersistentVolume
metadata:
  name: local-pv
spec:
  capacity:
    storage: 3Gi
  volumeMode: FileSystem
  accessModes:
  - ReadWriteOnce
  persistentVolumeReclaimPolicy: Delete
  storageClassName: local-storage
  hostPath:
    path: "/mnt/data"

---
# pv-claim.yaml
apiVersion: v1
kind: PersistentVolumeClaim
metadata:
  name: nginx-pvc
spec:
  # notice the pvc storageClassName matches the pv storageClassName
  storageClassName: local-storage
  accessMode:
  - ReadWriteOnce
  resources:
    requests:
      storage: 1Gi

---
# nginx-persistent.yaml
apiVersion: v1
kind: Pod
metadata:
  name: nginx-persitent
spec:
  containers:
  - name: nginx
    image: nginx
    volumeMounts:
    - name: nginx-data
      mountPath: /data/nginx
  volumes:
  - name: nginx-data
    persistentVolumeClaim:
      claimName: nginx-pvc

---
# nginx-local.yaml
apiVersion: v1
kind: Pod
metadata:
  name: nginx
spec:
  containers:
  - name: nginx
    image: nginx
    volumeMounts:
    - name: nginx-data
      mountPath: /data/nginx
  volumes:
  - name: nginx-data
    emptyDir: {}
kubectl exec -it <podname> -- <command you want execute>
pkill <podname> & kubectl get po --watch
# delete all k8s resources:
kubectl delete -f ./resources
10. ConfigMaps
ConfigMaps are a way to decouple configuration from application source code and Kubernetes Pods / Deployment files. If you are familiar with 12-Factor App principles, then this addresses factor 3: “Store config in the environment.”
ConfigMaps allow you to independently store data that your application needs in a Kubernetes object. ConfigMaps are decoupled from Pods and Deployments. In addition, ConfigMaps can be consumed by multiple Pods and Deployments, which can be extremely useful. As an example, if you have multiple microservies that need access to the same configuration parameter, all it takes is a single ConfigMap. This used to be accomplished with a Config-Server microservice, or supplying each microservice with the same environment variable, which made updates difficult.
We will go through the process of creating ConfigMaps from literal values, files, and directories. We’ll supply these values to Pods as environment variables, and finally create a simple Redis Deployment configured via ConfigMaps.
Create ConfigMaps from Literal Values
ConfigMaps are Kubernetes objects that store configuration external to source code. Creating a ConfigMap is easy:
kubectl create configmap <configmap-name> <data>
The <data> used to populate the ConfigMap can be from multiple different formats. For testing purposes, the easiest way to supply this is with literals.
Literals refers to data you enter in on the command line. Here’s the simplest way to create a ConfigMap:
kubectl create configmap my-config --from-literal=course="Kubernetes Fundamentals"
Now that we’ve created the ConfigMap, we can view it with:
kubectl get configmaps
The output should look like this:
NAME          DATA      AGE
my-config     1         20s
We can inspect the contents with:
kubectl describe configmap my-config
We can get an even better view with:
kubectl get configmap my-config -o yaml
You can also provide multiple values to a ConfigMap:
kubectl create configmap multi-config --from-literal=name.first=David --from-literal=name.last=Widen --from-literal=age=28 --from-literal=hometown="Glen Cove"
And get a better view with
kubectl get configmap multi-config -o yaml
Create ConfigMaps from Files
You can also create ConfigMaps from from a file. Your file should have a set of key=value upairs, one per line. Creating a ConfigMap from such files is easy:
kubectl create configmap <name> --from-file=<path-to-file>
To view a sample file to use with ConfigMaps, execute:
cat configs/game.properties
Execute the following to create a ConfigMap from that configuration file for a hypothetical video game’s configuration:
kubectl create configmap game-config --from-file=configs/game.properties
Now that we’ve created the ConfigMap, we can view it with:
kubectl get configmaps
The output should look like this:
NAME          DATA      AGE
game-config   4         20s
We can inspect the contents with:
kubectl describe configmap game-config
We can get an even better view with:
kubectl get configmap game-config -o yaml
You can also provide multiple values to a ConfigMap:
Creating ConfigMaps from a single file is very useful, because it lets you quickly convert multiple key=value pairs into data that Kubernetes objects can ingest. In addition, you can use env-files to provide more verbose source for developers.
# I'm an env-file
# Comments start with #
# Blank lines are ignored
# All other lines should be key=val
# Any quotes you include will become part of the value

name.first=David
name.last=Widen
age="28"
We can create ConfigMaps from env-files very similarly to how we did above, just swap --from-file with --from-env-file .
kubectl create configmap person-config --from-env-file=env/person.env
And, view the ConfigMap:
kubectl get configmap person-config -o yaml
Create ConfigMaps from Directories
You can also create a ConfigMap from a directory. This is very similar to creating them from files. It can be very useful, as it allows you to separate out configuration into multiple directories, and then you can create an individual ConfigMp for each directory, and then quickly swap out configuration.
First, let’s clear out our ConfigMaps:
kubectl delete configmap my-config

kubectl delete configmap multi-config

kubectl delete configmap game-config

kubectl delete configmap person-config
Now that we cleared out all of our old ConfigMaps, lets create a new one from a directory.
kubectl create configmap dir-config --from-file=configs
At this point, Kubernetes will create a ConfigMap and populate it with all of the configuration from all files in the directory.
We can see it pulled in both sets of configuration:
kubectl describe configmap dir-config
And here’s the content:
kubectl get configmap dir-config -o yaml
Using ConfigMaps in Deployments
Now that we can create ConfigMap objects, lets use them to configure a Pod.
First, create a config map from our environment file, person-config
kubectl create configmap person-config --from-env-file=env/person.env
There is a very simple Pod YAML file located at alpine.yaml . Here is the content:
apiVersion: v1
kind: Pod

metadata:
  name: alpine-test-pod
spec:
  containers:
    - name: alpine-test
      image: alpine
      command: ["/bin/sh", "-c", "env"]
      env:
        - name: FIRST_NAME
          valueFrom:
            configMapKeyRef:
              name: person-config
              key: name.first
  restartPolicy: Never
We can execute this pod, and see the environment variable we defined:
kubectl create -f ./resources/alpine.yaml
Notice the command we are running in the container prints env to stdout. We can look at the output by using kubectl logs.
kubectl logs alpine-test-pod
We can easily specify the values for multiple environment variables within a Pod by using one or more ConfigMaps. Now, if we want to update a configuration value for a Pod, we just need to update the ConfigMap, and then perform a rolling update of the Pods via a Deployment.
Creating Environment Variables from all values in a ConfigMap
We can also provide a Pod with environment variables for all key=value pairs inside a ConfigMap. This is very useful if you use a single file to provide an entire application’s configuration.
There is a very simple Pod YAML file located at ./resources/alpine-all-vars.yaml . Here is the content:
apiVersion: v1
kind: Pod

metadata:
  name: alpine-all-vars
spec:
  containers:
    - name: alpine-test
      image: alpine
      command: ["/bin/sh", "-c", "env"]
      envFrom:
        - configMapRef:
            name: person-config
  restartPolicy: Never
We can execute this pod, and see the environment variable we defined:
kubectl create -f ./resources/alpine-all-vars.yaml kubectl logs alpine-all-vars
Notice, redis-config and game-properties are environment variables that contain the entire file contents.
What’s more, we can even use environment variables inside of Pod commands if we define those environment variables via ConfigMaps.
For example, you can modify the previous file and change the command to:
command: ["/bin/sh", "-c", "echo $(name.first)"]
When you now run the Pod, it will output my first name. Make sure you complete this step before you move on.
We can also populate volumes with ConfigMap data.
apiVersion: v1
kind: Pod

metadata:
  name: alpine-volume
spec:
  containers:
    - name: alpine-test
      image:alpine
      command: ["/bin/sh", "-c", "echo /etc/config/"]
      volumeMounts:
      - name: configmap-volume
        mountPath: /etc/config
  volumes:
    - name: configmap-volume
      configMap:
        name: dir-config
  restartPolicy: never
You can run this pod, and it will show the contents of /etc/config inside the Pod.
kubectl create -f ./resources/alpine-volume.yaml kubectl logs alpine-volume
Configuring Redis with ConfigMaps
Now that we’ve explored ConfigMaps in detail, lets perform a real-wold deployment.
We will provide a Redis pod configuration via a ConfigMap. Given everything we know about Redis, this is pretty easy.
We have a Redis configuration file located at redis-config
First, we’ll create a ConfigMap from this file.
kubectl create configmap redis-config --from-file=./configs/redis-config
Let’s take a look at whats stored inside the ConfigMap:
kubectl get configmap redis-config -o yaml
Next, we’ll create a Pod that runs Redis, and provide the configuration via a ConfigMap.
Here is our YAML file:
apiVersion: v1
kind: Pod
metadata:
  name: redis
spec:
  containers:
  - name: redis
    image: redis
    command: ["redis-server"]
    args: ["/redis-master/redis.conf"]
    env:
      - name: MASTER
        value: "true"
    ports:
    - containerPort: 6379
    resources:
          limits:
            cpu: "0.5"
    volumeMounts:
    - mountPath: /redis-master-data
      name: data
    - mountPath: /redis-master
      name: config
  volumes:
  - name: data
    emptyDir: {}
  - name: config
    configMap:
      name: redis-config
      items:
        - key: redis-config
          path: redis.conf
Now, we can run this pod:
kubectl create -f ./resources/redis.yaml
Now that we’ve got the Pod running healthy, let’s exec into it, and see what’s there:
kubectl exec -t -i redis -- redis-cli
Now, we’re using the redis-cli inside of the Redis pod. Let’s get the data we configured in our Redis ConfigMap.
CONFIG GET maxmemory
CONFIG GET maxmemory-policy
Now, exit from the shell, and let’s clean up the environment:
kubectl delete configmap dir-config

kubectl delete configmap person-config

kubectl delete configmap redis-config
Let’s also get rid of our Pods:
kubectl delete pod alpine-volume

kubectl delete pod redis
practise
ConfigMaps: 配置外置原则的具体应用。
- configmaps are decoupled from pods and deployments.
- allows you store data independently.
- can be consumed by multiple pods and deployments.
NOTE: 当使用目录创建configmap时,不能使用复数形式,bug gongga。。
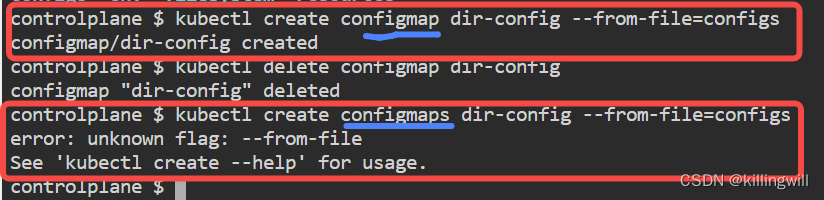
11. Secrets
Secrets are a way to deploy sensitive information to Kubernetes Pods. They are similar to ConfigMaps, but are designed for sensitive information you don’t want leaking out. They can optionally be encrypted at rest.
Secrets allow you to independently store sensitive data that your application needs in a Kubernetes object. Secrets are decoupled from Pods and Deployments. In addition, Secrets can be consumed by multiple Pods and Deployments, which can be extremely useful. As an example, if you have multiple microservies that need access to the same configuration parameter, all it takes is a single Secret. This used to be accomplished with a Config-Server microservice, or supplying each microservice with the same environment variable, which made updates difficult.
Kubernetes Secrets can store simple values like usernames and passwords. They can also store credentials to access a Docker registry, OAuth tokens, and SSH keys. In general, if there is some type of secret value you need to provide, regardless of the content, you can store it as a literal value and make sure your application can consume it without using a built-in construct.
We will go through the process of creating Secrets from literal values and files. We’ll supply these values to Pods as environment variables and directories.
Create Secrets from Files
Secrets enable us to provide sensitive information to running Pods. The easiest way to create them is via the command line.
We have 2 files in /resources that contain sensitive data:
cat ./resources/username

cat ./resources/password
These files are populated by running the following:
echo -n 'admin' > ./username

echo -n 'password' > ./password
Once you have these files, you can create a Kubernetes secret with the following:
kubectl create secret generic login-credentials --from-file=./resources/username --from-file=./resources/password
Now, we can view the secret with kubectl:
kubectl get secrets

NAME                  TYPE                                  DATA      AGE
login-credentials     Opaque                                2         51s
We can get even more information with:
kubectl describe secret login-credentials
Note that Kubernetes will not give us the values of the secrets, these are only provided to Pods at runtime in the form of directories and environment variables.
The actual data is stored in Etcd, by default in Base 64 encoded form. This data can be encoded at rest, but that is beyond the scope of this lab. For more information, please see the Kubernetes documentation.
Create Secrets from Kubernetes Manifest Files
You can also create a Kubernetes Secrets object by using a Manifest file. You can provide Secrets data in plaintext, or base64 encoded.
We’ll create a Kubernetes Manifest file using a base64 encoded secret. First, we’ll need to encode our secrets:
echo -n 'admin' | base64

echo -n 'password' | base64
Now that we have those 2 values, we can put them into a Kubernetes Manifest file:
apiVersion: v1
kind: Secret
metadata:
  name: secret-manifest
type: Opaque
data:
  username: YWRtaW4=
  password: cGFzc3dvcmQ=
This file is relatively simple, we set the kind to Secret, and provide the key=Base64(value) to the data map. It also provides a stringData map which can take un-base64 encoded data.
Now that we have our Manifest file, we can create a Secret using kubectl:
kubectl create -f ./resources/secret.yaml
# secret.yaml
apiVersion: v1
kind: Secret
metadata:
  name: secret-manifest
type: Opaque
data:
  username: YWRtaW4=
  password: cGFzc3dvcmQ=
We can now view the secret:
kubectl get secrets
And we can get more information from the Secret:
kubectl describe secret secret-manifest
Mount a Secret to a File in a Pod
Now that we have two sets of secrets, login-credentials and secret-manifest , we can deploy this data to Pods. This is done in a Manifest file. First, we’ll deploy secrets as volumes within a Pod.
apiVersion: v1
kind: Pod
metadata:
  name: redis-vol
spec:
  containers:
  - name: redis-container
    image: redis
    volumeMounts:
    - name: config
      mountPath: "/etc/secrets/config"
      readOnly: true
  volumes:
  - name: config
    secret:
      secretName: secret-manifest
    items:
    - key: username
      path: username
    - key: password
      path: password
We can see that the Pod specification creates a volume at /etc/secrets/config . We then define a volume that populates the content from the login-credentials secret.
We can include all secrets by default, or optionally (shown above) include specific values from the Secret object. In the above scenario, we are explicitly using the username and password secrets. and provided an additional path.
The two secrets will be stored inside the Redis container at /etc/secrets/config/username and /etc/secrets/config/password .
Those files will have the base64 decoded values of the secrets
You can also specify the read-write-execute mode of the secrets with the mode parameter on a per key basis, or for all keys with the defaultMode value.
kubectl create -f ./resources/pod-volume.yaml
# pod-volume.yaml
apiVersion: v1
kind: Pod
metadata:
  name: redis-vol
spec:
  containers:
  - name: redis-container
    image: redis
    volumeMounts:
    - name: config
      mountPath: "/etc/secrets/config"
      readOnly: true
  volumes:
  - name: config
    secret:
      secretName: secret-manifest
      items:
      - key: username
        path: username
      - key: password
        path: password
Now that we’ve created the pod, we can open up a bash shell:
kubectl exec -it redis-vol -- /bin/bash
Now, we can check out those secret files:
cat /etc/secrets/config/username

cat /etc/secrets/config/password
Store a Secret as an Environment Variable
We can also deploy Kubernetes Secrets to Pods as environment variables. This process is very similar to how we did it with volumes.
First, we’ll need a Pod Manifest file:
apiVersion: v1
kind: Pod
metadata:
  name: redis-env
spec:
  containers:
  - name: redis-container
    image: redis
    env:
      - name: USERNAME
        valueFrom:
          secretKeyRef:
            name: login-credentials
            key: username
      - name: SECRET_PASSWORD
        valueFrom:
          secretKeyRef:
            name: login-credentials
            key: password
This is almost identical to how we did this with ConfigMaps. Now, we can create the pod:
kubectl create -f ./resources/pod-env.yaml
apiVersion: v1
kind: Pod
metadata:
  name: redis-env
spec:
  containers:
  - name: redis-container
    image: redis
    env:
      - name: USERNAME
        valueFrom:
          secretKeyRef:
            name: login-credentials
            key: username
      - name: SECRET_PASSWORD
        valueFrom:
          secretKeyRef:
            name: login-credentials
            key: password
Now, we can go into the Redis container from our Pod and check the environment variables:
kubectl -ti exec redis-env sh env
We can see our environment variables as defined by the secrets we provided.
Conclusion
Secrets are powerful Kubernetes objects that let you deploy sensitive data to Pods. There are several other use-cases that can be solved with Kubernetes Secrets.
You can encrypt secrets at rest in Etcd, you can also deploy your secrets as hidden files. In addition, you can provide Docker Registry credentials to all pods deployed by a Service Account, deploy SSH keys to applications, etc.
Congratulations, you have completed the Secrets lab! Next up, we’ll tackle Kubernetes Persistent Volumes.
12. Debug Problems
Overview
In this exercise we will explore some common debugging techniques.
Exercise
This cluster has a broken manually launched deployment.
A. Fix the fix-me pod. You may check the image tags available in DockerHub.
B. There are two (2) manifest files in /manifests . Update these manifests and apply in the cluster.
cat nginx-deployment.yml;echocat clusterip-service.yml;echo
k get po -A
k get po fix-me
k logs fix-me
k edit po fix-me	# 去掉nginx不存在的tag3,使用默认的latest tag

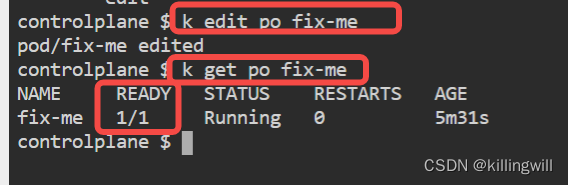
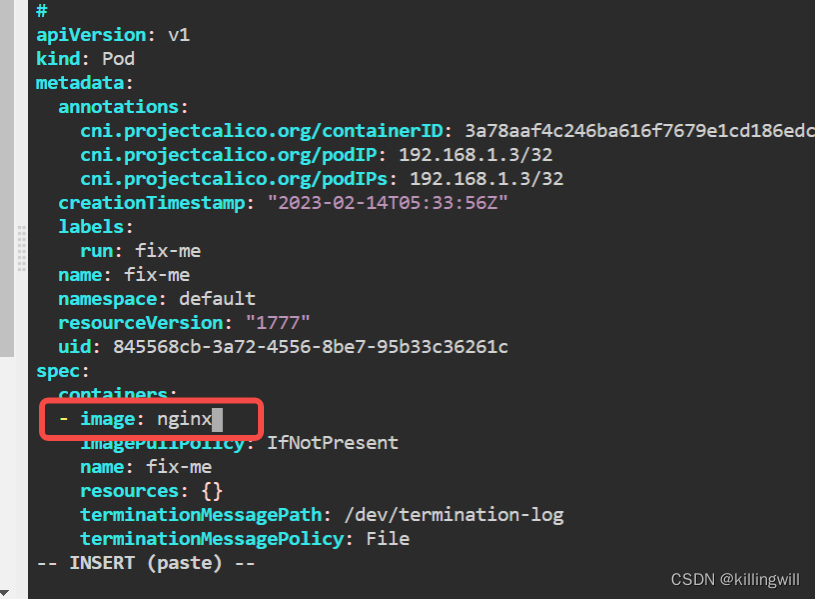
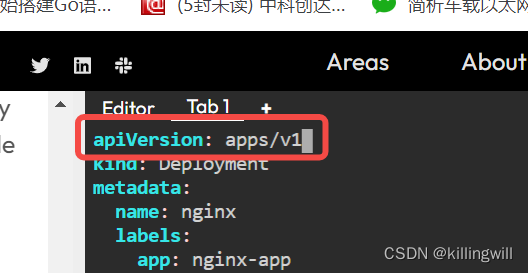
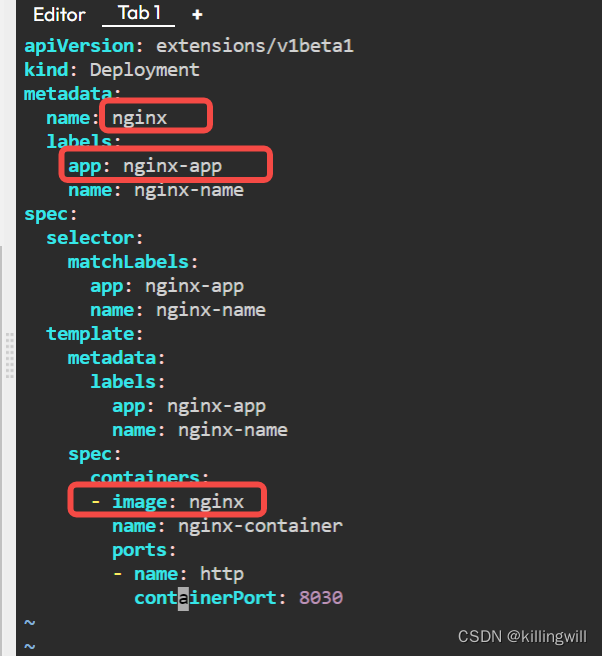
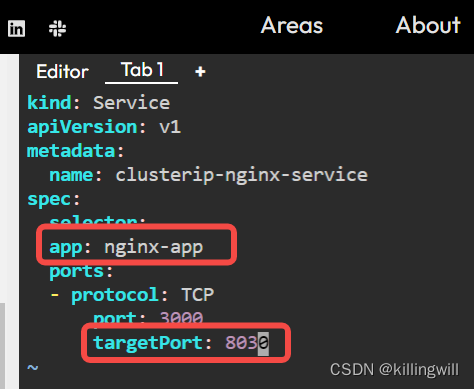
❌❌❌ wrong
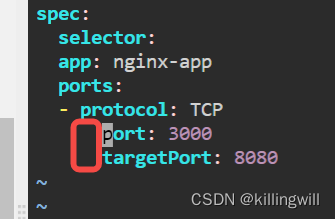
⭕️⭕️⭕️ right
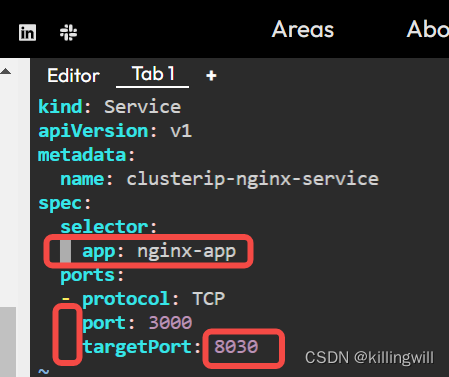
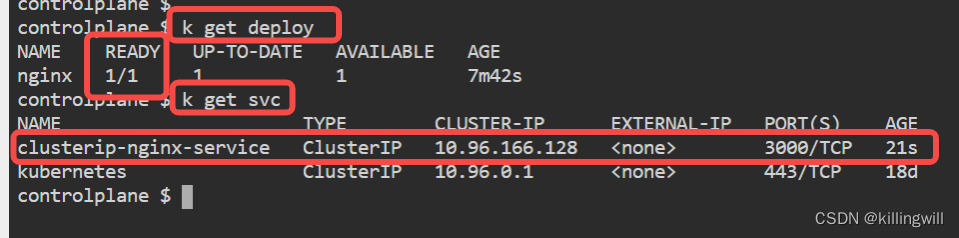
CKA environment based practise
Playground
This playground will always have the same version as currently in the Linux Foundation Exam.
kubelet version
kubelet version --short
Vim Setup
How to setup Vim for the K8s exams
Persist Vim settings in .vimrc
The following settings will already be configured in your real exam environment in ~/.vimrc. But it can never hurt to be able to type these down
We look at important Vim settings if you like to work with YAML during the K8s exams.
Settings
First create or open (if already exists) file .vimrc :
vim ~/.vimrc
Now enter (in insert-mode activated with i) the following lines:
set expandtab
set tabstop=2
set shiftwidth=2
Save and close the file by pressing Esc followed by :x and Enter.
Explanation
Whenever you open Vim now as the current user, these settings will be used.
If you ssh onto a different server, these settings will not be transferred.
Settings explained:
- expandtab: use spaces for tab
- tabstop: amount of spaces used for tab
- shiftwidth: amount of spaces used during indentation
Apiserver Crash
Configure a wrong argument
The idea here is to misconfigure the Apiserver in different ways, then check possible log locations for errors.
You should be very comfortable with situations where the Apiserver is not coming back up.
Configure the Apiserver manifest with a new argument –this-is-very-wrong .
Check if the Pod comes back up and what logs this causes.
Fix the Apiserver again.
Log Locations
Log locations to check:
/var/log/pods/var/log/containerscrictl ps+crictl logsdocker ps+docker logs(in case when Docker is used)- kubelet logs:
/var/log/syslogorjournalctl
Solution
# always make a backup !
cp /etc/kubernetes/manifests/kube-apiserver.yaml ~/kube-apiserver.yaml.ori

# make the change
vim /etc/kubernetes/manifests/kube-apiserver.yaml

# wait till container restarts
watch crictl ps

# check for apiserver pod
k -n kube-system get pod

Apiserver is not coming back, we messed up!


# check pod logs
cat /var/log/pods/kube-system_kube-apiserver-controlplane_a3a455d471f833137588e71658e739da/kube-apiserver/X.log
> 2022-01-26T10:41:12.401641185Z stderr F Error: unknown flag: --this-is-very-wrong
Now undo the change and continue
# smart people use a backup
cp ~/kube-apiserver.yaml.ori /etc/kubernetes/manifests/kube-apiserver.yaml
Misconfigure ETCD connection
Change the existing Apiserver manifest argument to: –etcd-servers=this-is-very-wrong .
Check what the logs say, without using anything in /var .
Fix the Apiserver again.
Log Locations
Log locations to check:
/var/log/pods/var/log/containerscrictl ps+crictl logsdocker ps+docker logs(in case when Docker is used)- kubelet logs:
/var/log/syslogorjournalctl
Solution
# always make a backup !
cp /etc/kubernetes/manifests/kube-apiserver.yaml ~/kube-apiserver.yaml.ori

# make the change
vim /etc/kubernetes/manifests/kube-apiserver.yaml

# wait till container restarts
watch crictl ps

# check for apiserver pod
k -n kube-system get pod
Apiserver is not coming back, we messed up!
# 1) if we would check the /var directory
cat /var/log/pods/kube-system_kube-apiserver-controlplane_e24b3821e9bdc47a91209bfb04056993/kube-apiserver/X.log
> Err: connection error: desc = "transport: Error while dialing dial tcp: address this-is-very-wrong: missing port in address". Reconnecting...

# 2) but here we want to find other ways, so we check the container logs
crictl ps # maybe run a few times, because the apiserver container get's restarted
crictl logs f669a6f3afda2
> Error while dialing dial tcp: address this-is-very-wrong: missing port in address. Reconnecting...

# 3) what about syslogs
journalctl | grep apiserver # nothing specific
cat /var/log/syslog | grep apiserver # nothing specific
Now undo the change and continue
# smart people use a backup
cp ~/kube-apiserver.yaml.ori /etc/kubernetes/manifests/kube-apiserver.yaml
Invalid Apiserver Manifest YAML
Change the Apiserver manifest and add invalid YAML, something like this:
apiVersionTHIS IS VERY ::::: WRONG v1
kind: Pod
metadata:
Check what the logs say, and fix again.
Fix the Apiserver again.
Log Locations
Log locations to check:
/var/log/pods/var/log/containerscrictl ps+crictl logsdocker ps+docker logs(in case when Docker is used)- kubelet logs:
/var/log/syslogorjournalctl
Solution
# always make a backup !
cp /etc/kubernetes/manifests/kube-apiserver.yaml ~/kube-apiserver.yaml.ori

# make the change
vim /etc/kubernetes/manifests/kube-apiserver.yaml

# wait till container restarts
watch crictl ps

# check for apiserver pod
k -n kube-system get pod
Apiserver is not coming back, we messed up!
# seems like the kubelet can't even create the apiserver pod/container
/var/log/pods # nothing
crictl logs # nothing

# syslogs:
tail -f /var/log/syslog | grep apiserver
> Could not process manifest file err="/etc/kubernetes/manifests/kube-apiserver.yaml: couldn't parse as pod(yaml: mapping values are not allowed in this context), please check config file"

# or:
journalctl | grep apiserver
> Could not process manifest file" err="/etc/kubernetes/manifests/kube-apiserver.yaml: couldn't parse as pod(yaml: mapping values are not allowed in this context), please check config file
Now undo the change and continue
# smart people use a backup
cp ~/kube-apiserver.yaml.ori /etc/kubernetes/manifests/kube-apiserver.yaml
Apiserver Misconfigured
The Apiserver manifest contains errors
Make sure to have solved the previous Scenario Apiserver Crash.
The Apiserver is not coming up, the manifest is misconfigured in 3 places. Fix it.
Log Locations
Log locations to check:
/var/log/pods/var/log/containerscrictl ps+crictl logsdocker ps+docker logs(in case when Docker is used)- kubelet logs:
/var/log/syslogorjournalctl
Issues
For your changes to apply you might have to:
- move the
kube-apiserver.yamlout of the manifests directory - wait for apiserver container to be gone (
watch crictl ps) - move the manifest back in and wait for apiserver coming back up
Some users report that they need to restart the kubelet (service kubelet restart) but in theory this shouldn’t be necessary.
Solution 1
The kubelet cannot even create the Pod/Container. Check the kubelet logs in syslog for issues.
cat /var/log/syslog | grep kube-apiserver
There is wrong YAML in the manifest at metadata;
Solution 2
After fixing the wrong YAML there still seems to be an issue with a wrong parameter.
Check logs in /var/log/pods.
Error:
Error: unknown flag: --authorization-modus.
The correct parameter is --authorization-mode.
Solution 3
After fixing the wrong parameter, the pod/container might be up, but gets restarted.
Check container logs or /var/log/pods, where we should find:
Error while dialing dial tcp 127.0.0.1:23000: connect:connection refused
Check the container logs: the ETCD connection seems to be wrong. Set the correct port on which ETCD is running (check the ETCD manifest)
It should be --etcd-servers=https://127.0.0.1:2379
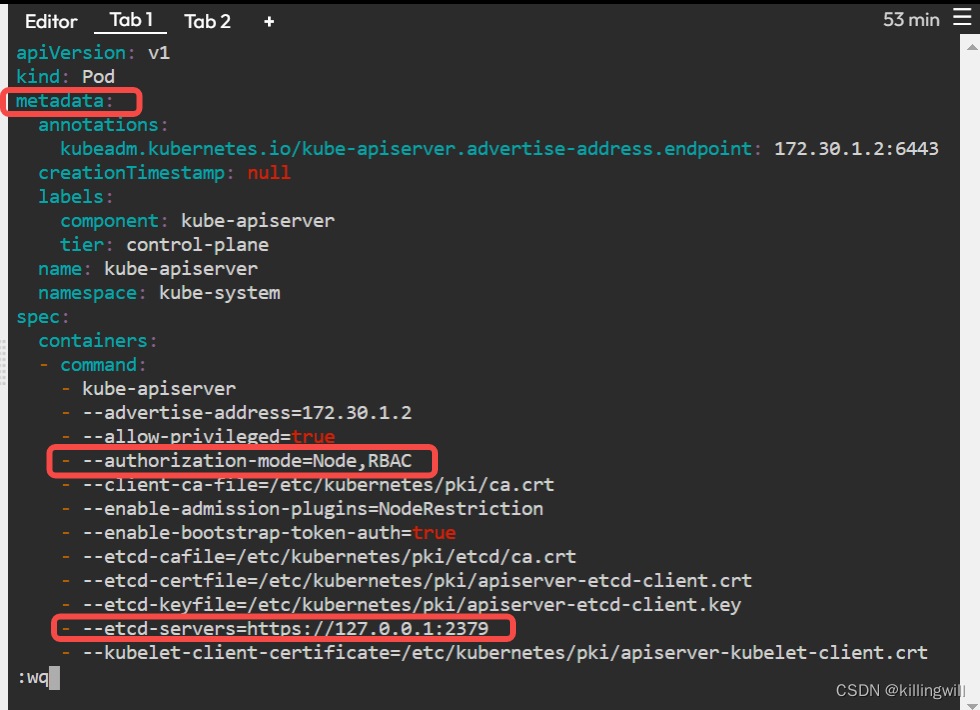

Application Misconfigured
NOTE:只有用resourceType/resourceName形式才可正确获取logs,不能使用空格进行分隔。
⭕️kubectl logs deploy/<depolyName> -n <ns-name>
❌ kubectl logs deploy <deployName> -n <ns-name>
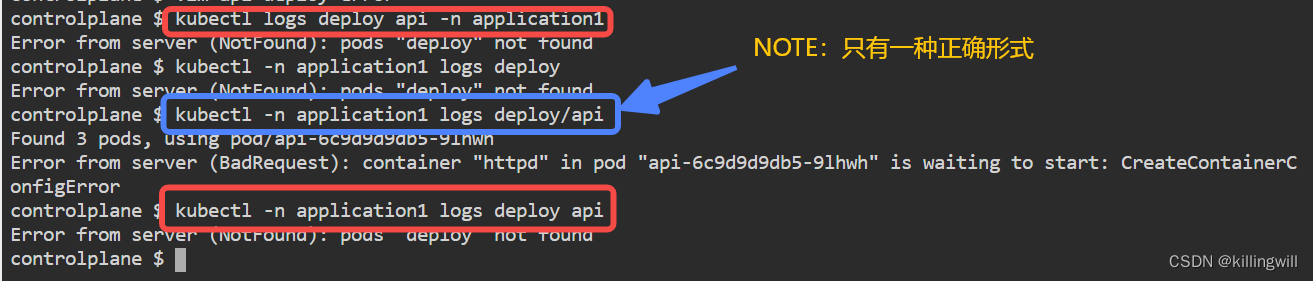
NOTE: 针对运行中的资源修改可直接使用kubectl edit命令进行:
kubectl edit <resource-type> <resource-name> -n <ns-name>
Application Multi Container Issue
Deployment is not coming up, find the error and fix it
There is a Deployment in Namespace application1 which seems to have issues and is not getting ready.
Fix it by only editing the Deployment itself and no other resources.
Tip
k -n application1 get deploy

k -n application1 logs deploy/api

k -n application1 describe deploy api

k -n application1 get cm
Solution
It looks like a wrong ConfigMap name was used, let’s change it
k -n application1 edit deploy api
spec:
  template:
    spec:
      containers:
      - env:
        - name: CATEGORY
          valueFrom:
            configMapKeyRef:
              key: category
              name: configmap-category	# edit part
After waiting a bit we should see all replicas being ready
k -n application1 get deploy api
# There is a multi-container Deployment in Namespace management which seems to have issues and is not getting ready.

kubectl get deploy -n management
kubectl edit deploy collect-data -n management
kubectl logs deploy/collect-data -c nginx -n management >> /root/logs.log
kubectl logs deploy/collect-data -c httpd -n management >> /root/logs.logs

# 发现问题如下:两个容器同时抢占80端口导致运行失败

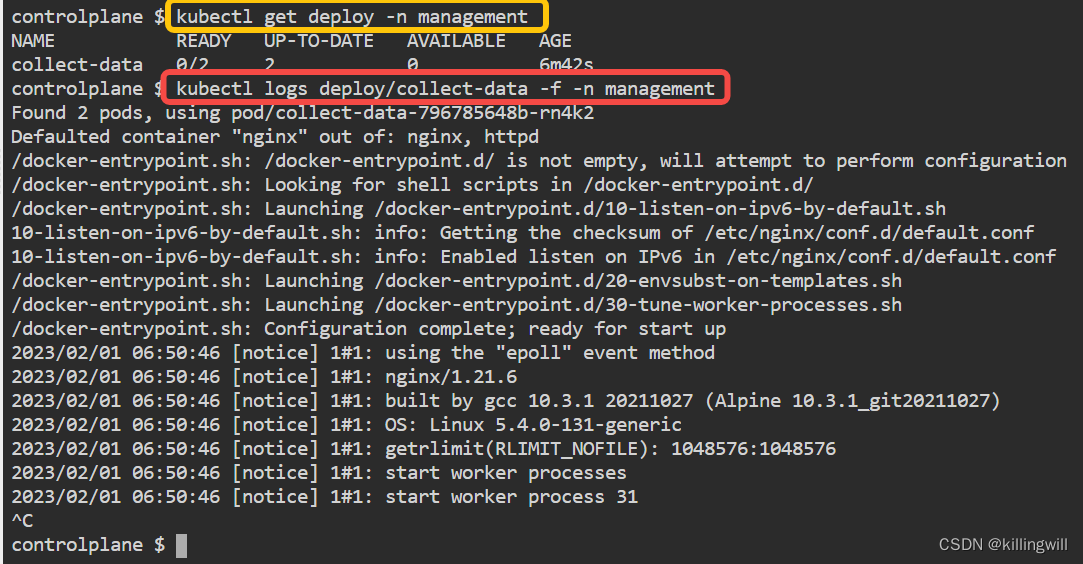
Fix the Deployment in Namespace management where both containers try to listen on port 80.
Remove one container.
tips:
kubectl -n management edit deploy collect-data
soluton:
Delete one of the containers
spec:
  template:
    spec:
      containers:
      - image: nginx:1.21.6-alpine
        imagePullPolicy: IfNotPresent
        name: nginx
        resources: {}
        terminationMessagePath: /dev/termination-log
        terminationMessagePolicy: File
#      - image: httpd:2.4.52-alpine
#        imagePullPolicy: IfNotPresent
#        name: httpd
#        resources: {}
#        terminationMessagePath: /dev/termination-log
#        terminationMessagePolicy: File
# should show all ready now
k -n management get deploy
You could also try to run nginx or httpd on a different port. But this would require Nginx or Apache (httpd) specific settings.
ConfigMap Access in Pods
Create ConfigMaps
- Create a ConfigMap named trauerweide with content tree=trauerweide
- Create the kubectl stored in existing file /root/cm.yaml
tips:
# create a new ConfigMap
kubectl create cm trauerweide -h

# create a ConfigMap from file
kubectl create -f ...
solution:
kubectl create cm trauerweide --from-literal tree=trauerweide

kubectl create -f /root/cm.yaml
Access ConfigMaps in Pod
- Create a Pod named pod1 of image nginx:alpine
- Make key tree of ConfigMap trauerweide available as environment variable TREE1
- Mount all keys of ConfigMap birke as volume. The files should be available under /etc/birke/*
- Test env+volume access in the running Pod
solution:
NOTE: 正在运行中的pod不支持kubectl edit po <pod-name>的动态修改,故使用kubectl run 命令快速生成一个pod时使用–dry-run=client以及-oyaml参数仅创建manifest yaml文件,而不创建运行中的pod:kubectl run <pod-name> --image=<> -o yaml --dry-run=client > pod-file-name.yaml
# 1.使用kubectl run命令快速创建pod的yaml文件,而不生成运行中的pod:
kubectl run pod1 --image=nginx:alpine -o yaml --dry-run=client > pod1.yaml
# 2.修改pod的yaml文件的volumes以及容器内的volumeMounts部分,增加容器内的env部分,使之符合题意要求
# 3.运行该pod
kubectl apply -f pod1.yaml

# 4.检查是否符合题意要求
kubectl get po
kubectl exec pod1 -- env | grep TREE
kubectl exec pod1 -- cat /etc/birek/tree; echo
kubectl exec pod1 -- cat /etc/birke/level; echo
kubectl exec pod1 -- cat /etc/birke/department; echo
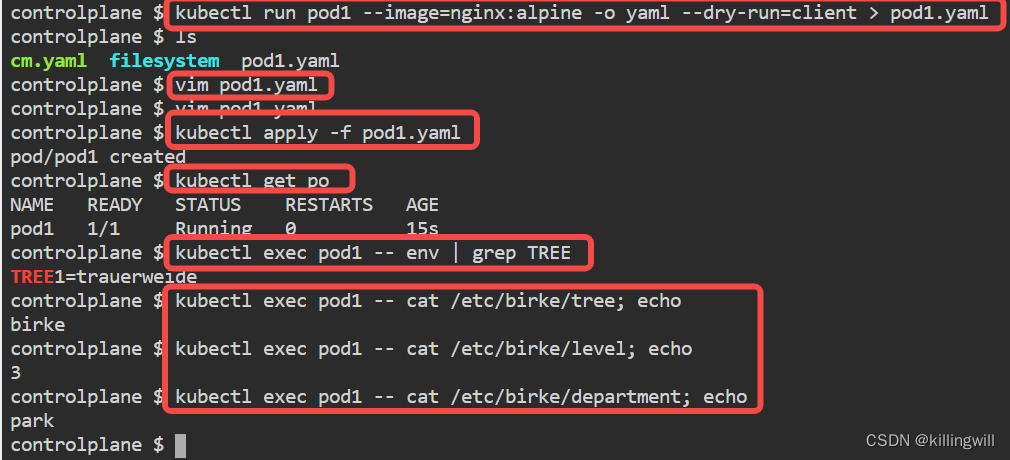
NOTE:增加如下部分内容
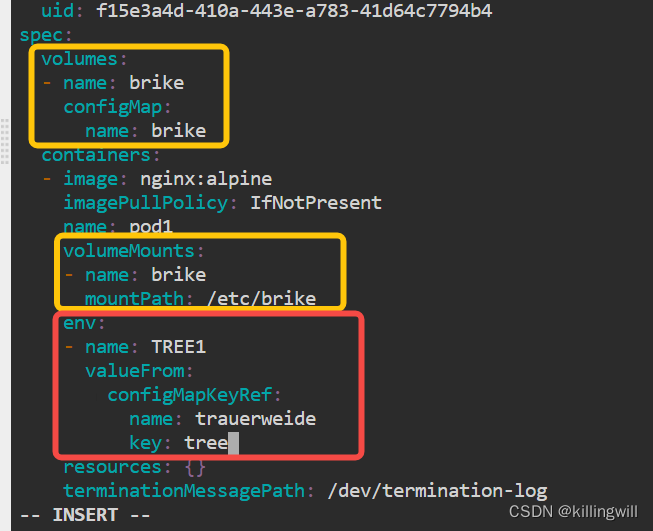
apiVersion: v1
kind: Pod
metadata:
  name: pod1
spec:
  volumes:
  - name: birke
    configMap:
      name: birke
  containers:
  - image: nginx:alpine
    name: pod1
    volumeMounts:
    - name: birke
      mountPath: /etc/birke
    env:
      - name: TREE1
        valueFrom:
          configMapKeyRef:
            name: trauerweide
            key: tree
verify:
kubectl exec pod1 -- env | grep "TREE1=trauerweide"
kubectl exec pod1 -- cat /etc/birke/tree
kubectl exec pod1 -- cat /etc/birke/level
kubectl exec pod1 -- cat /etc/birke/department
Ingress Create
Create Services for existing Deployments
There are two existing Deployments in Namespace world which should be made accessible via an Ingress.
First: create ClusterIP Services for both Deployments for port 80 . The Services should have the same name as the Deployments.
tips:
kubectl expose deploy -h
tips:
kubectl expose deploy/europe -n world --port=80
kubectl expose deploy/europe -n world --port=80
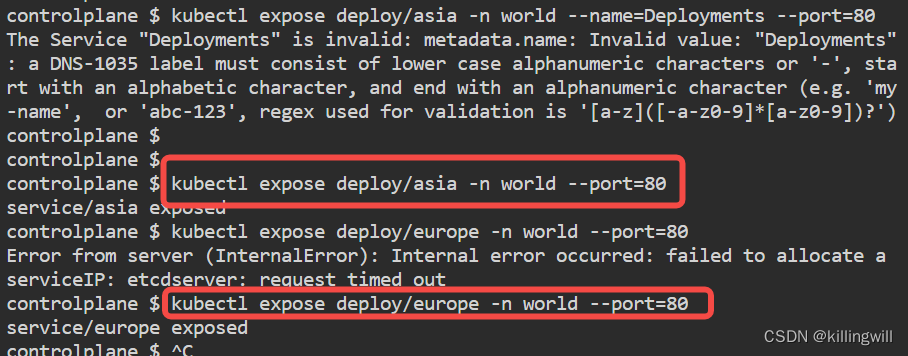

The Nginx Ingress Controller has been installed.
Create a new Ingress resource called world for domain name world.universe.mine . The domain points to the K8s Node IP via /etc/hosts .
The Ingress resource should have two routes pointing to the existing Services:http://world.universe.mine:30080/europe/
and
http://world.universe.mine:30080/asia/
Explanation
Check the NodePort Service for the Nginx Ingress Controller to see the ports
kubectl -n ingress-nginx get svc ingress-nginx-controller
We can reach the NodePort Service via the K8s Node IP:
# curl <nodeip>:<nodeport>
curl http://172.30.1.2:30080
And because of the entry in /etc/hosts we can call
curl http://world.universe.mine:30080

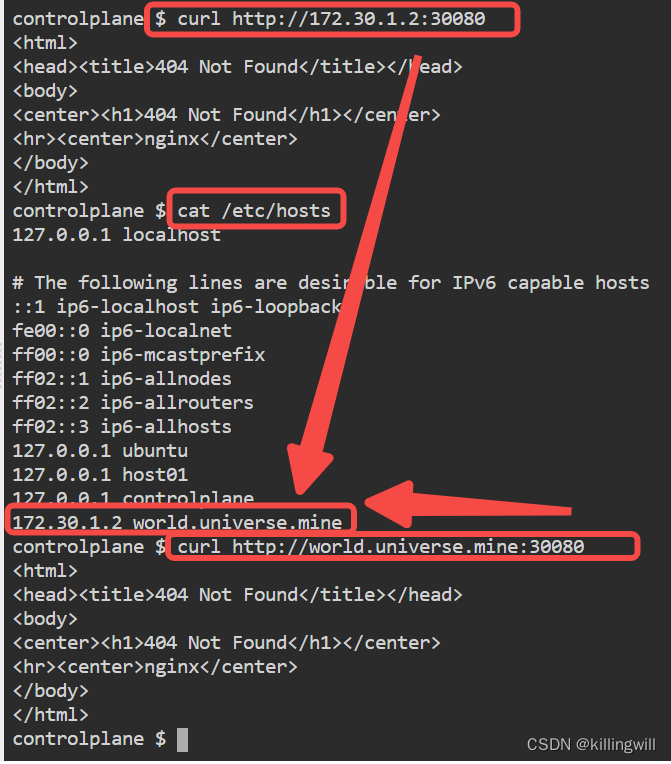
Tip 1
The Ingress resources needs to be created in the same Namespace as the applications.
Tip 2
Find out the ingressClassName with:
kubectl get ingressclass
Tip 3
You can work with this template
apiVersion: networking.k8s.io/v1
kind: Ingress
metadata:
  name: world
  namespace: world
  annotations:
    # this annotation removes the need for a trailing slash when calling urls
    # but it is not necessary for solving this scenario
    nginx.ingress.kubernetes.io/rewrite-target: /
spec:
  ingressClassName: nginx # k get ingressclass
  rules:
  - host: "world.universe.mine"
  ...
Tip 4: 快速创建ingress的yaml资源文件
kubectl create ingress -h
controlplane $ kubectl create ingress -h
Create an ingress with the specified name.

Aliases:
ingress, ing

Examples:
  # Create a single ingress called 'simple' that directs requests to foo.com/bar to svc
  # svc1:8080 with a tls secret "my-cert"
  kubectl create ingress simple --rule="foo.com/bar=svc1:8080,tls=my-cert"

  # Create a catch all ingress of "/path" pointing to service svc:port and Ingress Class as
"otheringress"
  kubectl create ingress catch-all --class=otheringress --rule="/path=svc:port"

  # Create an ingress with two annotations: ingress.annotation1 and ingress.annotations2
  kubectl create ingress annotated --class=default --rule="foo.com/bar=svc:port" \
  --annotation ingress.annotation1=foo \
  --annotation ingress.annotation2=bla

  # Create an ingress with the same host and multiple paths
  kubectl create ingress multipath --class=default \
  --rule="foo.com/=svc:port" \
  --rule="foo.com/admin/=svcadmin:portadmin"

  # Create an ingress with multiple hosts and the pathType as Prefix
  kubectl create ingress ingress1 --class=default \
  --rule="foo.com/path*=svc:8080" \
  --rule="bar.com/admin*=svc2:http"

  # Create an ingress with TLS enabled using the default ingress certificate and different path
types
  kubectl create ingress ingtls --class=default \
  --rule="foo.com/=svc:https,tls" \
  --rule="foo.com/path/subpath*=othersvc:8080"

  # Create an ingress with TLS enabled using a specific secret and pathType as Prefix
  kubectl create ingress ingsecret --class=default \
  --rule="foo.com/*=svc:8080,tls=secret1"

  # Create an ingress with a default backend
  kubectl create ingress ingdefault --class=default \
  --default-backend=defaultsvc:http \
  --rule="foo.com/*=svc:8080,tls=secret1"

Options:
    --allow-missing-template-keys=true:
        If true, ignore any errors in templates when a field or map key is missing in the
        template. Only applies to golang and jsonpath output formats.

    --annotation=[]:
        Annotation to insert in the ingress object, in the format annotation=value

    --class='':
        Ingress Class to be used

    --default-backend='':
        Default service for backend, in format of svcname:port

    --dry-run='none':
        Must be "none", "server", or "client". If client strategy, only print the object that
        would be sent, without sending it. If server strategy, submit server-side request without
        persisting the resource.

    --field-manager='kubectl-create':
        Name of the manager used to track field ownership.

    -o, --output='':
        Output format. One of: (json, yaml, name, go-template, go-template-file, template,
        templatefile, jsonpath, jsonpath-as-json, jsonpath-file).

    --rule=[]:
        Rule in format host/path=service:port[,tls=secretname]. Paths containing the leading
        character '*' are considered pathType=Prefix. tls argument is optional.

    --save-config=false:
        If true, the configuration of current object will be saved in its annotation. Otherwise,
        the annotation will be unchanged. This flag is useful when you want to perform kubectl
        apply on this object in the future.

    --show-managed-fields=false:
        If true, keep the managedFields when printing objects in JSON or YAML format.

    --template='':
        Template string or path to template file to use when -o=go-template, -o=go-template-file.
        The template format is golang templates
        [http://golang.org/pkg/text/template/#pkg-overview].

    --validate='strict':
        Must be one of: strict (or true), warn, ignore (or false).              "true" or "strict" will use a
        schema to validate the input and fail the request if invalid. It will perform server side
        validation if ServerSideFieldValidation is enabled on the api-server, but will fall back
        to less reliable client-side validation if not.                 "warn" will warn about unknown or
        duplicate fields without blocking the request if server-side field validation is enabled
        on the API server, and behave as "ignore" otherwise.            "false" or "ignore" will not
        perform any schema validation, silently dropping any unknown or duplicate fields.

Usage:
  kubectl create ingress NAME --rule=host/path=service:port[,tls[=secret]]  [options]

Use "kubectl options" for a list of global command-line options (applies to all commands).
Solution
kubectl get ingressclass
kubectl create ingress world -n world --class=<ingressclass-name> \
--rule="/europe=europe:80" \
--rule="/asia=asia:80" \
-o yaml --dry-run=client > ingress-world.yaml
# 检查ingress yaml文件符合题意后
kubectl apply -f ingress-world.yaml
kubectl get ing -n world

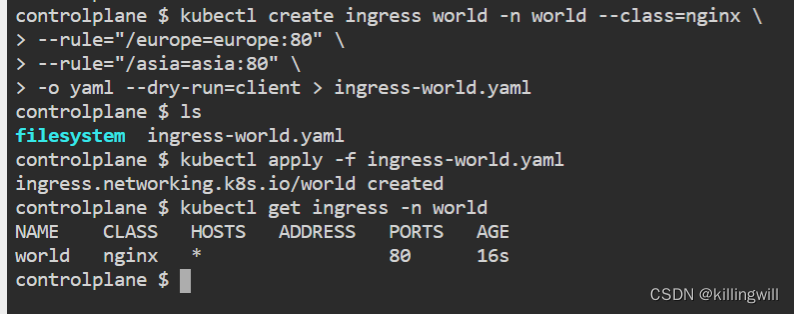
apiVersion: networking.k8s.io/v1
kind: Ingress
metadata:
  name: world
  namespace: world
  annotations:
    # this annotation removes the need for a trailing slash when calling urls
    # but it is not necessary for solving this scenario
    nginx.ingress.kubernetes.io/rewrite-target: /
spec:
  ingressClassName: nginx # k get ingressclass
  rules:
  - host: "world.universe.mine"
    http:
      paths:
      - path: /europe
        pathType: Prefix
        backend:
          service:
            name: europe
            port:
              number: 80
      - path: /asia
        pathType: Prefix
        backend:
          service:
            name: asia
            port:
              number: 80
NetworkPolicy Namespace Selector
Create new NPs
k8s NetworkPolicy editor:
https://editor.cilium.io/?id=bAvKH2IFhfODaW2c
apiVersion: networking.k8s.io/v1
kind: NetworkPolicy
metadata:
  name: untitled-policy
spec:
  podSelector: {}
  policyTypes:
    - Ingress
    - Egress
  ingress: []
  egress: []
---
apiVersion: networking.k8s.io/v1
kind: NetworkPolicy
metadata:
  name: untitled-policy
spec:
  podSelector: {}
  policyTypes:
    - Ingress
  ingress: []
There are existing Pods in Namespace space1 and space2 .
We need a new NetworkPolicy named np that restricts all Pods in Namespace space1 to only have outgoing traffic to Pods in Namespace space2 . Incoming traffic not affected.
We also need a new NetworkPolicy named np that restricts all Pods in Namespace space2 to only have incoming traffic from Pods in Namespace space1 . Outgoing traffic not affected.
The NetworkPolicies should still allow outgoing DNS traffic on port 53 TCP and UDP.
Tip
For learning you can check the NetworkPolicy Editor
The namespaceSelector from NPs works with Namespace labels, so first we check existing labels for Namespaces
k get ns --show-labels
Solution Part 1
Create the first NP:
apiVersion: networking.k8s.io/v1
kind: NetworkPolicy
metadata:
  name: np
  namespace: space1
spec:
  podSelector: {}
  policyTypes:
  - Egress
  egress:
  - to:
     - namespaceSelector:
        matchLabels:
         kubernetes.io/metadata.name: space2
  - ports:
    - port: 53
      protocol: TCP
    - port: 53
      protocol: UDP
Solution Part 2
Create the second NP:
apiVersion: networking.k8s.io/v1
kind: NetworkPolicy
metadata:
  name: np
  namespace: space2
spec:
  podSelector: {}
  policyTypes:
  - Ingress
  ingress:
   - from:
     - namespaceSelector:
        matchLabels:
         kubernetes.io/metadata.name: space1
Verify
# these should work
k -n space1 exec app1-0 -- curl -m 1 microservice1.space2.svc.cluster.local
k -n space1 exec app1-0 -- curl -m 1 microservice2.space2.svc.cluster.local
k -n space1 exec app1-0 -- nslookup tester.default.svc.cluster.local
k -n kube-system exec -it validate-checker-pod -- curl -m 1 app1.space1.svc.cluster.local

# these should not work
k -n space1 exec app1-0 -- curl -m 1 tester.default.svc.cluster.local
k -n kube-system exec -it validate-checker-pod -- curl -m 1 microservice1.space2.svc.cluster.local
k -n kube-system exec -it validate-checker-pod -- curl -m 1 microservice2.space2.svc.cluster.local
k -n default run nginx --image=nginx:1.21.5-alpine --restart=Never -i --rm  -- curl -m 1 microservice1.space2.svc.cluster.local
RBAC ServiceAccount Permissions
There are existing Namespaces ns1 and ns2 .
Create ServiceAccount pipeline in both Namespaces.
SAs should be allowed to view almost everything in the whole cluster. You can use the default ClusterRole view for this.
These SAs should be allowed to create and delete Deployments in their Namespace.
everything usingkubectl auth can-i.
RBAC Info
Let’s talk a little about RBAC resources:
A ClusterRole|Role defines a set of permissions and where it is available, in the whole cluster or just a single Namespace.
A ClusterRoleBinding|RoleBinding connects a set of permissions with an account and defines where it is applied, in the whole cluster or just a single Namespace.
Because of this there are 4 different RBAC combinations and 3 valid ones:
- Role + RoleBinding (available in single Namespace, applied in single Namespace)
- ClusterRole + ClusterRoleBinding (available cluster-wide, applied cluster-wide)
- ClusterRole + RoleBinding (available cluster-wide, applied in single Namespace)
- Role + ClusterRoleBinding (NOT POSSIBLE: available in single Namespace, applied cluster-wide)
Tip
k get clusterrole view # there is default one
k create clusterrole -h # examples
k create rolebinding -h # examples
k auth can-i delete deployments --as system:serviceaccount:ns1:pipeline -n ns1
Solution
# create SAs
k -n ns1 create sa pipeline
k -n ns2 create sa pipeline

# use ClusterRole view
k get clusterrole view # there is default one
k create clusterrolebinding pipeline-view --clusterrole view --serviceaccount ns1:pipeline --serviceaccount ns2:pipeline

# manage Deployments in both Namespaces
k create clusterrole -h # examples
k create clusterrole pipeline-deployment-manager --verb create,delete --resource deployments
# instead of one ClusterRole we could also create the same Role in both Namespaces

k -n ns1 create rolebinding pipeline-deployment-manager --clusterrole pipeline-deployment-manager --serviceaccount ns1:pipeline
k -n ns2 create rolebinding pipeline-deployment-manager --clusterrole pipeline-deployment-manager --serviceaccount ns2:pipeline
Verify
# namespace ns1 deployment manager
k auth can-i delete deployments --as system:serviceaccount:ns1:pipeline -n ns1 # YES
k auth can-i create deployments --as system:serviceaccount:ns1:pipeline -n ns1 # YES
k auth can-i update deployments --as system:serviceaccount:ns1:pipeline -n ns1 # NO
k auth can-i update deployments --as system:serviceaccount:ns1:pipeline -n default # NO

# namespace ns2 deployment manager
k auth can-i delete deployments --as system:serviceaccount:ns2:pipeline -n ns2 # YES
k auth can-i create deployments --as system:serviceaccount:ns2:pipeline -n ns2 # YES
k auth can-i update deployments --as system:serviceaccount:ns2:pipeline -n ns2 # NO
k auth can-i update deployments --as system:serviceaccount:ns2:pipeline -n default # NO

# cluster wide view role
k auth can-i list deployments --as system:serviceaccount:ns1:pipeline -n ns1 # YES
k auth can-i list deployments --as system:serviceaccount:ns1:pipeline -A # YES
k auth can-i list pods --as system:serviceaccount:ns1:pipeline -A # YES
k auth can-i list pods --as system:serviceaccount:ns2:pipeline -A # YES
k auth can-i list secrets --as system:serviceaccount:ns2:pipeline -A # NO (default view-role doesn't allow)
controlplane $ kubectl create serviceaccount -h
Create a service account with the specified name.

Aliases:
serviceaccount, sa

Examples:
  # Create a new service account named my-service-account
  kubectl create serviceaccount my-service-account

Options:
    --allow-missing-template-keys=true:
        If true, ignore any errors in templates when a field or map key is missing in the
        template. Only applies to golang and jsonpath output formats.

    --dry-run='none':
        Must be "none", "server", or "client". If client strategy, only print the object that
        would be sent, without sending it. If server strategy, submit server-side request without
        persisting the resource.

    --field-manager='kubectl-create':
        Name of the manager used to track field ownership.

    -o, --output='':
        Output format. One of: (json, yaml, name, go-template, go-template-file, template,
        templatefile, jsonpath, jsonpath-as-json, jsonpath-file).

    --save-config=false:
        If true, the configuration of current object will be saved in its annotation. Otherwise,
        the annotation will be unchanged. This flag is useful when you want to perform kubectl
        apply on this object in the future.

    --show-managed-fields=false:
        If true, keep the managedFields when printing objects in JSON or YAML format.

    --template='':
        Template string or path to template file to use when -o=go-template, -o=go-template-file.
        The template format is golang templates
        [http://golang.org/pkg/text/template/#pkg-overview].

    --validate='strict':
        Must be one of: strict (or true), warn, ignore (or false).              "true" or "strict" will use a
        schema to validate the input and fail the request if invalid. It will perform server side
        validation if ServerSideFieldValidation is enabled on the api-server, but will fall back
        to less reliable client-side validation if not.                 "warn" will warn about unknown or
        duplicate fields without blocking the request if server-side field validation is enabled
        on the API server, and behave as "ignore" otherwise.            "false" or "ignore" will not
        perform any schema validation, silently dropping any unknown or duplicate fields.

Usage:
  kubectl create serviceaccount NAME [--dry-run=server|client|none] [options]

Use "kubectl options" for a list of global command-line options (applies to all commands).

# the following options can be passed to any command
$ kubectl options
RBAC User Permissions
Control User permissions using RBAC
There is existing Namespace applications .
- User smoke should be allowed to create and delete Pods, Deployments and StatefulSets in Namespace applications.
- User smoke should have view permissions (like the permissions of the default ClusterRole named view ) in all Namespaces but not in kube-system .
- Verify everything using kubectl auth can-i .
RBAC Info
Let’s talk a little about RBAC resources:
A ClusterRole|Role defines a set of permissions and where it is available, in the whole cluster or just a single Namespace.
A ClusterRoleBinding|RoleBinding connects a set of permissions with an account and defines where it is applied, in the whole cluster or just a single Namespace.
Because of this there are 4 different RBAC combinations and 3 valid ones:
Role + RoleBinding (available in single Namespace, applied in single Namespace)
ClusterRole + ClusterRoleBinding (available cluster-wide, applied cluster-wide)
ClusterRole + RoleBinding (available cluster-wide, applied in single Namespace)
Role + ClusterRoleBinding (NOT POSSIBLE: available in single Namespace, applied cluster-wide)
Tip
# 1)
k -n applications create role -h
k -n applications create rolebinding -h

# 2)
# as of now it’s not possible to create deny-RBAC in K8s.
# so we allow for all other namespaces

# 3)
k auth can-i -h
k auth can-i create deployments --as smoke -n applications
Solution
- RBAC for Namespace applications
k -n applications create role smoke --verb create,delete --resource pods,deployments,sts
k -n applications create rolebinding smoke --role smoke --user smoke
- view permission in all Namespaces but not kube-system
As of now it’s not possible to create deny-RBAC in K8s
So we allow for all other Namespaces
k get ns # get all namespaces
k -n applications create rolebinding smoke-view --clusterrole view --user smoke
k -n default create rolebinding smoke-view --clusterrole view --user smoke
k -n kube-node-lease create rolebinding smoke-view --clusterrole view --user smoke
k -n kube-public create rolebinding smoke-view --clusterrole view --user smoke
Verify
# applications
k auth can-i create deployments --as smoke -n applications # YES
k auth can-i delete deployments --as smoke -n applications # YES
k auth can-i delete pods --as smoke -n applications # YES
k auth can-i delete sts --as smoke -n applications # YES
k auth can-i delete secrets --as smoke -n applications # NO
k auth can-i list deployments --as smoke -n applications # YES
k auth can-i list secrets --as smoke -n applications # NO
k auth can-i get secrets --as smoke -n applications # NO

# view in all namespaces but not kube-system
k auth can-i list pods --as smoke -n default # YES
k auth can-i list pods --as smoke -n applications # YES
k auth can-i list pods --as smoke -n kube-public # YES
k auth can-i list pods --as smoke -n kube-node-lease # YES
k auth can-i list pods --as smoke -n kube-system # NO
Find Pod with highest priority
Find the Pod with the highest priority in Namespace management and delete it.
Tip
Priority is an attribute in the Pod specification.
k -n management get pod -oyaml
Solution
k -n management get pod -o yaml | grep -i priority -B 20

k -n management delete pod sprinter
Create Pod with higher priority
In Namespace lion there is one existing Pod which requests 1Gi of memory resources.
That Pod has a specific priority because of its PriorityClass.
Create new Pod named important of image nginx:1.21.6-alpine in the same Namespace. It should request 1Gi memory resources.
Assign a higher priority to the new Pod so it’s scheduled instead of the existing one.
Both Pods won’t fit in the cluster.
Tip
Check for existing PriorityClasses, and the the one of the existing Pod
k -n lion get pod

k -n lion get pod -oyaml | grep priority

k get priorityclass
Solution
Generate the Pod yaml:
k -n lion run important --image=nginx:1.21.6-alpine -oyaml --dry-run=client > pod.yaml
Then change it to and apply
apiVersion: v1
kind: Pod
metadata:
  labels:
    run: important
  name: important
  namespace: lion
spec:
  priorityClassName: level3
  containers:
  - image: nginx:1.21.6-alpine
    name: important
    resources:
      requests:
        memory: 1Gi
  dnsPolicy: ClusterFirst
  restartPolicy: Always
Now there should only be the new Pod running
k -n lion get pod
We can also see logs about this procedure like: Preempted by lion/important on node controlplane
k get events -A --sort-by='{.metadata.creationTimestamp}'
k8s trouble shooting CTF: K8s trouble shooting simple pod errors
Crash Bang Wallop
- troubleshoot a CrashLoopBackOff Error.
- Get it back into a running state And capture the flag.
List all pods
start by retrieving your pods:
kubectl get po -A
identify which pod has an issue:
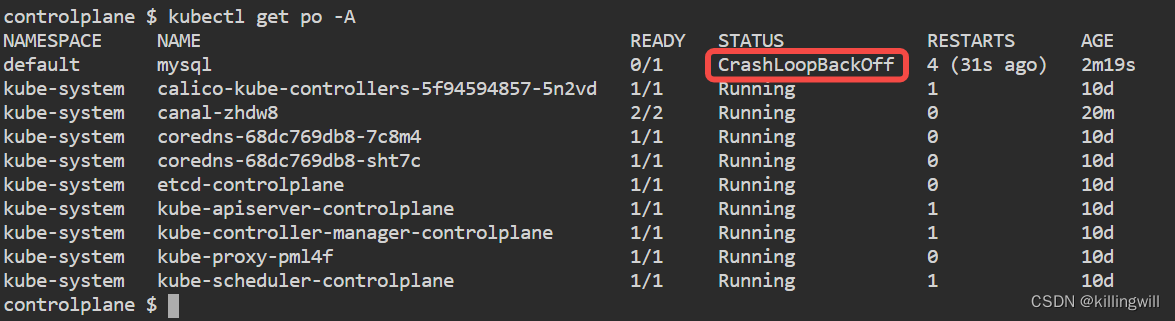
fix the broken pod:
- fix mysql pod, the first step would be describing the pod:
kubectl describe po mysql - next step look the logs:
kubectl get logs
k logs mysql
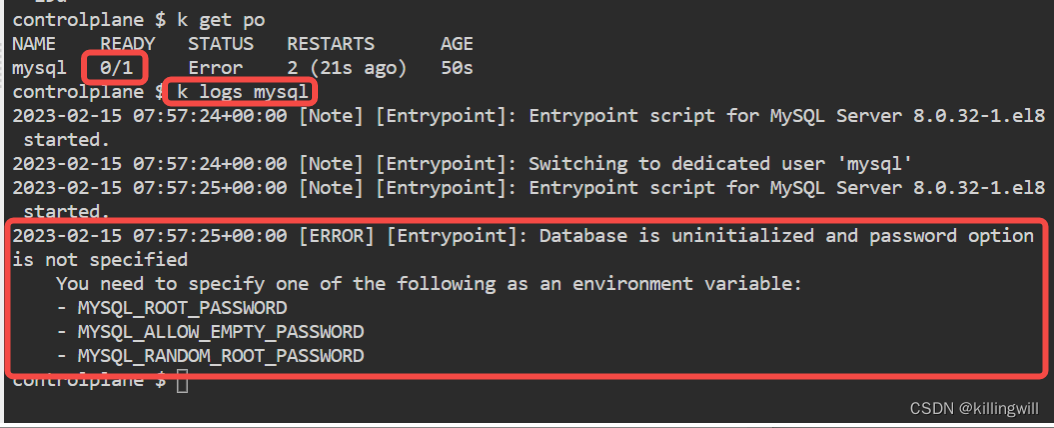

3. fix it:
kubectl get po mysql -o yaml > mysql-pod.yamlvim mysql-pod.yaml- add this part:
spec.containers.env.name: MYSQL_ALLOW_EMPTY
spec.containers.env.value: "true" - 删除原有pod,应用正确的pod yaml
kubectl delete po mysql
kubectl apply -f mysql-pod.yaml
or
使用kubectl edit直接修改
kubectl edit po mysql
使用如下方式快速启动一个带有env环境变量描述的pod,参照其env的添加方式修改我们的mysql pod:
NOTE: value需为字符串形式,即true也需要带有引号。


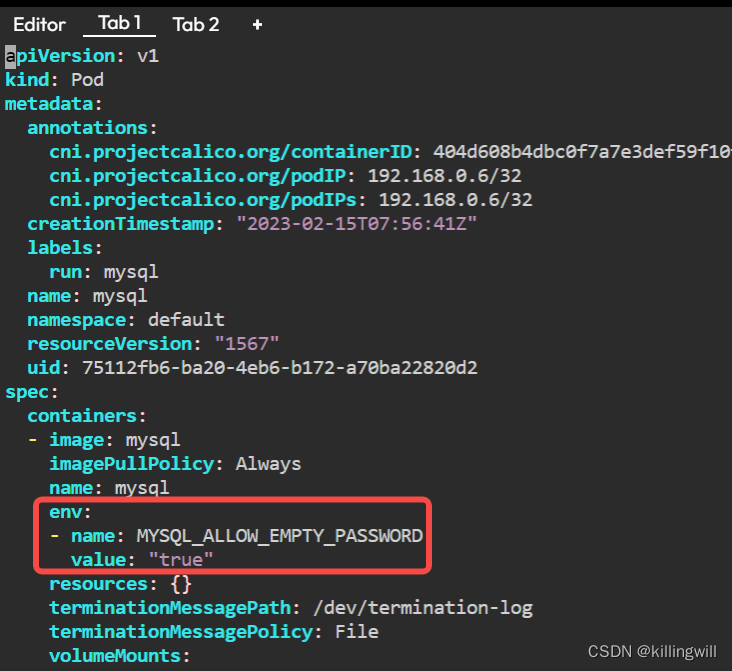
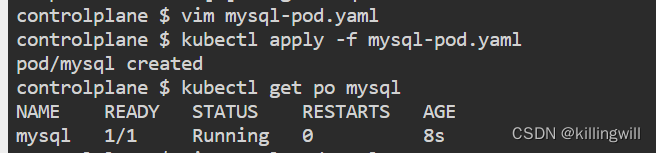
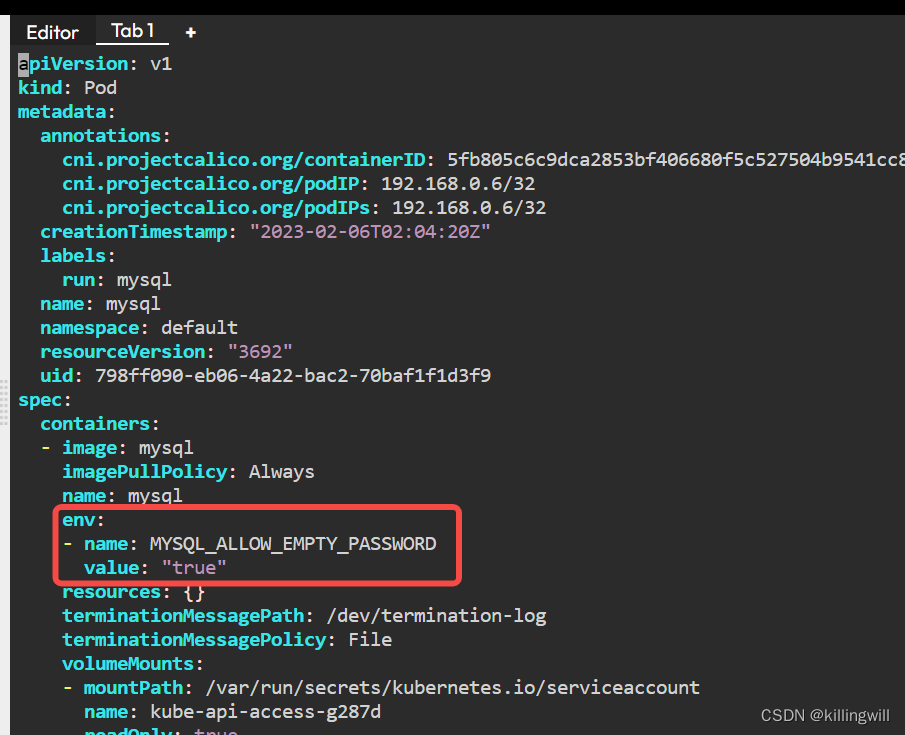
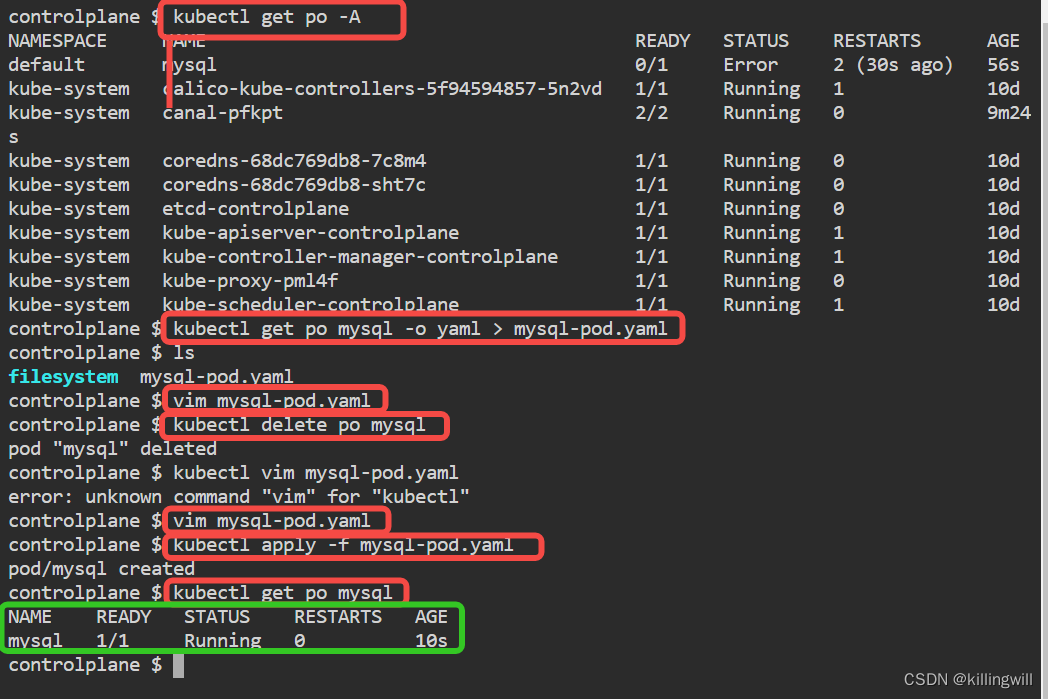
WELL DONE!
You solved this
Here is the flag
{environment-vars-not-set}
Fixing Deployments
look all pods in all ns:
kubectl get po -A
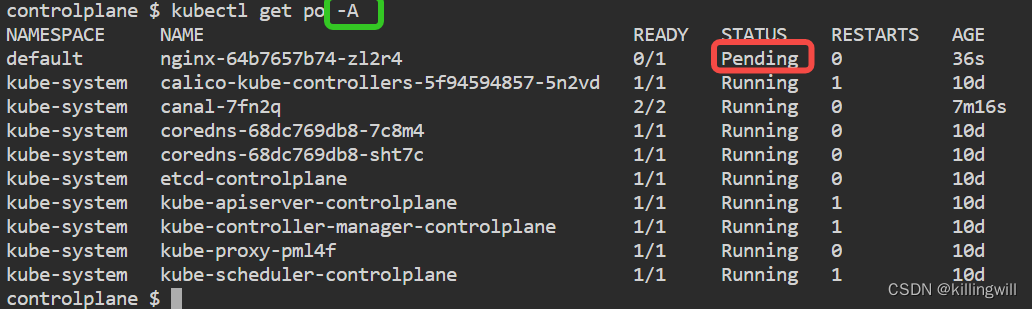
NOTE!!!
Deployment形式创建的失败的pod的获取方式,有时不能直接通过get po po-name的形式获取,因为若创建失败,则deploy或杀死失败的pod,再次尝试创建一个新的po,故pod的name会发生变化,则可使用指定标签的形式获取该pod: -l app=<prefix-name>
kubectl describe po -l app=nginx
or
kubectl descirbe po $(kubectl get po -l app=nginx)
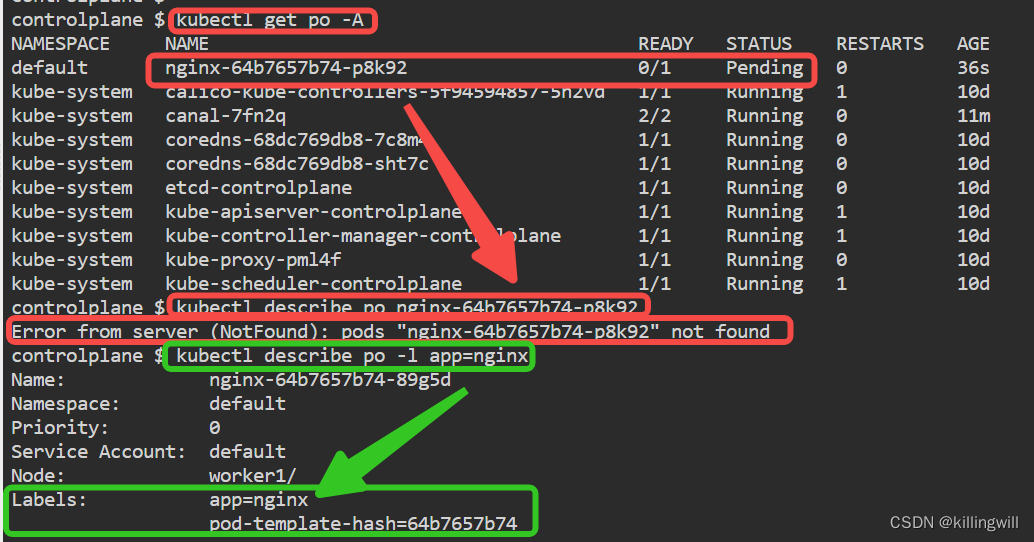
kubectl logs deploy/nginx
kubectl get deploy -o ymal | grep worker1
kubectl get node 发现不存在nodeName为worker1的
kubectl edit deploy nginx 使用dd命令删除nodeName=worker1的行
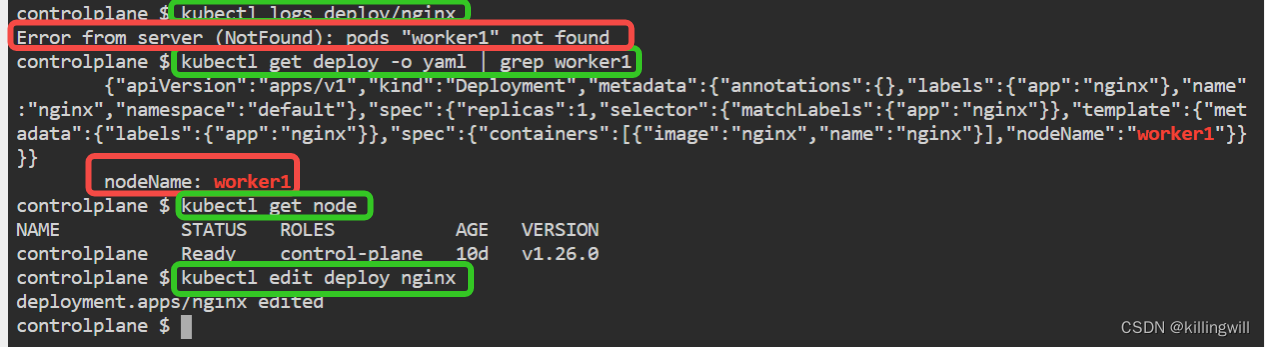
使用dd命令删除不存在的nodeName行,或者是将其改成为存在的nodeName名:
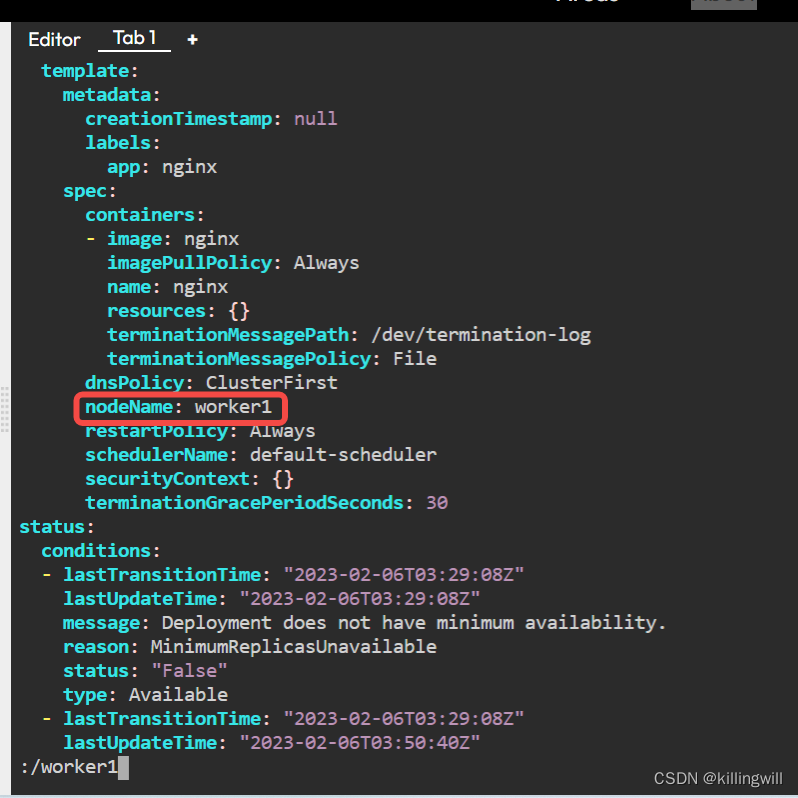
验证修改后正常运行:
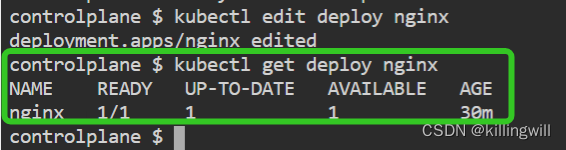
WELL DONE!
You solved this
Here is the flag
{nodename-or-no-name-that-is-the-questions}
Image issues
- start by looking at the pods in all ns:
kubectl get po -A
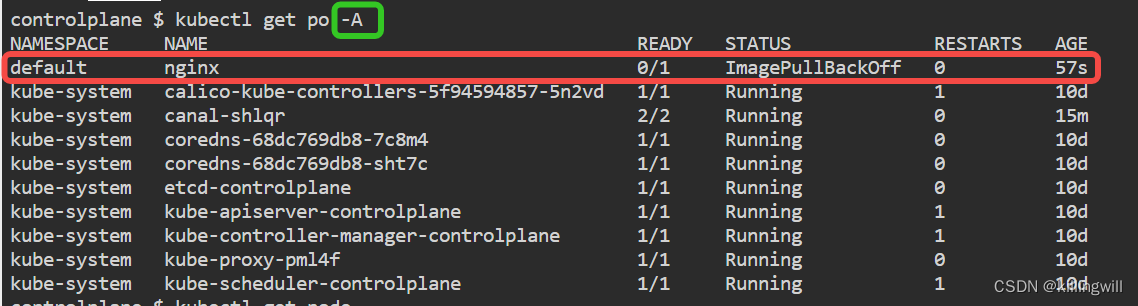
kubectl describe po nginx查看Events部分的错误提示:
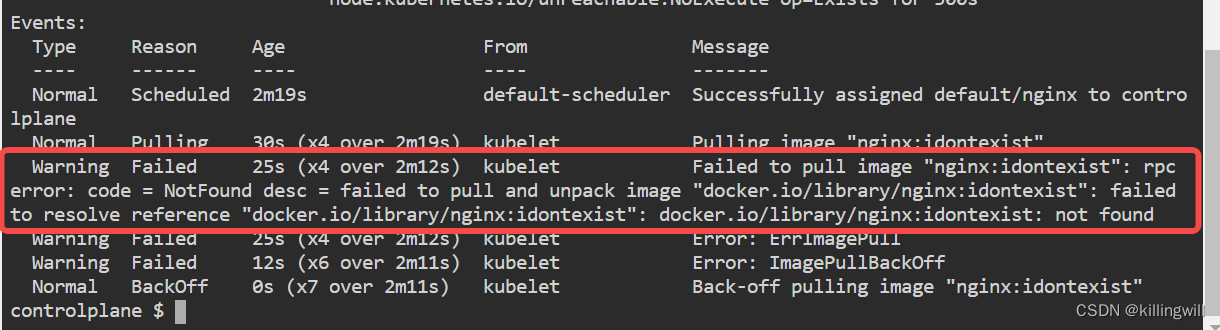
根据上述提示修改DockerHub中不存在的镜像名称:
kubectl edit pod nginx
将镜像错误的tag直接删除即可,则默认使用最新的latest镜像:
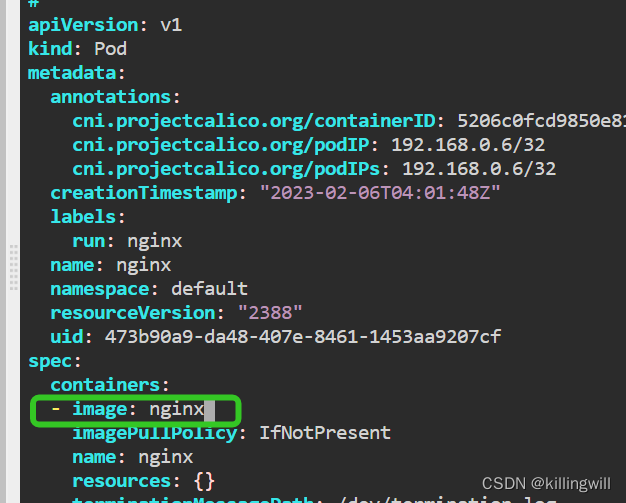
验证修改后正常运行:
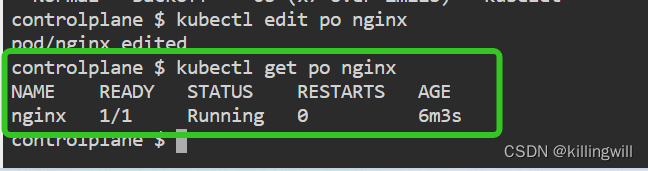
Under Construction
Search the pods
Start by retrieving your pods
k get pod -A
Identify which pod has an issue and add the name to the next command
k describe pod
If you have spotted the issue move to NEXT
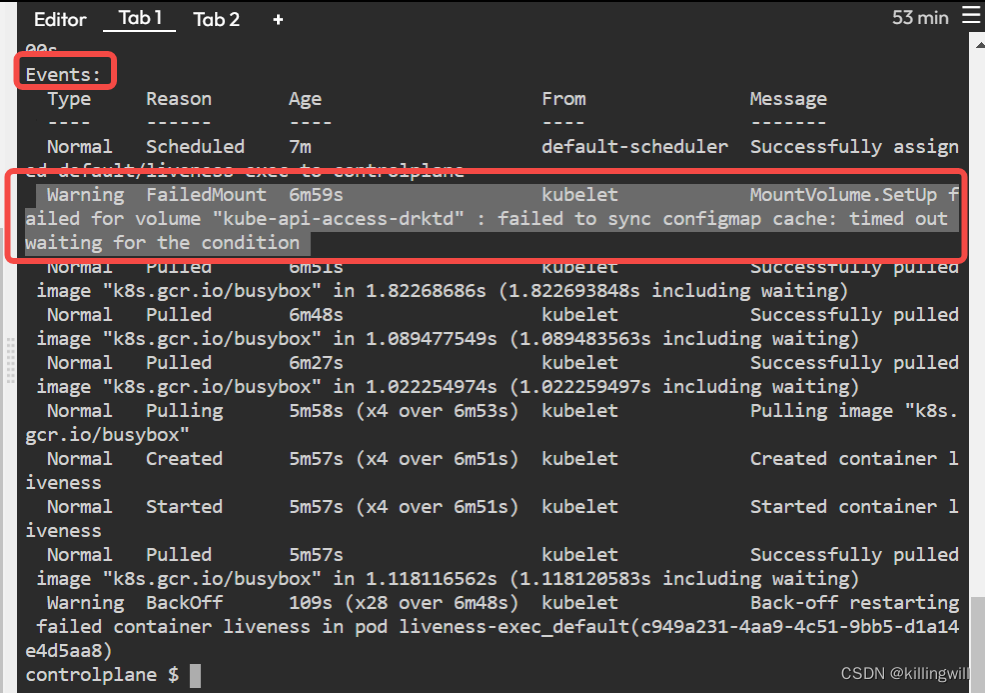
NOTE: projected书写格式,注意configmap路径path为相对路径形式,该部分正确
出错部分为busybox形式的镜像需加上sleep睡眠时间
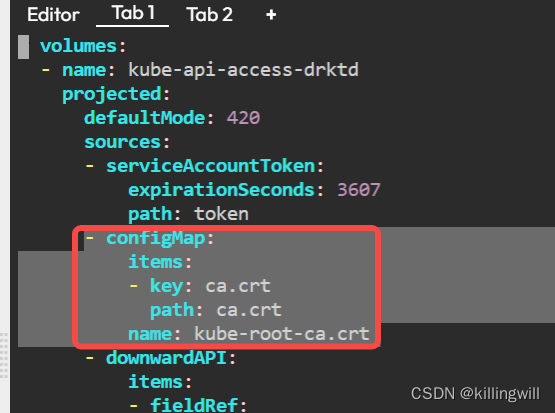
Fix the broken pod
If you are still having trouble have you looked at the
You may need to create a new pod but you’ll need the yaml first
POD=changeme k get pod $POD -o yaml > pod.yaml

vi pod.yaml
Now fix it!!!
k create -f pod.yaml

k get po $POD
Once you have it running click on
CHECK
to get the flag
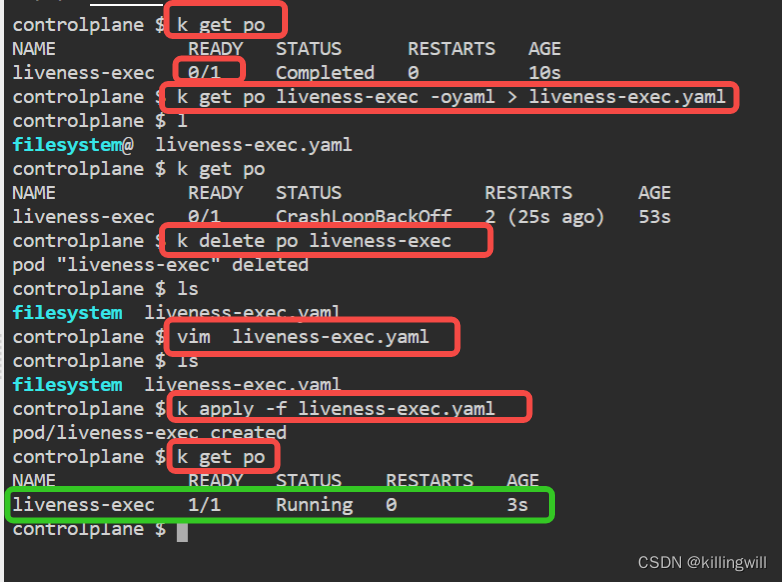
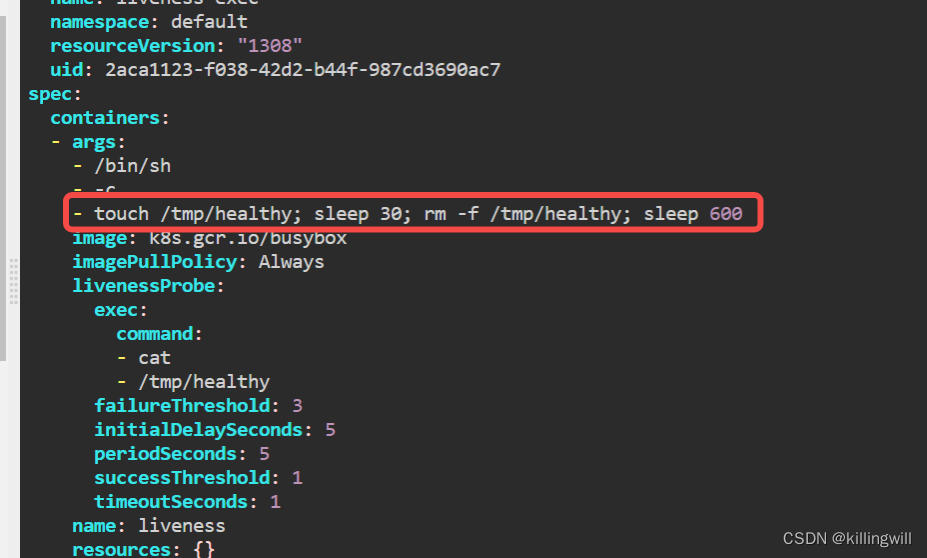
# Please edit the object below. Lines beginning with a '#' will b
# and an empty file will abort the edit. If an error occurs while
# reopened with the relevant failures.
#
apiVersion: v1
kind: Pod
metadata:
  annotations:
    cni.projectcalico.org/containerID: a5c2c200d45c6f95f3320341e8
    cni.projectcalico.org/podIP: 192.168.0.6/32
    cni.projectcalico.org/podIPs: 192.168.0.6/32
    kubectl.kubernetes.io/last-applied-configuration: |
      {"apiVersion":"v1","kind":"Pod","metadata":{"annotations":{
  creationTimestamp: "2023-02-15T06:41:00Z"
  labels:
    test: liveness
  name: liveness-exec
  namespace: default
  resourceVersion: "1764"
  uid: c157d65e-b716-4523-ae04-8d9ff72b0500
spec:
  containers:
  - args:
    - /bin/sh
    - -c
    - touch /tmp/healthy; sleep 30; rm -f /tmp/healthy; sleep 600    # where you need to edit
    image: k8s.gcr.io/busybox
    imagePullPolicy: Always
    livenessProbe:
      exec:
        command:
        - cat
        - /tmp/healthy
      failureThreshold: 3
      initialDelaySeconds: 5
      periodSeconds: 5
      successThreshold: 1
      timeoutSeconds: 1
    name: liveness
    resources: {}
    terminationMessagePath: /dev/termination-log
    terminationMessagePolicy: File
    volumeMounts:
    - mountPath: /var/run/secrets/kubernetes.io/serviceaccount
      name: kube-api-access-rz5pc
      readOnly: true
  dnsPolicy: ClusterFirst
  enableServiceLinks: true
  nodeName: controlplane
  preemptionPolicy: PreemptLowerPriority
  priority: 0
  restartPolicy: Always
  schedulerName: default-scheduler
  securityContext: {}
  serviceAccount: default
  serviceAccountName: default
  terminationGracePeriodSeconds: 30
  tolerations:
  - effect: NoExecute
    key: node.kubernetes.io/not-ready
    operator: Exists
    tolerationSeconds: 300
  - effect: NoExecute
    key: node.kubernetes.io/unreachable
    operator: Exists
    tolerationSeconds: 300
  volumes:
  - name: kube-api-access-rz5pc
    projected:
      defaultMode: 420
      sources:
      - serviceAccountToken:
          expirationSeconds: 3607
          path: token
      - configMap:
          items:
          - key: ca.crt
            path: ca.crt
          name: kube-root-ca.crt
      - downwardAPI:
          items:
          - fieldRef:
              apiVersion: v1
              fieldPath: metadata.namespace
            path: namespace
status:
  conditions:
  - lastProbeTime: null
    lastTransitionTime: "2023-02-15T06:41:00Z"
    status: "True"
    type: Initialized
  - lastProbeTime: null
    lastTransitionTime: "2023-02-15T06:42:05Z"
    message: 'containers with unready status: [liveness]'
    reason: ContainersNotReady
    status: "False"
    type: Ready
  - lastProbeTime: null
    lastTransitionTime: "2023-02-15T06:42:05Z"
    message: 'containers with unready status: [liveness]'
    reason: ContainersNotReady
    status: "False"
    type: ContainersReady
  - lastProbeTime: null
    lastTransitionTime: "2023-02-15T06:41:00Z"
    status: "True"
    type: PodScheduled
  containerStatuses:
  - containerID: containerd://8541542a7ca0a8de10dbfa988d39ad89f9b
    image: k8s.gcr.io/busybox:latest
    imageID: sha256:36a4dca0fe6fb2a5133dc11a6c8907a97aea122613fa3
    lastState:
      terminated:
        containerID: containerd://8541542a7ca0a8de10dbfa988d39ad8
        exitCode: 0
        finishedAt: "2023-02-15T06:44:28Z"
        reason: Completed
        startedAt: "2023-02-15T06:44:28Z"
    name: liveness
    ready: false
    restartCount: 5
    started: false
    state:
      waiting:
        message: back-off 2m40s restarting failed container=liven
        reason: CrashLoopBackOff
  hostIP: 172.30.1.2
  phase: Running
  podIP: 192.168.0.6
  podIPs:
  - ip: 192.168.0.6
  qosClass: BestEffort
  startTime: "2023-02-15T06:41:00Z"


 2022
2022


 被折叠的 条评论
为什么被折叠?
被折叠的 条评论
为什么被折叠?
 到【灌水乐园】发言


