事务管理
思考: Spring 提供了一个对jdbc Api进行封装的模板类,通过模板类能够对数据库进行CRUD操作,而没有对事务进行操作。而下面可以介绍Spring中的事务是如何管理的
1.1 简介
在 Java EE中 项目都是分层次的开发 ,事务放在持久层明显是不合理的
在Spring中提供分层设计业务层的事务处理解决方案,其原理是利用Spring AOP将事务管理代码抽取出来形成通知 ,然后再通过配置或编码的方式织入业务层的切入点
Spring中事务管理器的主要是PlatformTransactionManager接口来管理其中的主要方法为:
getTransaction获取事务状态commit提交事务rollback回滚事务
但是在实际的开发中一般使用DataSourceTransactionManager去管理JDBC或者Mybatis的事务
1.2 事务的隔离级别
在TransactionDefinition定了事务的隔离级别
注意:
写操作:增加 删除 修改 会开启事务
读操作:执行查询的时候也会开启事务
具体在该接口中 事务的隔离级别如下:
- ISOLATION_DEFAULT 默认级别 归属下面级别的以一种
- ISOLATION_READ_UNCOMMITTED 读未提交
- ISOLATION_READ_COMMITTED 读以提交
- ISOLATION_REPEATABLE_READ 可重复读
- ISOLATION_SERIALIZABLE 可串行化
1.3事务传播行为
在String中定义了以下事务传播行为
- REQUIRED
如果当前没有这个事务就新建一个事务 如果已经存在一个事务中 就加入到这个事务
- SUPPORTS
支持当前事务,如果当前没有事务,就以非事务的方式执行(没有事务)
- MANDATORY
使用当前的事务 如果当前没有事务就抛出异常
- REQUERS_NEW
新建事务,如果在当前事务中 就把当前事务挂起
- NOT_SUPPORTED
以非事务方式执行操作,如果当前存在事务就把当前事务挂起
- NEVER
以非事务的方式运行,如果存在事务 , 那就抛出异常
- NESTED
如果当前存在事务,则在嵌套事务内执行。如果当前没有事务,则执行REQUIRED
1.4基础XML配置事务
准备工作
导入jar包 需要导入 spring-tx-xxxx.jar
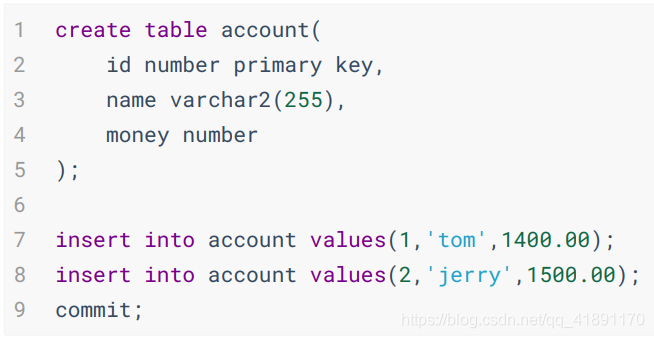
准备表 
写好实体类
package com.xyx.jdbc,bean;
	import lombok.Data;
	@Data
	public class Account{
		private long id;
		private String name;
		private double money;
}
编写dao层的接口以及它的实现类
-接口
	package com.xyx.jdbc.dao
	import com,xyx.jdbc.bean.Account;
public interface IAccountDao{
	Account findAccountById(long id);
	void updateAccount(Account account);
	Account findAccountByName(String name);
}
- 实现类
	package com.xyx.jdbc.dao.impl;
	import java.util.List;
	import java.util.Objects;
	import org.springframework.jdbc.core.RowMapper;
	import org.springframework.jdbc.core.support.JdbcDaoSupport;
	import com.xyx.jdbc.bean.IAccount;
	import com.xyx.jdbc.dao.IAccountDao;
	public class AccountDaoImpl extends JdbcDaoSupport implements IAccountDao{
	@Override
	public Account findAccountById(long id){
		return getJdbcTemplate().queryForOnject("select * from account where id = ?"),Account.class,id);
	}
	@Override
	public void updateAccount(Account account){
	getJdbcTemplate().update("update
	account set money = ? where id =
	?",account.getMoney(),account.getId());
	}
	@Override
public Account findAccountByName(String
name) {
List<Account> accouns =
getJdbcTemplate().query("select *
from account where name = ?",(rs,rowNum) -> {
Account account = new Account();
account.setId(rs.getLong("id"));
account.setName(rs.getString("name"));
	account.setMoney(rs.getDouble("money"));
	return account;
	}, name);
	if(Objects.isNull(accouns)) {
	return null;
	}
	if(accouns.size() > 1) {
	throw new RuntimeException("该用户
	拥有多个账户");
	}
return accouns.get(0);
		}
	}
}
-
撰写业务层接口和实现类
接口:
package com.xyx.jdbc.service;

import com.xyx.jdbc.bean.Account;

public interface  IAccountService {
	Account findById(long id);

	/**
	 * 	转账
	 * @param sourceName	转出账户名称
	 * @param targetName	转入账户名称
	 * @param money			转入金额
	 */
	void transfer(String sourceName,String targetName,double money);
}
实现类
package com.xyx.jdbc.service;

import com.xyx.jdbc.bean.Account;
import com.xyx.jdbc.dao.IAccountDao;

public class AccountServiceImpl implements IAccountService {


	private IAccountDao accountDao;

	public void setAccountDao(IAccountDao accountDao) {
		this.accountDao = accountDao;
	}

	@Override
	public Account findById(long id) {
		return accountDao.findAccountById(id);
	}

	@Override
	public void transfer(String sourceName, String targetName, double money) {
		Account sourceAccount = accountDao.findAccountByName(sourceName);
		Account targetAccount = accountDao.findAccountByName(targetName);

		sourceAccount.setMoney(sourceAccount.getMoney() - money);
		targetAccount.setMoney(targetAccount.getMoney() + money);

		accountDao.updateAccount(sourceAccount);

		int a = 10 / 0;

		accountDao.updateAccount(targetAccount);
	}

}
增加配置文件
<?xml version="1.0" encoding="UTF-8"?>
<beans xmlns="http://www.springframework.org/schema/beans"
    xmlns:xsi="http://www.w3.org/2001/XMLSchema-instance"
	xmlns:aop="http://www.springframework.org/schema/aop"
	xmlns:tx="http://www.springframework.org/schema/tx"
	xsi:schemaLocation="http://www.springframework.org/schema/beans
						http://www.springframework.org/schema/beans/spring-beans.xsd
						http://www.springframework.org/schema/tx
						http://www.springframework.org/schema/tx/spring-tx.xsd
						http://www.springframework.org/schema/aop
						http://www.springframework.org/schema/aop/spring-aop.xsd">
	<!--
		配置数据库连接池
	 -->
	<bean id="datasource" class="com.alibaba.druid.pool.DruidDataSource">
		<property name="driver" value="oracle.jdbc.OracleDriver"></property>
		<property name="url" value="jdbc:oracle:thin:@localhost:1521:xe"></property>
		<property name="username" value="spring"></property>
		<property name="password" value="spring"></property>
	</bean>

	<!-- 配置Dao -->
	<bean id="accountDao" class="com.xyx.jdbc.dao.impl.AccountDaoImpl">
		<property name="dataSource" ref="datasource"></property>
	</bean>

	<!-- 配置Service -->
	<bean id="accountService" class="com.xyx.jdbc.service.AccountServiceImpl">
		<property name="accountDao" ref="accountDao"></property>
	</bean>

	<!-- 事务配置代码 -->
	<bean id="transactionManager" class="org.springframework.jdbc.datasource.DataSourceTransactionManager">
		<property name="dataSource" ref="datasource"></property>
	</bean>

	<!-- 配置事务通知 -->
	<tx:advice id="txAdvice" transaction-manager="transactionManager">
		<!-- 配置事务属性 -->
		<tx:attributes>
			<!--
				name : 指定方法名称 *代表任意赐福
				read-only 是否是只读事务
				isolation:指定事务的隔离级别。默认值是使用数据库的默认隔离级别。
				propagation:指定事务的传播行为。
				timeout:指定超时时间。默认值为:-1。永不超时。
				rollback-for:用于指定一个异常,当执行产生该异常时,事务回滚。产生其他异常,事务不回滚。没有默认值,任何异常都回滚。
				no-rollback-for:用于指定一个异常,当产生该异常时,事务不回滚,产生其他异常时,事务回滚。没有默认值,任何异常都回滚

			 -->
			<tx:method name="*" read-only="false" propagation="REQUIRED"/>
			<tx:method name="find*" read-only="true" propagation="SUPPORTS"/>
		</tx:attributes>

	</tx:advice>
	<!-- 配置 aop -->
	<aop:config>
		<aop:pointcut expression="execution(* com.xyx.jdbc.service..*.*(..))" id="pt1"/>
		<aop:advisor advice-ref="txAdvice" pointcut-ref="pt1"/>
	</aop:config>


</beans>
至此我们就完成一个基于XML方式配置的事务管理


 676
676


 被折叠的 条评论
为什么被折叠?


