


最近搞网卡比较多,先汇总整理一些,后续希望可以多写写故障排查和性能调试相关得干货
1.什么是网卡
网卡是计算机与局域网互连的设备,网卡,又称为网络适配器或网络接口卡NIC(Network interface Card),是构成计算机网络系统中最基本的、最重要的和必不可少的连接设备,计算机主要通过网卡接入网络
2.目前主流网卡厂商
当前主流芯片厂家有intel、broadcom、cavium和Mellanox.
Intel是以太网卡领域重要厂商,基于DPDK构建生态,持续在网卡发力
Avago收购Emulex、broadcom后的以太业务后,成立新的母公司Broadcom,整合NIC业务,发力云场景.
Cavium聚焦FC HBA业务,发力存储HBA场景.
Mellanox:业界infiniband唯一厂商,应用于极致性能场景,如HPC,同时也提供以太解决方案.目前已被NVIDIA收购.
3.网卡分类
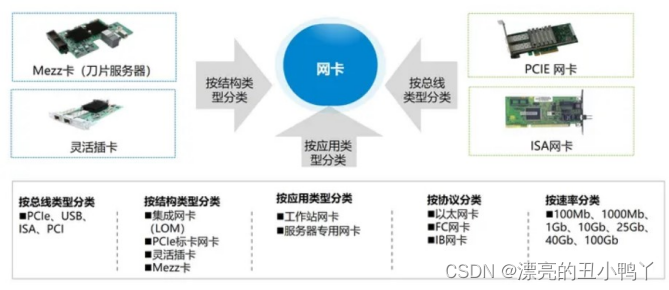
NIC:Network interface Card
特指以太网卡,支持TCP/IP协议,应用于以太网络中
Network Card, Gigabit , LC Fiber Optic,2 Ports , PCIE 2.0 X4-8086-1522-2
CNA :Converged Network Adapter
融合网卡,本质上是以太网卡,但支持FCoE功能(FC over Ethernet)
Other Cards , FCoE-SFP Interface , 2 ports , PCIE 2.0 X8-Vendor ID 19a2-Device ID 0710|0714-4
HBA:Host Bus Adapter
特指FC网卡,支持FC协议,连接存储或光纤交换机
Single Port FC HBA Card , PCIE 2.0 X4|PCIE 1.0 X8-Vendor ID 10DF-Device ID F100-1,8Gbps,Fiber Channel Multimode LC Optic Interface
HCA:Host Channel Adapter
特指Infiniband网卡,即IB卡,应用于高带宽、低时延的高性能计算项目中;
Other Cards , Infiniband MCX353A-FCBT,FDR Single port-56Gb/sPCIE 3.0 X8-Vendor ID 15b3-Device ID 1003-1
4.性能测试调优
4.1升级驱动固件
Intel网卡需要更新ice和fw,先刷ice再刷fw,否则会提示更新失败,使用ipimitool power reset重启机器后生效,mellanox网卡直接刷ofed包含驱动固件一键升级
intel下载驱动固件:https://www.intel.com/content/www/us/en/download-center/home.html
nvidia下载mlnx_ofed:https://network.nvidia.com/products/infiniband-drivers/linux/mlnx_ofed/
参考驱动中的README,有很多安装及配置操作指导命令
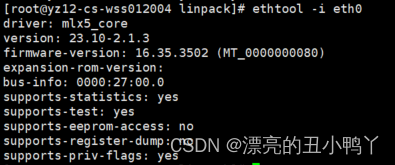
使用命令“ethtool -i ethX”检查driver/firmware版本
4.2确认pcie槽位速率
要发挥出网卡最大的性能就需要将支持PCIe 3.0的网卡插入PCIe v3.0 x8插槽
不同PCIE标准下的带宽
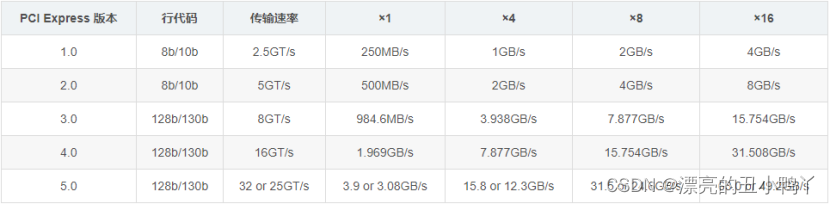
200G网卡则需要PCIe4.0,x16槽位
400G网卡则需要PCIe5.0,x16槽位
如果将一个支持PCIe 3.0的网卡插入PCIe 2.x插槽,就会使用不了全部的带宽
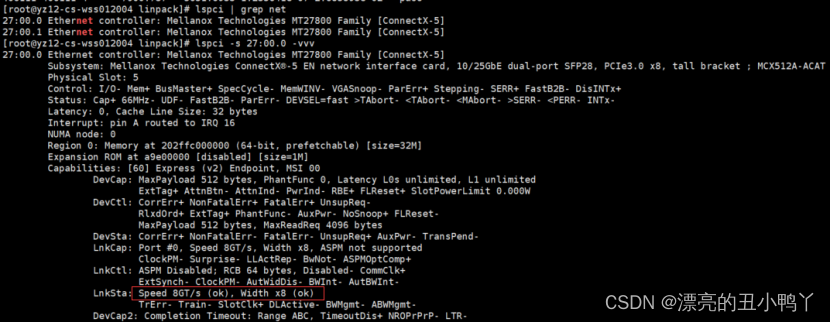
系统下查看网卡速率:查看网卡bus号为27:00.0 目前速率为X8
PCIe Max Payload Size512bytes
1.Firstly, query the value in order to avoid overriding other properties:
#setpci -s 04:00.0 68.w
5936
The first digit is the PCIe Max Read Request size selector.
2. Set the selector index:
#setpci -s 04:00.0 68.w=2936
3.The value should update using the command lspci:
lspci -s 04:00.0 -vvv | grep MaxReadReq
MaxPayload 256 bytes, MaxReadReq 512 bytes
LnkSta: Speed 8GT/s (ok), Width x8 (ok)
有时BIOS下设置pcie slot link width的带宽低于机器支持的最大带宽,则需要开机按del进入BIOS修改设置参数:Socket Configuration-> IIO Configuration
4.3 BIOS设置性能模式
老生常谈了,一些性能相关的设置项打开,节能的关闭,虚拟化相关的VMX/SR-IOV/IOMMU最好也都关掉
常见设置项
Hyper-ThreadingTechnolog/Enable LP ->Enable或者ALL LP
Numa->Enable
Snc/sub-NUMA->Enable
Turbo Mode->Enable
Package C State ->C0/C1 state
CPU C6 report -> disable
Enabled SpeedStep (PStates)->Enable
hardware p-states->Native Mode
BIOS control EPB->performance
Intel VT for Directed I/O->Disable
KTI prefetch->Enable
MWAIT = disable
4.4系统下锁频
使用 cpupower 命令打开系统性能模式:
cpupower frequency-set -g performance
系统下锁频CentOS7:
执行如下操作:
cd /etc/default
vim grub
在GRUB_CMDLINE_LINUX这一行中的quiet后面增加 processor.max_cstate=0 intel_idle.max_cstate=0 idle=poll,保存后退出vim
grub2-mkconfig -o /boot/grub2/grub.cfg 使新增加的参数生效
reboot 重启服务器
进入系统后,执行cpupower -c all frequency-set -g performance设置cpu的所有核为性能模式
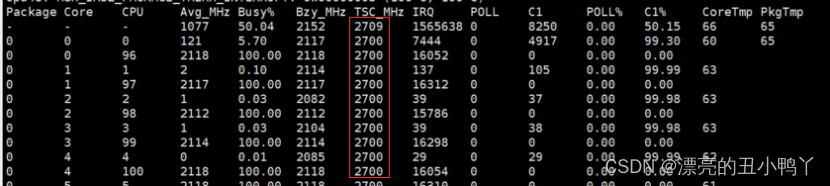
使用命令turbostat检查cpu的所有核的实际运行频率
4.5性能调优设置
对照实验:一次只聚焦一个调优项的修改,这样就可以得知每次的修改所带来的影响。在调优过程中越有条不紊的测试,就越容易定位和跟踪到引发性能瓶颈的根本原因。
4.5.1.停止irqbalance服务:systemctl stop irqbalance.service
使用所有CPU核心:[path-to-i40epackage]/scripts/set_irq_affinity -x all ethX
使用tuned-adm提高网络吞吐量:tuned-adm profile network-throughput;默认balance
设置mtu:ifconfig eth0 mtu 9000;默认1500
打开进程数限制:ulimit -s unlimited
4.5.2中断调控
默认情况下,自适应的中断调控功能是开启的,并且设计该功能的目的是在低CPU利用率和高性能之间提供一种平衡方法。然而,你可以根据实际情况手动调整中断相关配置
关闭自适应中断调控功能
ethtool -C ethX adaptive-rx off adaptive-tx off
开启自适应中断调控功能
ethtool -C ethX adaptive-rx on adaptive-tx on
将中断调控设置到固定的中断频率62us,大约16000中断每秒:
ethtool -C ethX adaptive-rx off adaptive-tx off rx-usecs 62 tx-usecs 62
如果此时CPU利用率已达100%,那么不再建议继续调高中断频率
关闭中断调控功能
ethtool -C ethX adaptive-rx off adaptive-tx off rx-usecs 0 tx-usecs 0
4.5.3Ring Size设置
尝试修改ring size的值,默认值是512,而最大值为4096
将ring size设置为固定值
ethtool -G ethX rx 256 tx 256
4.5.4Flow Control
默认情况下,flow control是被关闭的。
开启flow control:
ethtool -A ethX off rx on tx on
关闭flow control:
ethtool -A ethX rx off tx off
必须有一个支持flow control的链路层设备才能开启flow control
4.5.5系统设置
关闭防火墙
systemctl stop firewalld.service
setenforce 0
iptables -F
iptables -L
多核多线程
Iperf -P参数表 可设置多线程
taskset命令绑核
iperf测试命令前加taskset -c <指定核心>
eg:taskset -c 0-96 iperf -c 10.10.10.3 -w 64k -t 60 -i 1 -P 100
升级更高内核版本可能会带来更好的性能
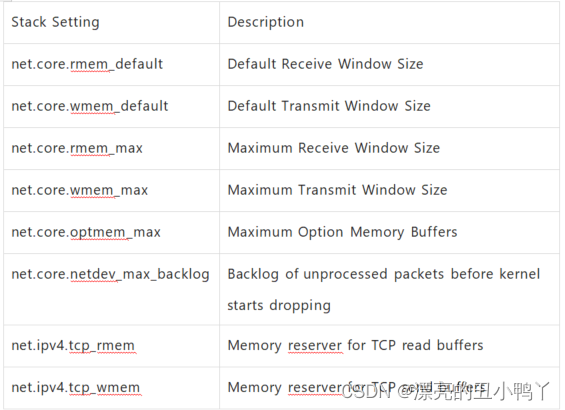
内核参数设置
尝试不同的值使当前系统、负载和流量类型达到最优工作状态
可以使用sysctl命令配置内核参数:
sysctl -w net.core.rmem_default=524287
4.5.6 Intel官方性能及延时测试调优操作指导
Throughput Adapter Tuning:
systemctl stop irqbalance
scripts/set_irq_affinity -X all
RDMA Latency:
systemctl stop irqbalance
scripts/set_irq_affinity -X local
Enable push mode:
echo 1 > /sys/kernel/config/irdma/
RDMA Bandwidth:
Enable Link Level Control:
ethtool -A tx on rx on
scripts/set_irq_affinity -X local
Latency:
Tuned-adm profile network-latency
systemctl stop irqbalance
ethtool -L combined {num of local CPUs}
ethtool -C adaptive-rx off adaptive-tx off
ethtool –C rx-usecs 0 tx-usecs 0
scripts/set_irq_affinity -X local
scripts/set_xps_rxqs
scripts/set_arfs
Busy poll disabled (need to enable aRFS):
sysctl -w net.core.busy_poll=0
sysctl -w net.core.busy_read=0
Busy Poll enabled: (without aRFS):
sysctl -w net.core.busy_poll=50
sysctl -w net.core.busy_read=50
4.5.7mellanox官方性能测试调优操作指导
基础设置
tuned-adm profile network-throughput
systemctl stop irqbalance.service
ifconfig eth2 mtu 9000
ulimit -s unlimited
Use the taskset application as follows: taskset -c 0-13,28-41 ib_send_bw &
Maximum CPU Core Frequency:cpupower frequency-set -g performance
Tune IRQ Affinity
▪ Get the IRQ numbers for the relevant interface(e.g. ens1). The first column is the IRQ number associated with the interface
(e.g. 92, 93 … 99)
#cat /proc/interrupts | grep ens1
CPU0 CPU1 CPU2 CPU3 CPU4 CPU5 CPU6 CPU7
92: 262357 0 1 0 0 0 0 0 PCI-MSI-edge ens1-0
93: 2 1427651 2 2 5 3 3 0 PCI-MSI-edge ens1-1
94: 0 0 302068 0 0 0 1 0 PCI-MSI-edge ens1-2
▪ Locate the appropriate SMP affinity
echo 1 >/proc/irq/92/smp_affinity
echo 2 >/proc/irq/93/smp_affinity
echo 4 >/proc/irq/94/smp_affinity
IRQ affinity tuning script set
show_irq_affinity.sh [interface]
show_irq_affinity_hints.sh [interface]
set_irq_affinity_bynode.sh [node_id] [interface]
Automatically spread the IRQs of single port evenly on a NUMA node
set_irq_affinity_bynode.sh [node_id] [interface1] [interface2]
Automatically spread the IRQs of dual-port evenly on a NUMA node
▪ set_irq_affinity_cpulist.sh [cpu_list] [interface]
Automatically spread the IRQs evenly on a list of cores
can be either a comma separated list of single core numbers (0,1,2,3) or core groups (0-3)
#set_irq_affinity_cpulist.sh 0-1 eth2
#set_irq_affinity_bynode.sh 0 eth2
4.6测试命令
iperf带宽测试,目前都是用iperf2测试,因为iperf3不支持多线程-P参数,如果用iperf3需要多开几个端口同时跑

单口带宽测试
server: iperf -s
Client: iperf -c 10.1.1.1 -w 64k -t 600 -i 1 -P 80
双向测试参数
-r, –tradeoff 先做传送再做接收(對 Client 而言)
-d, –dualtest 同时做传送与接收
Netperf测试延时
服务端:netserver
客户端:netperf -H 10.1.1.1 -t TCP_RR – -d rr -O “THROUGHPUT, THROUGHPUT_UNITS, MIN_LATENCY, MAX_LATENCY, MEAN_LATENCY”
测试带宽
netperf -H 10.1.1.1 -t TCP_STREAM -l 5 -p 8003 -n 30
netperf -H 10.1.1.1 -t UDP_STREAM -l 5 -p 8003 -n 30
netperf -H 10.1.1.1 -t TCP_MAERTS -l 5 -p 8003 -n 30
RDMA测试
ib_write_bw -F -S 1 -D 30 -R -q 4 -s 4096 -d rocep56s0
ib_write_bw -F -S 1 -D 30 -R -q 4 -s 4096 -d rocep168s0 10.10.10.3
ib_read_bw -F -S 1 -D 30 -R -q 4 -s 4096 -d rocep56s0
ib_read_bw -F -S 1 -D 30 -R -q 4 -s 4096 -d rocep168s0 10.10.10.3
ib_write_lat -s 2 -I 96 -a -d rocep58s0 -p 22341 -F
ib_write_lat -s 2 -I 96 -a -d rocep168s0 -p 22341 10.10.11.3 -F
ib_read_lat -s 2 -a -d rocep58s0 -p 22341 -F
ib_read_lat -s 2 -a -d rocep168s0 -p 22341 10.10.11.3 -F
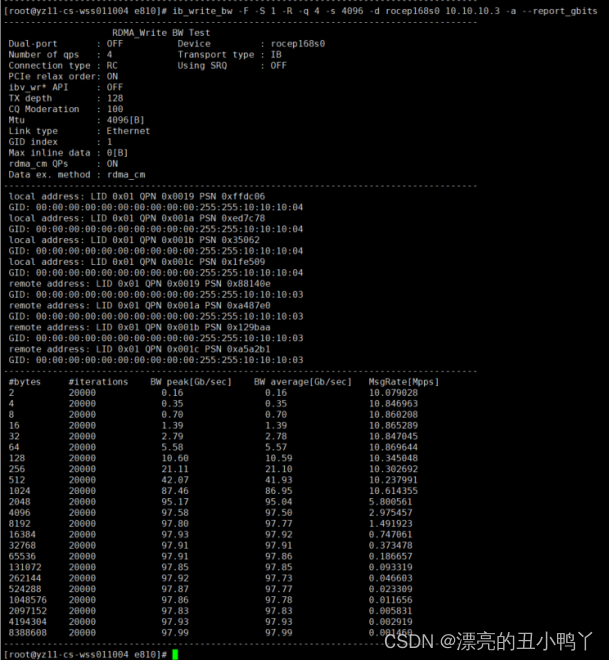
上图为100G网卡测试结果


 274
274

 被折叠的 条评论
为什么被折叠?
被折叠的 条评论
为什么被折叠?
 到【灌水乐园】发言


